Archive for the ‘Tips & Tricks’ category

Recover Forgotten Password for Outlook Data File (.PST)

August 13th, 2014 by Admin

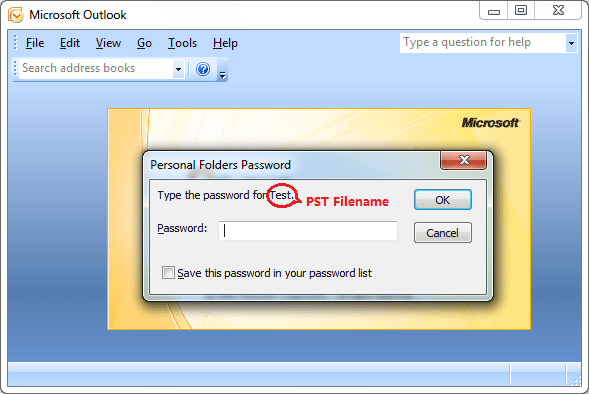
If you have password protected a Outlook data file (.pst), when you try to import or open the .pst file in Outlook, a dialog box similar to the following appears.

outlook-pst-password

Without the password, you cannot open the .pst file, and you cannot access any of mail messages it contains. Microsoft is not able to help you retrieve lost file passwords. If you’ve forgotten or misplaced the password to a Microsoft Outlook data file (.pst), you can recover it easily with the Outlook Password Recovery program.

Outlook Data File Location

Before getting started, you need to know where your Outlook data file is saved.

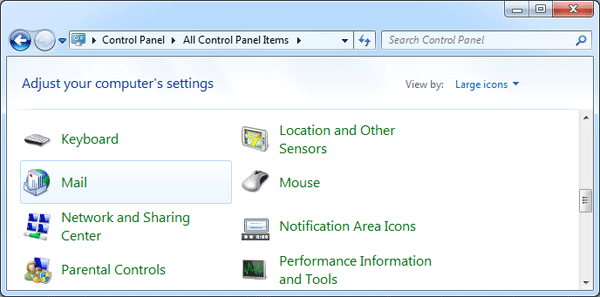
  1. Open the Mail applet from the Control Panel.

    control-panel

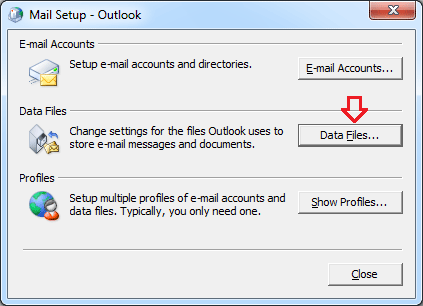
  2. Click on Data Files button. This will open the Account Settings window.

    mail-setup

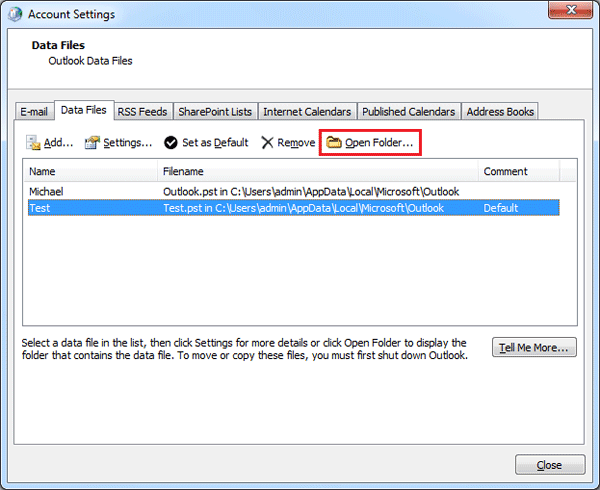
  3. Click the Data Files tab to see your Outlook data files, including PST and OST files. If you have multiple accounts in Outlook, you may notice several data files listed. In my example, I want to recover the password for the Test.pst file.

    outlook-pst-files

  4. Select your password protected PST file, and click Open Folder button to open the folder containing the PST in Windows Explorer.

Recover Outlook Data File Password

Have you forgotten the password to your Outlook data file which is required to access your email in Outlook? If you’ve figured out the location of your password-protected Outlook data file, you can import the .pst file to the Outlook Password Recovery program and recover your forgotten password. Here are step-by-step instructions:

  1. Download and install Outlook Password Recovery on your local computer.
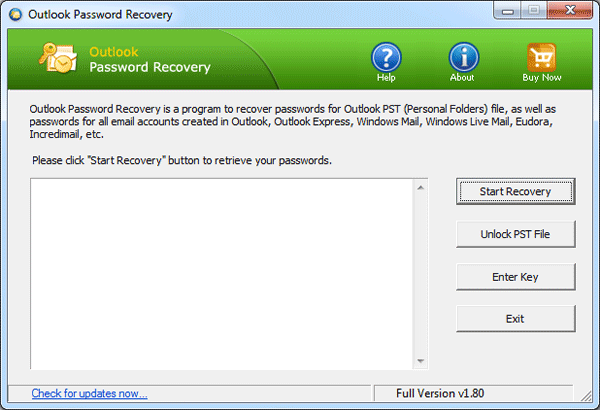
  2. Open up the Outlook Password Recovery program and click on Unlock PST File button.

    outlook-password-recovery

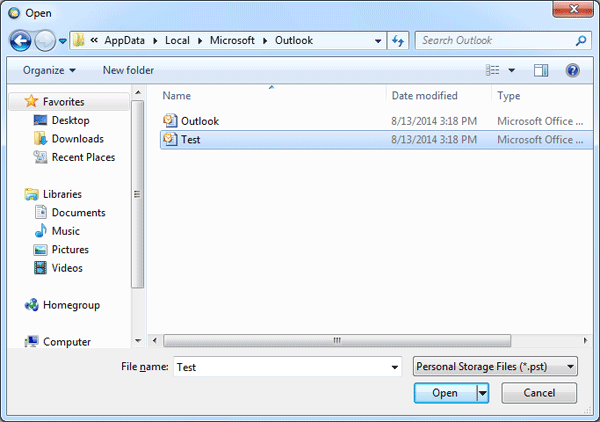
  3. The File Open dialog will appear. Choose your password-protected Outlook data file (.pst), and click Open.

    locate-pst-file

  4. The program will start to decrypt the PST file and provide 3 different passwords. You can then use any of them to unlock and open your password-protected Outlook data file.

With this method you can recover forgotten password for Outlook data file (.pst) that was created in Microsoft Outlook 2016, 2013, 2010, 2007, 2003, 2000. After opening your Outlook data file, you can then remove or change PST password within Outlook application.

How to Fix the Error: Outlook data file cannot be accessed

August 12th, 2014 by Admin

When you try to send or to receive email in Outlook 2010 or 2013, you may receive one of these error messages:

0x8004010F: Outlook data file cannot be accessed.
or
0x8004010F: The operation failed. An object could not be found.

This proved to be a profile issue with Outlook application, which can be resolved by re-creating your Outlook profile and re-configuring the email accounts. However, some of you might have multiple accounts and the thought of re-creating each one is just far too much. Here is an easier trick to fix this issue.

Tips: If you forgot your PST file password, or need to retrieve email account passwords that are stored locally, the Outlook Password Recovery program can be of help!

How to Fix the Error: Outlook data file cannot be accessed?

A missing or corrupt Outlook data file (also known as PST file, Personal Folders File) can also result in the 0x8004010F error when attempting to send and receive emails. Simply set your problematic email account to use a new PST file for storing emails and this would fix your issue. Here are step-by-step instructions:

Go to the Control Panel and clicking on Mail.

control-panel

In the Mail Setup window, click on E-mail Accounts to open the Account Settings dialog box.

mail-setup

If you have multiple accounts in Outlook, you may notice several email accounts listed. In the E-mail tab, select your problematic email account and click on Change Folder button at the bottom.

outlook-email-accounts

Select the Inbox folder under a different personal folders (PST) file. If there is only one PST file out there, click on New Outlook Data File button to create a new one. Then select the Inbox folder in the newly created PST file. Click OK.

new-delivery-location

Close the Account Settings window and attempt to “Send/Receive All Folders”, it should be working now! Hope this trick helps whoever gets this issue in the future.

Lost Admin Password on Windows 2000 Professional

August 11th, 2014 by Admin

Lost admin password on Windows 2000 Pro and can’t log on? How to bypass Windows 2000 password on an older server if you’ve forgotten what is is and want the files off the computer? You can use a PCUnlocker Live CD (or USB drive) to reset the lost password. This tutorial will show you how to do that, step by step.

Create A PCUnlocker Live CD/USB Drive

We’ll be using PCUnlocker. PCUnlocker is a bootable rescue CD that can reset local / domain administrator password on any Windows computer. It exists of a bootable CD ISO image. To get the software to work, you need to burn the PCUnlocker ISO image to a CD or USB flash drive using a burning software such as ISO2Disc.

Boot from PCUnlocker

Once you’ve completed the above step, put the CD in the optical drive or plug the USB drive into the Windows 2000 Pro computer you want to reset admin password for. Now you need to restart the PC and boot into the CD/USB.

You can do so by changing the boot order. See how you can change the boot order here.

Reset Lost Admin Password

Once you’ve set the boot order correctly, the computer will load the WinPE OS from the CD/USB drive and take you directly to the PCUnlocker program. This program automatically finds your Windows SAM registry file and extracts all your user accounts from it.

Select the administrator account and click on Reset Password. It will unlock / reset your lost Windows 2000 admin password immediately. Remove the CD/USB and restart your computer, and now you can enjoy log on to your Windows 2000 Pro without entering any password.

How to Reset or Change Outlook PST Password with Ease

August 7th, 2014 by Admin

When you add a password to a PST file, every time you start Outlook, a dialog box will ask you for the password. Without entering the password correctly, you will not be able to see any information in Outlook at all.

It’s a good practice to change your password regularly. In this article we’ll show you how to reset or change Outlook PST password, if you know your current password. If you can’t remember the password, see Recover forgotten PST password for instructions.

How to Reset or Change Outlook PST Password?

First of all, you need to open the Account Settings dialog in Outlook application. In Outlook 2007, you can access it by clicking on Tools menu and then select the Account Settings option. In Outlook 2013 or 2010, click on the File tab, and then click on Info. On the right hand side of the screen, click on the Account Settings button.

outlook-account-settings

When the Account Settings dialog opens, click on the Data Files tab. It will show you a list of the PST files that are in use by MS Outlook. Make sure that you highlight the PST file that you want to change the password for and then click on Settings.

The Outlook Data File screen opens. Click Change Password. A new window will appear asking you for three pieces of information. If your PST file is not password protected, just leave the old password blank. If you already have a password for your PST file but want to remove it, enter the current password in the “Old password” field and leave the other two fields blank.

changepstpassword

Make sure that the checkbox for “Save this password in your password list” is left unchecked. This will ensure that a password will always have to be entered when you start Outlook. Click OK and close out of the remaining open screens. You’ve now successfully reset / changed your Outlook PST password!

Reset Forgotten Windows Password for Xen Virtual Machine

August 5th, 2014 by Admin

Forgot Windows password to a Xen virtual machine? How can I reset a Windows 2008 (Xen HMV) VPS administrator login? To reset a lost VM password, you will need a tool called PCUnlocker. This software exists of a bootable CD image which can be burned to a CD or USB drive. Basically, you boot a Xen VM from the CD image and it allows you to reset forgotten Windows password offline.

How to Reset Forgotten Windows Password for Xen Virtual Machine?

  1. Download the self-extracting Zip archive of PCUnlocker and save it to your host OS. Extract the CD image (pcunlocker.iso) from the downloaded file. If you’ve enabled EFI/UEFI in your Xen VM, you need to use PCUnlocker Enterprise which supports UEFI booting.
  2. Start virt-manager (also known as Virtual Machine Manager). Select your Windows VM that need a password reset, click on EDIT menu at the top and then select Virtual Machine Details.
  3. In the Details window, click on IDE CDROM 1 tab. Click Connect to mount the PCUnlocker ISO image (pcunlocker.iso) to the virtual CD drive.
  4. Click on the Boot Options tab. Tick Enable boot menu. Check the CDROM item and put the CDROM item on top of the boot device list. Click Apply to save your changes.

    xen-boot-order

  5. Power on your Windows virtual machine and Xen will now boot from the PCUnlocker CD image, loading the WinPE OS and taking you directly into the tool. This program automatically finds your Windows SAM file and show you a list of local accounts.

  6. Select one of your user accounts and click on Reset Password button. It will reset your Windows VM password quickly, as well as unlock the account in the event it is locked out, disabled or expired.
  7. Disconnect your CD drive and restart the VM. Now you can enjoy log on to your Windows virtual machine without entering any password.

Using the same method you can reset lost Windows password for any virtual machine running in KVM, Xen, Qemu. This works with all versions of Windows, including Windows 8.1 and Windows Server 2012.

How to Reset Forgotten Syskey / Startup Password with Freeware

July 31st, 2014 by Admin

Forgot the syskey startup password and can’t boot up your system? In my previous post, I outlined how to lock your computer with syskey. SysKey is a little-known feature of Windows that allows users to lock out access to the Security Accounts Manager (SAM) registry hive so that login credentials cannot be cracked. The problem is, unlike BIOS password or Windows account password, there is no reliable way to get around the syskey startup password.

syskey

In the event of losing a syskey password, you can restore your computer back to an earlier point without syskey enabled. If there is no any restore point on the machine, the last resort is to try this freeware – Offline NT Password & Registry Editor, which can help you reset lost syskey startup password on Windows XP.

Note: This software is without any warranty. Please take at your own risk. It will not work on Windows 8, 7, Vista, or any higher version than Window XP. (Using it on Vista or windows 7 will cause a continuous reboot loop.)

How to Reset Forgotten Syskey / Startup Password?

  1. Download the CD image of Offline NT Password & Registry Editor from its official website and burn it to a blank CD.
  2. Boot your affected computer from the CD that you created. You may have to go into the BIOS settings to change the boot order to set CD/DVD as the first boot device.
  3. The boot CD will take you to the command prompt. The first thing you need to do is select your system partition:

    select-partition

  4. With the system partition selected, the utility then prompts you to specify the registry directory to edit. The default is fine, so hit Enter.

    registry-path

  5. Next you can choose whether to use password reset or some other thing, so just hit Enter for password reset.

    load-sam

  6. Next you’ll be prompted whether you want to edit user passwords or change syskey. You want to reset syskey startup password, so type 2 and hit Enter.

    reset-syskey

  7. Type y and press Enter to confirm the syskey disable.

    disable-syskey

  8. Once it’s done, type q to quit and hit Enter again.

    exit-chtnpw

  9. Type y to save your changes to disk. At this point you can reboot your computer.

    write-changes

As you can see, with Offline NT Password & Registry Editor you’re able to reset forgotten syskey startup password in minutes. However, the utility can just as easily destroy a Windows system’s data. For that reason, the tool should only be used as a last resort.

Forgot System Restore / Startup Repair Password in Windows 7

July 30th, 2014 by Admin

Need to repair or restore Windows 7 to a previous state but you can’t login with System Recovery Options? The System Recovery Options menu is a collection of repair and diagnostic tools for Windows like Startup Repair, System Restore, and more. It can be accessed by pressing and holding the F8 key when starting a computer. Once the Advanced Boot Options screen appears, highlight “Repair your computer” and press Enter.

advanced-boot-options

After a while, the System Recovery Options window will show up which prompts you to select the keyboard input method that you prefer, and subsequently asks you to log on as a local administrator account before running the Startup Repair or System Restore tool. But you’ll be stuck at the logon screen if you couldn’t remember the administrator password.

system-recovery-password

Just take it easy! Simply boot your computer from PCUnlocker Live CD and it enables you to remove forgotten Startup Repair password quickly. The PCUnlocker utility exists as a bootable ISO image, which needs to be burned to a blank CD or placed on a bootable USB drive. It could be used to reset lost administrator password on Windows 8, 7, Vista and XP.

Once you’ve created a PCUnlocker Live CD, put it in the CD drive of the Windows 7 computer that you’re trying to reset the password for. Power on the computer and make the CD-ROM to boot first in the BIOS. If all goes well, you should be booting into a mini Windows Preinstallation Environment (PE). PCUnlocker is launched automatically after the system has booted, and it searches your Windows installation and displays a list of local accounts stored in your SAM database.

Choose your administrator account and click on “Reset Password” button. The program will remove your forgotten password and tweak the account’s properties so you can later login without a password. Take out the Live CD and reboot your computer. Repeatedly press F8 key to access the Advanced Boot Options screen again, and you can then log on with a blank password and continue to perform a Startup Repair or System Restore. Done!

3 Methods to Disable NumLock on a Laptop Keyboard

July 21st, 2014 by Admin

Due to their compact size, many laptops don’t include a dedicated numeric keypad on the right side of the keyboard like a desktop computer. To conserve space, the keys of numeric keypad are shared keys with a block of keys in the center of the keyboard.

To use the numeric keypad on a laptop, you need to enable the NumLock key on your keyboard. NumLock key is used to convert part of the main keyboard to act as a numeric keypad rather than letters. When enabled, NumLock lets you use the 7-8-9, u-i-o, j-k-l and m keys as a numeric keypad.

numlock

However, most people do not realize the NumLock key is on their laptop keyboard, and sometimes this will only cause confusion once it’s activated accidentally. For example, this may cause you to enter your password incorrectly at Windows login screen. So here I’m going to show you 3 methods to disable NumLock on a laptop keyboard.

Method 1: Disable NumLock with Fn key

Most laptops have a Fn key you can press in conjunction with other keys to turn off the NumLock feature. But the precise way to disable NumLock varies depending on your laptop model. The Number Lock indicator will light up when the NumLock is enabled and will be unlit whenever the NumLock is disabled. Here are the most common keyboard shortcuts to enable/disable NumLock:

Fn + F11 (Acer, Toshiba, Samsung)
Shift + Num Lock
Fn + Num Lock (Sony, Gateway)
Fn + F11 + Scroll lock
Fn + F8 (HP)
Ctrl + F11
Fn + Shift + Num Lock
Fn + F4 (Dell)
Fn + Nmlk (Lenovo, ASUS)

After pressing the keyboard shortcuts to enable the NumLock, press the shortcuts again and it will disable NumLock.

Method 2: Disable NumLock with a Registry Fix

The status of the NumLock key is specific for each user, and NumLock is disabled by default. If you want the NumLock key enabled for use before a user presses CTRL+ALT+DEL to log on, you must use Registry Editor to change the default behavior.

Here is a simple registry fix to disable the NumLock key at startup:

  1. Press Windows + R to bring up the Run box. Type regedit and press Enter to open the Windows Registry Editor.
  2. In the Registry Editor, open the following registry key.
    HKEY_USER\.Default\Control Panel\Keyboard\
  3. Within the keyboard folder, you should have a string value named “InitialKeyboardIndicators” with a value of 0, 1, or 2. Change the value to 1, and you’re done. Below is the explanation of each of these values:

    0 = Num Lock is turned OFF after the logon.
    1 = Disable Num Lock.
    2 = Numlock is turned ON after the logon.

    disable-numlock

Method 3: Disable NumLock in the BIOS

In addition to the above methods, users can also change how their computer handles the NumLock when the computer first boots up through the BIOS.

  1. Turn on your computer, and as soon as you see the initial POST boot screen, press the designated key for entering the BIOS Setup.
  2. Locate the the “NumLock State,” “NumLock Key“, “Boot Up NumLock Status” or a similar option and change the value to Disabled or Off. In my example, there is a option labelled “NumLock Key” under the Boot tab, select it and press Enter to select Off.

    turn-off-numlock

  3. Save your changes and exit the BIOS.