Archive for the ‘Tips & Tricks’ category

Reset Forgotten Windows Password for Xen Virtual Machine

August 5th, 2014 by Admin

Forgot Windows password to a Xen virtual machine? How can I reset a Windows 2008 (Xen HMV) VPS administrator login? To reset a lost VM password, you will need a tool called PCUnlocker. This software exists of a bootable CD image which can be burned to a CD or USB drive. Basically, you boot a Xen VM from the CD image and it allows you to reset forgotten Windows password offline.

How to Reset Forgotten Windows Password for Xen Virtual Machine?

  1. Download the self-extracting Zip archive of PCUnlocker and save it to your host OS. Extract the CD image (pcunlocker.iso) from the downloaded file. If you’ve enabled EFI/UEFI in your Xen VM, you need to use PCUnlocker Enterprise which supports UEFI booting.
  2. Start virt-manager (also known as Virtual Machine Manager). Select your Windows VM that need a password reset, click on EDIT menu at the top and then select Virtual Machine Details.
  3. In the Details window, click on IDE CDROM 1 tab. Click Connect to mount the PCUnlocker ISO image (pcunlocker.iso) to the virtual CD drive.
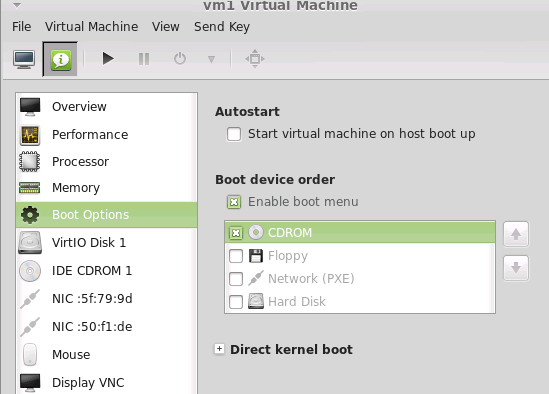
  4. Click on the Boot Options tab. Tick Enable boot menu. Check the CDROM item and put the CDROM item on top of the boot device list. Click Apply to save your changes.

    xen-boot-order

  5. Power on your Windows virtual machine and Xen will now boot from the PCUnlocker CD image, loading the WinPE OS and taking you directly into the tool. This program automatically finds your Windows SAM file and show you a list of local accounts.

  6. Select one of your user accounts and click on Reset Password button. It will reset your Windows VM password quickly, as well as unlock the account in the event it is locked out, disabled or expired.
  7. Disconnect your CD drive and restart the VM. Now you can enjoy log on to your Windows virtual machine without entering any password.

Using the same method you can reset lost Windows password for any virtual machine running in KVM, Xen, Qemu. This works with all versions of Windows, including Windows 8.1 and Windows Server 2012.

How to Reset Forgotten Syskey / Startup Password with Freeware

July 31st, 2014 by Admin

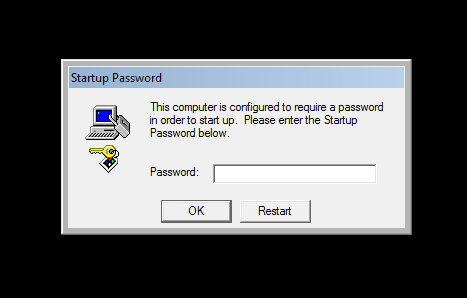
Forgot the syskey startup password and can’t boot up your system? In my previous post, I outlined how to lock your computer with syskey. SysKey is a little-known feature of Windows that allows users to lock out access to the Security Accounts Manager (SAM) registry hive so that login credentials cannot be cracked. The problem is, unlike BIOS password or Windows account password, there is no reliable way to get around the syskey startup password.

syskey

In the event of losing a syskey password, you can restore your computer back to an earlier point without syskey enabled. If there is no any restore point on the machine, the last resort is to try this freeware – Offline NT Password & Registry Editor, which can help you reset lost syskey startup password on Windows XP.

Note: This software is without any warranty. Please take at your own risk. It will not work on Windows 8, 7, Vista, or any higher version than Window XP. (Using it on Vista or windows 7 will cause a continuous reboot loop.)

How to Reset Forgotten Syskey / Startup Password?

  1. Download the CD image of Offline NT Password & Registry Editor from its official website and burn it to a blank CD.
  2. Boot your affected computer from the CD that you created. You may have to go into the BIOS settings to change the boot order to set CD/DVD as the first boot device.
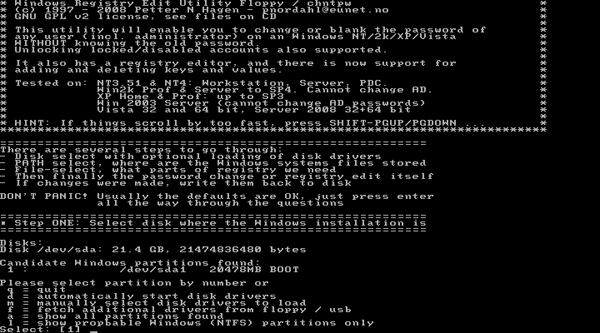
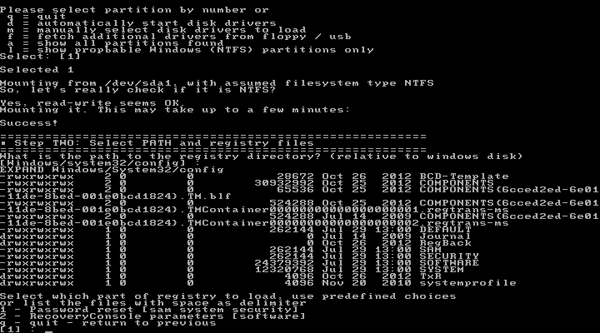
  3. The boot CD will take you to the command prompt. The first thing you need to do is select your system partition:

    select-partition

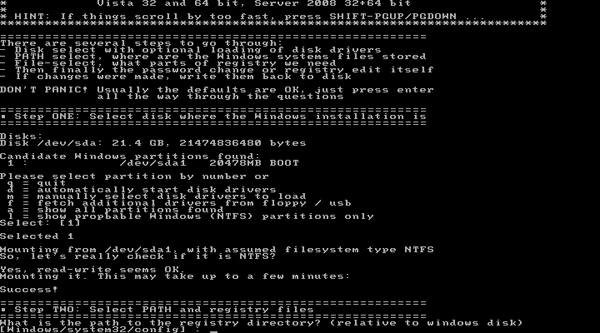
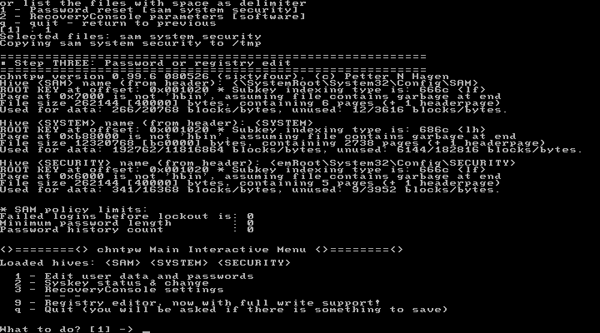
  4. With the system partition selected, the utility then prompts you to specify the registry directory to edit. The default is fine, so hit Enter.

    registry-path

  5. Next you can choose whether to use password reset or some other thing, so just hit Enter for password reset.

    load-sam

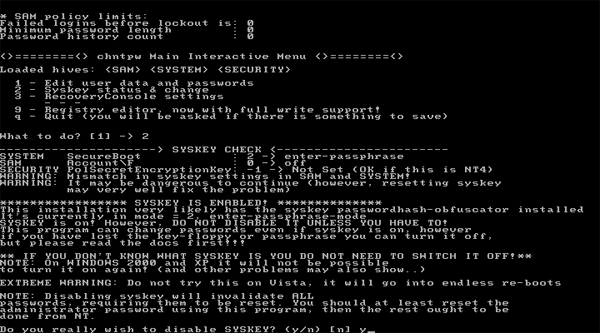
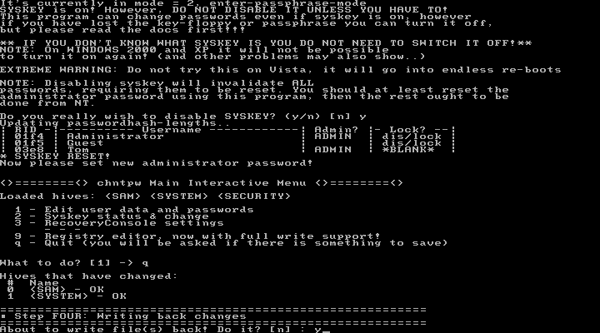
  6. Next you’ll be prompted whether you want to edit user passwords or change syskey. You want to reset syskey startup password, so type 2 and hit Enter.

    reset-syskey

  7. Type y and press Enter to confirm the syskey disable.

    disable-syskey

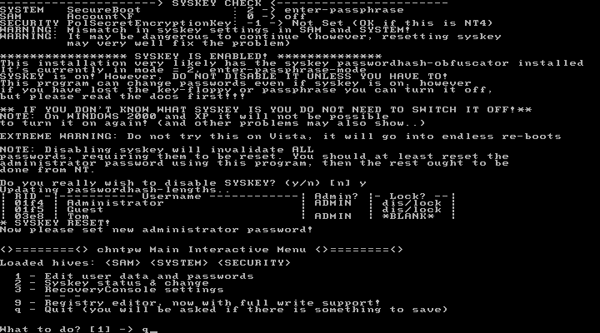
  8. Once it’s done, type q to quit and hit Enter again.

    exit-chtnpw

  9. Type y to save your changes to disk. At this point you can reboot your computer.

    write-changes

As you can see, with Offline NT Password & Registry Editor you’re able to reset forgotten syskey startup password in minutes. However, the utility can just as easily destroy a Windows system’s data. For that reason, the tool should only be used as a last resort.

Forgot System Restore / Startup Repair Password in Windows 7

July 30th, 2014 by Admin

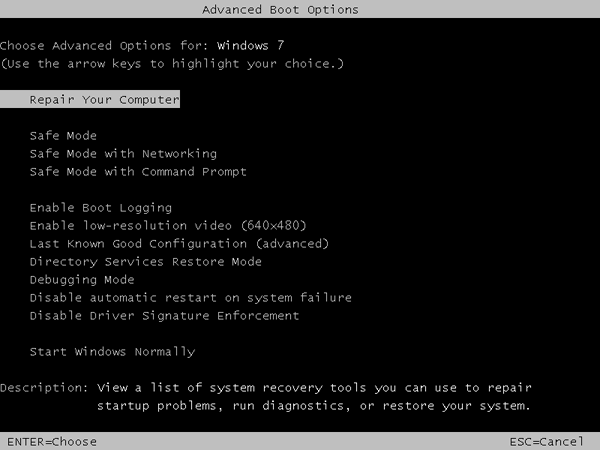
Need to repair or restore Windows 7 to a previous state but you can’t login with System Recovery Options? The System Recovery Options menu is a collection of repair and diagnostic tools for Windows like Startup Repair, System Restore, and more. It can be accessed by pressing and holding the F8 key when starting a computer. Once the Advanced Boot Options screen appears, highlight “Repair your computer” and press Enter.

advanced-boot-options

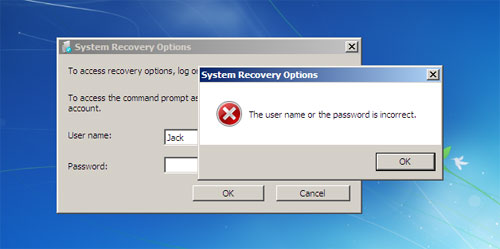
After a while, the System Recovery Options window will show up which prompts you to select the keyboard input method that you prefer, and subsequently asks you to log on as a local administrator account before running the Startup Repair or System Restore tool. But you’ll be stuck at the logon screen if you couldn’t remember the administrator password.

system-recovery-password

Just take it easy! Simply boot your computer from PCUnlocker Live CD and it enables you to remove forgotten Startup Repair password quickly. The PCUnlocker utility exists as a bootable ISO image, which needs to be burned to a blank CD or placed on a bootable USB drive. It could be used to reset lost administrator password on Windows 8, 7, Vista and XP.

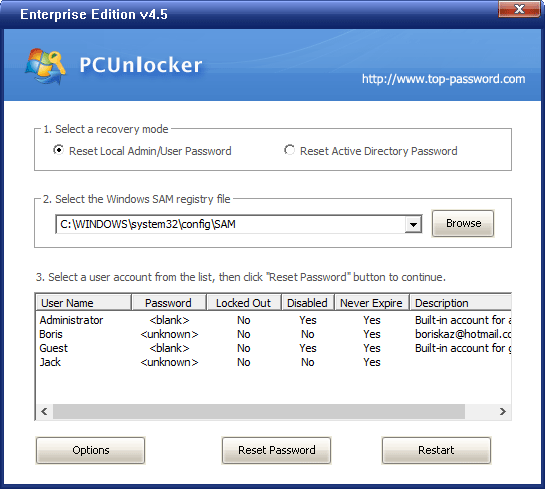
Once you’ve created a PCUnlocker Live CD, put it in the CD drive of the Windows 7 computer that you’re trying to reset the password for. Power on the computer and make the CD-ROM to boot first in the BIOS. If all goes well, you should be booting into a mini Windows Preinstallation Environment (PE). PCUnlocker is launched automatically after the system has booted, and it searches your Windows installation and displays a list of local accounts stored in your SAM database.

Choose your administrator account and click on “Reset Password” button. The program will remove your forgotten password and tweak the account’s properties so you can later login without a password. Take out the Live CD and reboot your computer. Repeatedly press F8 key to access the Advanced Boot Options screen again, and you can then log on with a blank password and continue to perform a Startup Repair or System Restore. Done!

3 Methods to Disable NumLock on a Laptop Keyboard

July 21st, 2014 by Admin

Due to their compact size, many laptops don’t include a dedicated numeric keypad on the right side of the keyboard like a desktop computer. To conserve space, the keys of numeric keypad are shared keys with a block of keys in the center of the keyboard.

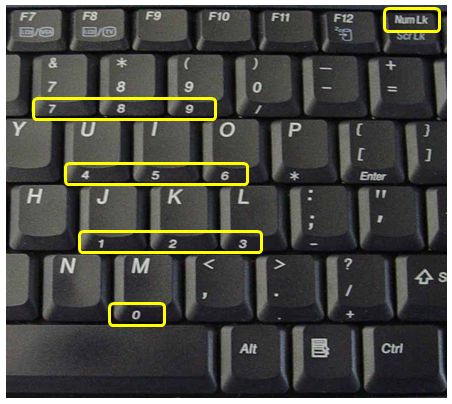
To use the numeric keypad on a laptop, you need to enable the NumLock key on your keyboard. NumLock key is used to convert part of the main keyboard to act as a numeric keypad rather than letters. When enabled, NumLock lets you use the 7-8-9, u-i-o, j-k-l and m keys as a numeric keypad.

numlock

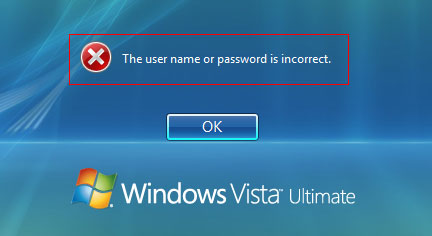
However, most people do not realize the NumLock key is on their laptop keyboard, and sometimes this will only cause confusion once it’s activated accidentally. For example, this may cause you to enter your password incorrectly at Windows login screen. So here I’m going to show you 3 methods to disable NumLock on a laptop keyboard.

Method 1: Disable NumLock with Fn key

Most laptops have a Fn key you can press in conjunction with other keys to turn off the NumLock feature. But the precise way to disable NumLock varies depending on your laptop model. The Number Lock indicator will light up when the NumLock is enabled and will be unlit whenever the NumLock is disabled. Here are the most common keyboard shortcuts to enable/disable NumLock:

Fn + F11 (Acer, Toshiba, Samsung)
Shift + Num Lock
Fn + Num Lock (Sony, Gateway)
Fn + F11 + Scroll lock
Fn + F8 (HP)
Ctrl + F11
Fn + Shift + Num Lock
Fn + F4 (Dell)
Fn + Nmlk (Lenovo, ASUS)

After pressing the keyboard shortcuts to enable the NumLock, press the shortcuts again and it will disable NumLock.

Method 2: Disable NumLock with a Registry Fix

The status of the NumLock key is specific for each user, and NumLock is disabled by default. If you want the NumLock key enabled for use before a user presses CTRL+ALT+DEL to log on, you must use Registry Editor to change the default behavior.

Here is a simple registry fix to disable the NumLock key at startup:

  1. Press Windows + R to bring up the Run box. Type regedit and press Enter to open the Windows Registry Editor.
  2. In the Registry Editor, open the following registry key.
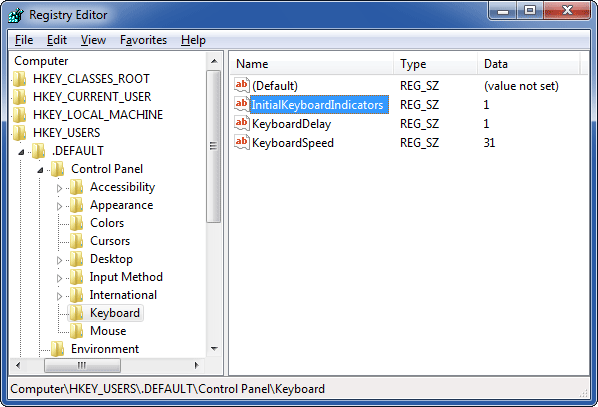
    HKEY_USER\.Default\Control Panel\Keyboard\
  3. Within the keyboard folder, you should have a string value named “InitialKeyboardIndicators” with a value of 0, 1, or 2. Change the value to 1, and you’re done. Below is the explanation of each of these values:

    0 = Num Lock is turned OFF after the logon.
    1 = Disable Num Lock.
    2 = Numlock is turned ON after the logon.

    disable-numlock

Method 3: Disable NumLock in the BIOS

In addition to the above methods, users can also change how their computer handles the NumLock when the computer first boots up through the BIOS.

  1. Turn on your computer, and as soon as you see the initial POST boot screen, press the designated key for entering the BIOS Setup.
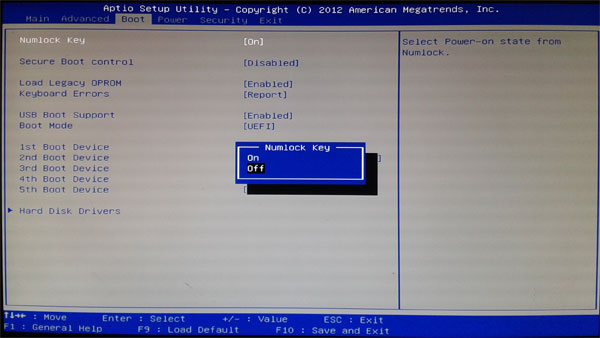
  2. Locate the the “NumLock State,” “NumLock Key“, “Boot Up NumLock Status” or a similar option and change the value to Disabled or Off. In my example, there is a option labelled “NumLock Key” under the Boot tab, select it and press Enter to select Off.

    turn-off-numlock

  3. Save your changes and exit the BIOS.

The Easy Way to Change Boot Sequence in VMware

July 9th, 2014 by Admin

If you’ve used any of VMware’s products you’ve probably been frustrated by trying to boot a virtual machine (VM) from CD or ISO image. When you start a VM, the VMware splash screen only shows for really short time. To enter into the VM’s BIOS Setup, you have to be really quick with your mouse moving focus to the VM and press F2 as quick as possible.

Recently I discovered a second method which allows you to change the boot sequence by modifying the .vmx file of your VM. This method works with all virtual machines running inside VMware Workstation, VMware Player, VMware ESXi/ESX, VMware Fusion, etc.

How to Change Boot Sequence in VMware?

  1. Locate the .vmx file for your virtual machine and open it in a text editor.
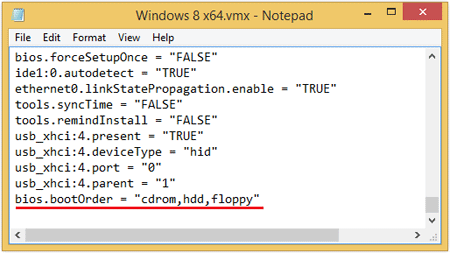
  2. Find the line that begins with bios.bootOrder. If there is no such line, simply add the following line to your .vmx file:
    bios.bootOrder = "cdrom,hdd,floppy"

    vmware-boot-order

    In this example, the virtual machine tries to boot with CD-ROM. If there is nothing to boot from, try from the disk. If that fails, try the floppy.

  3. Save the .vmx file and close the text editor. Start your virtual machine and it will automatically boot from your specified device.

How to Reset Sony Vaio Windows 7 Password with USB Drive

July 5th, 2014 by Admin

Can’t get past the login screen because you’ve forgotten Windows 7 administrator password? You just need to get back into your Sony Vaio laptop so you can get on with your day? Well, this problem can be solved with a bootable utility called PCUnlocker. Rather than cracking a Windows password, PCUnlocker bypasses it and lets you log into the computer without typing a password.

PCUnlocker can run from either a bootable CD or a USB drive. In this tutorial we’ll show you how to reset Sony Vaio Windows 7 password with a USB drive.

How to Reset Sony Vaio Windows 7 Password with USB Drive?

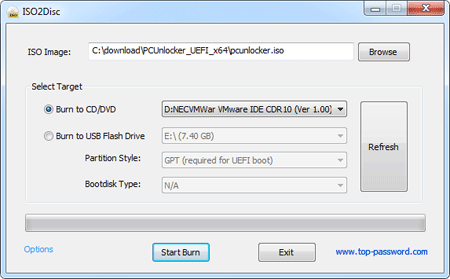
First of all, use a spare computer to download the ISO image of PCUnlocker. Burn the ISO to your USB drive with ISO2Disc, a tool for creating bootable USB drives.

When the bootable USB drive is ready, close the ISO2Disc program and unplug the USB drive. Later insert the USB drive into your affected Sony Vaio laptop.

Now you need to change the boot order in your computer’s BIOS. While turning on the machine, press and hold the F2 or F3 key to enter into BIOS Setup. If your model has the physical Assist button, press the Assist button while your computer is turned off. This will bring up the VAIOCare Rescue Mode menu and you can then press F2 to start BIOS Setup.

In the BIOS Setup, go to the Boot tab, make sure that External Device Boot is Enabled under Boot Configuration, and then change boot priority to boot from USB first. Save your changes and exit BIOS. The laptop will automatically boot from your created USB drive.

After the WinPE operating system is loaded into memory, the computer will start the PCUnlocker utility. It displays a list of Windows local accounts existing in your Windows 7 installation.

Choose an account and click on Reset Password button. The application will unlock / reset your forgotten Windows 7 user password immediately. Restart your computer and disconnect the USB drive, you can then boot into Windows 7 without being required to enter a password!

Reset Forgotten Windows 8 Password on ASUS Transformer Book T300/T100

July 4th, 2014 by Admin

How to unlock ASUS Transformer Book T300 after forgotten Windows 8 password? If you’ve tried the free password cracking Live CDs like Ophcrack or BartPE, you’ll soon realize that they won’t boot up on ASUS Transformer Book T300/T100. That is because ASUS Transformer Book T300/T100 is shipped with UEFI firmware instead of traditional BIOS.

In this situation, PCUnlocker can be of help and it fully supports UEFI booting. This guide will help you make a PCUnlocker Live USB with UEFI bootloader, and then use it to reset forgotten Windows 8 password on ASUS Transformer Book T300/T100.

Part 1: Preparing a bootable PCUnlocker USB drive

1. Download the zipped ISO image of PCUnlocker and save it on your local hard drive. Unzip it and you’ll see an ISO image named pcunlocker.iso.

2. Plug a 1GB or larger USB flash drive into your computer.

3. Download Rufus, a tool for creating bootable USB drives. Double-click the Rufus file to launch the utility.

4. Choose the drive letter for the flash drive you jut plugged in under the “Device” drop-down menu. Choose “GPT partition scheme for UEFI computer” and “FAT32”.

5. Make sure the box that says “Create a bootable disk using” is checked, and choose “ISO Image” and click the drive icon on the right to open an Explorer window and find your pcunlocker.iso image.

rufus

6. Click start. The computer will format your USB flash drive and prepare it as a bootable drive with UEFI bootloader. When the process is complete, eject it from your PC and move on to the next step.

Part 2: Booting PCUnlocker on the Asus Transformer Book T300/T100

1. Plug the PCUnlocker USB drive into the USB port of your Asus Transformer Book T300/T100.

2. While turning on the Asus Transformer Book, press and hold the F2 key so that you can enter into BIOS Setup. Another method is to hold down the volume down button while switching on. You then get 2 options to continue to boot into Windows or BIOS Setup. Then if you haven’t attached the keypad use the volume buttons to select “Enter Setup”.

3. In the BIOS Setup, navigate to the “Save and Exit” menu, you should see an option under Boot Override that has the name of your USB flash drive. Select your USB drive under the boot override option and hit Enter. Your computer should now boot from PCUnlocker USB drive.

Part 3: Reset Forgotten Windows 8 Password

Once you’ve booted into PCUnlocker, you’ll see a list of Windows 8 local accounts that are extracted from your Windows SAM database. Select a user account and click on “Reset Password” button, the program will remove your forgotten password in seconds.

If you’re using a Microsoft account as your machine’s login, there should be a local account that is linked to your Microsoft account, select that local account and reset the password. The program will assign a new password: Password123 so you can later log into your Windows 8 system locally.

So this is how can you easily reset forgotten Windows 8 password on ASUS Transformer Book T300/T100!

How to Bypass Windows 8.1 Password on Lenovo Yoga Laptop

July 3rd, 2014 by Admin

Forgot the admin password to your Lenovo Yoga laptop? Ever wondered how to recover or reset a forgotten password in Windows 8.1? PCUnlocker is a reliable, self-booting recovery CD that can reset the password of Windows 8, 7, Vista and XP. Just boot up your Lenovo Yoga laptop with PCUnlocker Live CD and you can bypass Windows 8.1 password easily!

Note: This method works on all Lenovo Yoga series laptops that come with Windows 8.1 pre-installed, including Lenovo Yoga 2 Pro. Of course, you can also use PCUnlocker to bypass Windows 8.1 passwords on HP, Dell, Sony, Toshiba, Acer and other laptops or tablets.

How to Bypass Windows 8.1 Password on Lenovo Yoga Laptop?

Before getting started, you need to make a PCUnlocker Live CD on an alternate computer. Download the zipped ISO image of PCUnlocker and extract it. Next burn the resulting pcunlocker.iso file to a blank CD (or USB stick) using the ISO2Disc program.

Put the CD in the CD drive of your Lenovo Yoga laptop. To get the laptop to boot from CD, we need to go into the BIOS and switch the Boot Mode from Unified Extensible Firmware Interface (UEFI) to Compatibility Support Mode (CSM). When the computer is off, press the Novo button and then select BIOS Setup.

In the BIOS Setup Utility, go to Security tab, and disable the Secure Boot option. Next, on the Boot tab, change the Boot Mode from UEFI to Legacy Support. Save the changes and exit BIOS. Shut down the laptop and then press the Novo button again and then choose Boot Menu. Choose to boot from PCUnlocker Live CD.

The laptop will load the WinPE OS from CD and open up the PCUnlocker utility. At this point the program can directly access the Security Accounts Manager (SAM) database and extract all your Windows user accounts.

Select your user account and click on “Reset Password” button. The program will reset your forgotten password by modifying the stored password hashes in the SAM registry file. Restart the computer and take out the CD. You can then log back into your Lenovo Yoga Windows 8.1 laptop with a blank password!

Conclusion

The advantage of this method is that it is very quick if you already have the PCUnlocker Live CD in your tool box. Thus it is useful for admins who have to perform this procedure often.

Save Any Web Page To PDF File in Windows and Mac

June 30th, 2014 by Admin

Have you ever wanted to download one or more Web pages in a form that you could read on a PDA or an e-book reader? Every time I came across a great tutorial on the Web, I will convert the content to a pdf file and keep it for future reference. If you are like me, and are also using Google Chrome, you can save any Web page to PDF file in just a few mouse clicks, without using any PDF conversion software.

How to Save Any Web Page To PDF File in Windows and Mac?

  1. First of all, start the Chrome browse and access the web page that you want to convert into a PDF file format.
  2. Press Ctrl + P in Windows PC or Command + P if you are using a Mac to open the the Print dialog.

    save-webpage-to-pdf

  3. Click on Save button to save the current online web page to to PDF format.

This is the simplest way to convert a web page to PDF file in Windows and Mac. If you’re not always connected to the Web, you can save your favorite articles you find online so you can read them offline later.