Archive for the ‘Tips & Tricks’ category

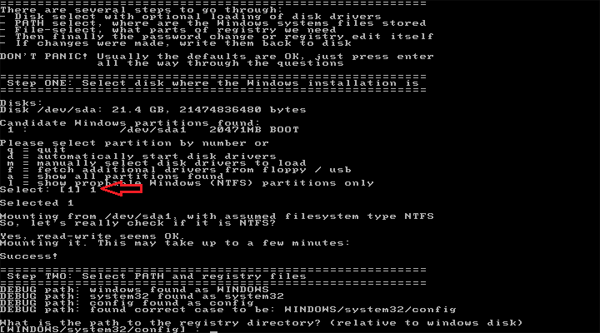
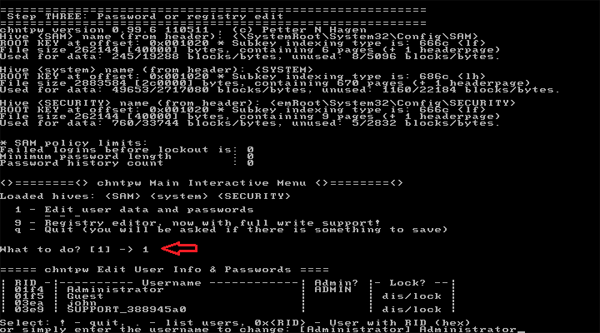
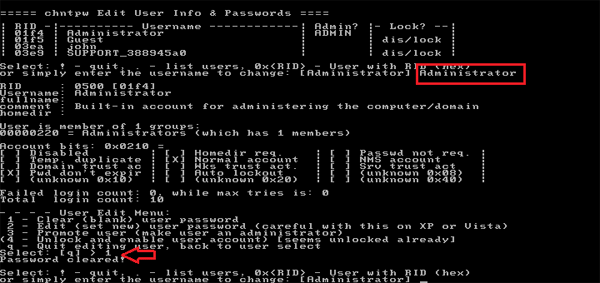
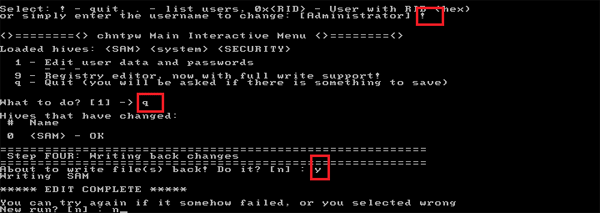
How to Override Lost windows 7/Vista/XP Password with USB Drive

June 13th, 2013 by Admin

Locked out of Windows after forgetting the administrator password? Just bought a used laptop but it is password protected and you are unable to get into it? Is there any way to override a lost Windows password and regain control of your computer without wiping any data? Here is a very easy method using a USB drive to override lost Windows 7/Vista/XP password quickly.

How to Override Lost windows 7/Vista/XP Password with USB Drive?

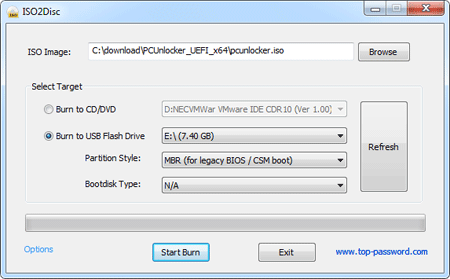
Firstly, you need to prepare a bootable password removal USB drive on another PC which you can log on. Download the .zip archive of Reset Windows Password utility onto your desktop. Open the ZIP file and extract it to a folder on your desktop. Within that folder, you’ll find a file called ResetWindowsPwd.iso. Simply burn the ISO image file to a USB drive using ISO2Disc program.

Plug the USB drive into your locked PC which needs to override a lost Windows password. Turn on the computer and get it to boot from the USB drive. Make sure you have your BIOS set to boot from removable device. Once you boot from the USB drive, the computer will start loading the WinPE operating system and open up the Reset Windows Password program.

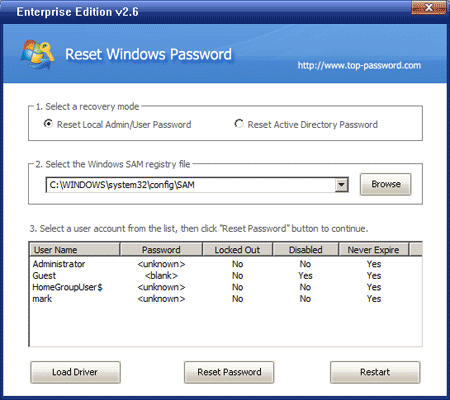
On the main interface of Reset Windows Password program, you can see all user accounts for your Windows installation. Choose a user account and click on Reset Password button. The program will unlock your user account and override the lost Windows password.

Unplug the USB drive and restart your computer. Now you should be able to log back into Windows system with a blank/empty password. It’s that easy!

Conclusion

So this is how can you override lost Windows 7/Vista/XP password easily. Instantly regain access to your password protected computer when you lost or forgot Windows password. No need to reinstall Windows.

How to Get F8 Key to Work Again for Safe Mode in Windows 10 and 8

June 13th, 2013 by Admin

If you’re running Windows 7/Vista/XP, just press F8 key while your computer is booting up and you can boot into Safe Mode easily. However, the F8 key doesn’t work in Windows 10 and 8. In my previous post I’ve covered another way to boot Windows 8 into Safe Mode, but the method is still not as convenient as F8 key. In this tutorial we’ll show you how to get F8 key to work again for Safe Mode in Windows 10 and 8.

How to Get F8 Key to Work Again for Safe Mode in Windows 10 / 8?

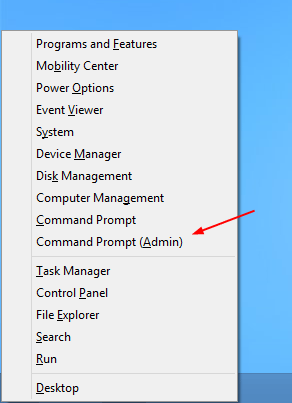
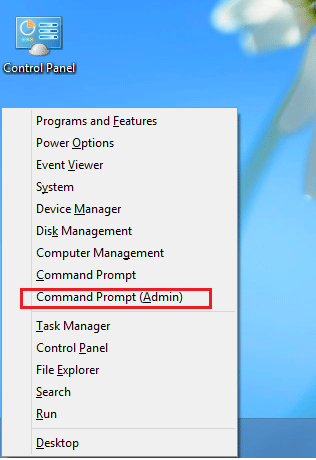
After getting into Windows 10 / 8, press Windows + X key combinations to bring up the Power User Menu. Click on Command Prompt (Admin) option. It will launch a command prompt which runs with administrator privileges.

power-user-menu

To get that classic F8 key to work again we need to restore the legacy boot menu policy. When the command prompt opens, run the following command:

bcdedit /set {default} bootmenupolicy legacy

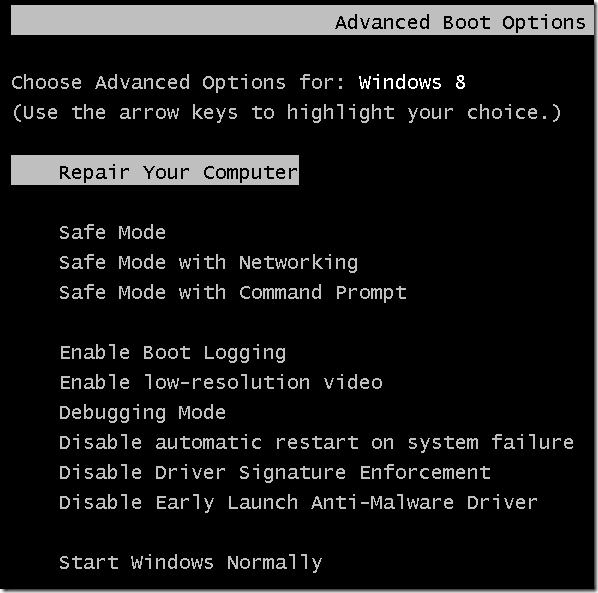
That’s all there is to it. Now restart your computer. Press F8 key during Windows startup, you will see the Advanced Boot Options menu from which you can select Safe Mode.

windows-8-safe-mode

If you want to disable the legacy boot menu again, simply run this command at the Command Prompt:

bcdedit /set {default} bootmenupolicy standard

How to Boot Windows 8 or 10 into Safe Mode

June 12th, 2013 by Admin

Couldn’t find a way to boot Windows 8/10 into Safe Mode? In the previous version of Windows, we can boot into Safe Mode by simply pressing F8 key while Windows starts. However, this all changes since Windows 8 and the F8 key doesn’t work anymore. Booting into Safe Mode when using Windows 8 or 10 is not as simple as with previous versions of Windows – but it is possible. Here is how to boot into Safe Mode in Windows 8 and Windows 10.

How to Boot Windows 8/10 into Safe Mode?

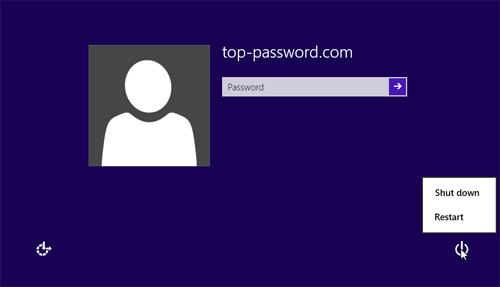
Turn on your computer and wait until it boots into the Windows 8/10 login screen. If the computer logs on to your user account automatically, you need to manually log off in order to bring up the login screen.

windows-8-login-screen

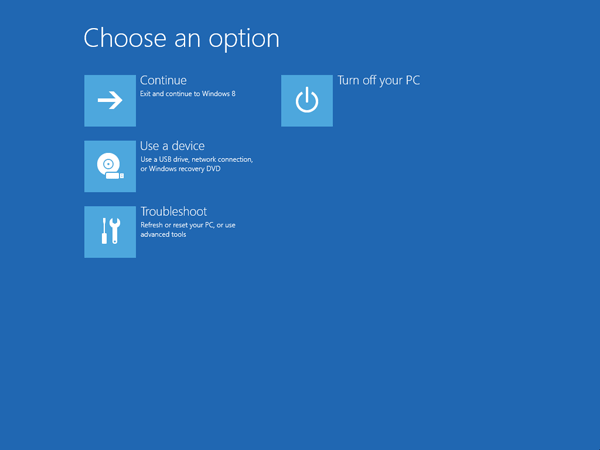
Hold down the SHIFT key and click on the Power icon visible on the bottom right of Windows 8/10 login screen, then click Restart option. In a moment you’ll see the recovery screen. click on the Troubleshoot option.

recovery-mode

Now select Advanced Options.

troubleshoot

In a moment you’ll see the Advanced options screen, as shown below. Select the Startup Settings option.

advanced-options

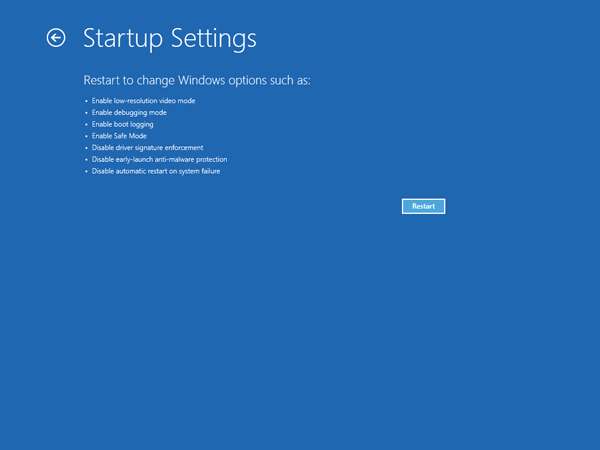
Next hit the Restart button.

startup-settings

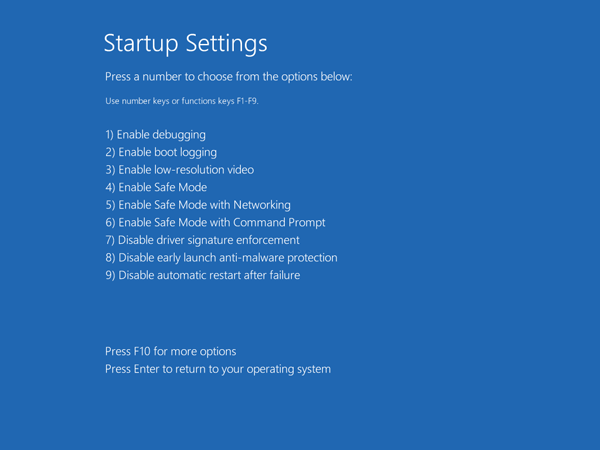
Wait while your computer restarts. You don’t need to do anything here or hit any keys. After a while, you should see the Startup Settings menu. You’ll see a number of advanced ways to start Windows 8/10, all aimed at assisting you in solving a Windows startup problem.

enable-safe-mode

Press F4 key on your keyboard to enter into Safe Mode. There’s nothing to do here but wait. Next up will be the login screen you normally see when your computer starts. Log on as administrator and now Windows 8/10 is running in Safe Mode.

Note: If you forgot the administrator password and can’t log into Safe Mode, you can easily reset the lost password using a Windows Password Reset boot CD/USB drive.

How to Reset Lost Windows 8 Password for UEFI-based Samsung Laptop

June 12th, 2013 by Admin

Locked out of your Samsung laptop because you’ve forgotten Windows 8 password? How to reset lost administrator password on your UEFI-based Samsung laptop? If you’ve bought a Samsung laptop with Windows 8 pre-installed, you may find out there is no option to boot from a CD/USB drive. That is because the traditional PC BIOS has been replaced with UEFI, which is no long compatible with your boot CD/USB. So how to unlock a Windows 8 Samsung laptop using a password reset boot CD? In this tutorial we’ll walk you through how to reset lost Windows 8 password on UEFI-based Samsung laptop.

How to Reset Lost Windows 8 Password for UEFI-based Samsung Laptop?

  1. If you don’t have a password reset boot CD/USB drive, you can create one easily. Simply download the self-extracting archive of Reset Windows Password utility on your computer. Unzip the download file which contains a bootable CD image. Burn the ISO image to a blank CD or USB drive using ISO2Disc, BurnCDCC or ImgBurn program.
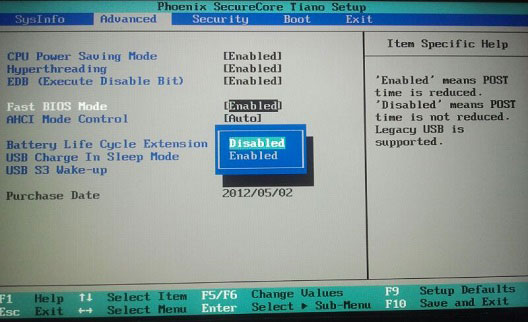
  2. Connect the boot CD/USB drive to your UEFI-based Samsung laptop. Upon powering on the laptop, press F2 to enter into BIOS. Navigate to the Advanced tab, disable the Fast BIOS Mode.

    samsung-bios-mode

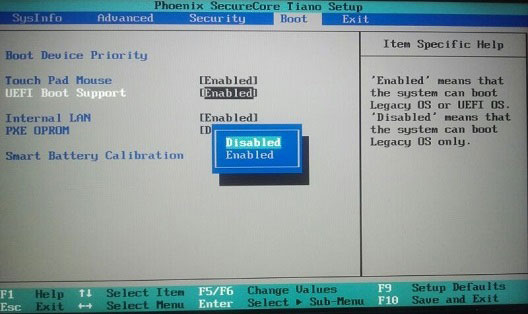
  3. Switch to the Boot tab, and then disable the UEFI Boot Support. Press F10 to save your changes and exit.

    samsung-uefi-boot

  4. Turn on or restart your Samsung laptop. Press F10 when you see the Samsung logo. Now you’ll see the boot CD/USB drive shown in the list of Boot Menu. Highlight your CD/USB drive with the cursor keys and press Enter. The computer should now boot from the CD/USB drive.
  5. After a while, the system will launch the Reset Windows Password program, which displays a list of Windows 8 user accounts on your Samsung laptop.

  6. Choose a user account and click on Reset Password button. The program will quickly remove your forgotten Windows 8 login password and unlock your user account if it is disabled, locked out or expired.
  7. Restart your Samsung laptop and remove the boot CD/USB drive. When the computer is powered on again, press F2 to enter into BIOS and then enable the UEFI Boot Support option. When you boot to the Windows 8 login screen, you can successfully log back into your user account using a blank/empty password.

How to Run the Command Prompt as Administrator in Windows 8

June 11th, 2013 by Admin

There are many situations where you need to open up the Command Prompt as administrator. But in Windows 8 the classic Start Menu is replaced with a new Charm Bar, which doesn’t provide you an option to run the Command Prompt. So here we’ll show you 2 options to run the Command Prompt as administrator in Windows 8.

Note: If you have logged on as a standard or limited user, you’ll be prompted to enter the administrator password when trying to run the Command Prompt as administrator. If you’ve forgotten the admin password, you can reset it using a Windows Password Reset boot CD or USB drive.

Option 1: Win + X Menu

Right-click in the bottom left corner of your screen, or press the Windows + X keyboard combination. This will bring up a menu with many administrative options, including Command Prompt (Admin), Control Panel, Computer Management, Task Manager, Windows Explorer, etc.

win+x-menu

Simply click on the Command Prompt (Admin) option, it will open up a Command Prompt with administrator privileges. This Win + X menu is also know as Power User Menu. It should be the easiest way to run the Command Prompt as administrator in Windows 8.

Option 2: Search Charm

Move the mouse cursor to the bottom right corner of the screen, the charm bar will appear on the right side of the screen. Click on the Search icon. Type cmd in the Search box.

Windows 8 will show Command Prompt in search results page. Right-click on the shortcut and select “Run as administrator” option given at the bottom.

That’s it. These are many different ways to open Command Prompt as administrator in Windows 8, but the methods above should be the easiest ones.

How to Bring Back the Delete Confirmation Dialog Box in Windows 8 / 10

June 10th, 2013 by Admin

If you’ve moved to Windows 8 or Windows 10, you will soon find out that Windows 8/10 no longer asks you to confirm the deletion of file or folder. When you select a file or folder and hit Delete key, it will be moved to the Recycle Bin right away without any confirmation. This might cause data loss if you accidentally delete some important files. Luckily, there is an easy way to bring Windows 8/10 file/folder delete confirmation dialog box back.

How to Enable the Delete Confirmation Dialog Box in Windows 8/10?

Right-click on the Recycle Bin icon on Desktop, and choose Properties. (If the Recycle Bin icon is hidden from your desktop, right-click anywhere on the desktop and choose Personalize from the pop-up menu. Click the option to change desktop icons. Select the radio box representing the Recycle Bin and click OK.)

windows-8-recycle-bin

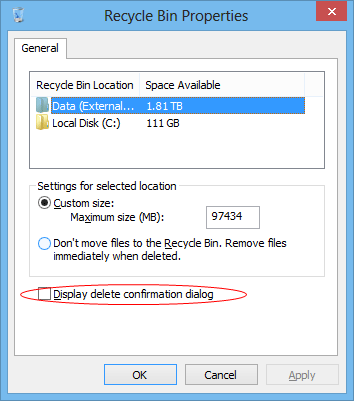
In the Recycle Bin Properties window, check the box next to the Display delete confirmation dialog option. Click OK to save the setting. Now, when you delete a file or a folder, the delete confirmation dialog box will appear.

That’s all there is to it, remember if you want to delete something without just sending it to the Recycle Bin you can always use the Shift + Delete key combination.

How to Reset Windows 8 Password on Dell Inspiron Laptop

June 10th, 2013 by Admin

I have forgotten the administrator password to Windows 8 installation and locked out. Is there a way to reset the password on my Dell Inspiron laptop? I do have physical access to the PC.

Forgot Windows 8 password on your Dell Inspiron laptop? How to reset Dell laptop password without wiping the whole operating system? You are not out of luck! Just create a password removal Live CD or USB drive on an accessible PC, you can then use it to boot off your locked Dell laptop and reset lost Windows 8 password in no time.

How to Reset Windows 8 Password on Dell Inspiron Laptop?

  1. Firstly, you need to find an accessible PC which you can used to create a Live CD/USB drive. Download the Reset Windows Password program which comes as a .zip archive of bootable ISO image. Unzip the download file and you’ll get the ResetWindowsPwd.iso file. Simply burn the whole ISO image file to a CD or USB flash drive using ISO2Disc utility.
  2. Connect the password removal Live CD/USB drive to your locked Dell Inspiron laptop. As soon as you power on the computer, repeatedly press F12 key to bring up the Boot Options screen. Choose the Setup option under Other Options menu and press Enter to enter into BIOS.
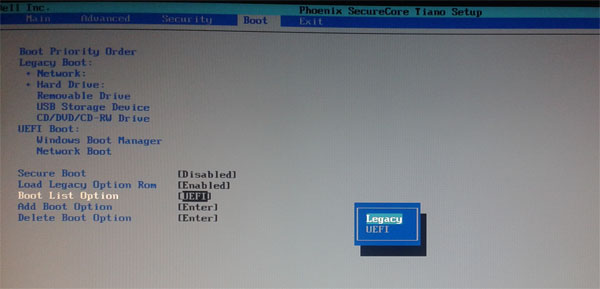
  3. Choose the Boot tab in BIOS. Disable the Secure Boot option and then change the Boot List Option from UEFI to Legacy. Press F10 to save changes and exit.

    dell-bios-uefi

  4. As what you have done above, press F12 key to bring up the Boot Options again. This time you will see 3 boot options on screen: Legacy Boot, UEFI Boot and Other Options. Choose the CD/DVD/CD-RW Drive or Removable Drive under the Legacy Boot menu. Press Enter.
  5. The computer will then boot from your created Live CD/USB drive. After a short while, the Reset Windows Password program will appear, which displays your Windows 8 SAM registry file and a list of local user accounts which can be used to log on your Dell Inspiron laptop.

  6. Choose a user account whose password you want to reset/unlock, then click on Reset Password button. The program will remove your forgotten Windows 8 password shortly.

After successfully resetting your Windows 8 password, remove the Live CD/USB drive and restart your computer. Quickly press F2 key during POST screen to enter into BIOS, then change the Boot List Option from Legacy back to UEFI and save your changes. When your Dell laptop boots to the Windows 8 logon screen, just leave the password blank and you can log back into your Windows 8 user account immediately.

How to Reset Windows 7 Password Using Sticky Keys Trick

June 8th, 2013 by Admin

I just bought my eleven year old daughter an HP laptop with Windows 7. I set her up as the administrator, with a password (which in hindsight, I shouldn’t have) she changed the admin password, but didn’t write the new password down, and can’t remember what she changed it to. Is there any free and straight forward techniques to reset Windows 7 password?

If you’ve ever forgotten your Windows 7 password or been asked to assist somebody else in resetting their lost password, there’s a lot of different ways to accomplish it. Here’s how to reset Windows 7 password by using the Sticky Keys trick.

Sticky Keys is designed for people who have difficulty holding down two or more keys at a time. By default, if you press the SHIFT key five times, the Sticky Keys dialog box will open up, even if you are at the Windows login screen. So if you replace the Sticky Keys application with the Command Prompt, you can then press the SHIFT key five times to open up a Command Prompt which runs with system privileges, which can used to reset forgotten passwords of any user accounts existing in your Windows 7 system.

How to Reset Windows 7 Password Using Sticky Keys Trick?

Firstly, you need to boot your locked Windows 7 PC from a Live CD, such as Windows PE, system repair disc, Ubuntu or Linux Live CD. After booting from a Live CD, you can access all files on your system partition through a GUI interface or command prompt.

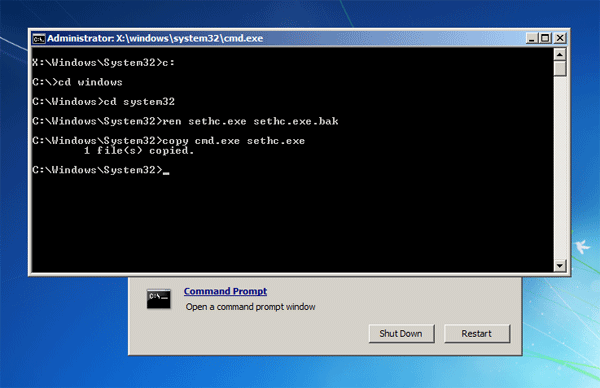
Simply replace the Sticky Keys application (c:\windows\system32\sethc.exe) with the Command Prompt (c:\windows\system32\cmd.exe). Please note the drive letter of your Windows 7 system as seen in Live CD may be different from what you’ve seen before.

Next take out the Live CD from the CD drive and restart your computer. When you reach the Windows 7 login screen, press the SHIFT key five or more times, this will bring up a Command Prompt instead of the Sticky Keys application.

Tips: If the system already has the Sticky Keys feature disabled, or you don’t have a Live CD around, you can use Password Recovery Bundle to reset your Windows 7 password instead.

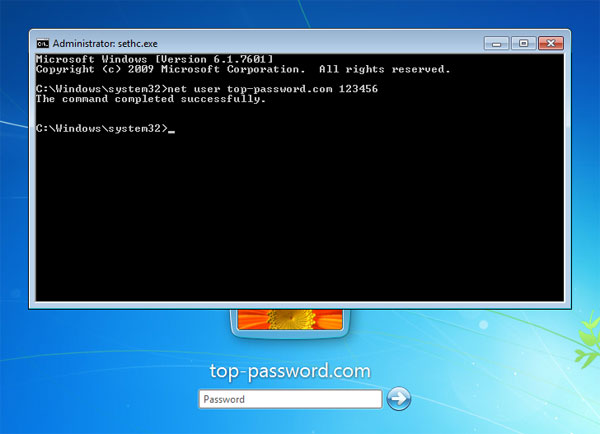
Type the following command to reset your forgotten Windows 7 password, replacing username with your account name and password with a new password.

net user username password

After that you can now log in using your new password.

After getting into Windows 7, it is important to rename the sethc.exe file so as to prevent any other user from using this same trick to reset your password. This is especially important if you use a shared computer.

Note: Resetting Windows 7 password using the Sticky Keys trick means you will lose access to EFS-encrypted files, encrypted email messages, and stored passwords for Internet Explorer and network resources. Remember to back up your important data regularly.

How to Reset Lost Windows 8 Password for UEFI-based ASUS Computer

June 7th, 2013 by Admin

My grandfather just bought an ASUS notebook PC with Windows 8 and set a password for the administrator account. However, he is up in age and forgot his password soon (did not write it down). Now he is trying to log in but of course it’s locked. How to unlock or reset a forgotten Windows 8 password on an ASUS laptop?

Forgot Windows 8 password and can’t log on your ASUS computer? How to unlock the administrator account without resetting your ASUS PC to factory settings? There are lots of bootable utilities which can help you reset Windows login password from a bootable CD, but most of them don’t support Windows 8 and they are also incompatible with UEFI BIOS.

If you’ve bought an ASUS computer with Windows 8 pre-installed, you’ll find that you can’t get it to boot from a Live CD as usual. That is because most of Windows 8 PCs use a new UEFI BIOS rather than the traditional BIOS, and you need to enable the Legacy BIOS support in BIOS. In this tutorial we’ll show you how to easily reset lost Windows 8 password for UEFI-based ASUS computer.

How to Reset Lost Windows 8 Password for UEFI-based ASUS Computer?

First of all, you need to create a Live CD (or USB flash drive) on another PC that you can access. Download the ZIP archive of Reset Windows Password utility and save it on your desktop. Open the ZIP file and extract it to a folder on your desktop. Within that folder, you’ll find a file called ResetWindowsPwd.iso. Burn the ISO image onto an empty CD using ISO2Disc, BurnCDCC or other ISO burning software.

Place the Live CD into the CD drive of your locked Windows 8 ASUS computer. Now we need to make some changes with the computer in order to get it to boot from the Live CD. Power off the computer. As soon as the ASUS logo appears, immediately press F2 key to enter the BIOS. Use the arrow key to select Boot tab and enable the Launch CSM option and disable the Fast Boot option.

enable-csm

Switch to the Security tab and disable the Secure Boot Control option. Save your changes and exit.

disable-secure-boot

Turn off your computer and power it on again. Quickly press ESC key to access the Boot Menu. This time the Live CD will show up in the Boot Menu. Choose your Live CD and press Enter. If you can’t bring up the Boot Menu, you can also press F2 key to enter into BIOS and set CD/DVD-ROM as the first boot option.

boot-menu

After successfully booting from the Live CD, the computer will open up the Reset Windows Password program after a few minutes. The program automatically searches the Windows SAM registry hive for your Windows 8 installation, and then display all of local user accounts on your ASUS PC.

Choose a user account and then click on “Reset Password” button. It will reset your forgotten Windows 8 password instantly.

Restart the computer and take out the Live CD from the CD drive. Remember to reset your BIOS settings to their factory defaults, otherwise Windows 8 will fail to boot. When the ASUS computer boots into the Windows 8 login screen, you can then log in to your user account with a blank/empty password!

How to Find Microsoft Office 2013 Product Key Easily

June 7th, 2013 by Admin

I have Office Professional 2013 installed on my laptop, and I wish to install it onto another computer, but I have lost the product key and don’t have the product key written down anywhere. Where can I find my Microsoft Office 2013 product key? Thanks for your help!

There are lots of chances that you lost Office 2013 product key or the product key sticker on the back of the CD/DVD case is damaged and unreadable. How can you find out lost Office 2013 product key when you have to do a system restore but to reinstall Office? Do no worry a bit, there is a product key recovery tool known as Product Key Finder, which can help you find product keys (CD key) for Microsoft Office 2013/2010/2007/2003 and Windows 8/7/Vista/XP. It is a very simple to use application, just a few mouse clicks and it will show you product key for Windows, Office and other software installed on your local system.

How to Find Microsoft Office 2013 Product Key Easily?

  1. Download Product Key Finder and save it on your computer. Double-click on the setup file and simply follow the setup wizard to complete the installation.
  2. Launch Product Key Finder and then click on “Start Recovery” button.
  3. It will provide you 3 options to recover lost product keys. The first option enables you to find lost Microsoft Office and Windows product keys from current system, while the other two options allow you to locate product keys from external software registry hive as well as remote computers.
  4. Choose the first option “From current system”, the program will quickly find your Microsoft Office 2013 product key, along with Windows product key and CD keys for many other software installed on your computer.

Overall Product Key Finder is a nice tool that helps you to find lost Office 2013 product key easily. Worrying about lost product key is a thing of the past, you now have Product Key Finder to your assistance.