Archive for the ‘Tips & Tricks’ category

How to Reset Lost Mac OS X Password without an Install Disk

March 20th, 2013 by Admin

Forgot your Mac admin password? Or maybe you purchased a used Mac from someone else and they’ve got it locked down? There are numerous ways to reset lost or forgotten Mac OS X password. In my previous post we’ve covered how to reset Mac OS X password with a installation CD. If you’ve forgotten your Mac password and you don’t have an install CD laying around, there’s no need to worry! There are still a few options to reset your lost Mac OS X password easily without an install disk.

Option 1: Reset 10.5 Leopard & 10.6 Snow Leopard password

  1. Power on or restart your Mac.
  2. At the chime (or grey screen if your chime is turned off), hold down Command+S on your keyboard to enter single-user mode.
  3. This step is optional, but it’s a good idea because it checks the consistency of the hard disk before moving on. At the prompt, type fsck -fy and press Enter/Return. Wait for the checks to complete before going to the next step.
  4. Type mount -uw / and press Enter.
  5. Type launchctl load /System/Library/LaunchDaemons/com.apple.DirectoryServices.plist and press Enter.
  6. Type ls /Users and press Enter. This lists all of the usernames on the computer – helpful if you don’t know or remember what these are.
  7. Type dscl . -passwd /Users/username password and replace “username” with one of the users displayed in the previous step. Replace “password” with a new password of your choice. Press Enter.
  8. Type reboot and press Enter.

Option 2: Reset 10.4 Tiger password

  1. Power on or restart your Mac.
  2. At the chime (or grey screen if your chime is turned off), hold down Command+S on your keyboard to enter single-user mode.
  3. Type sh /etc/rc and press Enter/Return.
  4. Type passwd username and replace “username” with the short name of the user account for which you’d like to reset the password.
  5. Type your desired password and press Enter. It won’t show itself on the screen, so be careful what you type. You will most likely have to enter it again to confirm.
  6. Type reboot and press Enter.

Option 3: Create a New User Account

This will create a new account, but all of your documents, pictures and everything will not be accessible.

  1. Power on or restart your Mac (should work for any Mac OS X system).
  2. At the chime (or grey screen if your chime is turned off), hold down Command+S on your keyboard to enter single-user mode.
  3. This step is optional, but it’s a good idea because it checks the consistency of the hard disk before moving on. At the prompt, type fsck -fy and press Enter/Return. Wait for the checks to complete before going to the next step.
  4. Type mount -uw / and press Enter.
  5. Type rm /var/db/.AppleSetupDone and press Enter.
  6. Type shutdown -h now and press Enter.

Although the above options will allow you to reset your own Mac password, it also means that others with physical access to your Mac will also be able to use them for accessing your information. To further protect your Mac, you should set an Open Firmware password using Apple’s utility.

How to Bypass Windows Administrator Password

March 19th, 2013 by Admin

I have forgotten the administrator password of my Windows 7 installation and locked out. Is there a way to reset or bypass the password? I do have physical access to the PC.

Few things are more annoying than forgetting your Windows administrator password. Without your Windows password your PC is nothing more than a door stop. In this tutorial I’ll show you how to bypass Windows administrator password which will allow you to login to Windows once again. All you need to bypass Windows password with this method is another Windows PC so you can download the Reset Windows Password utility and make a password reset Live CD/USB drive.

How to Bypass Windows Administrator Password?

  1. To get started, purchase the Reset Windows Password utility and download it onto your current computer. Unzip the download file and you’ll get the ResetWindowsPwd.iso file which contains the password hacking tool.
  2. Next, you need to turn that ISO file into a CD. All you need to do is get a CD/DVD burning program such as BurnCDCC or ImgBurn, which allows you to burn an ISO image to CD or DVD easily! If your computer doesn’t come with a CD/DVD burner, you can use the ISO2Disc program to burn a Windows password reset USB from that ISO image.
  3. Take the Live CD you just created to the computer you want to hack. Insert the CD into the CD drive and turn on the computer. Normally, the BIOS screen tells you the keyboard key you need to press to change the boot order, watch for that message! On most computers the BIOS key is Del, F9 or F12 but yours might be different, so watch out for that on the boot-up menu.
  4. Once you boot from the CD, it will load the miniature operating system and open the Reset Windows Password utility. This program automatically detect all Windows installations on your computer, and shows a list of user accounts existing in your Windows SAM registry hive.
  5. Choose the administrator account you want to bypass the password on and click on “Reset Password” button. It will remove your forgotten administrator password immediately. Remove the CD from the CD drive and restart the computer, you can then log into the administrator with an empty password. Done!

This tutorial is fairly simple to follow even if you are not very techie person. With this trick you can bypass Windows administrator password on any version of Windows operating system, including Windows 8/7/Vista/XP.

How to Find Windows 7 Product Key from Your Current Computer

March 13th, 2013 by Admin

Ever been in situation where you need to re-install Windows 7 or the system is crashed? It must be a frustrating experience when you found out that you can’t locate Windows 7 product key because the product key sticker has been scratched and damaged. So now what to do, How to recover or find your lost product key?

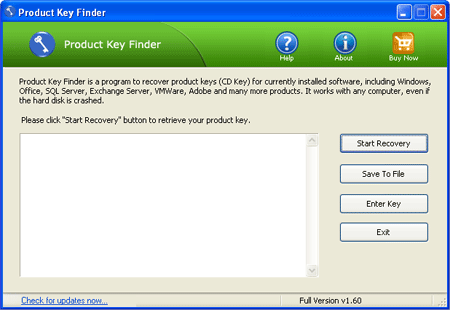
Yes you can do that with simple and easy steps, there is a professional key finder program called Product Key Finder, which will help you to find Windows 7 product key from your current computer.

How to Find Windows 7 Product Key from Your Current Computer?

  1. Download and install Product Key Finder on your computer.
  2. Launch Product Key Finder and click the Start Recovery button. It will bring up a drop-down menu that provides three recovery mode: From current systemFrom non-booting system and From remote computer.

  3. To recover product keys from your current Windows installation, choose the first recovery mode.
  4. The program will scan your Windows registry and find your Windows 7 product key immediately.

Note that you need to run the Product Key Finder program before formatting the system. If you format the system and try to retrieve the keys, you would find nothing as the registry would be completely fresh with no data stored. Hence, make sure to recover/find your Windows 7 product key in advance and print a hard copy of all the serial keys and keep it in your shelf.

Lost Administrator Password for Windows 2003 Server

March 12th, 2013 by Admin

I am trying get an unused server up and running, it booted fine but I was greeted with the login window and none of the known passwords seem to work. The server I am trying to get to work is not a Domain Controller and has not been used in a long time. How do I access Windows server 2003 without formatting the hard drive?

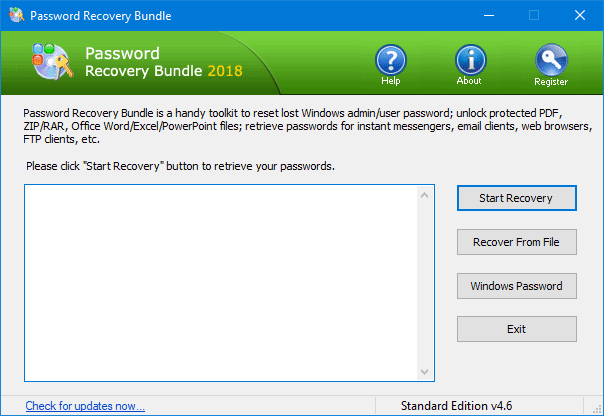
Lost administrator password of a Windows 2003 server machine which is rarely used? Is there any way to make the system up and running without needing to reinstall the system? There is a powerful rescue utility called Password Recovery Bundle, which enables you to create a Live CD/USB that could be used to reset lost or forgotten password for both local administrator and domain administrator on Windows 2003 server. Here we’ll guide you directly through all the steps involved in resetting lost administrator password for Windows 2003 server.

How to Reset Lost Administrator Password for Windows 2003 Server?

  1. Download and install Password Recovery Bundle on another computer that you can log in.
  2. Put a blank CD in the CD drive in order to create a Live CD.
  3. Launch Password Recovery Bundle and click on Windows Password button, it will display the ISO burning dialog.

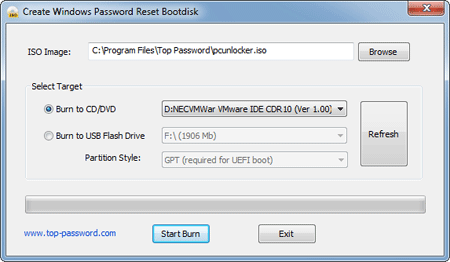
  4. Choose the CD you’ve plugged in and then click on Start Burn button to create a Live CD.
  5. After you have the Live CD, put it into the CD drive of your Windows 2003 server that needs a password reset.
  6. Turn on the server and have it boot from the Live CD. You may need to go into BIOS and set CD/DVD as the first boot device.
  7. After booting from the Live CD, it will load the Windows PE operating system inside the Live CD and start the Reset Windows Password program.

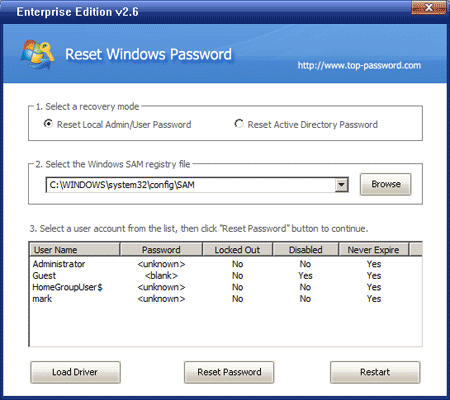
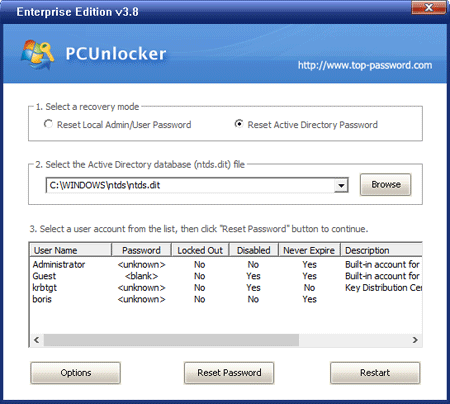
  8. By default, the program will display a list of local user accounts existing in your Windows SAM registry hive. If your server is a domain controller and you want to reset lost domain administrator password, please choose the Reset Active Directory Password option, the program will show your domain user accounts existing in the Active Directory database (ntds.dit).
  9. Choose the administrator account from the list, then click on Reset Password button, the program will reset your lost administrator password immediately.

The last step is to remove the Live CD and restart the server. You can then log into the administrator account of your Windows 2003 server. It’s simple as that! The Live CD could also be used to reset lost administrator password on Windows 2012/2008/2000 server.

How to Reset Lost Windows 8 Password for ThinkPad Laptop with UEFI BIOS

March 11th, 2013 by Admin

Hi! I have a Lenovo Thinkpad laptop with Windows 8 pre-installed, I forgot my password for the administrator account because I haven’t used it in so long, now I can’t log in. How can I reset or bypass the password?

Nowadays most ThinkPad laptops are shipped with Windows 8 pre-installed, and the traditional PC BIOS is replaced by UEFI. It can become a big issue if you forgot or lost Windows 8 password on a ThinkPad Laptop. There are many password cracking tricks and tools out there that can be used to unlock Windows password, but they don’t work any longer when you use it on ThinkPad laptop with UEFI BIOS. So here I’ll explain the steps of resetting lost Windows 8 password for ThinkPad laptop with UEFI BIOS.

How to Reset Lost Windows 8 Password for ThinkPad Laptop with UEFI BIOS?

Password Recovery Bundle can reset lost Windows 8 password with the help of bootable media such as CD/DVD or USB Flash Drive, which can be easily created using the app itself. To get started, you’ll need another PC for downloading and installing the app in order to create the bootable disk.

Once downloaded and installed, click the “Windows Password” button to open the bootdisk creating window. Choose your target device (CD/DVD or USB flash drive) and click on “Start Burn” button to start creating the Windows password reset bootdisk for you. Once done, click the OK button and unplug the USB device or remove the CD/DVD.

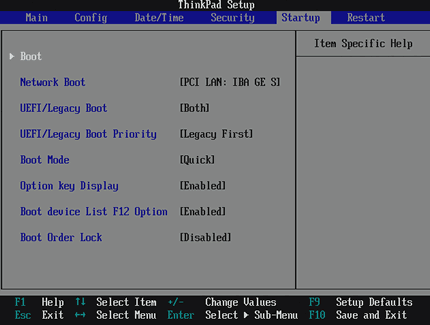
Now insert the bootable CD/CD or USB drive into your locked ThinkPad laptop. Power on the machine and enter into BIOS. Navigate to the Startup tab. Change the UEFI/Legacy Boot option from UEFI to Both, and set the UEFI/Legacy Boot Priority option to Legacy First. Press F10 to save your changes.

When the computer restarts, quickly press F12 key repeatedly until you see the Boot Menu. Choose the CD or USB drive you’ve created from the Boot Menu. Sit back and let the system load some required files that are necessary to complete the password reset operation.

Once you are presented with the Reset Windows Password window, choose your Windows SAM registry file from the drop-down menu. This comes useful in case you’re running a dual boot machine. Once selected, the program will display a list of user accounts for your Windows installation.

Choose the user account that needs a password rest, and click on “Reset Password” button. It will blank your Windows 8 password instantly. It’s simple as that! Now click Restart button and reboot your machine.

Congratulations! You’ve successfully unlocked a Windows 8 Thinkpad laptop with UEFI BIOS.

How to Hack Windows 8 Password without Data Loss

March 8th, 2013 by Admin

Forgot Windows 8 administrator password? How to regain access to your locked computer? At that time the only solution that comes into our mind is to reformat the hard drive, and reinstall windows. This is not the answer you will get here, I work in a software company and resetting Windows passwords is a task we do everyday, so today I will share with you how to hack Windows 8 password without data loss – the easy way. let’s proceed.

How to Hack Windows 8 Password without Data Loss?

Reset Windows Password utility is one of the more effective password hack tools that runs on a Live CD, and it can be used to hack almost any Windows password, including Windows 8 local/Microsoft account password.

  1. To get started, purchase the Reset Windows Password utility and download it onto your current computer. Unzip the download file and you’ll get the ResetWindowsPwd.iso file which contains the password hacking tool.
  2. Next, you need to turn that ISO file into a CD. All you need to do is get a CD/DVD burning program such as BurnCDCC or ImgBurn, which allows you to burn an ISO image to CD or DVD easily! If your computer doesn’t come with a CD/DVD burner, you can use the ISO2Disc program to burn a Windows password reset USB from that ISO image.
  3. Take the CD you just created to the computer you want to hack. Insert the CD into the CD drive and turn on the computer. Normally, the BIOS screen tells you the keyboard key you need to press to change the boot order, watch for that message! On most computers the BIOS key is Del, F9 or F12 but yours might be different, so watch out for that on the boot-up menu.
  4. Once you boot from the CD, it will load the miniature operating system and open the Reset Windows Password utility. This program automatically detect all Windows installations on your computer, and shows a list of user accounts existing in your Windows SAM registry hive.
  5. Choose the user account which you want to hack and click on “Reset Password” button. It will blank your Windows 8 password immediately just as there is no password set on that user account. Remove the CD from the CD drive and restart the computer, you can then log into that user account with an empty password. Done!

So, in this way you can hack the password of any Windows 8 account at times when you forget it so that you don’t need to re-install your OS for any reason. I hope this helps.

Must-have Windows 7/Vista/XP Password Recovery Boot Disk

March 7th, 2013 by Admin

It’s true that all versions of Windows enable you to create a password reset disc, but what do you do if you find yourself locked out without that disc? Or, you can log in as a limited user but can’t make changes – because nobody remembers the administrator password. How can you get out of these situations without formatting and re-installing the operating system?

No matter if you are a absolute beginner or a technician, every Windows users need a Windows 7/Vista/XP password recovery boot disk in their toolkit. There are several tools out there that can help you recover the forgotten password, and the best option is Password Recovery Bundle which has saved my bacon more than once.

Password Recovery Bundle is a must-have toolkit which can recover over 60 types of passwords. One of the most important features is that the software enables you to create a Windows7/Vista/XP password recovery boot disk which could be used to reset/unlock lost or forgotten Windows password easily.

Here, we’ll show you how to create a Windows password recovery boot disk and then use it to reset lost or forgotten Windows 7/Vista/XP password on your own.

Part 1: Create a Windows Password Recovery Boot Disk

Install Password Recovery Bundle on your computer. After installing, start the program and click on “Windows Password” button. You’ll see the bootdisk creating dialog which allows you to burn a Windows password recovery bootdisk on a CD/DVD or USB flash drive. Remove the CD or USB drive from your current computer and you can then use it to reset forgotten Windows admin/user password on all versions of Windows 7/Vista/XP system.

Part 2: Use the Boot Disk to Reset Forgotten Windows 7/Vista/XP Password

Boot your locked PC from the Windows password recovery boot disk you’ve created. The computer will load the Windows PE operating system inside the bootdisk. If it still boots from your hard drive, you need to change the boot order in BIOS to set your computer to boot from CD or USB drive.

When you get to the Reset Windows Password screen, you’ll see a list of user accounts found in your Windows SAM registry hive. Now click on any existing account and then click “Reset Password” button, it will unlock/blank your user account password immediately.

Remove the Windows password recovery bootdisk and restart the computer. When you reach the Windows login screen, just left the password field as blank and you can log into the system successfully.

Once you’re able to log back into your Windows installation, remember to change the password to something complex that you can still recall easily. Done!

How to Create a Recovery Drive in Windows 8

March 1st, 2013 by Admin

A Recovery Drive is the same as a system repair disc, but instead of being on a CD/DVD it is on a bootable USB drive. Once you boot up a Windows 8 computer with a Recovery Drive you will have access to the Advanced Startup Options, a menu full of advanced repair and troubleshooting tools for Windows 8 like Command Prompt, System Restore, Refresh Your PC, Reset Your PC, Automatic Repair, and more.

Today we are going to discuss and preparing guidelines for you to make a Recovery Drive in Windows 8. This recovery disc contains all troubleshooting tools and options built-in in it, which could be a life saver in case something bad happens to your PC.

How to Create a Recovery Drive in Windows 8?

  1. Open the Control Panel and choose the Large Icons Option from the View by category.

  2. Click on the Recovery item to launch the Create a recovery drive application.

  3. Before clicking on the Next button, you should insert the USB flash drive into the computer. Please note that your USB drive should have at least 256 MB of space in order to create the recovery drive.
  4. Clicking on the Next button, the program will automatically searches for USB drives available to be used as a Recovery Drive. Choose the drive letter that corresponds to the flash drive you want to use as a Windows 8 Recovery Drive.

  5. On the next screen you will get a warning that everything will be deleted on the USB drive. To continue, click the Create button.

  6. The wizard will inform you of the successful creation of the recovery drive once it is done.

Note: It is also important to create the recovery USB drive on the machine with the same bit-type as the one you need to repair. If you create the drive on a 32-bit machine you will only be able to repair 32-bit versions of Windows 8. The same goes for 64-bit versions of the recovery drive.

To be able to boot from the Recovery Drive, you need to first change the boot priority to boot from USB drive in BIOS. For UEFI-based computer, you also need to switch the boot mode from UEFI to Legacy and disable the Secure Boot option by following this guide: How to Set PC to Boot with Legacy BIOS Mode Instead of UEFI Mode.

How to Change or Reset DSRM Administrator Password

February 28th, 2013 by Admin

DSRM (Directory Services Restore Mode) is a boot mode on a domain controller for repairing and restoring Active Directory data. To boot your computer into DSRM mode, you need to know the DSRM administrator password, which is set during the process of promoting member server to a domain controller. There’s a chance you could forget your DSRM administrator password because it’s so rarely used. In this tutorial we’re going to explain how to change or reset the DSRM administrator password on Windows Server 2012/2008/2003 and 2000.

Change or Reset the DSRM Administrator Password

If you can log on domain controller using the domain administrator account, you can use the NT Directory Services utility (Ntdsutil.exe) to change the DSRM administrator password. To do so, follow these steps:

  1. Log on to the domain controller using an account with administrative rights.
  2. Go to Start | Run, type cmd, and press [Enter].
  3. At the command prompt, type cd %SystemRoot%\System32,and press [Enter].
  4. Type ntdsutil, and press [Enter].
  5. Type set dsrm password, and press [Enter].
  6. At the DSRM command prompt, you can reset the password for either the server on which you’re working or for another server. For the former, type reset password on server null, and enter the new password when prompted. (No characters will appear when you type the password.)
    To reset the password for another server, type reset password on server <servername> (where <servername> is the DNS name for the server in question), and enter the new password when prompted. (No characters will appear when you type the password.)
  7. At the DSRM command prompt, type q to exit.
  8. At the Ntdsutil command prompt, type q to exit the utility and return to the command prompt.

Couldn’t Login to Domain Controller?

If you can’t log into domain controller, the trick mentioned above doesn’t work any more! Fortunately there is a professional Windows password cracking utility – Reset Windows Password, which allows you to reset DSRM password easily. Just follow these steps:

  1. You need an alternative computer with internet access to download the Reset Windows Password utility.
  2. Unzip the download file, you’ll get the ResetWindowsPwd.iso file.
  3. Burn the ISO image file to a CD or USB thumb drive using the ISO2Disc tool.
  4. Insert your newly burned CD/USB drive into the domain controller and turn on the computer. Get into the BIOS and change the boot order to set the computer to boot from CD/USB.
  5. Once you’ve gotten it to boot from the CD/USB, the computer will load the system inside the CD/USB drive and launch the Reset Windows Password utility.

    Reset Windows Password

  6. Click on the Reset Local Admin/User Password option, you’ll see the Windows SAM database and local user accounts.
  7. Choose the local administrator account and click on the Reset Password button.
  8. It will remove your forgotten DSRM administrator password immediately.

The DSRM administrator password is a tremendously powerful password, and you should change it at regular intervals, along with all of your other administrative account passwords.