Archive for the ‘Tips & Tricks’ category

Add “Take Ownership” to Right-Click Context Menu in Windows

February 1st, 2013 by Admin

Guess what is the most annoying part of Windows 7 or Vista? Every time you try to access a system file/folder you get “Permission Denied” error. Windows 8/7/Vista doesn’t allow any user even the Administrator to modify (rename, delete, move) those system files. In order to gain full permissions to system files and folders, you need to take ownership & grant full control permissions to files & folder.

Taking ownership generally requires you to dive in and out of GUI menus, or break out the command prompt. It’s far more complicated than it needs to be, and thankfully, there is a free utility, called Ownership Changer, that makes this process easier.

Updated: We just released the first version of TakeOwnershipPro, a freeware to take ownership and grant yourself full permission to access any files or folders in Windows.

How to Add “Take Ownership” to Right-Click Context Menu in Windows?

Download and unzip the files contained in the TakeOwnership.zip file. Double-click the InstallTakeOwnership.reg file to install Take Ownership option in context menu.

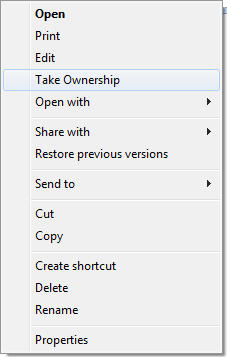
Here’s what the new right-click menu will look like after installing Take Ownership option:

If the Take Ownership option doesn’t work for you, or simply doesn’t suit your needs, double-click the RemoveTakeOwnership.reg file to remove it from context menu.

How to Take Ownership & Grant Full Control Permissions to Files & Folder in Windows 8/7/Vista

February 1st, 2013 by Admin

Starting with Windows Vista, Microsoft implemented additional security for system files that assigns TrustedInstaller as the only owner with full control permissions. All other administrators or user accounts including SYSTEM have been granted only read, execute or traverse permissions. Such a design is useful in the presence of inexperienced users, who might otherwise accidentally delete or modify important system files. However, for the tech savvy, it can be an aggravating obstacle.

Hence in case if you need to access, modify or delete system files or folder you need to take ownership first then assign rights or permission to respective users. Here is the step-by-step guide to help you take ownership and grant full control permissions to files & folder in Windows 8/7/Vista.

Updated: We just released the first version of TakeOwnershipPro, a freeware to take ownership and grant yourself full permission to access any files or folders in Windows.

How to Take Ownership & Grant Full Control Permissions to Files & Folder in Windows 8/7/Vista?

  1. In Windows Explorer, navigate and locate the file or folder which you want to take ownership and has full read/write/execute control access permission on.
  2. Right-click on the file or folder and select Properties from the context menu.
  3. On the File/Folder Properties dialog, go to Security tab and then click on Advanced button.

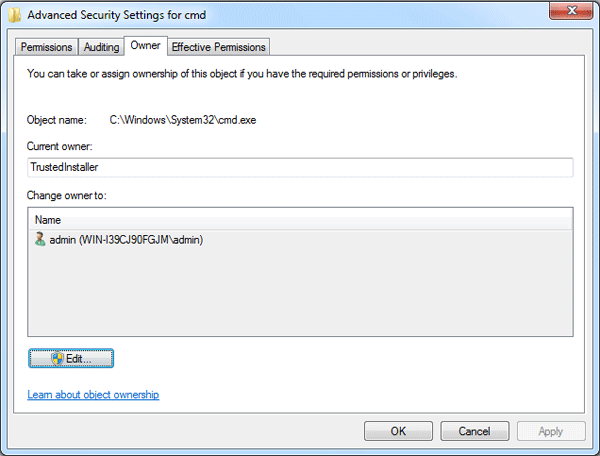
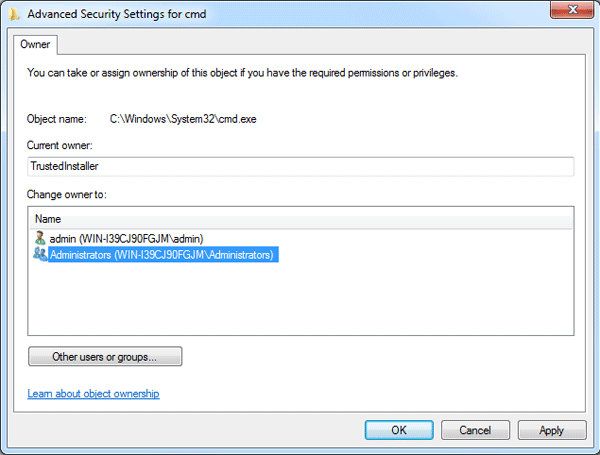
  4. In the Advanced Security Settings dialog, click on Owner tab, which will indicate the current owner as TrustedInstaller or some other user account.

  5. Click on the Edit button and select user from given Change Owner to list. If user or group is not in given list then click on Other users or groups. Enter name of user/group and Click OK.

  6. Click OK to exit from all Properties dialog boxes.
  7. Right-click on the file or folder and select Properties from the context menu to bring up the File/Folder Properties dialog again.
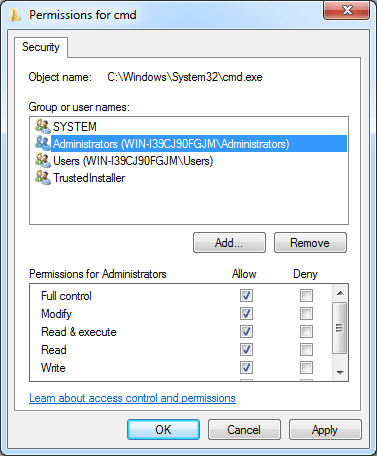
  8. Under Security tab, click on Edit button to change permissions.
  9. Highlight the user who wants the permissions on the object be changed in the Group or user names box.

  10. click on Full Control check box under the Permissions box to assign full read-write access control permissions to the user or group.
  11. Click OK to save your changes. The file or folder now belongs to you with full control permissions.

Lost Windows 7 Administrator Password?

January 30th, 2013 by Admin

I’ve lost my Windows 7 Administrator Password, causing me to be unable to install programs or do other system tasks. I’ve search various forums and found some answers, but none seem to work. I’d like to be able to remove the password without doing anything extreme to Windows.

Lost Windows 7 administrator password? Sure, there are a few workarounds to access your account using a Linux Live CD but they are time consuming and boring as you need to go through a long procedure. In this tutorial we’ll show you how to remove lost Windows 7 administrator password in just 3 steps.

How to Remove Lost Windows 7 Administrator Password?

1. Download the CD-ISO ZIP file of Reset Windows Password utility and extract it to get the ISO file. Burn the ISO file to a CD/DVD using a CD/DVD recording software such as ISO2Disc.

2. Before inserting the CD/DVD to your locked Windows 7 computer, make sure that you have made necessary changes to boot priority setting in the BIOS so that you can boot from CD/DVD. Insert the CD/DVD into the optical drive and restart your machine. In a few seconds you will see the Reset Windows Password program.

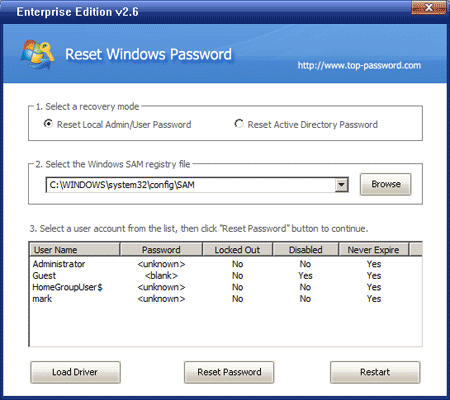
3. You should see the user accounts existing in your Windows SAM registry hive. Choose the administrator account and then click on Reset Password button, the program will remove your lost administrator password instantly.

Remove the CD/DVD and restart the computer. When the Windows 7 logon screen appears, click on the administrator account and left the password field as blank, you’ll then log into Windows 7 and regain access to all your important files on your computer. No need to worry about data loss when you forgot or lost Windows 7 administrator password! Simply follow this guide and you can remove the forgotten password in just a few minutes.

Windows Live Mail Password Recovery

January 27th, 2013 by Admin

I forgot my password used in a private mail in Windows Live Mail, Windows 7 default mail reader. I need to know what the password is, but I have no idea how to reveal the actual password hidden behind the asterisk characters in Windows Live Mail software. Can you please suggest any programs I can use to reveal what is behind the *********** ?

Sometimes you may forget the password of a mail account. However, if you had let your email client to remember the password for your account, you might just be able to log in. In such a scenario you may be lucky enough to retrieve your password from your email client. In this tutorial we’ll show you an easy way to recover email account passwords stored in Windows Live Mail or Windows Mail.

How to Recover Passwords from Windows Live Mail and Windows Mail?

  1. Download and install Password Recovery Bundle on your computer.
  2. Start Password Recovery Bundle program.
  3. Click on Start Recovery button, navigate to the Email Password from the drop-down menu. It will show you all supported email clients.
  4. Select Windows Live Mail or Windows Mail from the list.
  5. It will retrieve the passwords and login details of your email accounts saved in Windows Live Mail or Windows Mail.

So, have you forgotten your Windows Live Mail password and want it back? This is probably the easiest way to retrieve your password back! It could be a life saver when your email client crashed or you forgot your email account password.

How to Hack Windows 7/Vista/XP Password Using BackTrack

January 24th, 2013 by Admin

Lost your Windows 7/Vista/XP password and cannot log in to your machine? If you have a rescue disk, you should be okay. If not, you might have to turn to BackTrack Linux for help.

Microsoft stores the password hashes of Windows user accounts in the registry hive c:\windows\system32\config\sam. This file is highly protected and not accessible while Windows is running even for the administrator user. To circumvent the protection and access the SAM file, we need to boot from a Live CD such as BackTrack so we can hack Windows password in the SAM registry file.

The method that I describe in this tutorial can works with any computer running Windows 7/Vista/XP system. To get started, you need to download a live edition of BackTrack Linux distribution and burn that ISO image to a CD (you could also burn BackTrack on a USB drive). Either way, you will need to boot in to Linux to hack your forgotten Windows 7/Vista/XP password.

How to Hack Windows 7/Vista/XP Password Using BackTrack?

  1. First of all boot your target computer using BackTrack Live CD or USB drive.
  2. Once Backtrack is booted, log in to the root user account using the default password: toor. Type in startx to start the GUI.
  3. Now go for Application > Privilege Escalation > Password Attacks > Offline Attack > chntpw.
  4. Identify and mount your Windows partition in read/write mode using below commands:
    umount /mnt/hda1
    modprobe fuse
    ntfsmount /dev/hda1 /mnt/hda1

    If your hard disk is SATA type then you need to use /sda1 instead of /hda1 in the above steps.
  5. To list out all the users in the Windows SAM registry hive:
    ./chntpw -l /mnt/hda1/windows/system32/config/SAM
  6. To reset the password for any specific user:
    ./chntpw -u username /mnt/hda1/windows/system32/config/SAM

BackTrack is widely used by most tech-savvy Linux users to hack Windows login password. But if you don’t have much experience with Linux, it’s better to use another software to hack Windows 7/Vista/XP password – Reset Windows Password, which is a Live disk based on Windows PE operating system and makes it much easier for average computer users to hack Windows password on their own.

How to Unlock A Laptop If You Forgot Your Password

January 23rd, 2013 by Admin

I just got a new laptop with Windows 7 on it and its really great. But, I went on a 2 month trip and forgot my password and I didn’t write it down either. Now I can’t even get pass the login screen to get into Windows! Please, can someone help me? I’d really appreciate it because I’ve tried everything I can think of.

Forgot the login password on your laptop? Your stupid annoying cousin has changed your password? Or something should have gotten mistyped while you was resetting your password and now you can’t log on your laptop? The most common method of unlocking a laptop is to boot up in Safe Mode by pressing F8 when the BIOS screen appears and log onto the built-in administrator account. Hopefully this account doesn’t have a password and it’s not disabled, but most of the time it does not.

In this tutorial we’ll show you how to unlock a laptop if you forgot your Windows 8/7/Vista/XP password. No matter what situation you are in, you can always unlock/reset the forgotten password on your laptop by following the instructions below.

How to Unlock A Laptop If You Forgot Your Password?

  1. First, you will need to download the Reset Windows Password utility on another PC that you can access. This can be your work PC, or a friend or family member’s PC.
  2. Unzip the download file and you’ll get the ResetWindowsPwd.iso file. Just burn this bootable ISO image to a CD or USB flash drive using ISO2Disc software.
  3. Next, insert the CD or USB flash drive into your locked laptop and boot the laptop from it. If you don’t know how to set your laptop to boot from CD or USB drive, please refer to this guide: How to Boot A Computer from CD or USB Drive.
  4. The computer will load the mini operating system inside the CD or USB flash drive and open up the Reset Windows Password window as follow.Reset Windows Password
  5. Choose your desired Windows SAM registry hive from the drop-down list.
  6. Choose a user account and then click on Reset Password button. The program will remove your forgotten password and unlock/enable this user account instantly.
  7. Restart the computer and remove the CD or USB flash drive, you should then be able to log on your laptop without being asked to type a password.

It’s essential to have a copy of Reset Windows Password utility before something inevitably happens to your laptop. Especially when you forgot your password and need to use your laptop urgently, you can use it to unlock your laptop quickly and easily.

How to Retrieve Firefox Passwords from Crashed Computer

January 18th, 2013 by Admin

My old computer crashed and it had all my old passwords on it! I was wondering if it were possible to somehow retrieve them. I can access data from the computer, but I can’t open the Firefox application due to the virus. I was running it on Vista with the newest version of Firefox as of April 2011. I’d really appreciate the help – I cant remember all of my passwords.

In case you ever find yourself in a situation where your computer crashes or you can’t start Windows anymore, you can retrieve Firefox passwords easily from your hard drive. Just add the hard drive to your current computer as a slave drive, Firefox Password Recovery program allows you to decrypt and recover the passwords saved in Firefox password file in just a few mouse clicks. Let’s proceed.

How to Retrieve Firefox Passwords from Crashed Computer?

  1. Connect your crashed hard drive to a working computer as a slave drive
  2. Download Firefox Password Recovery software and install it on your computer.
  3. Launch Firefox Password Recovery program and click on Recover From File button.

  4. On the next window, choose your Firefox installation directory and profile path.

  5. Click OK. It will retrieve the Firefox passwords quickly from the external hard drive.

Firefox Password Recovery also allows you to retrieve Firefox passwords for your current working computer. It’s helpful for you to export/backup Firefox passwords before re-installing Windows or formatting your hard drive.

How to Fix the Problem “Windows Won’t Accept My Password”

January 18th, 2013 by Admin

I have been using Windows 7 Ultimate for some time using the same password. I have not, repeat not, forgotten my password, but now it won’t accept it. Why has this happened, and more importantly, how do I get back in? I haven’t got a pre-made disk which will allow me to reset the password.

Windows won’t accept your password even if you’ve typed in a correct password? If your account are not locked out or disabled, it’s likely that you have turned on the NumLock feature that many laptops have. After enabling the NumLock feature, you’ll find a strange problem and you can’t type normal anymore. For example, when you type in “hey, how’s it going”, your computer would type “123456… etc.”. If you later try to type something else it will continue in sequence from before, eg: “7890123… etc”

The NumLock feature is used to convert part of the main keyboard to act as a (slightly skewed) numeric keypad rather than letters. NumLock is rarely used for its original purpose, and ends up confusing the user if it has for some reason been activated without the user being aware of this. This can be more of an issue on most laptop computers, since activating the NumLock function typically requires use of the Fn key and if a user accidentally switches it on they may have no idea how to switch it off.

How to Turn Off NumLock Feature?

Find the NumLock key and press it to reverse things and set it back to normal. On my Dell it’s Fn + F4, on my Compaq it’s Fn + ScrLk. It’s different on every make and model. Based on your keyboard you can get original settings of your keyboard in following ways.

  • Fn + F11
  • Shift + Num Lock
  • Fn + Num Lock
  • Fn + F11 + Scroll lock
  • Fn + F8 (on HP laptop)
  • Ctrl + F11
  • Fn + Shift + Num Lock

Some keyboards have and don’t have the Num Lock key. If there is then just press the Num Lock or NmLk key. Sometimes you have to hold the Fn button with the Num Lock key. If there is no Num Lock key on your keyboard then just follow these steps: START -> ALL PROGRAMS -> ACCESSORIES -> ACCESSIBILITY -> ON-SCREEN KEYBOARD -> NLK.

Find the correct key combination on your laptop and your problem should be solved. If you still can’t log in to Windows, you can use the Reset Windows Password utility to remove your administrator/user password so you can then log on your computer without typing a password. After getting into Windows, you can turn off NumLock feature easier.