Archive for the ‘Tips & Tricks’ category

How to Break Outlook .PST Password

September 28th, 2012 by Admin

I am facing very critical problem. I forgot my Outlook .pst password. My important emails are in the it. How can I break this password? Please guide me! It’s very urgent for me. Thanks in advance.

Most people know that Outlook stores your Outlook data (e-mail messages, calendars, contacts, tasks, and notes, and more) in a PST file. To prevent any unauthorized access to your personal and confidential information in Outlook, you can protect your PST file with a password. But things goes wrong when you set strong password for your PST file but forgot the password later, how to break Outlook .PST file password?

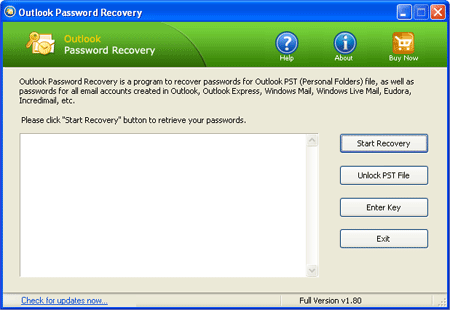
Luckily there is a powerful Outlook password breaker software that can help you break PST password easily – Outlook Password Recovery, which allows you to break Outlook PST password in Microsoft Outlook 2010, 2007, 2003, XP, 2000, 97.  Just locate your PST file and you can recover your forgotten password in just a single mouse click!

How to Break Outlook .PST Password?

  1. Download and install Outlook Password Recovery program on your computer.
  2. Launch the program and then click on the Unlock PST File button.

  3.  On the pop-up dialog, locate your Outlook PST file and then click on the Open button. If you don’t know where the PST file is located, please refer to this article: Introduction to Outlook Personal Folders File (.pst)
  4. Your Outlook PST password will be recovered immediately.

Outlook Password Recovery program is capable to break password of any length and complexity and also recover multilingual password. It supports all versions of MS Outlook. So, if you lost or forgotten your PST file password, download this Outlook password breaker tool to recover lost password in fraction of seconds.

Introduction to Outlook Personal Folders File (.pst)

September 27th, 2012 by Admin

Outlook Personal Folders file (.pst) provides a centralized storage of email folders, email messages, attachments, contacts, calendar items, and so on.  For security purpose you can set a password to protect the Outlook Personal Folders file (.pst). Every time you open Microsoft Outlook application, you’ll be required to enter the password before accessing any data in Outlook. This is very useful to prevent unauthorized users from reading your emails when you are absent.

Part 1: Where is the Outlook Personal Folders File (.pst)?

The fastest way to open the folder where your Outlook Personal Folders file (.pst) is saved is to do the following:

  1. In Outlook 2010, click the File tab.
  2. Click Account Settings, and then click Account Settings.
  3. On the Data Files tab, click an entry, and then click Open Folder Location.

Outlook Personal Folders file (.pst) created by using Outlook 2010 are saved on your computer in the Documents\Outlook Files folder. If you are running Windows XP, these files are created in the My Documents\Outlook Files folder.

If you upgraded to Outlook 2010 on a computer that already had data files that were created in earlier versions of Outlook, these files are saved in a different location in a hidden folder.

Windows 7 and Windows Vista     <drive>:\Users\<user>\AppData\Local\Microsoft\Outlook

Windows XP     <drive>:\Documents and Settings\<user>\Local Settings\Application Data\Microsoft\Outlook

 Note: To use Windows Explorer to navigate to the folder where your Outlook Personal Folders file (.pst) is saved, you must first turn on the display of hidden folders. In Windows Explorer, on the Tools menu, click Folder Options. On the View tab, under Advanced Settings, under Files and Folders, under Hidden files and folders, click Show hidden files and folders. If you want to see all file name extensions, clear the Hide extensions for known file types check box under Files and Folders. Hidden folders appear dimmed to indicate they are not typical folders.

Part 2:  Forgot Your Outlook Personal Folders File (.pst) Password?

Forgot your Outlook Personal Folders file (.pst) password? You may lost access to the entire email data in Outlook, including the incoming and outgoing messages, calendar info, contacts and contact groups, tasks and to-dos, journals and much more. Don’t worry! With Outlook Password Recovery program you can recover Outlook Personal Folders file (.pst) password instantly.

Here are steps to recover Outlook Personal Folders file (.pst) password:

  1. Download and install Outlook Password Recovery program on your computer.
  2. Launch Outlook Password Recovery and then click on the Unlock PST File button.
  3. Browse to your Outlook Personal Folders file (.pst), and click Open.
  4. The program will recover and display Outlook Personal Folders file (.pst) in seconds.

How to Fix ‘Access Denied’ Error When Delete A File

September 27th, 2012 by Admin

Have you ever tried to delete a file and you receive the “Access Denied” error message? This error is quite common and you’re not alone. The problem can occur due to many different reasons, maybe the file is being used by some other programs, you do not have administrator privileges, or maybe you are trying to delete a file on a write-protected disk.

You know how frustrating such error message can be. Fortunately, there is a small freeware that can help to fix the access denied error so you can delete your files without any hassle – Unlocker. This software lets you see which process is holding the lock on the file/folder and then helps you unlock it. After Installing this software you can simply right click the file/folder that is giving “Access is Denied” or “File May Be In Use” errors and then click on Unlocker.

A new window will now pop-up showing the processes as shown below. Now you can either unlock all of the processes or kill the process.

On the left of the ‘Kill Process’ button there is a drop-down menu where you can select Copy, Move, Rename, or Delete functions for a locked file.

This program is useful for the following types of errors:

  • Cannot delete file: Access is denied
  • There has been a sharing violation.
  • The source or destination file may be in use.
  • The file is in use by another program or user.
  • Make sure the disk is not full or write-protected and that the file is not currently in use.

Download Unlocker Now!

How to Hack Windows 7 Password The Easy Way

September 26th, 2012 by Admin

The easiest and most straightforward way to hack Windows 7 password is to use a password reset disk. The problem with this option is that you have to create the reset disk before the password is lost. Thus if you don’t have a password reset disk, this option is not for you. With the third-party software – Reset Windows Password, you are allowed to create a Live CD which can be used to boot your locked computer and hack Windows 7 password in no time.

Before we begin, you need to prepare an empty CD and make a password hacking Live CD on another computer you have full access to. Later set your locked computer to boot from the Live CD and hack the forgotten/unknown password. Here are the step-by-step instructions.

How to Hack Windows 7 Password The Easy Way?

  1. Click here to download the Reset Windows Password software. Once the download is complete, unzip the download file and you’ll find the CD ISO image: ResetWindowsPwd.iso.
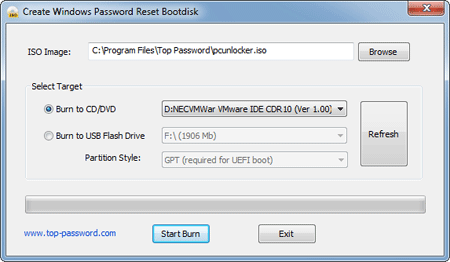
  2. Burn the ISO image to an empty CD using any CD/DVD recording software such as BurnCDCC or ISO2Disc.
  3. Place the Live CD you’ve created in the CD drive of your computer with a password you want to hack. Head into the computer BIOS and set your computer to boot from CD.
  4. The boot procedure may take one or two minutes, and the Reset Windows Password program will start.

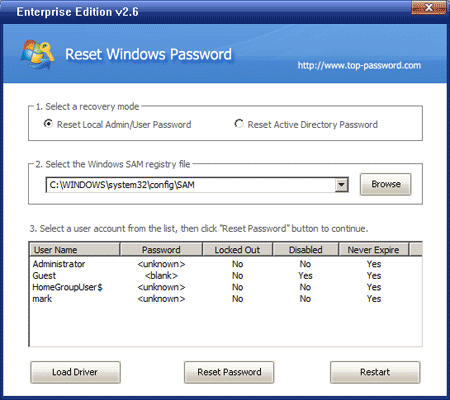
  5. From the main window of Reset Windows Password program, you could see the Windows SAM registry file and user accounts inside the SAM file.
  6. Choose the user account whose password you want to hack, and then click on the Reset Password button. It will blank your forgotten/unknown password instantly.

Remove the Live CD and restart the computer. You can then log in to the computer without being asked to enter Windows login password, as you’ve successfully hacked Windows 7 password and replaced the forgotten password with an empty password.

How to Disable Hibernation in Windows 10, 8, 7, Vista and XP

September 26th, 2012 by Admin

Hibernation is a great way to cut down on the computer’s power consumption when it’s not in use. It also helps save battery on the laptops. When the computer is in hibernate it lets you save all the data in RAM to hard drive persistently and switch off the computer. Then you can switch on the computer with exact same settings and opened applications.

When you enable hibernation, it creates a file: hiberfil.sys, located on your root system partition which saved the state of all open documents and files. The file size of hiberfil.sys is about the size of your physical memory. So it would consume lots of hard disk space.

If you never plan to put your computer into hibernation then it’s probably a good idea to disable hibernation and gain all the disk space back. Here we’ll show you how to disable hibernation using Command Prompt in Windows 10, 8, 7, Vista and XP.

How to Disable Hibernation in Windows 10, 8, 7, Vista and XP?

  1. Go to Start Menu -> All Programs -> Accessories -> Command Prompt, right-click on it and select Run as Administrator. In Windows 8/10, press Windows + X to open WinX menu, then select Command Prompt (Admin).
  2. Type the command: powercfg –h OFF

  3. Press Enter key, this will disable the hibernate feature.
  4. Now restart the computer, you won’t be able to see hibernate.sys file in your system drive. If you can still see it, simply delete it.
  5. Now you have successfully disabled hibernate and free the hard disk space.

If you want to enable hibernation again, you can use the same method above to open an elevated Command Prompt with administrator rights, then type the command: powercfg –h ON to enable the hibernation.

How to Crack Windows Vista Password with USB Drive

September 25th, 2012 by Admin

My son cannot remember his Windows Vista login password on his laptop and we do not have a reset disk. Short of taking it to a repair center, is there any way he can crack the password himself?

Forgot Windows Vista password? It’s truly that computer users have a tendency to forget the administrator password. If you can’t recall the original password, you’ll be stuck at the login screen. In this article I’ll show you how to crack Windows Vista password with a USB drive. In the event that you forget your password, you can easily use the USB drive to crack the password and log onto your computer.

How to Crack Windows Vista Password with USB Drive?

To get started, we need to find a Windows Vista password cracker utility. Here I’m going to use Reset Windows Password tool, which comes as a Live CD ISO image that can also be burned onto  a USB drive. Boot your locked computer from the USB drive and you can crack Windows Vista password easily. Here is the step-by-step instructions:

  1. Download the Reset Windows Password utility onto an accessible computer. Unzip the download file, you’ll find an ISO image file: ResetWindowsPwd.iso.
  2. Burn the ISO image to your USB drive using ISO2Disc tool. If you have important data on your USB drive, I recommend you make a backup firstly. The burning procedure will format the USB drive and erase all data on it.
  3. Plug your USB drive in to your Windows Vista computer whose password you want to crack.
  4. Go into the computer BIOS and set USB device as the first boot device.
  5. Turn on your computer and it will then boot from your USB drive.  After a while, it will launch the Reset Windows Password utility.
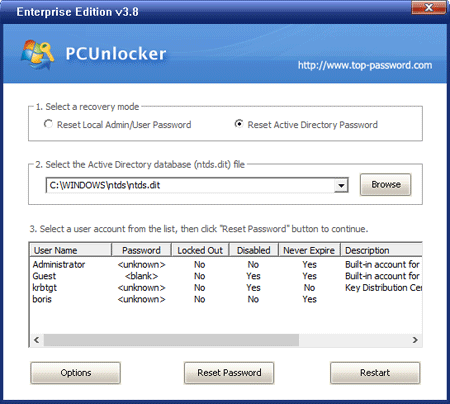
  6. On the screen, choose your desired user account and then click on the Reset Password button. It will blank your forgotten password immediately.
  7. Unplug the USB drive from the computer and restart it. You can then log on to Windows Vista system with a blank password.

That’s all! If you want to set a new password for your computer to prevent unauthorized accessing, ensure that the password you are going to set is convenient for you to remember and will not be lost again.

Lost Windows 7 Password?

September 24th, 2012 by Admin

Did you lose Windows 7 password? Have you forgotten your Windows 7 password? Follow the guide in resetting Windows 7 password to gain access again to Windows 7.

When installing Windows 7 the first time, the setup will prompt us to create a user account and password. The password ensures that only you have access to your user account or user profile. If Windows 7 is installed already, when you first turn on your new computer, you will still be prompted to setup a Windows login credential. It’s a rule of thumb of remember the password and keep it private by not sharing it to anyone. However, there are end-users who forget their Windows 7 password, so we’ll discuss on this article on what to do if you lose your Windows 7 password.

Using Password Hint and Password Reset

If you forget Windows 7 password and received an error message that the entered user name or password is incorrect, Windows will display the password hint. Try remembering the password using the hint that you’ve created. If you really cannot remember your password, and you have created a password reset disk, click “Reset Password” on the login screen and follow the instructions when Forgotten Password Wizard is displayed.

There’s no Password Reset Disk?

Not everyone created Windows 7 password reset disk which means your account is locked and you have no access unless you have another administrator account. Try to login using another administrator account in Windows 7 (it can be another admin user account that you’ve created before or the default but hidden administrator account that you’ve enabled), select Start button, type lusrmgr.msc in the Search box and press Enter key. The Local User and Groups console will be displayed. Select “Users” in the left pane. Right-click the account that you need to reset the password for, and click Set Password. Type and confirm the password.

Note that resetting the password in Windows 7 using another administrator account has impact: You will lose access to encrypted e-mail messages, stored password for websites and encrypted files on that account that you reset the password for. If your emails and files are not encrypted, you are not affected.

What if there’s no other administrator account in Windows 7 to reset a password?

The worst scenario is you did not enable the default but hidden admin account in Windows 7 or you don’t have another account with administrator permission. Don’t worry, because you can try another method to reset when you lose your Windows 7 password by using a third-party password utility software: Password Recovery Bundle.

To prevent from losing your Windows 7 password again, take advantage of the password reset disk in Windows. The Forgotten Password Wizard will create a userkey.psw file in any removable drive of your choice so you can use to reset a forgotten Windows 7 password in any event. This will save you time and trouble in case you’ve forgotten your Windows 7 password.

How to Change Active Directory Password Policy in Windows Server 2008

September 24th, 2012 by Admin

When setting up a new Windows Server 2008 server with Active Directory you will discover that you are not allowed to edit the default domain policy. You can use complex passwords to meet the default password policy, but sometimes you may need to continue using simple passwords, edit or disable the strong password policy, what should you do next?

Here is the step-by-step guide to change Active Directory password policy in Windows Server 2008. You need to log on domain controller using administrative account so you have sufficient privileges to make the change.

How to Change Active Directory Password Policy in Windows Server 2008?

  1. Click Start, click Administrative Tools, and then click Group Policy Management.

  2. Under Group Policy Management window, go to Forest > Domains > {your domain} > Default Domain Policy, click on the Settings tab you can see the default password policy applied to your domain user accounts.

    Unfortunately, there is no option for you to edit or change the default domain policy. The only way to change your password policy is to create a new domain policy to overwrite the default domain policy.

  3. To create a new domain policy, please click on your domain name in the left panel, then select Create a GPO in this domain, and Link it here….

  4. Now right-click on the domain policy you’ve created and then click Edit.

  5. In the appearing window, go to Policies > Windows Settings > Security Settings > Account Policies > Password Policy.
  6. You can double-click on the Password must meet complexity requirements in the right pane to disable the setting, or double-click on Minimum password length to change the password requirement, and so on.
  7. After you complete the editing of your domain policy, right-click on your new domain policy and tick the Enforced and Link Enabled to make your changes to take effect.

How to Reset A User Password in Active Directory

September 24th, 2012 by Admin

Active Directory allows network administrators to centrally manage the user accounts, and other resources on a network. Users can use a single username and password to log in to any computer on the Active Directory domain. If you forget your password, you can reset it from the Active Directory Users management console. You must be an Active Directory administrator with the proper permissions to reset a user’s password. This guide provides a step-by-step set of instructions on how to reset a user password in Active Directory.

Note: If you have forgotten domain administrator password and can’t log in to the domain controller any more, you need to use the Reset Windows Password utility to reset your forgotten domain admin password.

How to Reset A User Password in Active Directory?

Before resetting Active Directory user password, you need to log on domain controller with administrator rights, then follow these steps:

  1. Click Start, click Control Panel, double-click Administrative Tools, and then double-click Active Directory Users and Computers.
  2. Navigate to the Users item of your Active Directory domain in the left pane.
  3. Right-click the domain user account you want to reset the password for in the right pane, and select Reset Password.

  4. Type a new password into the Password and Confirm Password boxes.
  5. Click OK. Done!