Archive for the ‘Tips & Tricks’ category

Forgot Admin Password for Windows 7 64-bit PC?

September 17th, 2012 by Admin

Forgot password to Windows 7 64-bit Dell Laptop, please help! I am a novice in the IT world, the password I picked is pretty good but I locked myself out of my laptop. I have tried everything with no luck.

Forgot the admin password for your Windows 7 64-bit PC? Your kid changed your admin password and now has no idea what he changed it to? Many people face this problem you are not alone. There are many tricks and tips on what to do when you forgot admin password. Unfortunately, most of them are based on Linux bootdisk and all procedures are too complicated for Windows users.

Luckily there is a boot-disk utility based on Windows PE that allows you to reset your forgotten admin password for Windows 7 64-bit computer, It has a simple graphical user interface that even the computer novice can get it to work! The software is Reset Windows Password. Let’s see how can you use it to reset forgotten admin password on Windows 7 64-bit desktop and laptop computers.

Forgot Admin Password for Windows 7 64-bit PC? How to Reset the Password Easily?

The password-resetting procedure can be divided into 3 steps. It should be the simplest solution for you to regain access to your Windows 8/7/Vista/XP/2008/2003 64-bit operating system.

Step 1: Create a Windows Password Reset Disk

The first thing you’ll need to do is create a bootable password reset disk. This may require you to grab a thumb drive and use a friend’s computer to do this. Follow the instructions to create a password reset disk:

  1. Download the Reset Windows Password package.
  2. Once you’ve downloaded the package, unzip the download file and you’ll get the CD/DVD ISO image file: ResetWindowsPwd.iso, which you can burn it onto a CD, DVD or USB thumb drive.
  3. Burn the ISO image to a USB thumb drive using the ISO2Disc tool.

Once the password reset disk is created successfully, you can then use it to boot your locked computer and perform password resetting.

Step 2: Boot from Password Reset Disk

Now you need to set your locked computer to boot from the password reset disk you’ve created. Booting from a USB thumb drive can be done fairly easily using BIOS settings. Every BIOS is a little different, though you should be able to access it using the instructions that appear on screen when you first power up your machine and find a boot order or option to select boot device. Holding DEL or F12 when rebooting can usually get you where you need to be. Some systems are different, however.

If you still can’t figure out how to make your computer boot from USB thumb drive, please refer to this article:

How to Set Your Computer to Boot from CD or USB Drive

Step 3: Reset Admin Password on Windows 7 64-bit PC

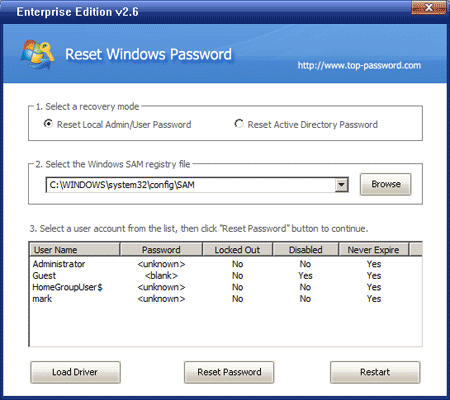
Once you’ve configured the locked computer correctly, plug in your USB thumb drive and turn on the computer. It will boot from the password reset disk. Once the boot procedure is complete, it will launch the Reset Windows Password program. This is the software you’ll need to reset your forgotten admin password on Windows 7 64-bit PC.

The software allows you to select the Windows SAM registry hive from the drop-down list. It will then display a list of Windows user accounts inside the SAM file. Choose your desired user account and then click on the Reset Password button. It will remove your forgotten or unknown password instantly.

The next step is to unplug the USB thumb drive and restart the computer. You can then log in to your Windows 7 64-bit system with a blank password. If you don’t have a USB thumb drive, you can also use a CD or DVD to follow the steps above to reset your forgotten admin password.  Enjoy!

Remove Stored Network Passwords in Windows 7, Vista and XP

September 17th, 2012 by Admin

Windows stores user names and passwords on your PC so when you try to log on to network shares, websites (Windows Integrated Authentication) or Remote Desktop Connections, you don’t have to reenter the login information. Caching logins can be helpful if users have multiple usernames and passwords for different programs and can also speed login times for users. However, by storing passwords, Windows also makes it possible for an unauthorized person to walk up to the computer and use the stored passwords to access the protected programs.

I recommend checking which passwords Windows has already stored and delete those that pose a high security risk. Here’s the method to remove stored Windows network passwords.

How to Remove Stored Network Passwords in Windows 7?

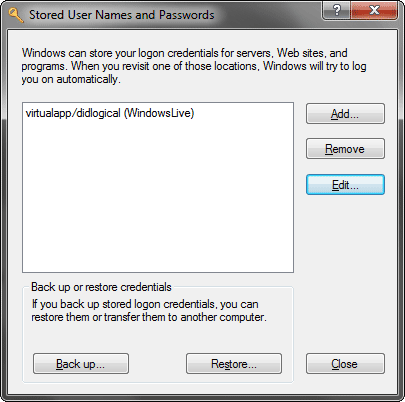
You can access the Windows Vault through the Credential Manager. The easiest way is by just typing “Credential Manager” in the Windows 7 Start Menu search prompt. You can also access the Credential Manager through the Control Panel: -> User Accounts -> User Accounts. The link to the Credential Manager can be found in the left navigation bar.

You can remove an entry by selecting it from the list and clicking Remove.

How to Remove Stored Network Passwords in Windows Vista?

To access Stored Usernames and Passwords, you have to run “control userpasswords2” from the command prompt, then click on Advanced, and then on Manage Passwords. You can also launch the tool via the Control Panel: User Accounts -> User Accounts, and then click on “Manage your network passwords” in the left navigation bar.

You can remove an entry by selecting it from the list and clicking Remove.

How to Remove Stored Network Passwords in Windows XP?

In Windows XP, to access Stored Usernames and Passwords, you have to run “control userpasswords2” from the command prompt, then click on Advanced, and then on Manage Passwords. You can also launch the tool by running “rundll32.exe keymgr.dll, KRShowKeyMgr” from the command prompt.

You can remove an entry by selecting it from the list and clicking Remove.

How to Disable USB Storage Drive Access in Windows

September 15th, 2012 by Admin

Disabling USB storage drive access to your computer is essential if you must share your computer with others who you don’t trust.  To prevent others from using USB flash drive or mass storage device to copy and transfer your data and files, you can simply disable USB ports in computer BIOS. However, disabling USB ports will also block other USB based devices such as USB keyboard, USB mouse, printer,etc.

As a workaround, you can use the following registry trick to disable only USB storage drive access while you can still use USB keyboard and mouse normally.  With this trick you can prevent others from taking out data from your personal computer without permission or spreading viruses through the use of USB storage drive.

How to Disable USB Storage Drive Access in Windows?

Open Windows registry editor quickly from Run box by pressing Win+R key. Now type regedit and hit OK. When it opens, browse to the following key address.

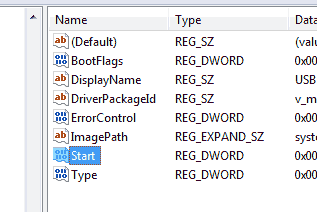
HKEY_LOCAL_MACHINE\SYSTEM\CurrentControlSet\services\USBSTOR

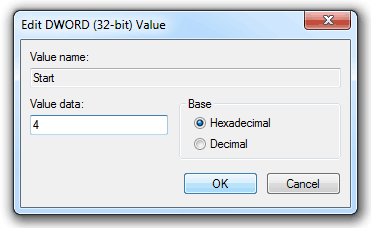
You will see an item list in the right part of the window. Now, Double click on the name Start. A new small box will appear.

In the box you will find the value data set to 3. Change that value to 4 and select Hexadecimal in the Base group. Now click OK.

But, it may not work till your next restart.

To enable access to USB storage drive again, just change the Start key value back to 3. Done.

This trick allows you to disable any USB mass storage device such as USB flash drive, USB key and portable hard disk from been used in your Windows PC, while still allowing hardware components to work properly via USB connection. It works in most Windows operating system such as Windows 8, 7, Vista, XP, Windows Server 2008, 2003 and 2000.

8 Useful Windows Keyboard Shortcuts

September 14th, 2012 by Admin

Taking your hands of the keyboard to use the mouse can be annoying. Luckily, Windows has a number of keyboard shortcuts that can speed you along. Use these Windows keyboard shortcuts to perform tasks, such as cutting and pasting text, quickly and easily.

Check out the selection of shortcuts below and see if there aren’t a couple you didn’t know about that could be saving you some real time.

1. Win + F

Use this key combination to open Windows Search. If you got something quick to search for, though, you can go ahead and use the top right corner of any Explorer window. With Windows Search you can search your entire computer for something that you’ve been looking for. It will scan every volume you have installed on your computer. Don’t underestimate its power!

2. Win + E

This will open up an Explorer window. This is very useful if you want a quick way to get to My Computer.

3. Win + L

Here is an extremely interesting one. This will lock down Windows. If you have it set up to where you have to enter a password to open Windows, you will have to enter your password when it is locked. Otherwise, just hit OK and you will return to Windows. This tip could be especially useful for laptop users. Say you are leaving your laptop for a moment. If you use this shortcut, you can feel safe that nobody is going to mess with anything while you are gone.

4. Win + D

This will minimize every window you have open. I use this constantly because I tend to have about ten windows open at the same time. To move the windows back to normal you can hit the Windows Shortcut Key + D again and all the windows will be restored.

5. Win + R

This opens up the Run command. I’m not really a big fan of the Run command except to use it to speed up my startup. But if you constantly use the run command this will save you some time.

6. Ctrl + Esc

This will bring up the Start Menu. In Windows 8, the Start button is removed so you can’t access the Start Menu as convenient as before. But you can still press Ctrl + Esc to access the Start Menu quickly.

7. Ctrl + Alt + Del

The Ctrl + Alt + Del key combination is used to access the Task Manager, so that you can close the application by killing its process.

8. Shift + Del

Right-click on the files or folders you want to delete, and then press Shift+Del, it will delete the files directly without sending them to the recycle bin.

These are eight really simple time-saving keyboard shortcuts that might actually save you some day from ever thinking of what you could have done to cherish every moment in your life. Time is something precious, more so if you approach a ripe old age or own a business. Now, for your next goal: putting your saved time to good use!

How to Reset System Password on Windows 8, 7, Vista and XP

September 13th, 2012 by Admin

What do you do when you forget your Windows system password? Forgetting your Administrator password can leave you without access to your system, or worse. This could happen out of honest forgetfulness, the result of idiotic roommates with nothing better to do, or any number of other situations that could result in a total loss of access to your system.

Thankfully, being locked out doesn’t mean you can’t regain control through Windows password recovery software. In fact, all you really need is a USB thumb drive and another computer to create a bootable USB disk on. In many cases, you can reset system password in just a few minutes.

How to Reset System Password on Windows 8, 7, Vista and XP?

The password-resetting procedure can be divided into 3 steps. It is perhaps the simplest solution for you to regain access to your system on Windows 8/7/Vista/XP.

Step 1: Create a System Password Reset Disk

The first thing you’ll need to do is create a bootable system password reset disk. This may require you to grab a thumb drive and use a friend’s computer to do this. Follow the instructions to create a system password reset disk:

  1. Download the Reset Windows Password package.
  2. Once you’ve downloaded the package, unzip the download file and you’ll get the CD/DVD ISO image file: ResetWindowsPwd.iso, which you can burn it onto a CD, DVD or USB thumb drive.
  3. Burn the ISO image to a USB thumb drive using the ISO2Disc tool.

Once the system password reset disk is created successfully, you can then use it to boot your locked computer and perform password resetting.

Step 2: Boot from System Password Reset Disk

Now you need to set your locked computer to boot from the system password reset disk you’ve created. Booting from a USB thumb drive can be done fairly easily using BIOS settings. Every BIOS is a little different, though you should be able to access it using the instructions that appear on screen when you first power up your machine and find a boot order or option to select boot device. Holding DEL or F12 when rebooting can usually get you where you need to be. Some systems are different, however.

If you still can’t figure out how to make your computer boot from USB thumb drive, please refer to this article:

How to Set Your Computer to Boot from CD or USB Drive

Step 3: Reset System Password

Once you’ve configured the locked computer correctly, plug in your USB thumb drive and turn on the computer. It will boot from the system password reset disk. Once the boot procedure is complete, it will launch the Reset Windows Password program. This is the software you’ll need to reset your system password.

The software allows you to select the Windows SAM registry hive from the drop-down list. It will then display a list of Windows user accounts inside the SAM file. Choose your desired user account and then click on the Reset Password button. It will remove your forgotten or unknown password instantly.

The next step is to unplug the USB thumb drive and restart the computer. You can then log in to your Windows system with a blank password.

How to Crack Outlook Password

September 12th, 2012 by Admin

I forgot my password for Outlook 2007 in my PC. However, I can still access my Gmail account. How do I retrieve or crack my Outlook password?

If you forgot your Outlook password, there’s no need to worry much. With Outlook password cracker utility, you can crack Outlook password quickly and easily. It is important that the Outlook password you are trying to crack is stored on your computer (i.e. you are recovering your own password and not trying to crack someone’s passwords).

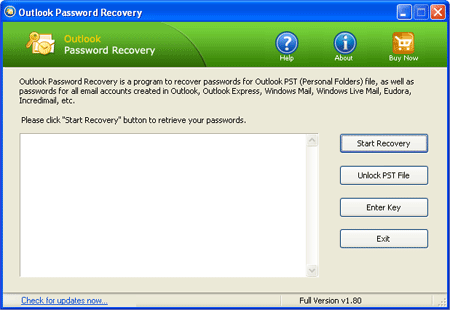
When it comes to Outlook password cracker utility, I highly recommend Outlook Password Recovery, a powerful password cracking software to recover forgotten email account passwords stored in Microsoft Outlook 2010, 2007, 2003, XP, 2000. Get this software and install it on your computer, just one click and you can find out your Outlook password in a short time. Follow the steps below to see how can you crack Outlook password easily.

How to Crack Outlook Password?

  1. Download and install Outlook Password Recovery program on your computer.
  2. Launch Outlook Password Recovery, then click on the Start Recovery button.

  3. The program will automatically search Microsoft Outlook profiles and crack Outlook passwords save in Outlook application.
  4. In a short time, it will display the recovered login details: email account, username, password, account type (IMAP, POP3, SMTP,LDAP, HTTP) and server name.

This program is not a hacker tool. To crack Outlook password, you must have physical access to your computer.

Windows Password Remover

September 11th, 2012 by Admin

What if you forget the password of your Windows or you need to remove Windows password for other purpose? Just got a Windows password remover utility, a professional Windows password recovery software to remove lost Windows administrator and user passwords easily. No need to reinstall Windows.

There are many ways of removing forgotten Windows password out there, but most of them are so painful and ineffective, or too technical for most computer users to follow. Here I’ll show you the simplest and effective way to help you remove Windows password on any Windows system, including Windows 8/7/Vista/XP/2008/2003/2000. Reset Windows Password utility is the Windows password remover tool we’ll use to create a bootable CD/USB for password removal. Let’s see the detail instructions.

How to Remover Windows Password with Windows Password Remover Utility?

To get started, you need to find another computer to create a Windows password removal CD or USB drive, then you can use the CD or USB drive to boot the computer whose password you want to remove.

  1. Download the Reset Windows Password utility. Unzip the download file, you’ll see the ISO image file: ResetWindowsPwd.iso.
  2. Burn that ISO image to a blank CD or DVD using whatever burning software you prefer, such as BurnCDCC. If your computer doesn’t come with a CD/DVD recorder, you can burn the ISO image to a USB flash drive with ISO2Disc.
  3. Insert the CD or USB drive you’ve just created into the computer whose password you’re going to remove. Set the computer to boot from the CD or USB drive.
  4. When the computer is configured correctly, it will load the operating system inside the CD or USB drive, and launch the Reset Windows Password utility.

  5. From the screen of Reset Windows Password utility, you can see the Windows SAM registry hives detected on your hard drive. Choose one of your Windows SAM registry hives from the drop-down list, the program will show a list of Windows user accounts for your Windows installation.
  6. Select your desired user account and then click Reset Password button. It will remove your forgotten Windows password in no time.

Now take out the Windows password removal CD or USB drive. Restart the computer and at the logon screen, click your user account and leave the password box blank, you can then log in to your computer without any hassle. Windows password remover tool makes it incredibly easy to remove your forgotten Windows login password!

How to Boot from USB Drive without BIOS Support

September 11th, 2012 by Admin

I’ve created a bootable USB flash drive with Windows 7 on it, however my laptop (Gateway M520) doesn’t have an option to boot from USB. I’ve also checked and there is no BIOS upgrade available from Gateway. Is there anyway to boot from a CD-ROM that will allow the computer to read from the USB drive?

You may have created a bootable USB flash drive with you to solve computer problems, or prepared a USB drive as a Windows installation disk, but what if a PC’s BIOS doesn’t support USB boot?

I have written about making a USB installation disk for Windows 7, but it is of no use if the motherboard or BIOS does not support USB booting, if you are stuck in a situation where BIOS does not support booting from USB or CD-ROM, free boot-manager PLoP would be the best solution for the problem.

How to Boot from USB Drive without BIOS Support?

These instructions will allow you to boot from a USB drive when your BIOS does not support USB booting.

  1. Download Plop Boot Manager from plop’s website.
  2. Once the download is finished, extract the downloaded file. You see the image file: plpbt.iso.
  3. Burn that image to a blank CD or DVD using whatever burning software you prefer, such as BurnCDCC.
  4. Connect your USB drive to the computer and insert the plop boot manager disc.
  5. In order for the boot manager disc to load, you need to enter into BIOS and set CD/DVD as the first boot device.
  6. Restart the computer. The boot manager will load and allow you to select your USB drive from the list.

  7. Your computer will then start to boot from your USB flash drive.

If your computer doesn’t come with a CD/DVD drive, you can put the boot manager ISO image on a floppy disk instead.

How to Set Your Computer to Boot from CD or USB Drive

September 11th, 2012 by Admin

Computers normally boot from the hard drive, which makes sense as this is where Windows operating system is stored. However, in some cases you will need to boot from CD or USB drive instead – e.g. if you need to install/reinstall Windows, or boot from a rescue CD/USB to backup your files, diagnose and repair a faulty Windows installation, or reset forgotten Windows password, etc. So in this tutorial we’re going to show you how to set your computer to boot from CD or USB drive.

Generally, there are two options to make your computer boot from CD or USB drive. When you power on your computer, check the boot-screen for setup key or boot menu key.

Option 1: By pressing the boot menu key, the screen will show a list of devices that your computer can boot from. Just use the arrow key to select your desired device (CD, USB or Hard Drive) and then press Enter. Your computer will directly boot from a specific device. This is the simplest way to set your computer to boot from CD/USB drive without changing computer BIOS settings. But the boot menu key is not available on some computers, then you need to turn to Option 2 instead.

Option 2: By pressing the setup key, it will bring up the BIOS Setup Utility. Once in the BIOS, navigate to the option that controls the boot order (this may be under “Boot” or “System Configuration” or “Storage”). There should be a list for “Boot Priority”. Place the CD/DVD or USB drive at the top of this list. Save your changes. Now restart the computer, it will try to boot from CD/DVD or USB drive before hard drive.

Usually, when you turn on your PC, there is a very short period, when the BIOS entrance command appears on the screen, but if you miss the moment, you will have to start all over again. If you know, what the keys combination you should use is, you need to press it immediately upon computer reboot, and sometimes you need to try pressing the key repeatedly as soon as the computer starts up.

The BIOS setup keys and boot menu keys are different as per computer manufacturer and even as per computer model. For you convenience, I am listing the BIOS setup keys and boot menu keys for the most popular computer models.

Brand Destination Hotkey
Dell BIOS Key
F2
Boot Menu F12
HP BIOS Key
F10 Note: Pressing ESC will bring up a menu with all hotkey options
Boot Menu F9
Lenovo BIOS Key
F2 or blue “Thinkpad” button
Boot Menu F12 or “Novo” button
Toshiba BIOS Key
F2
Boot Menu F12
Acer BIOS Key
Notebook: F2 Desktop: DEL
Boot Menu F12
Sony BIOS Key
Press F2, select the 2nd option
Boot Menu F10 or “Assist” button
Samsung BIOS Key
F2
Boot Menu F10 (Not always implemented)
Asus BIOS Key
DEL or F2
Boot Menu ESC
Gateway BIOS Key
F1 or F2
Boot Menu ESC, F10 or F12

 
For Windows 10 or 8 computers, there are also another two ways to access the BIOS(UEFI) Setup:
2 Options to Access UEFI BIOS Setup in Windows 8 / 10

2 Ways to Run a Program as Administrator in Windows

September 10th, 2012 by Admin

One of the features that make Windows 8/7/Vista securer than its previous versions is that most of the applications are launched by default without having local admin rights, even when you log in as an account that belongs to local administrator group.

And you probably already know that if you want to launch an application with local admin rights, you would have to use Run as Administrator to fire up the application.

Many applications need to be run as administrator in order to function properly, especially older software that haven’t been updated to support Windows 7 or Vista yet. So here I’ll show you 2 ways to run a program as administrator in Windows 8, 7, Vista.

Method 1: Run a Program Once as an Administrator

  1. Navigate to the program folder of the program you want to run. For example, C:\Program Files\Top Password.
  2. Right-click the program icon (the .exe file).
  3. Choose Run As Administrator.
  4. If you see a User Account Control prompt, accept it.

Method 2: Always Run a Program as an Administrator

  1. Navigate to the program folder of the program you want to run. For example, C:\Program Files\Top Password.
    Right-click the program icon (the .exe file).
  2. Choose Properties.
  3. On the Compatibility tab, select the Run This Program As An Administrator option.
  4. Click OK.
  5. If you see a User Account Control prompt, accept it.

You can run a program once as an administrator, or you can set a program to always run as an administrator, which fully depends on your choice.