Archive for the ‘Tips & Tricks’ category

How to Reset Your Windows Password without A Reset Disk

August 26th, 2012 by Admin

Have you forgotten your windows login password? This is the common problem which may arrive to every user at some point of time. The simplest way to reset a forgotten password is by using a previously created password reset disk. You can create such disk on a USB removable media or floppy within the Windows User Accounts Menu, for which go to Windows Control Panel > User Accounts > Create a password reset disk which you will find in the left pane. You can do this to your new PC as once you have the disk, insert it when starting the PC in turn it will cause Windows to display the Reset Password option at the login screen, in this way you will regain an access to your system.

But imagine worst case scenario when you try to login to your computer after many days (months may be) and you forget your Windows password and also haven’t created a password reset disk beforehand. What to do next? Here we’ll show you an easy way to reset your forgotten Windows password without a reset disk.

How to Reset Your Windows Password without a Reset Disk?

After forgetting your Windows password, the computer will become inaccessible and you can’t install any software to get around the problem. The only way is to create a Windows password reset disk and then use it to boot your computer, so you then have the ability of resetting your Windows password. Let’s begin.

Step 1: Create a Windows Password Reset CD

  1. To prepare for the password-resetting procedure, you need another computer to connect to the Internet, download the Reset Windows Password utility.
  2. Unzip the download file which contains an ISO image file: ResetWindowsPwd.iso.
  3. Next, burn the ISO image to a CD/DVD with any CD burning software such as BurnCDCC. A Windows password reset disk will be ready in one or two minutes.

Step 2: Boot Your Locked PC from the Password Reset CD

  1. Now that you’ve prepared the Windows password reset CD, go to the computer for which you have forgotten the password.
  2. Insert the Windows password reset CD and turn on the computer.
  3. When it is powered on, check the boot-screen for setup key (i.e. DELETE key, F8 key, F2 key) to enter BIOS Setup Utility.
  4. Change its BIOS settings to make it try to boot from the CD first.

Step 3: Reset Windows  Password

  1. Once you have configured the BIOS correctly, your computer will boot from the Windows password reset CD.
  2. After a while, the boot CD will launch the Reset Windows Password program.
  3. Choose the SAM registry hive from the list, the program will display a list of Windows user accounts on the computer.
  4. Select the user account whose password you forgot, then click Reset Password button.
  5. It will reset your forgotten Windows password in no time.

Now take out the password reset CD and reboot your computer. You can then log on to your computer without be asking for a password. It’s also super easy to reset your forgotten Windows password even if you haven’t created a password reset disk beforehand.

How to Access the BIOS of Your Computer

August 24th, 2012 by Admin

Two of the most common functions why you might access your system’s BIOS are changing the boot order to allow a CD/USB or other device to boot before a hard drive or supplying a security password to lock your computer.

Unfortunately, the BIOS and the way we access the BIOS is far from standardized. Any of the following keyboard keys can invoke the BIOS (sometimes referred to as system setup): F1, F2, F10, F12, Del, Esc, or Ins. Once in the BIOS, you must use the keyboard to navigate the menus and change the settings. Again, this isn’t standardized either and there are at least a dozen implementations of the BIOS interface.

Here’s a list of the ways and access keys to press to access BIOS Setup Utility on variety of popular OEM computer systems, motherboard makers and major BIOS brands. Note that some BIOS or computer systems may have more than one method of accessing BIOS depending on when the BIOS is released.

Acer (Aspire, Power, Veriton, Extensa, Ferrari, TravelMate, Altos): Press [F2] or [Del] Immediately After Power Up
Acer (Altos 600 Server): Press [Ctrl]+[Alt]+[Esc] or [F1] During Boot (for Advanced Options)
Acer (Older PC): Press [F1] or [Ctrl]+[Alt]+[Esc] to Access BIOS
AMI (American Megatrends AMIBIOS, AMI BIOS): Press [Delete] During Boot
AMI
AMI (American Megatrends AMIBIOS, AMI BIOS) – Old Version: Press [F1] or [F2] During Boot
Award BIOS (AwardBIOS): Press [Del] After Powering Up Computer
Award BIOS (AwardBIOS) – Old Version : Press [Ctrl]+[Alt]+[Esc] During Boot
ALR: Press [Ctrl]+[Alt]+[Esc] or [Ctrl]+[Alt]+[Del] During Boot
ARI: Press [Ctrl]+[Alt]+[Esc] or [Ctrl]+[Alt]+[Del] During Boot
AST Advantage: Press [Ctrl]+[Alt]+[Esc] During Boot
Compaq (Presario, Prolinea, Deskpro, Systempro, Portable): Press [F10] When Blinking Cursor Jumps To Top Right Corner of Screen
Compaq (Presario, Prolinea, Deskpro, Systempro, Portable): Press [F10] When Logo Screen Is Displayed
Compaq (Older Computers): Press [F1], [F2], [F10], or [Del] Key
Cybermax: Press [Esc] Key
Dell (XPS, Dimension, Inspiron, Latitude. OptiPlex, Precision, Vostro): Press F2 When Dell Logo Is Displayed Until “Entering Setup” Appears
Dell (Older 486 Models): Press [Ctrl]+[Alt]+[Enter] During Boot
Dell (Some Models): Press Reset Button Twice (i.e. Power Reset Button)
Dell Dimension L566cx System: Press [Del]
Dell (Older Laptop Models) : Press [Fn]+[Esc] or [Fn]+[F1]
DTK (Datatech Enterprises): Press [Esc] Key Right After Powering On the PC.
EISA Computer: Press the Reset button on the Front of the Computer, then Press [Ctrl]+[Alt]+[Esc] immediately when the memory count begins or Press [Crtl]+[Alt]+[S].
eMachines (eMonster, eTower, eOne, S-Series, T-Series): Press [Tab] or [Del] During Boot
eMachine (Some Older Computers): Press [F2]
Fujitsu (LifeBook, Esprimo, Amilo, Tablet, DeskPower): Press [F2] When Fujitsu Logo Is Appearing.
Gateway Using Phoenix BIOS (DX, FX, One, GM, GT, GX, Profile, Astro): Press [F1]
Gateway (Some Older PCs): Press [F2]
Hewlett-Parkard (HP Pavilion, TouchSmart, Vectra, OmniBook, Tablet): Press [F1] Upon Startup or Bootup
Hewlett-Parkard (HP Alternative): Press [F2] or [Esc]
Hewlett-Parkard (HP) Tablet PC: Press [F10] or [F12]
IBM ThinkPad using IBM BIOS (Early Models): Press [Ctrl]+[Alt]+[Ins] When Cursor Is At Upper-Right Corner of Screen
IBM ThinkPad using IBM BIOS (Later Models): Press and Hold [F1] When Powering Up Laptop
IBM ThinkPad using Phoenix BIOS: Press [Ctrl]+[Alt]+[F11] from DOS Prompt
IBM PS/1 (Late Models), PS/ValuePoint and 330s: Press [Ctrl]+[Alt]+[?]
IBM PS/2 with Reference Partition: Press [Insert] During Boot
IBM PS/2: Press [Ctrl]+[Ins] When Pointer Is At Top Right of Screen
IBM PS/2: Need Reference Disk and ADF Disk for Setup
IBM PS/2 75 and 90: Press [Ctrl]+[Alt]+[?]
IBM (PC, XT, AT): Press [F1] Immediately On Powering On the Computer
IBM (Older Computers or Notebooks): Press [F2]
Lenovo (ThinkPad, IdeaPad, 3000 Series, ThinkCentre, ThinkStation): Press [F1] or [F2] on Boot Up
Lenovo (Older Products): Press [Ctrl]+[Alt]+[F3], [Ctrl]+[Alt]+[Ins] or [Fn]+[F1].
Microid Research MR BIOS: Press [F1]
Micron (MPC Computers ClientPro, TransPort): Press [F1], [F2] or [Del] On Startup
NEC (PowerMate, Versa, W-Series): Press [F2] During Boot
NEC Versa Notebook: Press and Hold Down [F1] Upon Startup or Bootup
Olivetti PC Pro: Press [Ctrl]+[Alt]+[Shift]+[Del](in Num Pad) During Boot
Packard Bell (8900 Series, 9000 Series, Pulsar, Platinum, EasyNote, imedia, iextreme): Press [F1], [F2], or [Del].
Packard Bell (Early 386 and 486 Dodels): Press [Ctrl]+[Alt]+[S] Sequence
Phoenix BIOS (Phoenix-Award BIOS): Press [Del] During Power On Self-Test
Phoenix BIOS (Phoenix-Award BIOS) – Old Version: Press [Ctrl]+[Alt]+[S], [Ctrl]+[Alt]+[Esc], [Ctrl]+[Alt]+[Ins] or [Ctrl]+[S] During Power On Boot Self-Test Right After Startup
Sharp (Notebook Laptops, Actius UltraLite): Press [F2] On Computer Starts
Sharp (Old PCs): Require Setup Diagnostics Disk to Access BIOS
Shuttle (Glamor G-Series, D’vo, Prima P2-Series, Workstation, X Mini XPC, Surveillance): Press [F2] or [Del] on System Startup
Sony (VAIO, PCG-Series, VGN-Series): Press [F1], [F2] or [F3] After Turning On the Computer
Sony Vaio 320 Series: Press [F2] During Boot
Tandon 386: press [Ctrl]+[Shift]+[Esc]
Tandon: press [Ctrl]+[Shift]+[Esc]
Toshiba (Portégé, Satellite, Tecra): Press [Esc] During Boot
Toshiba (Portégé, Satellite, Tecra with Phoenix BIOS): Press [F1] during Boot
Zenith, Phoenix: Press [Ctrl]+[Alt]+[Ins] During Boot

Miscellaneous and Other Common BIOS Key Sequences:

[Ctrl]+[Esc]
[Ctrl]+[Ins]
[Ctrl]+[Alt]
[Ctrl]+[Alt]+[+]
[Ctrl]+[Alt]+[F3]
[Ctrl]+[Alt]+[Del]
[Ctrl]+[Alt]+[S]
[Ctrl]+[Alt]+[Enter]
[Ctrl]+[Alt]+[Ins]
[Ctrl]+[Alt]+[Esc]
[Ctrl]+[Shift]+[Esc]
[Tab]
[F1]
[F3]
[F4]
[F10]
[F12]
[Fn]+[Function Key]

Fix the Problem ‘Outlook Can’t Remember Password’

August 24th, 2012 by Admin

In some cases Outlook doesn’t remember your password, even if you enable the option to remember the password. This error is caused by a malfunctioning of the Protected Storage Space from Windows. To solve this problem, run the registry editor and navigate to the key HKEY_CURRENT_USER\Software\Microsoft\Protected Storage System Provider. You will find a key with a long name starting with S-1-5-21 which you have to delete. In most cases the problem is solved and next time the passwords will be saved.

Note: by doing this you will lose all stored passwords in Internet Explorer, Windows Live Messenger and other Microsoft applications. It’s advisable to recover and backup all types of saved passwords using Password Recovery Bundle.

If you are not allowed to delete that key, there is probably a problem with the permissions of your user account. Select the key Protected Storage System Provider, right click on it and choose  Permissions button and then click Advanced button. Make sure that your user account has Full Control for this key and subkeys. Activate the option Reset permissions on all child objects and enable propagation of inheritable permissions, click OK and repeat the earlier mentioned procedure. If needed, check the Microsoft KB files (http://support.microsoft.com/kb/290684). Here you will find out why Outlook can’t remember password and solutions to fix this problem.

How to Find or Recover Outlook Express Password

August 22nd, 2012 by Admin

Forgot Outlook Express email password or identity password? Can’t remember the email password saved in Outlook Express? Is it possible to retrieve the saved password from Outlook Express? Here we’ll show you an easy way to find/recover email account password and identity password in Outlook Express.

How to Find or Recover Outlook Express Password?

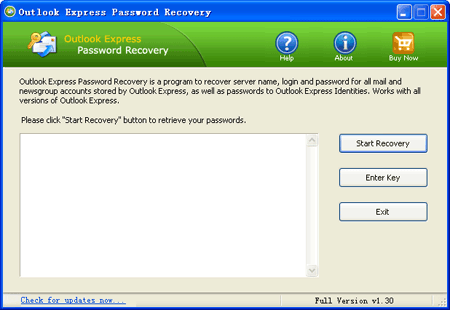
  1. Launch the Outlook Express Password Recovery program.
  2. Click the Start Recoverybutton, the program will instantly find and recover passwords for identities, mail, news and LDAP accounts in Outlook Express.Outlook Express Password Recovery

With Outlook Express Password Recovery software you can easily find and backup your forgotten email passwords in Outlook Express before reinstalling or upgrading the operating system. Even a computer novice can recover Outlook Express password in just one click!

How to Disable Autorun in Windows 8/7/Vista/XP

August 22nd, 2012 by Admin

Autorun is a feature in Windows that is meant as a convenience. A lot of times it is, but more often than not it become a hassle, as users do not always want to launch a CD or thumbdrive just because they put it in the computer. Aside from that, it is a fast way for viruses to spread. If a thumbdrive contains a virus, all it needs to launch itself is for autorun to initiate.

Keep in mind that just because autorun is disabled you can still get to your CD or USB drive by going to My Computer and launching the CD ROM or USB drive.

How to Disable Autorun in Windows 8/7/Vista/XP:

  1. Launch the Run dialogue box by pressing Win + R, then type Gpedit.msc and press Enter.
  2. The Group Policy window should open. In the left pane, double-click Administrative Templates.
  3. In the right pane, double-click System.
  4. Scroll down and double-click Turn Off Autoplay.
  5. In the Turn Off Autoplay Properties window, select Enabled. Then from the dropdown next to Turn Off Autoplay on, select All drives and then click OK.
  6. Exit Group Policy by selecting File, then choosing Exit from the menu.

So disable the autorun option in Windows to help keep your computer safe from USB transmitted viruses.

How to Use PDF Password Cracker to Remove PDF Permission

August 21st, 2012 by Admin

Found a precious PDF document, but cannot copy, edit, or even print it? You’ll find out that the PDF file you get is protected with a permission password. Normally, you cannot make most of the PDF file if you do not get the permission to unlock it. To help you solve the problem, we’re going to talk about how to remove PDF permission with PDF password cracker.

Here just use one tool you could have the PDF permission removed. That’s PDF Password Recovery. It enables you to remove PDF permission password in 3 step.

How to Use PDF Password Cracker to Remove PDF Permission?

  1. Download and install PDF Password Recovery software on your computer.
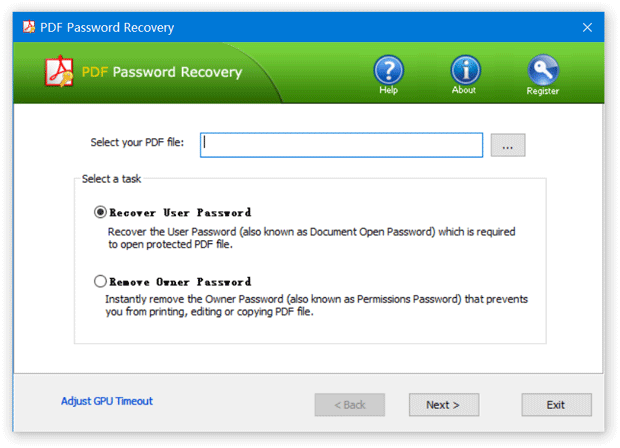
  2. Run PDF Password Recovery program, then click the button to select your password-protected PDF document (*.pdf), then choose the Remove Owner Password option.

    PDF Password Recovery

  3. Click the Next button.
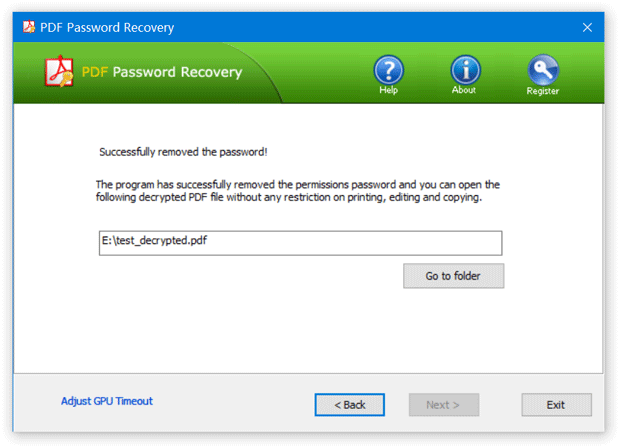
  4. Immediately the tool will remove PDF permission password set on it, and a new non-protected copy will be created. You will then be allowed to print, copy, modify the decrypted PDF document without even knowing the permission password.

    Remove PDF Owner Password

PDF Password Recovery allows you to crack the PDF password that protects the PDF from copying, editing and printing. It is the best PDF password cracker you’ll ever used!

How to Find Lost Outlook Password

August 21st, 2012 by Admin

I have been using Outlook for my Gmail account for years. Now I’m going to reinstall the computer and can’t remember my password. I can still access my Gmail account via Outlook as the password is remembered by Outlook application. Is there any way to find Outlook password?

Office Outlook is widely used in home and office computers. It allows you to save email password that you use to connect with your email server so that you do not have to retype it every time. However, if you forgot Outlook password you’ll lose your email account after reinstalling Windows or Office application. When this happens, make yourself calm down first, then try to find a password recovery solution.

If you don’t have an option, here is my recommendation: Outlook Password Recovery, which allows you to find Outlook password saved in Outlook 2010, 2007, 2003, XP, 2000, 98, 97. It’s the best Outlook password finder utility that enables you to find lost Outlook password in just 3 steps.

How to Find Lost Outlook Password?

  1. Download and install Outlook Password Recovery tool.
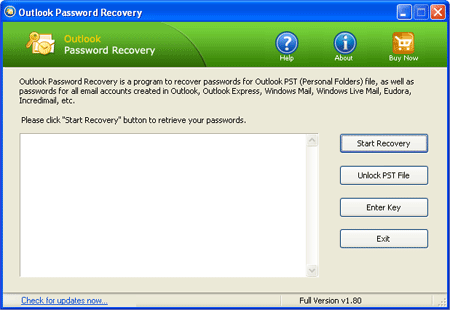
  2. Run Outlook Password Recovery, then click the Start Recoverybutton.
    Outlook Password Recovery
  3. The program will automatically search Microsoft Outlook profiles. Instantly find Outlook password and display all the login details: email account, username, password, account type (IMAP, POP3, SMTP,LDAP, HTTP) and server name.

If your email password is not remembered in Outlook, then you are unable to find Outlook password using this method. You need to contact your email service provider to get back your forgotten password.

How to Change Product Key After Installing Windows 7 or Vista

August 18th, 2012 by Admin

Do you need to change Windows product key so you can activate Windows 7 or Windows Vista properly? Sometimes, users are required to change or re-enter the product keys in Windows 7 or Windows Vista to solve and fix activation problems, or after buying a genuine license for Windows operating system, it’s necessary to reactivate Windows. This article shows you 2 methods to change or re-enter product key that already installed in the system.

Method 1: Manual

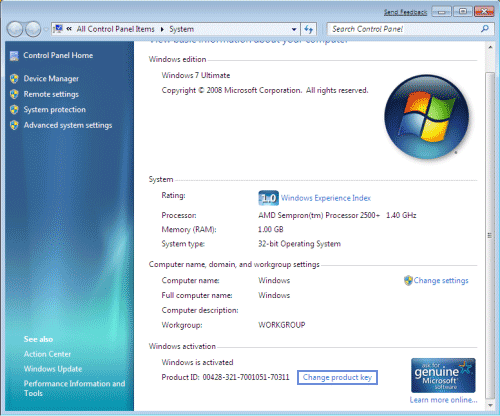
  1. Right click on My Computer and select Properties.
  2. Wait a second for windows activation details to get populated.

  3. Click on Change Product key link after your Windows activation details are populated.
  4. Enter new product key and click on next to activate your Windows 7 or Vista.

Method 2: Command Prompt

  1. Click on start and type command (cmd) with run as administrator option
  2. Now type following command:
    “slmgr.vbs -ipk <insert your product key here>”
  3. To activate windows after changing the key, run “slmgr.vbs -ato”

If you misplace or lost your Windows product key, you can recover Windows product keys for your local computer using Product Key Finder program.

How to Reset MySQL Root Password

August 18th, 2012 by Admin

Forgot your MySQL root user password? Don’t worry. We are here for rescue.

When you tried to login to root without entering a password, you may get ‘Access Denied’ message, as MySQL is expecting a password. This article explains how to reset MySQL root password when you don’t remember your old one.

How to Reset MySQL Root Password:

Step 1: Stop the MySQL service by going to Control Panel, Administrative Tools and Services. Right-click on the service and choose Stop.

Step 2: Create a new text file and copy and paste the following lines into it:

UPDATE mysql.user SET Password=PASSWORD('MyNewPass') WHERE User='root';
FLUSH PRIVILEGES;

Make sure to change the password “MyNewPass” to whatever password you want to replace the current one with. Now save the file and give it a name like C:\mysql-init.txt or whatever you like.

Step 3: Now go to the command prompt and type in the following command:

C:\> C:\mysql\bin\mysqld-nt --init-file=C:\mysql-init.txt

In my case, I had to change the path to something different than C:\mysql\bin. If you installed MySQL using the installation wizard, which I did, you have to use a different command:

C:\> "C:\Program Files\MySQL\MySQL Server 5.0\bin\mysqld-nt.exe"
         --defaults-file="C:\Program Files\MySQL\MySQL Server 5.0\my.ini"
         --init-file=C:\mysql-init.txt

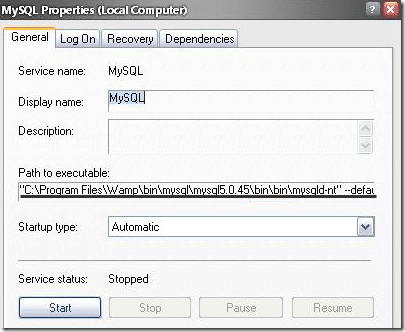
So what is the path for your defaults-file? You can get the exact value by going to the Services dialog again and right-clicking on MySQL and choosing Properties. The box that says “Path to executable” has the value for defaults-file.

At this step, I ran into an error. Every time I would try to execute the command, I would end up getting an error message and the password would not be reset.

InnoDB: Operating system error number 32 in a file operation.
InnoDB: The error means that another program is using InnoDB’s files.
InnoDB: This might be a backup or antivirus software or another instance
InnoDB: of MySQL. Please close it to get rid of this error.

In my case, I have to go to the Task Manager and click on the Processes tab. Here I found that I already had several instances of MySQL running! I don’t know why or how they were started, but even with the service stopped, there were processes running.

I killed off all the processes and ran the command again, which worked perfectly.

Step 4: Go back to the Services window and restart the MySQL service. You should now be able to log into the MySQL database! Enjoy!