Archive for the ‘Tips & Tricks’ category

Protect Website Passwords Saved in Your Browser

July 25th, 2012 by Admin

One of the most convenient tools browsers offer is the ability to save and automatically prefill your website login details and passwords. Because so many sites require accounts and it is well known (or should be at least) that using a shared password is a big no-no, a password manager is almost essential and also a handy feature. But what happens if someone is wandering by and decides to start poking around with your browser and vulnerable internet sites?

To protect your website passwords saved in your browser, it’s essential to learn more about the security features built into Firefox, Internet Explorer and Chrome.

It doesn’t matter how secure your passwords are if you’ve allowed a browser to store them with no protection. You’re left doubly unprotected by having no Windows password, as an unattended PC will force the user to log back in but without a password, an intruder is straight in.

Firefox offers good protection in that it can store an encrypted password file on your hard drive, if you ask it nicely. This protects all the log-in user names and passwords with a master password. So if someone happens to be on your computer and fires up the browser, they’ll have to enter your master password before the browser starts to automatically fill in all of your bank details without you.

For Internet Explorer there’s no such direct replacement. There is a Content Advisor that’s designed to block inappropriate content rather than block access to the browser and stored passwords. If you open Internet Options > Content and under Content Advisor click Enable, you’ll be prompted to enter a password and hint.

Initially this is massively annoying as it’ll prompt you for every website. We suggest you set a homepage, so when the browser is first opened the password will be required and you can allow all the other sites. The alternative is to set up blocks just on sites that require passwords.

When it comes to Chrome, security is even more lax: there isn’t any way to password protect access to the browser within Chrome itself. There is an extension called Secure Profile that goes some way to address this. It forces a password to be entered before access to the browser is allowed. However, as it’s an extension it can be disabled by knowledgeable people and due to limits on Java it displays the password being entered. But it does block access and is better than nothing.

Note: If you already forgot website passwords saved in your browser and want to recover them, Password Recovery Bundle is the software that can help you easily recover website logins and passwords stored in Internet Explorer, Firefox, Chrome, Safari, etc. But if your website passwords are protected with a master password, it’s unrecoverable unless you know the master password.

How To Install Windows 8 from USB Flash Drive

July 24th, 2012 by Admin

Some times you may prefer to install windows 8 from USB, there may be wide variety of reasons like, you don’t have a DVD drive or you wanted to install windows 8 in you netbook etc. No matter what the reason is, there is an easy way to do this. In this tutorial we’ll show you how to create a bootable Windows 8 installation USB drive and then use it to do a clean install of Windows 8.

Step 1: Create a Bootable Windows 8 Installation USB Drive

  1. First of all, insert your pen/USB drive and back up any data inside it.
  2. Now download Windows 7 USB/DVD tool and open it.
  3. Browse to your windows 7 ISO image using the “Browse” button.
  4. As we are going to create a bootable USB drive, select “USB device” option.
  5. Now select the USB drive letter and click “Begin copying”.

Step 2: Configure the BIOS of Your Computer

  1. Turn on your computer. When it is powered on, check the boot-screen for setup key (i.e. DELETE key, F8 key, F2 key) to enter BIOS Setup Utility.
  2. Use the arrow keys to select the BOOT tab, then change the Boot Device Priority: Set 1st Boot Device to Removable Device so you can boot from a USB flash drive and perform Windows installation.
  3. Press F10 to save your changes.

Step 3: Install Windows 8 from USB Flash Drive

Assuming that you properly configured your BIOS, insert the Windows 8 Installation USB Drive into the USB port on your computer. Turn on the computer. Windows 8 setup program should now load, you can now continue to finish setting up Windows 8  from USB drive. Depending on the speed of your USB device, this may take a while.

Conclusion

This guide is quite easy to follow and anyone who has basic computer skill will able to create a bootable Windows 8 installation USB drive and install Windows 8 with any hassle. Many computers ship without Windows installation discs. So it’s necessary to create a Windows installation disk in case you need to do a fresh install of Windows on your own. Enjoy!

How to Reset Windows Server 2008 R2 Password

July 23rd, 2012 by Admin

I have forgotten my Administrator Password in Windows Server 2008 R2. How should I recover or reset it? I’ve searched the web a lot without any satisfactory results, and I’m desperate I don’t know what to do. I have the original DVD, but I don’t want to reinstall it tho, because I also have Win 7 on another partition, and I don’t know how will it go. Please, do you know of any tips/tricks for doing that?

Windows 2008 R2 server is the latest and more secured operating system from Microsoft. If you are a system administrator dealing with Windows Server 2008 R2, you might have faced the situations of forgetting the Windows administrator password and don’t know how to bypass or reset the password. This post explains very simple steps to reset Windows 2008 R2 administrator password without knowing the original password.

To reset the forgotten administrator password on a computer which you can’t login, you need to use a bootable live CD to boot the computer. Password Recovery Bundle is the right software that can help you create a bootable password reset CD/USB. Follow the steps below to reset your forgotten Windows Server 2008 R2 administrator password easily.

How to Reset Windows Server 2008 R2 Administrator Password:

  1. Download Password Recovery Bundle and save it on another computer you have admin access to. Install and launch Password Recovery Bundle, then click Windows Password button, the pop-up dialog enables you to create a password reset CD.
  2. To make your locked computer boot off the password reset disk, head over to the computer’s BIOS and make some changes: Set CD-ROM as the 1st boot device.
  3. Insert the password reset disk you’ve created into your locked computer. Restart the computer. You’ll notice the boot screen is not the same as usual because it is loading from the password reset disk now.
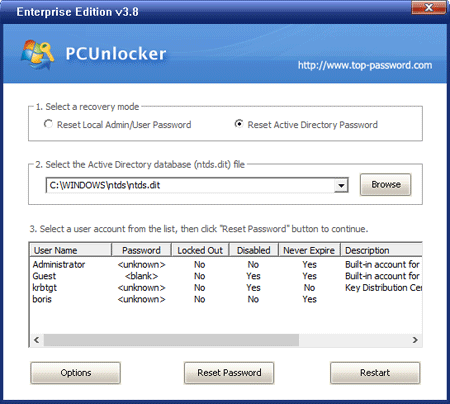
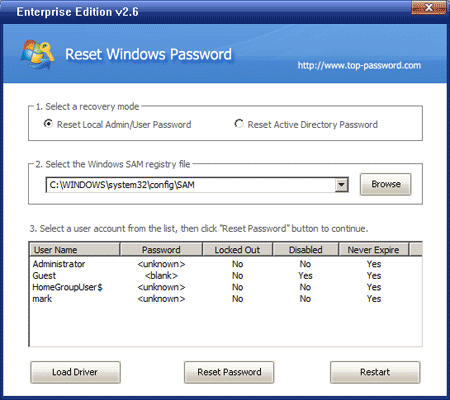
  4. It takes a while to load some necessary files and launch the Reset Windows Password utility. On the main screen of Reset Windows Password utility, you can see the Windows SAM database file and a list of Windows local accounts on Windows Server 2008 R2.

    Here we’re going to reset Windows local administrator password, so we choose the Reset Local Admin/User Password option.

  5. Choose a user account whose password you forgot, then click Reset Password button. The program will reset your forgotten password and unlock the user account if necessary.
  6. Remove the password reset disk and restart the computer.

Now you can log in to Windows Server 2008 R2 without entering a password. Additionally, you can also use the boot CD to reset forgotten domain administrator password on Windows Server 2008 R2.

Use WinPE to Recover Data from Unbootable System

July 23rd, 2012 by Admin

I’m in a big pinch right now. My computer (32-bit Vista Home Premium sp2) refuses to boot up (it keeps crashing with an error code 0x7b). I don’t care about the computer right now but I need to backup the data inside it. How do we transfer the data from a computer into an external drive when Windows doesn’t even boot up?

How to recover from a crashed system and safely carry out all the important data from a crashed computer? If your PC just won’t boot, or you can’t get into it because it is overrun with viruses, you can use a Windows PE boot CD as a quick way to get access to your files and copy them to another PC, or external drive. The process is simple enough.

How to Recover Data from Unbootable System:

  1. To get data back from any crashed and unbootable system, we need a bootable CD to access all the available partitions on the system. Click the following link to create a Windows PE bootdisk on any accessible computer.
  2. How to Create a Bootable Windows PE CD or USB Flash Drive

  3. Set your crashed or unbootable computer to boot from CD by going to the Computer BIOS.
  4. Once the computer boots off the CD,  it will load the operating system inside the CD. After logging into Windows PE system, you’ll be able to see all the data and files on the hard drive of your crashed or unbootable computer.
  5. Attach an USB or any external storage drive to the system and you can copy and backup all your important files to it.

Personally, I have used this CD on numerous occasions and in most cases, I successfully recovered my files like my Mp3 collections, software and documents files. With a non-booting system, our primary aim is to recover all the data first before trying out any solution since a wrong solution can wipe out all the available data from the hard drive.

How to Refresh or Reset Your Windows 8 Computer

July 20th, 2012 by Admin

Microsoft has added lots of new features and stuff on Windows 8 and it is also noteworthy that they have introduced better recovery options in Windows 8. Windows 8 gives us two types of Windows recovery options: Refresh and Reset. Both are very important recovery options because they help to get Windows back in healthy mode. If your system is not running well and has some issues then you can use the Refresh option. It will refresh your PC without causing any loss of your personal information. On the other hand, the Reset option will completely erase all of your personal information such as photos, music and others documents and install a new Windows 8 version on your PC. The Reset feature will restore the whole Windows 8 into default factory settings.

How to Refresh or Reset Your Windows 8 Computer:

Firstly, insert the Windows 8 DVD in your system. It is important to insert the DVD because the system needs to have the setup file again to complete the Refresh and Reset option and to complete this task the Windows files are necessary that is available on the DVD.

Once you insert the Windows 8 DVD in the DVD drive, go to Control Panel and search for Recovery in the search area of the control panel. Once you find Recovery option, click on it to start the Recovery window.

Now a new window will be popped up. To refresh your installed Windows 8 system and restore the PC settings to the factory defaults, please click on Get Stared button under the Refresh option.

Once you click on the Get Started button, Windows 8 will be starting the process of refreshing your PC and would keep your photos, music, videos and other files safe and intact.

As shown in the above image, Windows 8 would start the process of refreshing the PC and would intimate you about what is happening during the refresh process. Click on the Next button to proceed and wait for some time for the process to complete. While Refresh option is on, the computer will restart automatically and would show refreshment process on the main screen.

Conclusion

The Refresh and Reset options in Windows 8 will certainly make life much easier for the general consumer. I recommend that if anyone’s having issues with Windows 8 that they should first Refresh their PC and if fails then resort to Resetting your PC.

How to Break Windows 7 Administrator Password

July 20th, 2012 by Admin

So if you have forgotten the password of your administrator account in Windows 7 or just want to break in the administrator account of your college or office, do not worry, you can easily do that. There are numerous ways available to do so but the best possible way is to use a Windows 7 password reset disk.

To break Windows 7 administrator password what all you need is just an ISO image of Reset Windows Password utility, which is so powerful that it can instantly break Windows admin password for almost any Windows system.

How to Break Windows 7 Administrator Password:

  1. Before the work, prepare a blank CD/DVD. Then download the self-extracting package of Reset Windows Password utility onto another accessible computer. Unzip the download file, you’ll see an ISO image: ResetWindowsPwd.iso, which you have to burn onto a CD. The CD is the password reset disk we’ll later use to break Windows 7 password.
  2. Insert the password reset disk into your Windows 7 computer. Set the computer to boot from the CD.
  3. Restart the computer, it will start to boot from the CD. After a while, your computer will launch the Reset Windows Password program. The software automatically detects the Windows SAM registry hive and locates Windows user accounts existing in your Windows 7 system.

  4. Choose the administrator account, then click Reset Password button to remove your forgotten password.
  5. Remove the CD and restart your computer.

Congratulations you’ve successfully break your forgotten Windows 7 admin password. You’ll then be able to log in to your Windows 7 administrator account without entering a password. The breaking method requires you have physical access to your locked computer.

How to Reset Forgotten Ubuntu Password

July 17th, 2012 by Admin

Forgot your Ubuntu password? How to reset it? There are many reasons you might need to reset your forgotten Ubuntu password:

  • Someone gave you a computer with Ubuntu installed on it but not the password for the user account.
  • You just installed Ubuntu and forgot what password you selected during the installation process.
  • You have too many passwords in your life and can’t keep track of them all.

Well, this tutorial will help you reset your Ubuntu login password, regardless of what reason you have forgotten your password.

How to Reset Forgotten Ubuntu Password:

  1. Reboot your computer, and then as soon as you see the GRUB Loading screen, make sure to hit the ESC key so that you can get to the menu.

  2. Use the Up /Down arrow keys to select “Recovery Mode”, which is usually the second boot option.

  3. Wait for all the boot-up processes to finish, you’ll be presented with a few options. In this case, you want the “Drop to root shell prompt” option so press the Down arrow to get to that option, and then press Enter to select it.

  4. Use the following command to reset your forgotten Ubuntu password.

    passwd <username>

  5. After changing your password, use the following commands to reboot your system. (The sync command makes sure to write out data to the disk before rebooting)

After it finishes booting, just enter the password that you reset it to, and you are in! Forgot your Ubuntu password? it’s incredibly easy to reset your password with this trick.

Forgot Windows 7 Password for Your Laptop?

July 16th, 2012 by Admin

I have an old laptop that’s not been used for quite a while, problem is that I forgot Windows 7 password on my laptop, I’ve tried many different passwords that it could possibly be without any luck. I have some important documents and pictures on there that I really don’t want to lose with a brand new windows install. Is there any way to recover or reset the password?

Forgot your laptop password or someone has changed Windows 7 password on your laptop? How to reset laptop password without erasing any important files stored on your computer? In this article I’ll show you how to reset your forgotten Windows 7 password for your laptop so you can log on and regain access to your important data on your laptop.

How to Reset Windows 7 Password for Your Laptop:

  1. Before the work, prepare a blank CD/DVD. Then install and run Password Recovery Bundle on another accessible computer. Click Windows Password button to bring up the CD recording dialog, then burn the default ISO image onto your CD. The CD is the password reset disk we’ll later use to reset Windows 7 password.
  2. Insert the password reset disk into your locked laptop. Set the laptop to boot from the CD.
  3. Restart the computer, it will start to boot from the CD. After a while, your computer will launch the Reset Windows Password program. The software automatically detects the Windows SAM registry hive and show a list of user accounts existing in your Windows 7 system.

  4. Choose the user account whose password you already forgot, then click Reset Password button to reset your forgotten laptop password.
  5. Remove the CD and restart your computer.

Now you’ve done the procedure of resetting Windows 7 password on your laptop. You can get into your laptop without be asking for a password. If your laptop doesn’t have a CD-ROM drive, you can create a password reset disk on a USB drive to reset your laptop password.

Disable User Account Control (UAC) in Windows 7/Vista

July 16th, 2012 by Admin

User Account Control (UAC) is a security feature in Windows 7 and Vista that requires all users to log on and run in standard user privileges mode instead of as administrator with full administrative rights. When standard end-user requires administrator privileges to perform certain tasks such as attempting to install an application or write to registry, Windows will prompt a UAC credential prompt to notify the user that a credential of administrator user account is needed for authorization or permission, thus reduce the chance user can accidentally make modifications to system files or settings and eliminate the ability for virus or malware to invoke administrator privileges without a user’s knowledge.

However, in a lot of cases, administrator rights are needed by end-users to perform certain tasks such as install or update programs and perform typical system-level task. UAC can be troublesome, and sometime annoying especially when you’re the only single user who uses the computer, and has all the latest anti-virus and anti-spyware utilities installed and updated. User Account Control is enabled by default in Windows 7 and Vista, so you will have to turn off and disable the User Account Control.

In this tutorial we’ll show you how to disable UAC in Windows 7 and Vista.

Disable UAC in Windows Vista:
Open up Control Panel, and type in “UAC” into the search box. You’ll see a link for “Turn User Account Control (UAC) on or off”.

On the next screen you should uncheck the box “Use User Account Control (UAC)”, and then click on the OK button.

You’ll need to reboot your computer before the changes take effect, but you should be all done with annoying prompts.

Disable UAC in Windows 7:
Windows 7 makes it much easier to deal with UAC settings, and in fact you don’t have to completely disable UAC if you don’t want to. Just type UAC into the start menu or Control Panel search box.

You can simply drag the slider up or down, depending on how often you want to be alerted.

If you drag it all the way down to the bottom, you’ll have disabled it entirely.