Archive for the ‘Tips & Tricks’ category

How to Make Taskbar Icons Smaller or Larger in Windows 11

February 21st, 2022 by Admin

How can I change the size of the taskbar icons in Windows 11? There is no option available in the Windows Settings app which lets you resize the taskbar icons. Thankfully, you can make the taskbar and its icons smaller or larger using a registry tweak.

How to Make Windows 11 Taskbar Icons Smaller or Larger

  1. Press the WIN + R keyboard shortcut to open the Run command box, type regedit and hit Enter to launch Registry Editor.

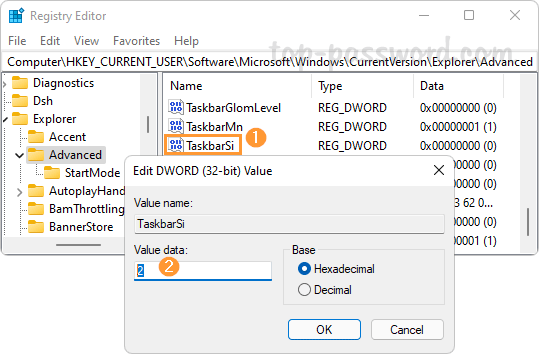
  2. On the left side of Registry Editor, navigate to the key: HKEY_CURRENT_USER\Software\Microsoft\Windows\CurrentVersion\Explorer\Advanced. Right-click the Advanced key and select New -> DWORD (32-bit) Value.

  3. Name the new value as TaskbarSi. Next, double-click on TaskbarSi and enter 2 in the Value data field to make the taskbar icons bigger, or enter 0 to make them smaller.

    Whenever you need to restore the taskbar icons to the original default size, just change the value data of TaskbarSi to 1.

  4. Close Registry Editor. Log off your user account and then log in, you’ll find that the taskbar icons are shown with a different size.

That’s it!

3 Methods to Disable Background Apps on Windows 11

February 18th, 2022 by Admin

How can I turn off background apps in Windows 11? By default, most apps are set to run in the background. This might cause your computer to run slower or use more power and bandwidth. In this tutorial we’ll show you simple ways to disable specific apps or all apps from running in the background on Windows 11.

Method 1: Disable Specific Background Apps Using Settings App

  1. Press the Windows key + I to launch the Windows Settings app. Click Apps on the left sidebar, then click “Apps & features” on the right pane.

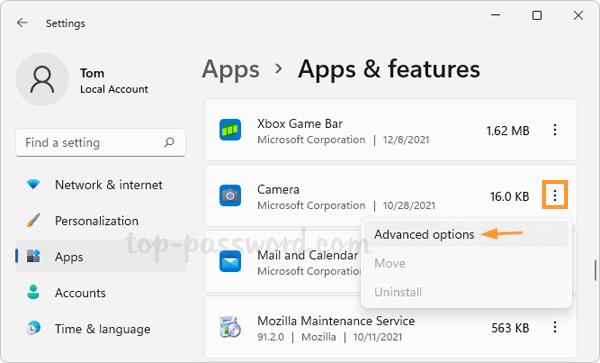
  2. Scroll through the list of apps and find the app which you want to prevent from running in the background. Click on the three dots next to the app and select “Advanced options” from the pop-up menu.

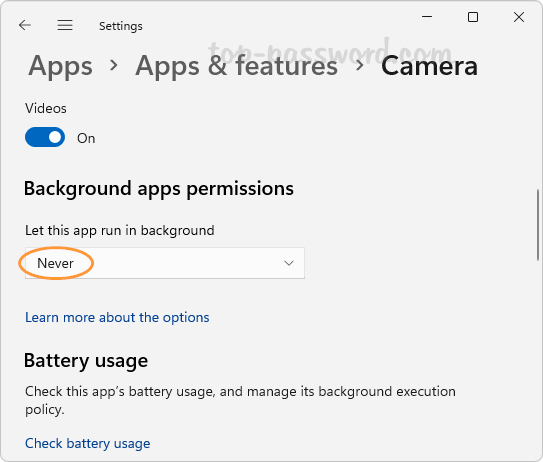
  3. Under the “Background apps permissions” section, select “Never” from the drop-down list. This app will never run in the background.

Method 2: Disable All Background Apps Using Group Policy

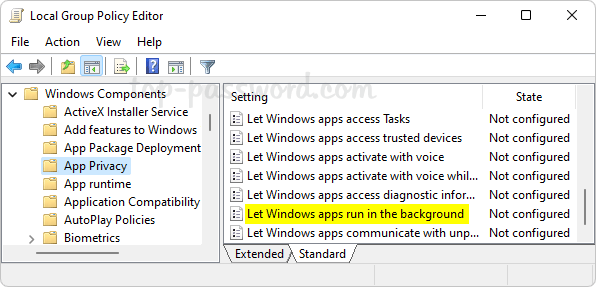
  1. Open Local Group Policy Editor and browse to: Computer Configuration -> Administrative Templates -> Windows Components -> App Privacy. On the right side, double-click the “Let Windows apps run in the background” policy.

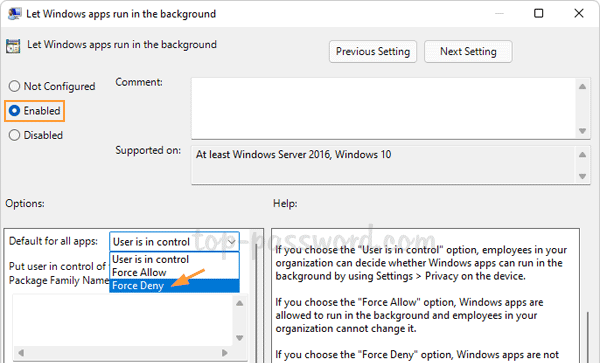
  2. Select the Enabled option. Click the “Default for all apps” drop-down menu, select “Force Deny“.

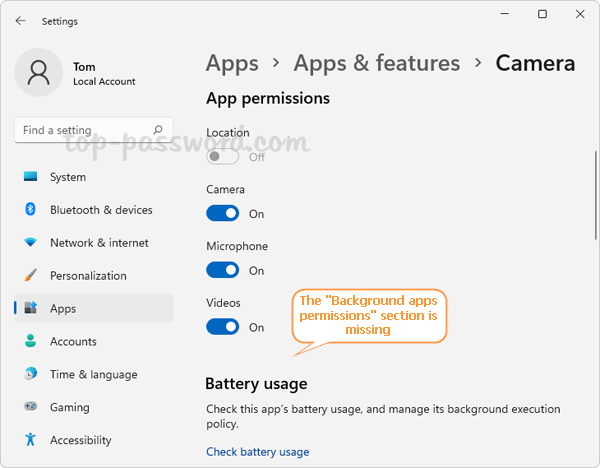
  3. Click Apply and then OK. After restarting your system, Windows 11 will disable all background apps for all user accounts. If you open the Settings app and go to: Apps -> Apps & features, you’ll find that the “Background apps permissions” setting for all apps disappears.

Method 3: Disable All Background Apps Using Registry Editor

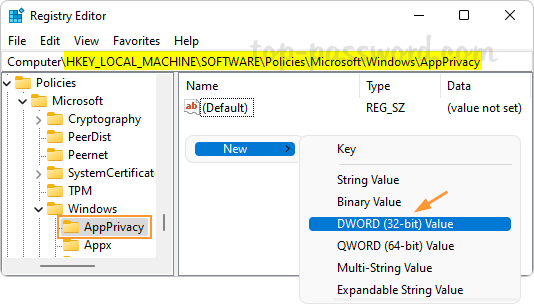
  1. Open Registry Editor and navigate to: HKEY_LOCAL_MACHINE\SOFTWARE\Policies\Microsoft\Windows\AppPrivacy. On the right pane, right-click the blank area and select New -> DWORD (32-bit) Value.

    If the “AppPrivacy” key is missing, right-click on “Windows” key and select New -> Key, name it as AppPrivacy.

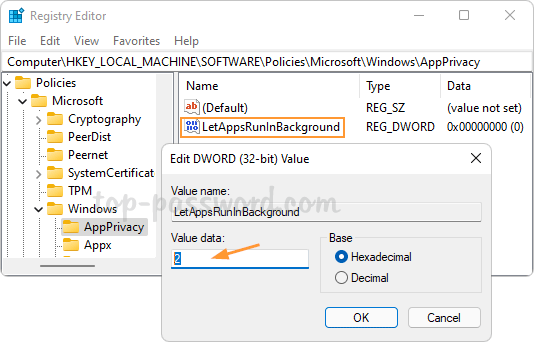
  2. Name the newly-created DWORD as LetAppsRunInBackground, and then double-click it and set its value data to 2. Click OK.

  3. Restart Windows 11 to apply your changes. This will prevent all apps from running in the background for all users. Whenever you need to revert the changes, just delete the AppPrivacy key and you’re done.

How to Open the New or Old Volume Mixer in Windows 11

February 15th, 2022 by Admin

How to get back the old Volume Mixer in Windows 11? Windows 11 comes with a new, redesigned Volume Mixer which is now part of the Settings app, while the old Volume Mixer is still available. In this tutorial we’ll show you different ways to open the new or old Volume Mixer in Windows 11.

Method 1: Open the New Volume Mixer in the Settings App

Right-click the sound icon in the system tray and then choose “Open volume mixer” from the pop-up menu.

The Settings app will launch and get you to the page: System/Sound/Volume mixer. The new Volume Mixer lets you adjust the overall sound level or change the volume for individual apps.

Method 2: Open the Old Volume Mixer via Control Panel

Open the Control Panel in Category view, and click on Hardware and Sound.

Under the Sound section, click the “Adjust system volume” option.

The old Volume Mixer utility will launch immediately.

Method 3: Open the Old Volume Mixer via Run Command

Press the WIN + R keyboard shortcut to launch the Run box, type sndvol and hit Enter to open the old Volume Mixer app.

If you need to access the classic Volume Mixer frequently, just create a desktop shortcut and point to the executable file C:\Windows\System32\SndVol.exe. Next, right-click the shortcut and pin it to the taskbar or the Start Menu for quick access.

How to Fix: Windows 11 Desktop Icons not Showing

February 12th, 2022 by Admin

Desktop icons disappeared after Windows 11 update? Cannot right-click anywhere on the desktop to restore the missing icons? Here are a couple of troubleshooting tips to fix the problem of Windows 11 desktop icons not showing.

Method 1: Enable Show Desktop Icons

Right-click any empty space on your desktop and navigate to the View tab at the top, then check the “Show desktop icons” option.

Make sure there is a check-mark next to the “Show desktop icons” option.

Method 2: Configure Your Desktop Icons’ Settings

Press the WIN + I keyboard shortcut to open the Settings app, then navigate to: Personalization -> Themes. On the right-hand side pane, click the “Desktop icon settings” option.

Select the icons that you want to display on the desktop, For example, Computer, Recycle Bin, User’s Files, Network, or Control Panel.

Click Apply and then OK to see if the missing desktop icons appear.

Method 3: Check Group Policy Setting

If all desktop icons disappear and you cannot right-click on the desktop, then check if this issue is caused by a improper group policy.

  1. Open Local Group Policy Editor and browse to: User Configuration -> Administrative Templates -> Desktop. On the right-side, double-click the “Hide and disable all items on the desktop” policy.

  2. If this policy is enabled, select “Not Configured” and click OK.

  3. Restart your computer to make the changes take effect. The missing desktop icons should come back and the right-click problem should also be fixed.

Method 4: Rebuild the Icon Cache

If your desktop icons are missing or appear blank or broken, you can fix the issue by rebuilding the desktop icon cache. Just open the elevated Command Prompt and execute the following command:
DEL %userprofile%\AppData\Local\IconCache.db /a

Log off your account and log in to see if the problem is fixed.

Conclusion

Desktop icons still don’t show up after trying the above methods? It’s possible that you’ve been logged in with a temporary profile, or you need to fix corrupted values for icon spacing in Registry Editor. As a last resort, you can perform a clean boot or restore your PC to an earlier restore point.

Windows 11: How to View Command History in PowerShell or Command Prompt

February 3rd, 2022 by Admin

Is there a simple way to see Command Prompt history without using arrow keys? Can I view PowerShell command history for previous sessions? In this tutorial we’ll show you how to quickly access the history of commands you recently typed in Windows Terminal (PowerShell or Command Prompt).

Part 1: View Command History in PowerShell

When you’re at the PowerShell console, just run the history command and it will display all commands you typed during the current session.

By default, PowerShell maintains the command history of all sessions and store it in a text file located in your user profile directory. Just press the Windows key + R together to launch the Run dialog, copy and paste the following path and press Enter:
%userprofile%\AppData\Roaming\Microsoft\Windows\PowerShell\PSReadline

File Explorer will open to your specified location and you can see a text file named ConsoleHost_history.txt.

Open the ConsoleHost_history.txt file with NotePad and it reveals all the commands that you have typed in each PowerShell sessions.

Part 2: View Command History in Command Prompt

When you’re at the Command Prompt, just execute the below command and the command history for your current session will appear on the screen.
doskey /history

or press F7 key to open a pop-up inside the Command Prompt, which shows a list of the commands that have been entered in this session. You can use the up and down arrow keys to select a command, and then press Enter to execute the command again.

Once you close the Command Prompt window, the history will be removed permanently. Before closing it, you can use the following command to save the command history:
doskey /history > d:\MyHistory.txt

That’s it!

How to Enable the Classic Boot Menu in Windows 11

February 2nd, 2022 by Admin

Dual-boot menu does not show up and can’t select which operating system to boot? How can I enable F8 key for accessing Safe Mode? You just need to enable the classic Windows Boot Manager screen in Windows 11, which will display OS selection menu and also let you press F8 key to access Safe Mode.

How to Enable the Classic Boot Menu in Windows 11

  1. Press the Windows key + R together to launch the Run command box, type cmd and press CTRL + SHIFT + ENTER keyboard shortcut to open the Command Prompt as administrator.

  2. Run the following command to enable the legacy boot menu:
    bcdedit /set {bootmgr} displaybootmenu yes

  3. Close Command Prompt and reboot your PC. You’ll see the Windows Boot Manager screen at startup, which shows a list of installed operating systems.

    If you press F8 key as the screen indicates, it will let you access Advanced Boot Options, including Safe Mode.

    Whenever you need to disable the classic boot menu, just open an elevated Command Prompt and execute this command:
    bcdedit /set {bootmgr} displaybootmenu no

That’s it!

Fast Ways to Open Command Prompt in Windows 11

January 28th, 2022 by Admin

Windows 11 brings Windows Terminal to the forefront and you may find that it’s not easy to access the classic Command Prompt. If you get accustomed to using Command Prompt, here are the fastest ways to open Command Prompt in Windows 11.

Method 1: Open Command Prompt in Windows 11 via Run

Press the Windows key + R together on your keyboard to open the Run dialog box. Type cmd and press ENTER to launch a regular Command Prompt window.

or type cmd, and then press CTRL + SHIFT + ENTER keyboard shortcut to open an elevated Command Prompt.

Method 2: Open Command Prompt in Windows 11 via Search

Click the Search button in the taskbar. Type cmd in the search box at the top. The Command Prompt app will appear under Best Match section.

You can click Open or “Run as administrator” to launch a Command Prompt window, or pin it to the Start menu or taskbar for quick access.

Method 3: Open Command Prompt in Windows 11 via Start

Right-click the Start button in the taskbar and choose Windows Terminal. If you’re going to open Command Prompt as administrator, click the “Windows Terminal (Admin)” option instead.

When the Terminal app opens, click on the down-facing arrow in the title bar and select “Command Prompt“.

It will open the Command Prompt immediately.

Method 4: Open Command Prompt in Windows 11 via Task Manager

Open Task Manager. Click the File menu and select “Run new task“.

Type cmd in the Open box, tick the “Create this task with administrative privileges” option if you want to open an elevated Command Prompt.

Once you click OK, the Command Prompt will immediately open up.

Step-by-Step Tutorial to Enable DNS over HTTPS in Windows 11

January 25th, 2022 by Admin

Windows 11 comes with built-in support for DNS over HTTPS (DoH), which lets you encrypt all DNS requests between your PC and the DNS server to improve your online privacy and security. In this tutorial we’ll walk you through the steps to enable DNS over HTTPS for all programs (including browsers) on your Windows 11 computer.

How to Enable DNS over HTTPS in Windows 11

  1. Press the Windows key + I to open the Settings app. Choose “Network & internet” from the sidebar. On the right side, click on “Advanced network settings“.

  2. You’ll see a list of installed network adapters. Click on Wi-Fi or Ethernet to expand the settings, depending on your active internet connection.

  3. Click on the “View additional properties” link.

  4. click on Edit next to “DNS server assignment”.

  5. In the window that pops up, make sure the “Edit DNS settings” drop-down list is set to Manual. Turn on IPv4 and enter the primary and secondary DNS server addresses which support DoH. Select the “Encrypted only (DNS over HTTPS)” option for both DNS servers.

    Here are the public DNS servers which support DoH:

    Google
    IPv4: 8.8.8.8, 8.8.4.4      
    IPv6: 2001:4860:4860::8888, 2001:4860:4860::8844
    
    Cloudflare
    IPv4: 1.1.1.1, 1.0.0.1      
    IPv6: 2606:4700:4700::1111, 2606:4700:4700::1001
    
    Quad9
    IPv4: 9.9.9.9, 149.112.112.112     
    IPv6: 2620:fe::fe, 2620:fe::fe:9
  6. After clicking Save, Windows 11 will automatically start encrypting DNS requests for all your programs and web browsers.

2 Methods to Hide “Pin to taskbar” from Context Menu in Windows 11

January 21st, 2022 by Admin

Is it possible to hide “Pin to taskbar” or “Unpin from taskbar” context menu for programs or apps? If you don’t allow users to remove pinned apps from the taskbar or pin new programs to the taskbar, here are 2 simple methods to disable or hide “Pin to taskbar” option from right-click context menu in Windows 11.

Method 1: Hide “Pin to taskbar” from Context Menu Using Group Policy

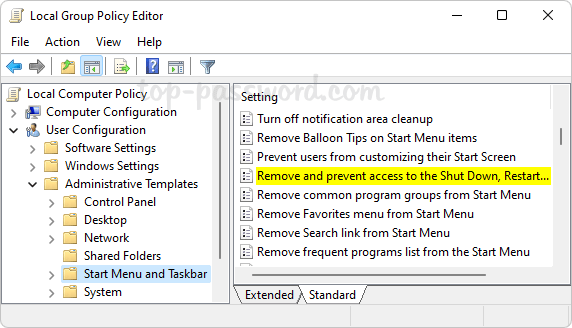
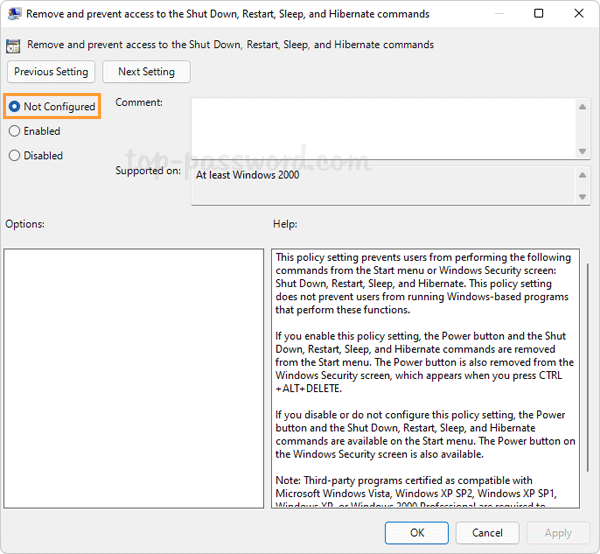
  1. Open Local Group Policy Editor and expand to: User Configuration -> Administrative Templates -> and Start Menu and Taskbar. Double-click the “Do not allow pinning programs to the Taskbar” policy on the right pane.

  2. Select the Enabled option. Click Apply and then OK.

  3. Sign out of your account or restart your computer. You’ll find the “Pin to taskbar” option is already removed from right-click context menu. When you right-click any pinned apps on the taskbar, the “Unpin from taskbar” option will not show up any more.
Method 2: Hide “Pin to taskbar” from Context Menu Using Group Policy

  1. Open Registry Editor and browse to HKEY_CURRENT_USER\Software\Policies\Microsoft\Windows in the left pane. Right-click the Windows key and select New -> Key.
  2. Name the new key as Explorer, and click to select it. On the right pane, right-click any blank area and choose New -> DWORD (32-bit) Value.

  3. Name the new DWORD as NoPinningToTaskbar. Next, double-click it and change its value data to 1. Click OK. This will hide “Pin to taskbar” and “Unpin from taskbar” context menu for apps in Windows 11.

    Whenever you need to restore the missing “Pin to taskbar” option or revert back to the previous settings, just delete the DWORD “NoPinningToTaskbar” and you’re done.

  4. Close Registry Editor. Log out and log back in again to make these changes take effect.

How to Disable or Enable Memory Compression in Windows 11 / 10

January 18th, 2022 by Admin

Memory compression is a new feature introduced in Windows 10, which can store more data in your RAM than it otherwise could, by storing part of the memory pages in RAM in a compressed form. For example, if your applications need to store 4 GB of data in the RAM at the same time, Windows might have 3 GB of uncompressed data and 0.5 GB of compressed data that actually takes up 1 GB in RAM.

With memory compression, Windows can compress a fraction of the memory in order to reduce page swap out. This is very useful when your PC doesn’t have enough physical memory. In this tutorial we’ll show you how to disable or enable memory compression in Windows 11 / 10.

Part 1: Check if Memory Compression is Enabled

Open up Task Manager. Go to the Performance tab and select Memory on the left sidebar. You will see how much memory is compressed under the “In use (Compressed)” section. As you can see in the following screenshot, 2.3 GB of memory is in use, and of that 80.9 MB is compressed.

If the compressed memory is shown as 0 MB, it’s likely that the memory compression feature is disabled on your system.

Part 2: Disable or Enable Memory Compression

  1. Right-click on the Start button in the taskbar and select Windows Terminal (Admin). If you’re running Windows 10, open Windows PowerShell as administrator.

  2. Then run the Disable-MMAgent -mc command to disable memory compression, and afterwards execute the command Get-MMagent to check if memory compression is disabled successfully.

  3. If you need to turn on or enable memory compression, enter this command and press Enter.
    Enable-MMAgent -mc

  4. Reboot your computer to apply the changes. The next time you log in to your system, you can launch Task Manager and check if memory compression is running or not.