Archive for the ‘Tips & Tricks’ category

3 Ways to Disable Screen Auto-Rotation in Windows 10

July 13th, 2019 by Admin

My screen keeps rotating automatically and it’s really annoying? If your tablet or laptop is equipped with gyroscope sensors, Windows 10 will automatically rotate the desktop to landscape or portrait mode automatically depending on the physical orientation of the screen. To lock the screen into your preferred orientation, here are 3 ways to disable screen auto-rotation in Windows 10.

Method 1: Disable Screen Auto-Rotation Using Action Center

To get started, you need to open the Action Center by either clicking the Action Center icon from the lower-right corner of the taskbar or pressing the Windows key + A shortcut.

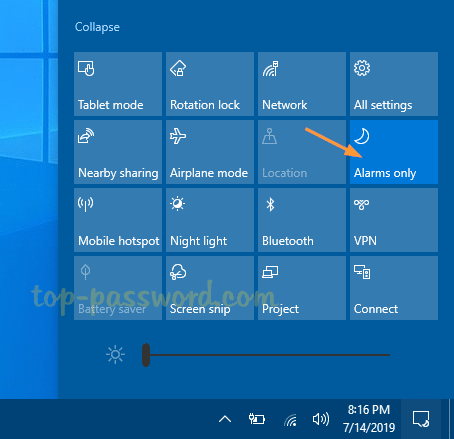
When the Action Center pane appears, you can click the Rotation lock icon to lock your screen into its current orientation. Now your device won’t automatically rotate the screen any longer.

Method 2: Disable Screen Auto-Rotation Using Settings App

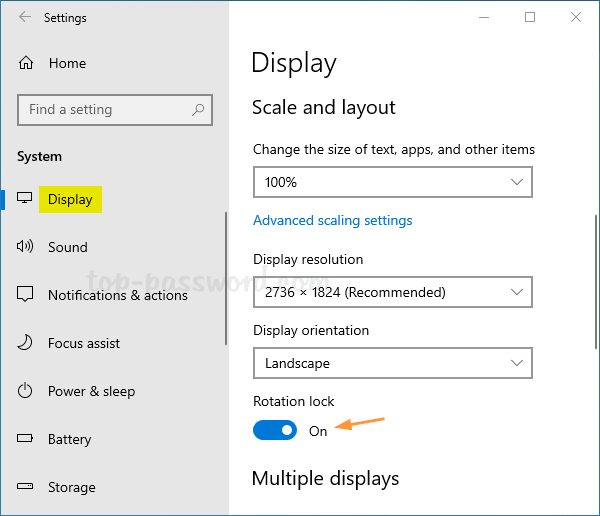
Press the Windows key + I to open the Settings app, navigate to System -> Display.

On the right pane, scroll down to find the option named “Rotation lock“. Just toggle it to On to disable screen auto-rotation. If you don’t see the option, it’s possible that your device doesn’t support the screen rotate feature at all.

Method 3: Disable Screen Auto-Rotation Using Registry Editor

Open Registry Editor and browse to the following key:
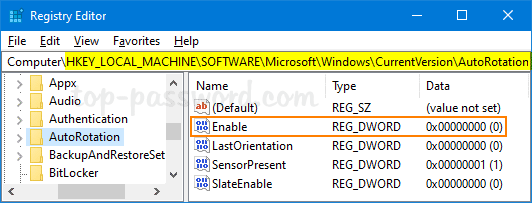
HKEY_LOCAL_MACHINE\SOFTWARE\Microsoft\Windows\CurrentVersion\AutoRotation

Look for the DWORD Enable in the right pane, then double-click it and set the value to 0. This will disable screen auto-rotation and prevent the screen from rotating automatically.

Close Registry Editor and reboot Windows 10 to apply your changes. If you need to enable screen auto-rotation again, just change the value of Enable to 1 and you’re done.

Disable Thumbnail Preview When You Snap a Window in Windows 10

July 9th, 2019 by Admin

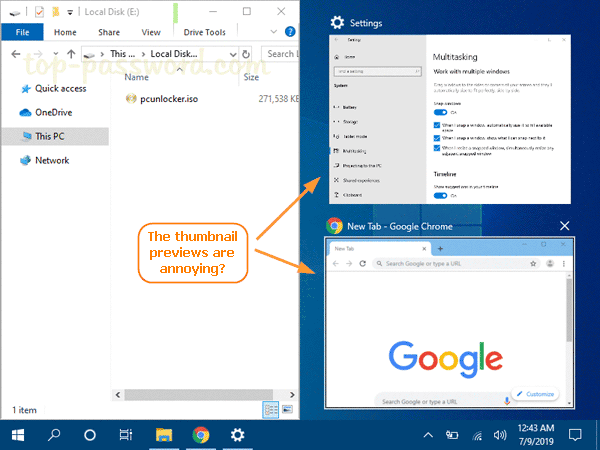
When dragging a window to one side or corner of your screen, Windows 10 will display the thumbnail previews of other open windows to fill the other side of the screen. This looks like that Task View is activated but it’s actually a feature called Snap Assist. If you find the thumbnail previews are really annoying, you can disable Snap Assist using the Settings app in Windows 10.

How to Disable Snap Assist in Windows 10

  1. Press the Windows key + I shortcut to open the Settings app. Click on the System category.

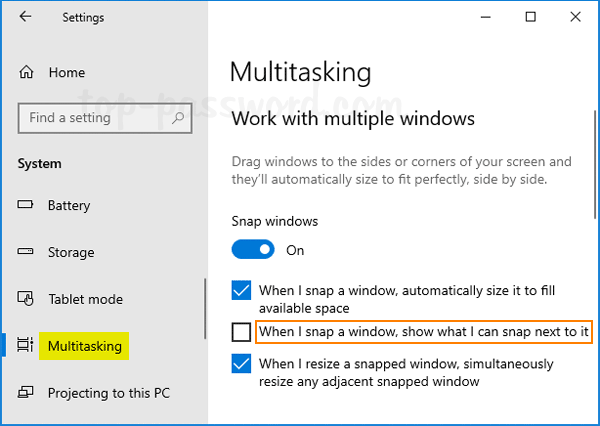
  2. Select the Multitasking tab in the left menu. On the right side, uncheck the option labeled “When I snap a window, show what I can snap next to it“. This will disable Snap Assist thumbnail window only, and you can still snap a window with keyboard or mouse.

    If you want to disable snapping completely, just toggle the “Snap windows” option to Off.

That’s all there is to it.

How to Download and Install Latest Drivers for all Surface Devices

July 8th, 2019 by Admin

Have you experienced graphics problem with new Surface Pro tablet? Couldn’t update the drivers to the latest version through Windows Updates? In this tutorial we’ll walk you through the steps to manually download and install the latest drivers for all Surface devices.

How to Download and Install Latest Drivers for all Surface Devices

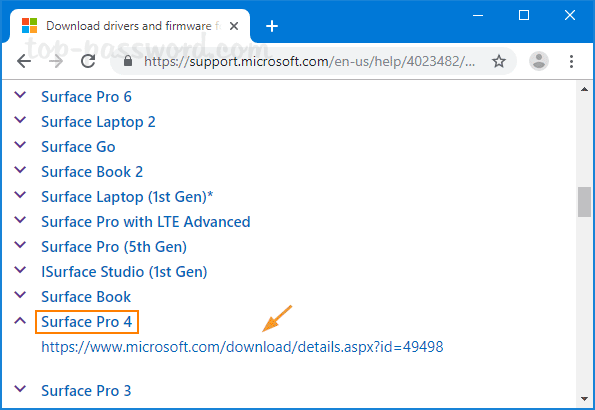
  1. Go to the page: Download drivers and firmware for Surface. Select your Surface model from the list and click the download link that appears underneath the model.

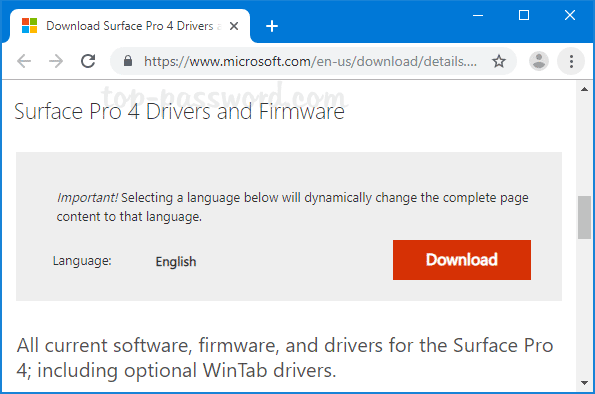
  2. Click on the red Download button.

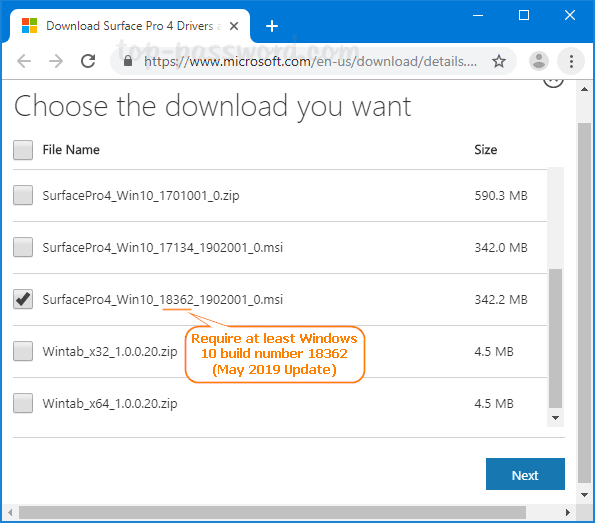
  3. You’ll see a list of driver updates package for each build of Windows 10. Select the latest driver package that you need and click Next. For example, to install the drivers contained in SurfacePro4_Win10_18362_1902001_0.msi file you must have Windows 10 May 2019 Update v1903 (build number: 18362), or newer installed on your Surface Pro 4.

    If you need to determine the build of Windows 10 that is installed, please check out this article: 4 Ways to Find What Version & Build Number of Windows 10 You’re Running

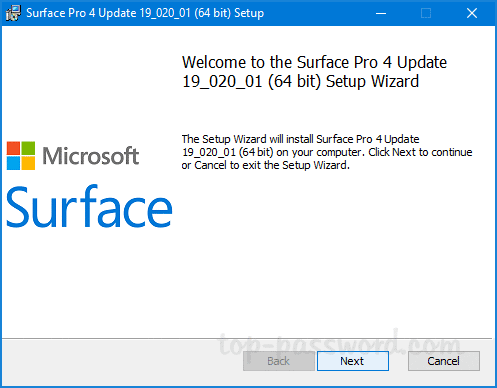
  4. Once the download is complete, double-click on the .msi file to launch the driver installation wizard. Keep clicking Next until it is finished.

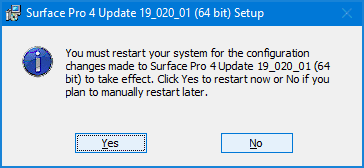
  5. When you’re prompted to restart your Surface device to finish installing the driver updates, click Yes.

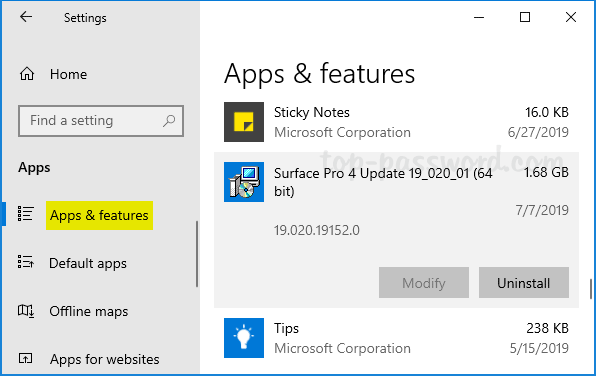
  6. Now you’ve successfully installed the latest drivers on your Surface device. Whenever you want to roll back the Surface drivers you just installed, just open the Settings app and navigate to Apps > Apps & features. Look for the driver package with a name like “Surface Pro 4 Update xx_xxx_xx (64 bit)“, click it and you’ll see an option to uninstall it.

That’s it!

How to Restore Missing Power Plans in Windows 10 / 8

July 5th, 2019 by Admin

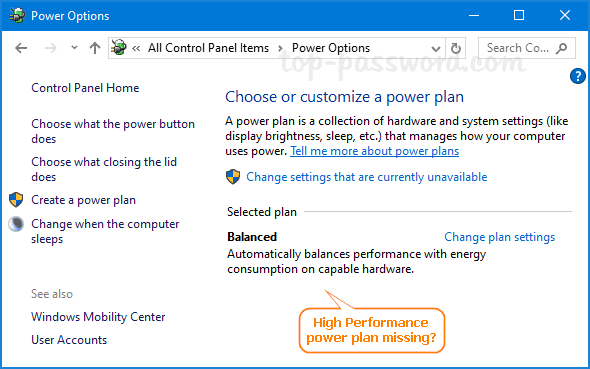
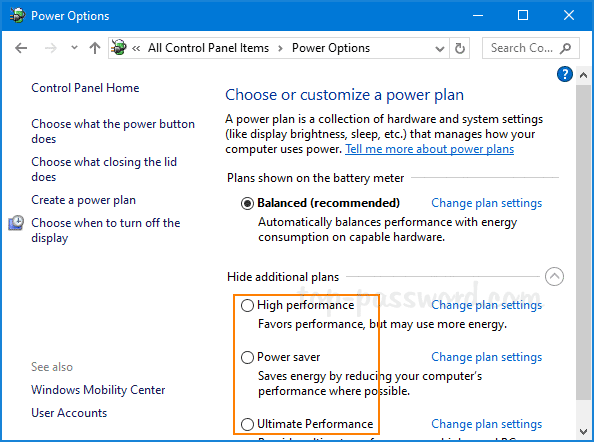
High Performance power plan missing after Windows 10 updates? Only balanced power plan is available on your DELL Inspiron laptop? By default, every Windows installation should come with three predefined power plans: Power Saver, Balanced, and High Performance. If any power plan is missing on your PC, here are easy ways to restore it.

Method 1: Disable Connected Standby

Connected Standby is a new feature introduced since Windows 8 that offers a fast sleep/wake. By default, Connected Standby is enabled and it will limit what power settings or plans are available to users. To restore your missing power plans, you may need to turn off Connected Standby using this registry tweak:

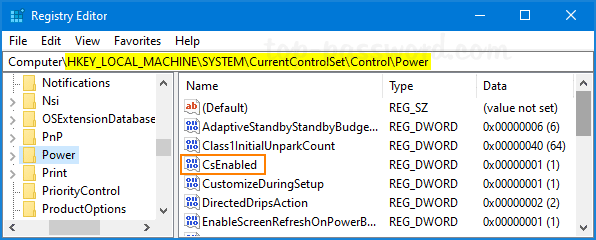
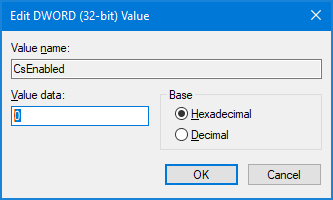
  1. Open Registry Editor and navigate to: HKEY_LOCAL_MACHINE\SYSTEM\CurrentControlSet\Control\Power. In the right pane, double-click on the DWORD CsEnabled to modify it.

  2. Change the value from 1 (enable) to 0 (disable), and click OK.

  3. Close Registry Editor. After rebooting you should have your default power plans back.

Method 2: Restore Missing Power Plans Using Command Prompt

  1. Open the Command Prompt as administrator.
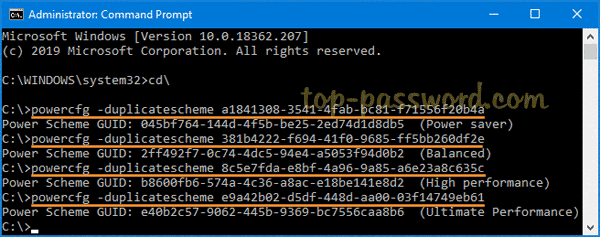
  2. Copy and paste the command below for the missing power plan you want to restore into the Command Prompt, and hit Enter.

    • Power saver:
      powercfg -duplicatescheme a1841308-3541-4fab-bc81-f71556f20b4a
    • Balanced:
      powercfg -duplicatescheme 381b4222-f694-41f0-9685-ff5bb260df2e
    • High Performance:
      powercfg -duplicatescheme 8c5e7fda-e8bf-4a96-9a85-a6e23a8c635c
    • Ultimate Performance (available since Windows 10 April 2018 Update):
      powercfg -duplicatescheme e9a42b02-d5df-448d-aa00-03f14749eb61
  3. When done, open the Power Options and you can immediately access the missing power plans that you just added.

Conclusion

The above methods should work on most Windows 10/8 systems. If you still couldn’t get the power plans back, just open the Control Panel and add a new power plan for your own purpose.

How to Turn on Automatic Registry Backup in Windows 10

July 2nd, 2019 by Admin

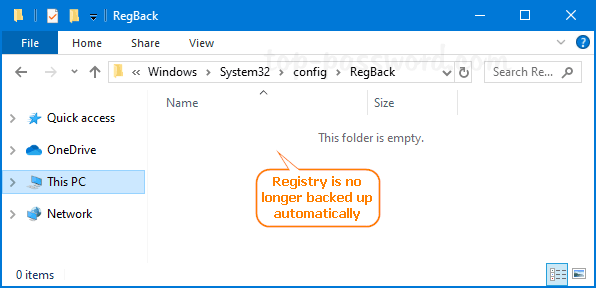
Starting with the April 2018 Update (version 1803), Windows 10 stopped backing up the registry automatically to the RegBack folder, and Microsoft encourages users to use a system restore point in the event of registry corruption. Navigating to the Windows\System32\config\RegBack folder and you’ll find that it’s empty.

This change is by design, and is intended to help reduce the overall disk footprint size of Windows. For those who still want to restore the functionality of creating registry backup automatically, here is a registry tweak to turn on automatic registry backup in Windows 10.

How to Turn on Automatic Registry Backup in Windows 10

  1. Press the Windows key + R to open the Run dialog, type regedit and hit Enter to launch Registry Editor.

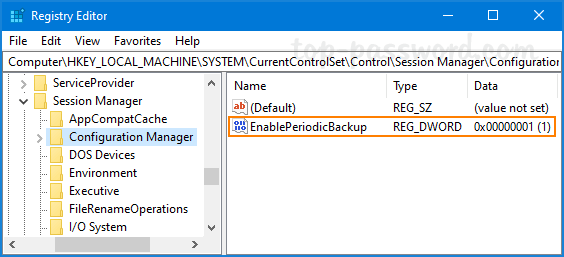
  2. Browse to this key: HKEY_LOCAL_MACHINE\SYSTEM\CurrentControlSet\Control\Session Manager\Configuration Manager. On the right pane, right-click on blank space and select New -> DWORD (32-bit) Value.

  3. Name the new DWORD EnablePeriodicBackup. Next, double-click it and set the value to 1.

  4. After a reboot, Windows 10 will automatically backup the registry to the RegBack folder, and create a RegIdleBackup task to manage subsequent backups.
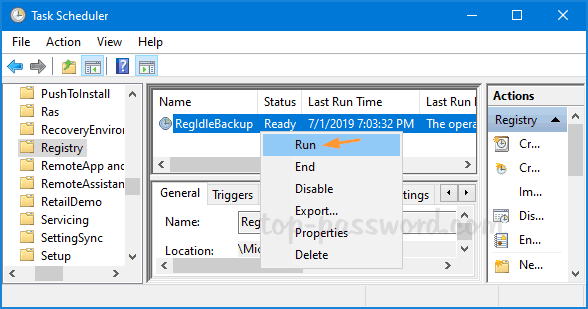
  5. If you need to create backups of the registry manually, just open Task Scheduler and navigate to Microsoft\Windows\Registry. Right-click on the RegIdleBackup task and select Run.

    It will immediately save your registry to the Windows\System32\config\RegBack folder.

That’s how you can easily turn on automatic registry backup in Windows 10. When your registry gets damaged and corrupted, you can restore the registry backup to the folder Windows\System32\Config with a Live CD.

How to Disable Windows Hello PIN Setup in Windows 10

July 1st, 2019 by Admin

How do I stop Windows 10 from asking you to set up a PIN at startup? Is there a way to disable the add a PIN option in the Settings app? In this tutorial we’ll show you how to disable Windows Hello PIN setup using group policy in Windows 10.

How to Disable Windows Hello PIN Setup in Windows 10

  1. Press the Windows key + R to open the Run dialog, type gpedit.msc and hit Enter to open Local Group Policy Editor. If you’re running Windows 10 Home, Local Group Policy Editor is not available and you can use other ways to disable Windows 10 PIN login.

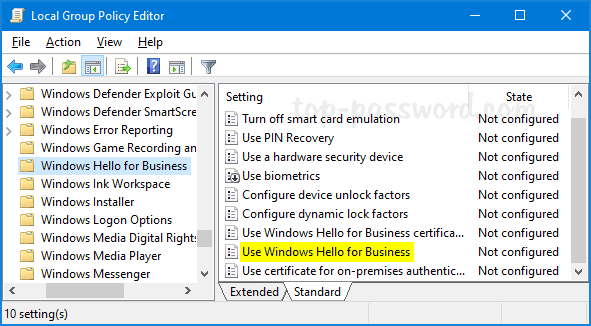
  2. Navigate to: Computing Configuration / Administrative Templates / Windows Components / Windows Hello for Business. On the right-side pane, double-click on the “Use Windows Hello for Business” policy.

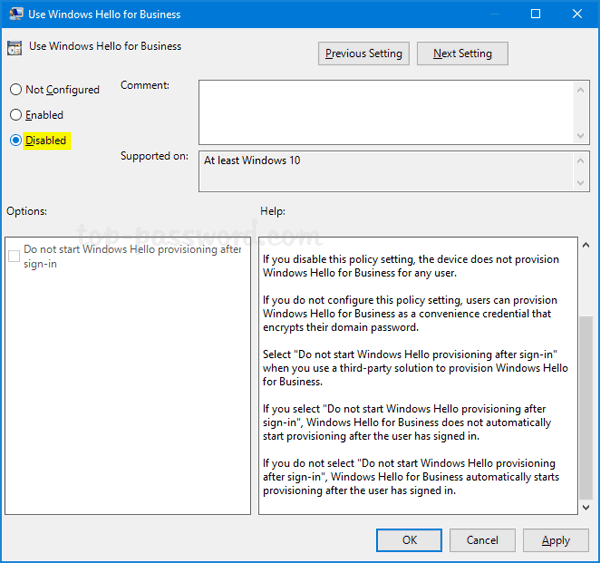
  3. Select Disabled. Click Apply and then OK.

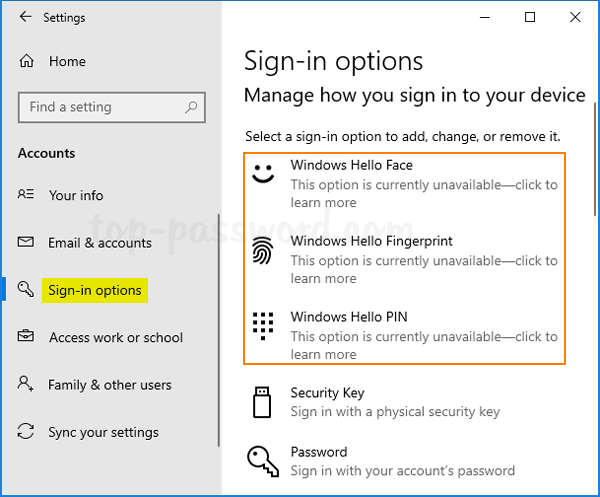
  4. Reboot your computer to apply the changes. The next time you open the Settings app and go to Accounts -> Sign-in options. You’ll find that the options to set up Windows Hello PIN / Face / Fingerprint are unavailable any longer.

If you’ve already set up Windows Hello PIN before applying the above policy, you can still sign in to Windows 10 with PIN or remove the existing PIN sign-in option. But you’re unable to change the PIN any longer.

How to Create Windows-Compatible ISO Image from CD / DVD / USB in Mac OS X

June 28th, 2019 by Admin

How can I make an ISO file from your physical disc on macOS Mojave? By default, macOS just uses its platform’s native file system HFS for ISO image. If you need to share the resulting ISO image with friends who use Windows, Linux or Ubuntu, then you have to save it in ISO-9660 format. In this tutorial we’ll walk you through the steps to create a Windows-compatible ISO image from CD, DVD or USB in Mac OS X.

How to Create ISO Image from CD / DVD / USB in Mac OS X

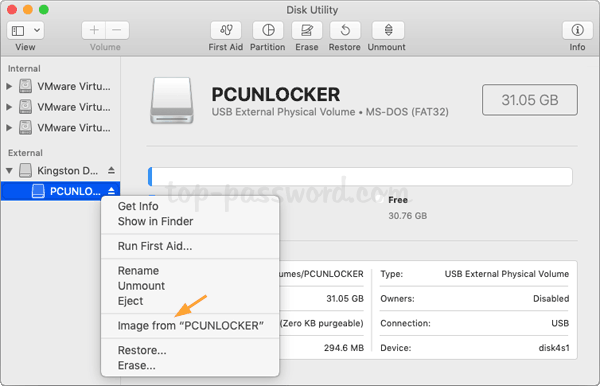
  1. Insert the CD/DVD or USB you want to create an ISO image from into your Mac and then launch Disk Utility. When your CD/DVD or USB appears in the left sidebar of Disk Utility, right-click on it and select Image from.

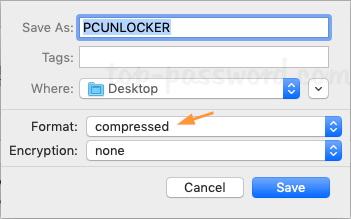
  2. In the Save As dialog, select Desktop as your destination and choose the compressed image format, then click on Save.

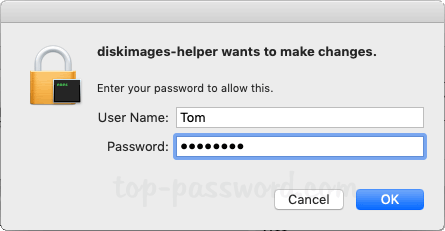
  3. When prompted that diskimages-helper wants to make changes, type your Mac password and click OK.

  4. Disk Utility will create a disk image with the .dmg extension and you can find it on your Desktop. Next, in order to convert the resulting .dmg to a Windows-compatible ISO file, open the Terminal and type this command:
    hdiutil makehybrid -iso -joliet -o ~/Desktop/filename.iso ~/Desktop/filename.dmg

  5. When the process is complete, you can distribute the ISO image to your friends who use Windows, Linux, Ubuntu, Mac or other operating systems. Happy burning!

How to Convert Disk Image Between .DMG and .ISO Format on Mac OS X

June 27th, 2019 by Admin

So you downloaded an .iso image, and now you want to convert it to .dmg format? How can I convert .dmg to a Windows-compatible .iso on Mac? Don’t bother downloading any third party software, you can easily convert .dmg to .iso or .iso to .dmg format using the Terminal or Disk Utility on Mac OS X.

Method 1: Convert Between .DMG and .ISO Using Terminal

Mac OS X has a command line tool called hdiutil which allows you to create, mount and convert different types of disk image with ease. Here’s how to convert .dmg to .iso format using the Terminal:

  1. Just press Ctrl + Alt + T on your keyboard to open the Terminal.
  2. Enter the following command into the Terminal window, assuming that you’ve put the .dmg file on your desktop.
    hdiutil makehybrid -iso -joliet -o ~/Desktop/filename.iso ~/Desktop/filename.dmg

    When the process finishes, you’ll get an ISO image that is compatible with Windows, Linux, Ubuntu and Mac.

If you need to convert a disk image from .iso to .dmg, just execute the following command in the Terminal window:
hdiutil convert ~/Desktop/filename.iso -format UDRW -o ~/Desktop/filename.dmg

Sit back and wait for the process to complete.

Method 2: Convert Between .DMG and .ISO Using Disk Utility

  1. Just launch Disk Utility (in /Applications/Utilities). In the menu bar at the top of the screen, select Images -> Convert.

  2. Browse to the .DMG or ISO file you would like to convert, select it and click on the Choose button.

  3. In the pop-up window, select Desktop as your destination. In order to convert .dmg to .iso, make sure to choose DVD/CD master as the Image Format. Click on Convert.

    If you want to convert .iso to .dmg, set the Image Format to “compressed” instead. Click on Convert and you’ll have a .dmg file ready to use.

  4. Simply rename the converted .cdr file to .ISO and you’ll get a Mac-compatible .ISO image. However, a renamed file won’t work on Windows or Linux. To make a Windows/Linux/Mac compatible .ISO file, you have to convert the .cdr file to .iso format using this command:
    hdiutil makehybrid -iso -joliet -o ~/Desktop/filename.iso ~/Desktop/filename.cdr

Conclusion

DMG is a disk image format commonly used by Mac OS X, but it’s practically unusable on Windows or Linux platform. After converting .dmg to .iso on your MacOS, you can copy it to any Windows or Linux computer for burning or mounting.

How to Change Text Color in Windows 10 without Software

June 21st, 2019 by Admin

How do I change the color of the fonts in Windows 10? The text color in Windows is black by default and there is no GUI option available to change the text color for your current theme. In this tutorial we’ll show you how to change text color in Windows 10 using a registry tweak.

This method doesn’t change the text color of all windows. Before getting started, make sure you have turned off High Contrast in Windows 10.

How to Change Text Color in Windows 10 without Software

  1. Press the Windows key and R to bring up the Run box, type regedit and hit Enter to open Registry Editor.

  2. Navigate to the following key:
    HKEY_CURRENT_USER\Control Panel\Colors

    On the right pane, locate WindowText and double-click it to modify.

  3. Just enter the RGB (Red, Green, Blue) value for your desired color and click OK.

    For example, white is 255 255 255, black is 0 0 0. You can use an online color picker to find the RGB value of any color.

  4. After setting new color, changes will take effect on the next login.

If you also need to change the title bar text color, just use the same method to change the RGB values for the following registry settings:
HKEY_CURRENT_USER\Control Panel\Colors\ActiveTitle
HKEY_CURRENT_USER\Control Panel\Colors\TitleText
HKEY_CURRENT_USER\Control Panel\Colors\InactiveTitle
HKEY_CURRENT_USER\Control Panel\Colors\InactiveTitleText

That’s it!