Archive for the ‘Tips & Tricks’ category

Windows 10: Hide or Unhide Folders / Files Using Command Prompt

April 11th, 2019 by Admin

Is there a way to hide important files to prevent accidental deletion? In this tutorial we’ll show you how to hide or unhide folders / files in Windows 10 using Command Prompt.

Hide Folders or Files

When you’re going to hide a specific folder or file, open up the Command Prompt and type:
attrib +h "your_folder_or_file"

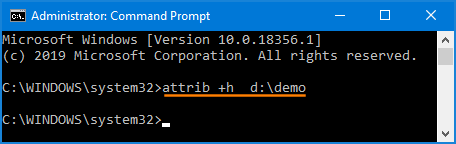
This command will assign the “Hidden” attribute to your target folder or file, and make it disappear from the File Explorer view.

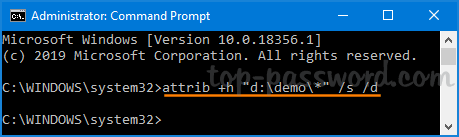
If you need to hide all files and subfolders in your target location (for exmaple, D:\demo), run this following command:
attrib +h "d:\demo\*" /s /d

List Hidden Files

If you need to list hidden files and folders while in Command Prompt, use the CD command to change your working directory and then type:

dir /a:h

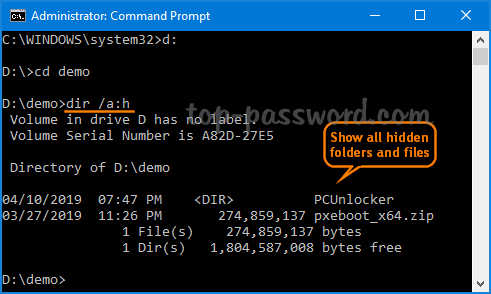
This will show all hidden folders or files in that location.

Unhide Folders or Files

When you need to unhide a specific folder or file, execute this command:
attrib -s -h "your_hidden_folder_or_file"

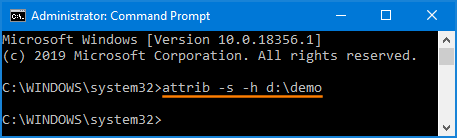
In order to unhide all hidden files and subfolders under a location (e.g. D:\demo), type this command:
attrib -s -h "d:\demo\*" /s /d

That’s it! The built-in option to hide folders/files is pretty easy but it’s not secure because anyone can unhide them the easy way. If you need to hide sensitive files from prying eyes, it’s a good idea to use third-party softwares (for instance, Protect My Folders) to hide and lock your folders/files with a password.

How to Fully Shutdown Windows 10 Instead of Hibernating It

April 10th, 2019 by Admin

By default, Windows 10 enables a feature called Fast Startup (Hybrid Shutdown) that can shut down and boot up your PC much faster than Windows 7 or previous versions of Windows. When you shutdown Windows 10, you’re actually performing a partial hibernation.

If you prefer to have your PC completely shut down, you can either turn off Fast Startup feature or use the following methods to fully shutdown Windows 10.

Method 1: Perform a Full Shutdown Using Shift Key

We’ve covered many different ways to shutdown Windows 10 in the past, but you might not realize that Windows 10 is just doing a hybird shutdown by default. If you would like to perform a full shutdown, simply hold down the SHIFT key on your keyboard and then click the “Shut down” option in the Start Menu, or on the sign-in screen.

Method 2: Perform a Full Shutdown Using Command Prompt

Just open an elevated Command Prompt or PowerShell window, type the following command and press Enter:

shutdown /s /f /t 0

This will immediately close any open applications without prompting to save your work, and completely shut down your PC.

Conclusion

The Fast Startup feature can make your computer boot up faster, saving valuable seconds every time you turn on Windows 10. However, if your Windows 10 was installed on a speedy solid-state drive (SSD), Fast Startup don’t actually make any difference and a full shutdown is recommended.

Create Windows 10 bootable USB from ISO on Mac without BootCamp

March 21st, 2019 by Admin

How can I make a bootable Windows installation USB on Mac OS X? After upgrading to macOS Mojave, you may find that Boot Camp Assistant is no longer supported and thus creating a bootable USB turns out to be a little bit challenging. In this tutorial we’ll show you how to create Windows 10 bootable USB from ISO on Mac, by using the Terminal or third-party software like UNetbottin.

Method 1: Create Windows 10 Bootable USB on Mac Using UNetbottin

UNetbootin is a free, open source utility that allows you to create bootable USB drives on Windows, Linux, and Mac OS X. If you’ve downloaded Windows 10 ISO image, here is how you can create a bootable Windows installer USB on Mac using UNetbootin.

  1. Plug a USB drive into your Mac and open Disk Utility. Select your USB drive from the left panel and click on Info button. Note down the device name since we will need that later.

  2. Next, download and launch the UNetbottin utility. Select the “Diskimage” radio button, click “” to select a bootable ISO image.

  3. After locating your Windows 10 ISO file, click on Open.

  4. Choose Type as USB Drive and select the device name of your USB drive (you probably would’ve noted it down earlier, so refer to that). Click OK to start installing to the USB drive.

  5. This process takes several minutes or longer, depending on the size of your selected ISO image.

Method 2: Create Windows 10 Bootable USB on Mac Using Terminal

Of course, if you prefer not to use third-party software, you can still use the excellent Terminal app, which is a little bit more involved, but no additional software needs to be installed. Follow these steps:

  1. After connecting a USB drive to your Mac, open a Terminal window and type diskutil list to display all the disks attached to your machine. You have to figure out the disk identifier of the USB drive you need to format. In my example, my USB drive is mounted as “disk2” and it’s about 32GB.

  2. Next, run the following command to format your USB drive and name it “WIN10“, where # is a placeholder for the disk identifier of your USB drive.
    diskutil eraseDisk MS-DOS "WIN10" GPT disk#

  3. Now, mount your Windows 10 ISO image with the command below, assuming it’s saved the Downloads folder. In my case, it is mounted as a volume named “ESD-ISO“.
    hdiutil mount ~/Downloads/your_windows_10_image.iso

  4. Finally, run the following command to copy all the files from the mounted ISO to your USB drive.
    cp -rp /Volumes/ESD-ISO/* /Volumes/WIN10/

    This command will take a while, and once it finishes, you can disconnect the mounted ISO with this command:
    hdiutil unmount /Volumes/ESD-ISO

  5. Now you should be able to boot from the USB to install Windows 10 on your Mac or Windows machine.

Conclusion

These should be the easiest ways to create a Windows 10 bootable USB from ISO on Mac, without using Boot Camp Assistant. No matter which method you prefer, be sure that you backup any important data on your USB drive, as the procedure of creating bootable USB will delete everything on it.

How to Securely Delete Files in Windows 10 without Third Party Software

March 18th, 2019 by Admin

When you delete a file, Windows only marks the file as deleted and it continues existing on your hard drive, even after you empty it from Recycle Bin. The deleted files can be recovered using data recovery software until they’re overwritten. In this tutorial we’ll show you how to use Microsoft’s command-line utility to securely delete, shred and wipe your files in Windows 10, so they can’t be recovered.

Part 1: Securely Delete Specific Folders or Files

To get started, download the SDelete utility from Microsoft’s website. After extracting the download file, copy the resulting .exe files to the System32 directory: C:\Windows\System32.

Open the elevated Command Prompt and you can securely and permanently delete any folder or file by running this command:
sdelete.exe -p 3 -s "your_folder_or_file"

By default, SDelete will overwrite the given file only once. You can use the –p option to specify the number of times to overwrite the data.

Part 2: Securely Wipe & Overwrite Free Space on Entire Drive

How can I overwrite the files that have been previously deleted without using the SDelete utility? To securely wipe all files and folders you have already deleted, simple run the following command to overwrite all free space on your drive. Replace D with the drive you want to clean up.
sdelete.exe -c:D

This command will only wipe the free space to prevent recovery of deleted files, and it won’t affect any files on your drive, so it’s safe. There is a similar built-in console tool called cipher.exe which also lets you wipe the free disk space, but it’s much slower than SDelete.
cipher /w:D

Conclusion

Using the SDelete utility you can securely delete files and wipe free space in Windows 10 to prevent any sensitive data from falling into the wrong hands. Despite SDelete does not have a graphical user interface, it is still easy for anyone to use.

3 Steps to Turn Windows 10 PC into a Wi-Fi Mobile Hotspot

March 13th, 2019 by Admin

Can I make my Windows 10 laptop a Wi-Fi hotspot? Need to share your PC’s internet connection with other device over Wi-Fi? In this tutorial we’ll walk you through the steps to turn Windows 10 computer into a Wi-Fi mobile hotspot without using third-party software.

Before getting started, make sure your PC has an internal or external wireless adapter. The Wi-Fi mobile hotspot will allow up to eight devices to get online simultaneously.

How to Turn Windows 10 PC into a Wi-Fi Mobile Hotspot

  1. Open the Settings app, and then go to Network & Internet.

  2. Click “Mobile hotspot” in the pane on the left. Toggle on “Share my Internet connection with other devices” to enable the mobile hotspot feature. The system will generate a random name and password for this hotspot, and you can change those by clicking the Edit button.

  3. Change the network name and password, select either 2.4-GHz or 5-GHz network band and click OK.

    Now your Windows 10 PC is acting as a Wi-Fi hotspot, and you can connect to it using your mobile phone or other computers.

That’s it!

What is difference between a BIOS password and a Windows password?

March 12th, 2019 by Admin

Can’t get past the password screen while the computer is booting? When you ran into this situation, it’s possible that you forgot the BIOS password or Windows password on your PC. In order to determine which type of password it is, you need to know the differences between a BIOS password and a Windows password.

BIOS Password:

BIOS (or UEFI) is non-volatile firmware used to perform hardware initialization before calling the boot loader to start the OS. BIOS has a setup utility which provides the ability to view and manage your computer’s hardware settings, such as changing the boot order or enabling CPU virtualization.

Through the BIOS Setup Utility, you can set up two different types of passwords:

  • Setup password: The computer will prompt for this password only when you are trying to access the BIOS Setup Utility. This password is also called “Admin password” or “Supervisor password” which is used to prevent others from changing your BIOS settings.
  • System Password: This will be prompted before the operating system can boot up. This password might also be called “User password” or “Power-on password” and it can stop someone powering up your computer.

If you forget any of these passwords, the reset process can be difficult or impossible. Depending on the motherboard of the computer in question, you can clear a lost BIOS password through jumper settings or removing the CMOS battery.

Windows Password:

Windows allows you to create separate accounts for different people to share a single PC. Each person can set a unique Windows password for their accounts to prevent unauthorized access.

If you forgot your Windows password and can’t log in to your PC, just boot your PC with PCUnlocker Live CD or USB and you can remove the password with ease.

Conclusion

BIOS password adds a hardware-level layer of security and locks the early stages of the startup process. After the BIOS passes the control to OS, you’ll see the Windows logo displayed on the screen. When your PC boots to the welcome/lock screen, you can click on the user name and sign in with a Windows password.

How to Rollback NVIDIA Driver to Previous Version in Windows 10

March 11th, 2019 by Admin

Get a blue screen while installing NVIDIA driver? The latest NVIDIA driver has made all your games run at extremely low fps? Updating NVIDIA drivers can boost your gaming performance, but it might cause incompatible issue as well. In this tutorial we’ll show you how to roll back NVIDIA driver to previous version in Windows 10.

How to Rollback NVIDIA Driver to Previous Version in Windows 10

  1. Open Device Manger. Expand the Display adapters, right-click on your NVIDIA graphics card under this category and then select Properties.

  2. The Device Properties dialog box will now pop up. Select the Driver tab, and then click on the Roll Back Driver button.

    Note: If the button is greyed out, it means there is no old driver version that Windows can roll back to. In this case, you have to download the old driver from NVIDIA official website and install it manually.

  3. In the Driver Package rollback dialog box, Select any reason why you’re rolling back, and click Yes to confirm. Just wait for the driver to being restored to previously installed version.

  4. When the rollback is done, you can check the driver version and date. If the date and version information decreases, then you’ve successfully rolled back the NVIDIA driver.

That’s it!

Easy Ways to Update NVIDIA Display Driver in Windows 10

March 8th, 2019 by Admin

It’s not always necessary, but occasionally you’ll have to update NVIDIA display driver to the latest version. For instance, NVIDIA display driver keeps crash or your game asks for graphics driver update. In this tutorial we’ll show you easy ways to update NVIDIA display driver in Windows 10.

Method 1: Update NVIDIA display driver through Device Manager

  1. Open Device Manager and expand the Display adapters category, you’ll see the manufacturer and model of your graphics card. Just right-click it and select Update driver.

  2. Click on the “Search automatically for updated driver software” option.

  3. It will search online for the latest driver from Windows Update and install it on your Windows 10 PC.

This method can help you get the best drivers for your NVIDIA graphics card. But there is still a good chance that a newer driver is available on the device’s manufacturer website.

Method 2: Update NVIDIA display driver manually

  1. Open the NVIDIA Driver Downloads page with your web browser. Select your specific product type/series and operating system, then click on Search.

  2. Click on Download.

  3. After the download is complete, double-click on it to start NVIDIA Package Launcher. When it asks you for a location to save the NVIDIA driver files, just click OK to proceed.

  4. Once the system check is passed, select the “NVIDIA Graphics Driver” option and click on “Agree and Continue“.

  5. Select “Express (Recommended)” and click on Next to begin installing the driver files.

  6. When the installer has completed, you will see a window similar to the screenshot below.

    Now you’ve successfully updated your NVIDIA display driver to the latest version in Windows 10.