Archive for the ‘Tips & Tricks’ category

How to Show Day of Week in Windows 10 Taskbar Clock

May 18th, 2018 by Admin

By default, Windows doesn’t add the day of the week (for example, Monday, Tuesday, etc) to the system tray clock. Here are 2 simple ways to make Windows 10 show day of week in the taskbar notification area.

Method 1: Set Taskbar Clock to Show Day of Week Using Control Panel

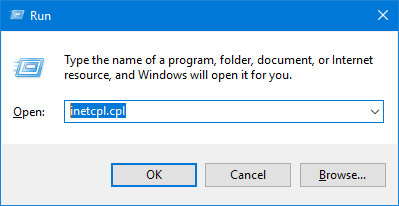
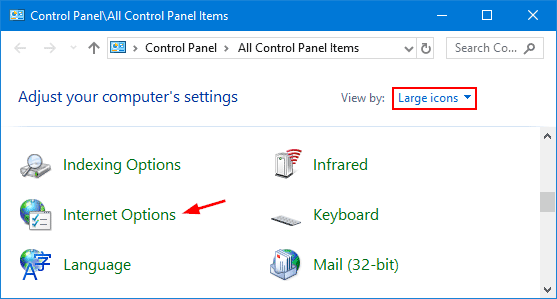
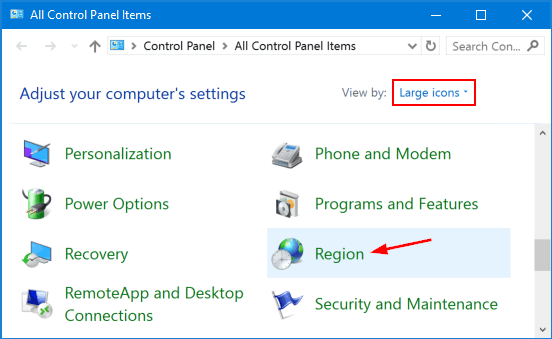
  1. Open the Control Panel in Large icons view, and click Region.

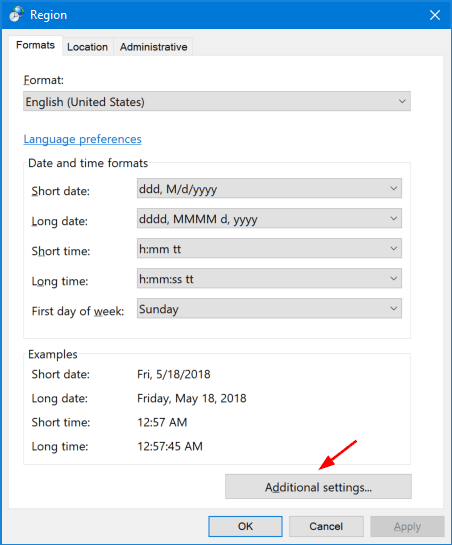
  2. In the Region window, click the Additional settings button in the bottom right corner.

  3. Switch to the Date tab, and then add the “ddd, ” string at the beginning of the Short date field. Click OK and you’re done!

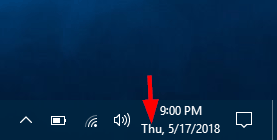
  4. You will now see the day of the week to displayed in the taskbar clock.

Method 2: Set Taskbar Clock to Show Day of Week Using Registry Editor

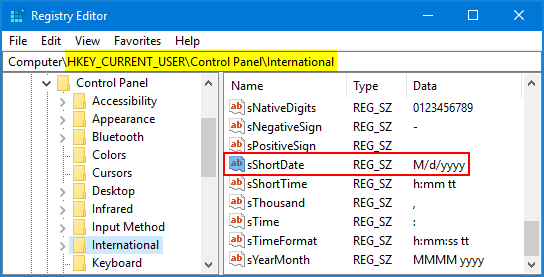
  1. Open the Registry Editor and then navigate to the following key:
    HKEY_CURRENT_USER\Control Panel\International
  2. Double-click the sShortDate entry in the right side of the Registry Editor window.

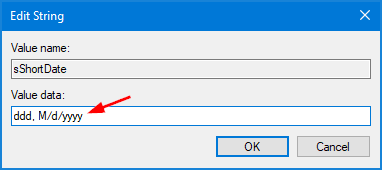
  3. In the Edit String window, Add the “ddd, ” string at the beginning of the Value data field and click OK.

  4. Close Registry Editor and log off or restart Windows to take effect. The system tray clock will display the day of week.

This tip also works on Windows 8, 7, Vista and XP. Hope you find this small tip useful!

How to Switch Left and Right Mouse Button Functions in Windows 10

May 17th, 2018 by Admin

Left mouse clicking acts like right click? How to change mouse to left handed in Windows 10? By default, Windows sets your left mouse button as the primary button which is used for selecting and dragging. If your system brings up the right-click context menu when left clicking an items on the desktop, it’s likely that the primary button is changed to the right mouse button. In this tutorial we’ll show you 3 easy ways to switch left and right mouse button functions in Windows 10.

Method 1: Switch Left and Right Mouse Button Functions from Settings App

  1. Press the Windows + I key combination to open the Settings app, and click Devices.

  2. Choose the Mouse tab on the left side. On the right side, you can select Left or Right from the “Select your primary button” drop-down list.

  3. When finished, close the Settings app. This change will take effect immediately.

Method 2: Switch Left and Right Mouse Button Functions from Control Panel

  1. Open the Control Panel in Large icons view, and click Mouse.

  2. By default, the “Switch primary and secondary buttons” option is unchecked. In case you’re left handed and want to change the mouse primary button to be the right button, just check that option and click OK.

  3. Now you can check if the left or right mouse clicking works as you expect.

Method 3: Switch Left and Right Mouse Button Functions from Registry Editor

  1. Open the Registry Editor, and then navigate to the following key:
    HKEY_CURRENT_USER\Control Panel\Mouse
  2. On the right side panel, double-click the SwapMouseButtons entry and set its value data depend on which button you would use as the primary button.
    • 0 = Set left mouse button as primary
    • 1 = Set right mouse button as primary

  3. When finished, close Registry Editor. You have to log off or restart Windows before the changes take effect.

Using CMD to Create Undeletable Folder in Windows 10

May 16th, 2018 by Admin

How can I prevent a folder from being inadvertently deleted by myself? Worry about that your kids may accidentally delete your important documents? To avoid this situation, you can use a simple CMD trick to create undeletable and unrenamable folder in Windows 10.

How to Create Undeletable Folder in Windows 10 Using CMD?

The following keywords are reserved by Windows to name the internal devices, and you’re unable to create, delete or rename a folder that has its name from one of these words (case insensitive):

CON, PRN, AUX, CLOCK$, NUL, COM1, COM2, COM3, COM4, COM5, COM6, COM7, COM8, COM9, LPT1, LPT2, LPT3, LPT4, LPT5, LPT6, LPT7, LPT8, and LPT9

Fortunately, you can use the Command Prompt in Windows 10 to create folders with reserved names. Follow these steps:

  1. Open the Command Prompt as administrator.
  2. At the Command Prompt, enter the drive name like D: or E: where you wish to create the undeletable folder and press Enter.
  3. Next, type “md con\” command to create a folder with a reserved name “con” and press Enter.

    Now, open File Explorer and try to delete or rename the “con” folder, you’ll get the error message like “Could not find this item” or “invalid file handle“.

  4. As of the Fall Creators Update, Windows 10 can’t let you even browse the files inside the “con” folder.

    In order to move any important files into or outside of this undeletable folder, you may also have to do it by running the “move” command at the Command Prompt.

Deleting the Undeletable Folder:

Now you might be wondering – how to delete undeletable folder using CMD? Although, it is impossible to manually delete the folder using File Explorer, you can delete that folder by typing “rd /s /q con\” at the elevated Command Prompt.

This trick works also on Windows 8.1, Windows 8/7/Vista/XP. Try it yourself to create one such folder which can neither be deleted nor be renamed.

4 Ways to Take a Screenshot on Surface Pro 4 Tablet

May 14th, 2018 by Admin

Do you want to take a screenshot of your Surface Pro screen and share it with friends? In this tutorial we’ll show you 4 simple ways to take a screenshot on Surface Pro 4 tablet, without using third-party software.

Method 1: Take Screenshot Using Surface Hardware Buttons

Press both the Power button and the Volume-up button simultaneously, and then release them. You’ll notice the screen briefly dim then brighten again to let you know a screenshot is taken.

All screenshots you took with this method, will be saved in your C:\Users\user_name\Pictures\Screenshots folder.

Method 2: Take Screenshot Using Keyboard Shortcut

First of all, check the FN key on your Type Cover to make sure that its light is off. Hold down the Windows key and then press the PrtSn key. This will capture your Surface screen and place the resulting screenshot in the same Screenshots folder under the Pictures library.

Method 3: Take Screenshot with Surface Pen

Double-clicking the eraser button on the top of your Surface Pen will take a screenshot that you can crop immediately, then save to the Screenshots folder under Pictures in OneDrive.

Method 4: Take Screenshot Using Snipping Tool

Windows comes with a built-in utility called Snipping Tool that makes taking screenshot easier than above methods. Once launching the Snipping Tool, you can take a screenshot of the full screen, specific program windows, or any area you want to capture. This tool lets you to save the screenshot as a JPEG, PNG, GIF, or HTML file as your desire.

How to Clear Saved Credentials for Network Share or Remote Desktop Connection

May 9th, 2018 by Admin

When you try to access protected file shares on the network or launch RDP sessions, you’ll be prompted to save the passwords. If you checked the option to remember your credentials, Windows will store your passwords for the next connection.

In this tutorial we’ll show you 2 simple ways to clear saved credentials for network share, remote desktop connection or mapped drive in Windows 10 / 8 / 7.

Method 1: Clear Network Saved Credentials Using Control Panel

  1. Open the Control Panel and select Large icons in the View by menu. Click User Accounts.

  2. Click the “Manage your credentials” option at the top left.

  3. Select the Windows Credentials type and you’ll see the list of credentials you have saved for network share, remote desktop connection or mapped drive.

  4. Click one of the entries in the list and expand it, you can then click the Remove option to clear it.

Method 2: Clear Network Saved Credentials Using the Run Command

  1. Press the Windows key + R together to open the Run box. Type the following command and hit Enter.
    rundll32.exe keymgr.dll, KRShowKeyMgr

  2. You’ll see the Stored Usernames and Passwords window. To remove a saved network credential you can select one of the entries and click Remove.

That’s it!

How to Find Your Computer Name in Windows and Mac OS X

May 8th, 2018 by Admin

Do you need help locating your computer name? PCs on the same network need unique names so they can identify and communicate with each other. In this tutorial we’ll show you how to easily find your computer name in Windows 10 / 8 / 7 and Mac OS X.

Part 1: Find Computer Name in Windows 10 / 8 / 7

Simply right-click on the My Computer (or This PC) shortcut on the desktop, and then select Properties.

Under the “Computer name, domain, and workgroup settings” section, you will find the computer name listed. If your PC is connected to a domain, the full computer name will include the domain name.

Another way of finding computer name is using the Command Prompt. Just type hostname into the Command Prompt and hit Enter, you’ll see your computer name immediately.

Part 2: Find Computer Name in Mac OS X

Click the Apple logo in the top left corner, and then select System Preferences from the Apple Menu.

Click on the Sharing icon.

Your computer name will be listed at the top of the window that opens in the Computer Name field.

That’s it!

6 Ways to Open Performance Monitor in Windows 10

May 7th, 2018 by Admin

Performance Monitor is Windows’ built-in utility that lets you monitor almost every aspect of performance, including CPU, memory, file system, database, and network usage. This is really useful for IT admins to troubleshoot performance issues or determine where bottlenecks might occur. In this tutorial we’ll show you the quickest ways to open Performance Monitor in Windows 10.

Method 1: Open Performance Monitor from Start Menu

Click the Start button. Scroll through the app list and find the System Administrative Tools section. Expand it and click Performance Monitor.

Method 2: Open Performance Monitor via Run

Press the Windows key + R keyboard shortcut to open the Run command, type perfmon and hit Enter.

This will launch Performance Monitor utility quickly.

Method 3: Open Performance Monitor with Cortana Search

Type “performance” (without double quotes) inside the Cortana Search box on the taskbar, and then click the appropriate result.

Method 4: Open Performance Monitor from Control Panel

Open the Control Panel in Large icons view, and click Administrative Tools.

In the next window, you can double-click the Performance Monitor shortcut to open it.

Method 5: Open Performance Monitor from Computer Management

Use the Windows key + X keyboard shortcut to open the Power User menu, and select Computer Management.

In the left pane of Computer Management, expand to Performance -> Monitoring Tools and you can access Performance Monitor.

Method 6: Open Performance Monitor from Command Prompt or PowerShell

Open the Command Prompt or PowerShell, then type perfmon and press Enter to open Performance Monitor.

That’s it!

How to Check if I Have Windows Administrator Rights?

May 7th, 2018 by Admin

Do I have local admin rights? Before you can make system-wide changes to the system, such as install software or run elevated command prompt, you’ll need to log into Windows as a user with administrative rights. Here’s how to quickly check if a user account is an administrator or not in Windows 10 / 8 / 7 / Vista / XP.

Method 1: Check for Administrator Rights Using Control Panel

  1. Open the Control Panel in Large icons view, and then click User Accounts.

  2. Click the Manage another account link.

  3. You should see all the accounts on your computer. If your account has admin rights, you can see the word “Administrator” under your account name.

    As you can see from the screenshot above, pcunlocker is an administrator while david is a standard/limited user.

Method 2: Check for Administrator Rights Using Command Prompt

  1. Press the Windows key + R keys on the keyboard to open the Run box. Type cmd and press Enter.

  2. In the Command Prompt, type the following command and hit Enter.
    net user account_name

  3. You’ll get a list of attributes of your account. Look for the “Local Group Memberships” entry. If your account belongs to the “Administrators” group, it should have admin rights.

That’s it!

3 Ways to Restart File Explorer in Windows 10

May 5th, 2018 by Admin

How do I restart Windows Explorer manually if it isn’t responding? I accidentally turned off Windows Explorer. Now, nothing is on my desktop, including the start menu. How do I get it back? In this tutorial we’ll show you 3 easy ways to restart File Explorer manually in Windows 10.

Method 1: Restart File Explorer from Task Manager

Press and hold down the key combination Ctrl + Shift + Esc to launch Task Manager. To see all of your PC’s current processes, click More details at the bottom of the Task Manager window.

Switch to Process tab, locate the Windows Explorer entry from the list, then click the Restart button on the lower-right hand corner.

Method 2: Quit File Explorer and Then Start It

Open Task Manager. In the Details tab, locate the explorer.exe process and then click the End task button.

There is another handy way for quitting the Windows Explorer. In Windows 10 / 8, you can hold Ctrl+Shift while right-clicking any empty area of the taskbar. Click the Exit Explorer command from the popup menu.

After quitting File Explorer, the taskbar and desktop icons will disappear. To access File Explorer again, press Ctrl + Shift + Esc keys on your keyboard to open Task Manager. Click the File menu and then choose “Run new task“.

Type explorer.exe into the Open box and hit OK to relaunch Windows Explorer.

Method 3: Restart File Explorer Using Command Prompt

You can also use the taskkill command to perform a restart of File Explorer. Here’s how to restart File Explorer from Command Prompt:

  1. Open the Command Prompt as administrator.
  2. Copy the following commands and paste them into Command Prompt:
    taskkill /f /IM explorer.exe
    start explorer.exe

    The first command will terminate File Explorer, while the second one will relaunch it.

Quick Ways to Open Internet Options in Windows 10 / 8 / 7

May 3rd, 2018 by Admin

Where do I find Internet Options in Windows 10? Internet Options is a Control Panel applet which lets you manage browser security level, control your privacy, block or allow specific websites and so on. In this tutorial we’ll show you 4 quick ways to open Internet Options in Windows 10 / 8 / 7.

Method 1: Open Internet Options from Internet Explorer

Open up the Internet Explorer. Click the Settings icon in the upper-right corner, or click the Tools menu.

Select Internet options from the drop down menu, you can then access Internet Options immediately.

Method 2: Open Internet Options via Run Command Box

Press the Windows key + R to open the Run command box. Type inetcpl.cpl and press Enter.

You can now get to Internet Options.

Method 3: Open Internet Options from Control Panel

Open the Control Panel, and change it to the Large icons view.

Click Internet Options.

Method 4: Open Internet Options via Search

In Windows 10, type “internet options” in the Cortana Search box and you can then access Internet Options from the search result.

If you’re running Windows 7, click the Start button and type “internet options” in the Search box. Click its shortcut and it will open Internet Options quickly.