Archive for the ‘Tips & Tricks’ category

Customize Critical & Low Battery Level and Action in Windows 10

November 17th, 2016 by Admin

Need to change alert level of low battery on your laptop? No low battery level warning message and your computer always just shuts off? You won’t lose your unsaved documents if you set your computer to go into hibernation when reaching the critical-battery level. In this tutorial we’ll show you how to customize the critical & low battery level and action in Windows 10.
How to Customize Critical & Low Battery Level and Action in Windows 10?

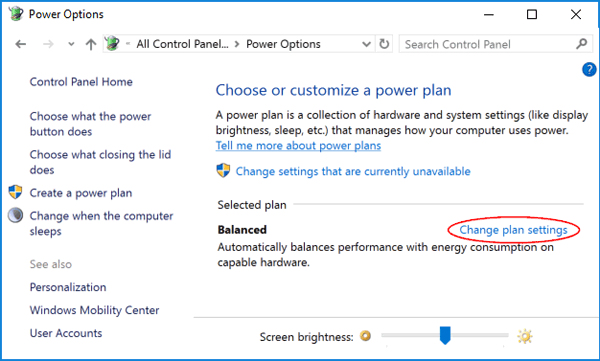
  1. Open the Control Panel with Large icons view. Click Power Options.

    power-options

  2. Click the Change plan settings link next to the power plan that is currently selected for your laptop or tablet.

    change-power-plan

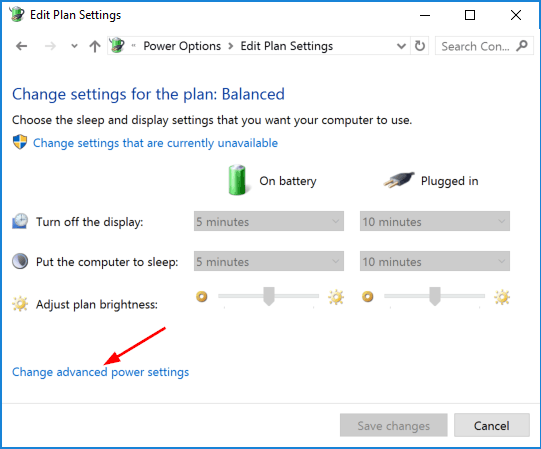
  3. Click the Change advanced power settings link at the bottom.

    advanced-power-settings

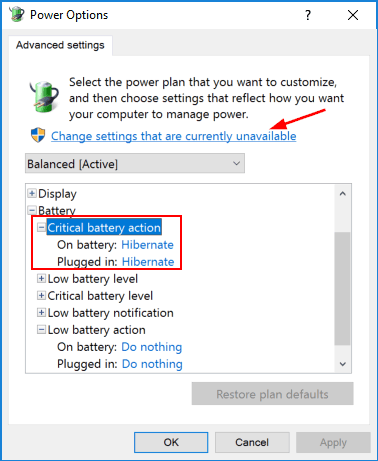
  4. When the Power Options dialog box shows up, click the “Change settings that are currently unavailable” link at the top to edit all power settings. Expand the Battery section in the list and you can find various battery settings.
  5. Expand the Critical battery action, you can select Hibernate, Sleep or Shutdown for both On battery and Plugged in. Expand the Low battery action and you can have the computer do nothing when the low battery level is reached.

    critical-battery-action

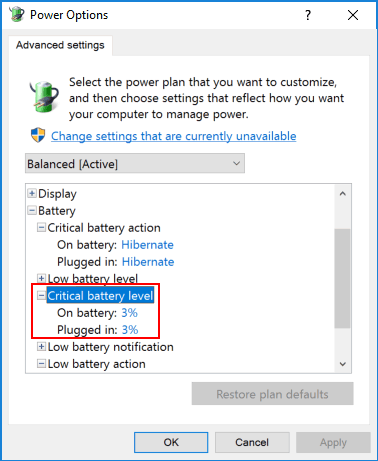
  6. Expand the Critical battery level, you can adjust the battery power percentage to 3% or higher. There is also corresponding option to change the low battery level.

    critical-battery-level

  7. When it’s done, click OK to save your changes. If you have messed up the settings, just click the Restore plan defaults button at the bottom and your critical & low battery level and action will be restored to default.

How to Turn On / Off Battery Saver in Windows 10

November 16th, 2016 by Admin

Windows 10 has a new feature called Battery Saver, which can extend the battery life on Windows 10 laptops and tablets. It works just like the Lower Power Mode on an iPhone. In this tutorial we’ll show you how to turn on or off Battery Saver in Windows 10.

How to Turn On / Off Battery Saver in Windows 10?

Open the Settings app by clicking the Settings icon on Windows 10 Start Menu, or pressing the Windows key + I keyboard shortcut.

open-settings-app

In the main Settings window, click System (Display, notifications, apps and power) icon.

system-settings

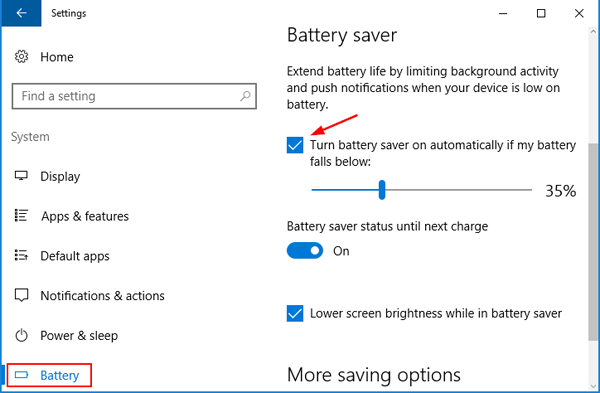
Select Battery on the left-hand side. Under the Battery saver section on the right side, you can access all battery saver settings.

turn-on-battery-saver

To turn on Battery Saver, make sure you check the “Turn battery saver on automatically if my battery falls below” option. Use the slider bar to change the default 20% value to the battery level you want.

Next, you’ll see a slider labeled Battery saver status until next charge. This is just another way to turn on Battery Saver. When this toggle is switched to On, you will enter Battery Saver mode now until connecting your PC to a power charger.

Battery Saver also includes an option to dim the screen brightness. If you check the “Lower screen brightness while in battery saver” setting, your display will be dimmed automatically to reduce battery usage when in Battery Saver mode.

If you want to turn off Batter Saver completely, just turn off both “Turn battery saver on automatically if my battery falls below” and “Battery saver status until next charge“. Now your PC will never enter Battery Saver mode even if you run out of battery.

Fix: Right-Click Context Menu Not Showing / Responding in Windows

November 16th, 2016 by Admin

Mouse right-click not working on your desktop or Windows Explorer? Whenever you try to right-click anything on the desktop or in Windows Explorer / Start Menu, you might see no response at all and the context menu won’t open. In this tutorial we’ll show you several methods to fix the problem of right-click context menu not showing / responding in Windows 10, 8 and 7.

Method 1: Enable Windows Explorer’s Context Menu Using Group Policy

There is a chance that your Windows Explorer’s context menu is disabled by group policy setting. Here’s how to tweak it:

  1. Press the Windows key + R to open the Run box. Type gpedit.msc and press Enter.

    gpedit

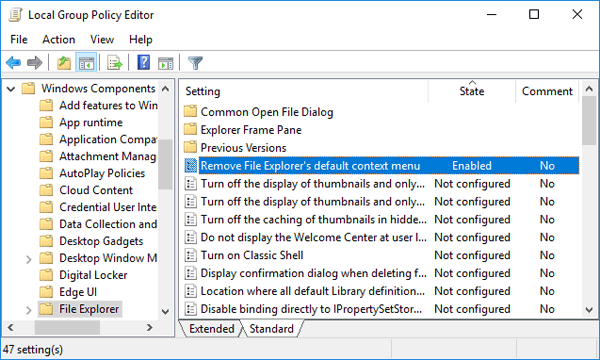
  2. In the Local Group Policy Editor window, navigate to: User Configuration -> Administrative Templates -> Windows Components, and then click on File Explorer (or Windows Explorer).
  3. On the right side of the window, scroll down until you see the setting “Remove Windows Explorer’s Default Context Menu“. Double-click on it to modify.

    explorer-context-menu-policy

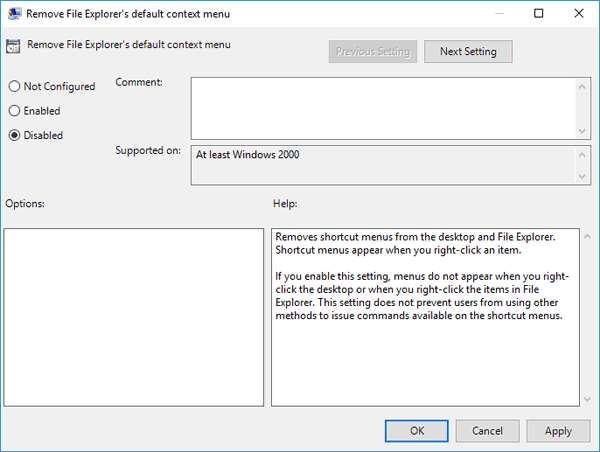
  4. Select either Not Configured or Disabled, and click OK. Reboot your computer and see if the right-click context menu now works.

    enable-explorer-context-menu

If you have no access to Local Group Policy Editor, please use this registry hack instead to enable Windows Explorer’s context menu:

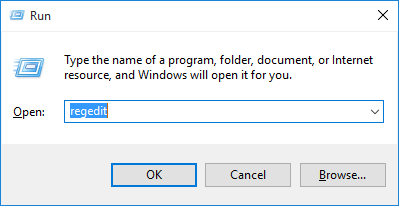
  1. Press the Windows key + R to open the Run box. Type regedit and press Enter.

    regedit-via-run

  2. In the left pane of Registry Editor, browse down to the following key:
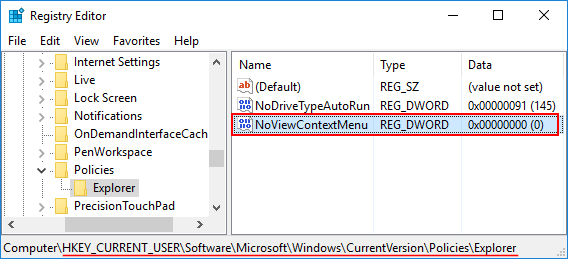
    HKEY_CURRENT_USER\Software\Microsoft\Windows\CurrentVersion\Policies\Explorer
  3. Double-click the 32-bit DWORD value NoViewContextMenu on the right hand side, and set it to 0. (it will disable Windows Explorer’s context menu if you set NoViewContextMenu to 1)

    remove-explorer-context-menu

Method 2: Remove Third-Party Shell Extensions from Context Menu

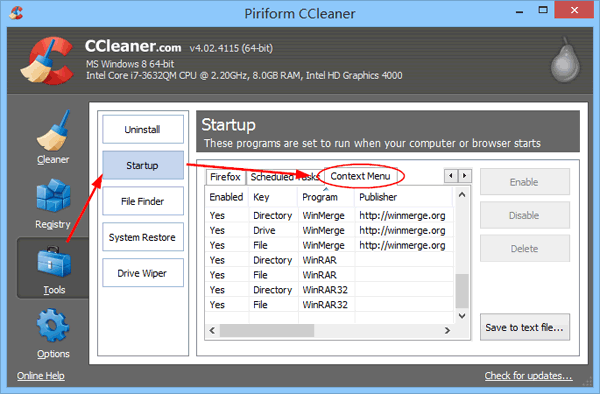
The right-click menu not showing issue might be caused by Shell Extensions. To fix it, try to disable all third-party shell extensions from the right-click context menu. This can be done using the software CCleaner.

ccleaner

Head over to the Piriform website and download the free version of CCleaner. After running CCleaner, click the Tools section in the left hand side. On the right hand side, click Startup and then click Context Menu. From there you can disable or delete any third-party shell extensions.

Method 3: System Restore

If you still couldn’t get the right-click context menu to work, restoring your system back to a previous working condition will be your good choice. To learn how to perform a system restore, please check out this article: Recover Unbootable Windows 10 or 8 with Restore Point.

Fix: Desktop Icons Show Only Text in Windows 10

November 16th, 2016 by Admin

“All Desktop icons shows only text, my start menu doesn’t work, and my taskbar only show the icons on the right! I tried it in Safe Mode, and still the same! Please help me!!”

All your desktop shortcuts are showing text only, without any icons? However, you can still click the shortcut text to open Windows Explorer or your application. In this tutorial we’ll show you a simple way to fix the desktop icons missing problem in Windows 10.

desktop-showing-text-without-icon

How to Fix: Desktop Icons Show Only Text in Windows 10?

  1. Press the Windows key + R to open the Run box. Type regedit and press Enter.

    regedit-via-run

  2. In the left pane of Registry Editor, navigate to the following key:
    HKEY_LOCAL_MACHINE\SOFTWARE\Microsoft\Windows\CurrentVersion\Explorer\Shell Icons
  3. Right-click on Shell Icons and select either Delete or Rename (rename it to whatever you want).

    rename-shell-icons-key

  4. Reboot your computer and you’ll find all your desktop icons are coming back. It’s that simple!

Tutorial: Change Screen Resolution in Windows 10

November 13th, 2016 by Admin

With a lower resolution all the texts and images appear larger. Likewise, at a higher resolution, the items look sharper and smaller. When you install Windows 10, it automatically sets the recommended screen resolution fix to the screen. But sometimes your game or software might won’t work with the default resolution, so here we’ll show you how to change screen resolution in Windows 10.

How to Change Screen Resolution in Windows 10?

  1. Right-click any empty space on your desktop. Select Display settings from the context menu.

    display-settings

  2. In the right pane, you can see the options to change the text size, brightness and orientation. Scroll down and click on Advanced display settings.

    advanced-display-settings

  3. Click on the drop-down box under Resolution to view all supported resolutions, and select one of the listed resolutions and then click Apply button.

    custom-screen-resolution

  4. If your desired resolution is not shown in the drop-down box, scroll down to the bottom and click Display adapter properties.

    display-adapter-properties

  5. In the display adapter’s Properties dialog box, select the Adapter tab, and then click List All Modes.

    list-all-modes

  6. This will open a new window listing every single resolution that your display can support. Select a resolution and click OK and then Apply.

    valid-screen-resolution

How to Restore Desktop Icons in Windows 10

November 11th, 2016 by Admin

All your desktop icons were missing after restarting your computer? How can I get those icons showing up again? It’s a known issue in Windows 10 that all of a sudden the icons on your desktop might disappear without warning. In this tutorial we’ll show you 3 methods to restore missing / disappeared desktop icons (including This PC, Network, Control Panel and Recycle Bin) in Windows 10.

Method 1: Make sure Show Desktop icons is enabled

Right-click on any empty space on your desktop. From the context menu, select View and then check for the Show desktop icons at the bottom. You should be able to see all of your desktop icons.

show-desktop-icons

Method 2: Turn off tablet mode

If you’ve accidentally enabled tablet mode, Windows 10 will display the Start Screen instead of the desktop every time you sign into your account, so you will see no desktop icons showing up on your screen. Switching back and forth between Desktop mode and Tablet mode would fix your problem.

tablet-mode-in-action-center

To disable Tablet mode, click the Action Center icon (looks like a speech balloon) on the taskbar, and then click on the Tablet mode button. Your system will then change back to desktop mode. Hopefully all your desktop icons are restoring back.

Method 3: Restore Most Common Desktop icons

If your default desktop icons (like This PC, Control Panel etc.) are missing, you can make them visible from the Settings app. To get started, press the Windows key + I hotkey to open the Settings window. Click Personalization. Next select Themes tab on the left, click the Desktop icon settings link on the right. From the popup window, you can check all desktop icons and click OK.

Now Windows 10 should display the common desktop icons on the screen. That’s about it, I hope this article helped you to get your desktop icons back. If you have any comments, or questions, just reach for the comments below.

Fix: Windows 10 Opens Right-Click Context Menu to Left Side

November 11th, 2016 by Admin

In Windows 10, the right-click context menu will open to the left side of the cursor as default. If you’re accustomed to seeing the context menu on the right side, you can tweak this behavior easily. This tutorial shows you 2 simple ways to make Windows 10 display right-click context menu on the right side instead of the left side.

open-context-menu-to-left-side

Method 1: Make Windows 10 Open Context Menu to The Right in Tablet PC Settings

  1. Press the Windows key + R to open the Run box. Type the following command and press Enter.
    shell:::{80F3F1D5-FECA-45F3-BC32-752C152E456E}

    open-tablet-settings-via-run

  2. When the Tablet PC Settings dialog opens, click Other tab. Check the Left-handed option and click OK.

    tablet-pc-settings

  3. Sign out of your account or restart your computer. Windows 10 will open the right-click context menu to the right side of your cursor.

Method 2: Make Windows 10 Open Context Menu to The Right Using Registry Editor

  1. Press the Windows key + R to open the Run box. Type regedit and press Enter.

    regedit-via-run

  2. In the left pane of Registry Editor, navigate to the following key:
    HKEY_CURRENT_USER\Software\Microsoft\Windows NT\CurrentVersion\Windows

    MenuDropAlignment

    You should see a value named MenuDropAlignment in the right pane (If it doesn’t exist, create a new string value named MenuDropAlignment). Double-click on it to modify.

  3. In order to make context menu open to the right side, type 0 in the Value data field and click OK.

    edit-MenuDropAlignment

    If you want Windows to show context menu to the left side, just set MenuDropAlignment back to 1.

  4. After you edit the value, you need to sign out and sign in back to your Windows account or restart your computer. Windows should place the context menu on the right side.

How to Change DPI Scaling Settings in Windows 10

November 5th, 2016 by Admin

A lower DPI will make screen elements (for example, icons, fonts and windows) appear smaller and a higher setting will make them appear bigger. By default Windows has system-wide scaling setting of 96 DPI. In this tutorial we’ll show you 3 ways to change Windows 10 DPI settings to the scaling level you want.

Method 1: Change Windows 10 DPI Settings from Settings

  1. Right-click an empty area on your desktop, and then select Display settings from the context menu.

  2. The Settings app will open the Display tab. In the right pane, click on the drop-down menu to “Change the size of text, apps, and other items” and select the DPI percentage you want to set for your display.

  3. Just underneath that you’ll see a link labelled “Custom scaling“. If you don’t like the default scale levels, you can click that link to set a custom scaling percent from 100 to 500.

  4. When you’re done, sign out and sign in to see the DPI changes.

Method 2: Change Windows 10 DPI Settings from Control Panel

  1. Open the Control Panel in Large icons view. Click Display.

    display

  2. Under Change size of items, click on the set a custom scaling level link.

    set-custom-scaling-level

  3. This brings up the familiar old Custom sizing options dialog. From there, you can select the scaling percentage you want from the drop-down menu, or drag the ruler left or right to the scaling percentage that suits your monitor.

    custom-sizing-options

  4. Click OK and sign out for the new DPI settings to take effect.

Method 2: Change Windows 10 DPI Settings Using Registry Editor

  1. Press the Windows key + R to open the Run box. Type regedit and hit Enter to access Registry Editor.

    regedit-via-run

  2. Navigate to the following registry key in the left pane.
    HKEY_CURRENT_USER\Control Panel\Desktop
  3. In the right pane you’ll see two settings labeled Win8DpiScaling, LogPixels. In my example, LogPixels is set to (decimal) 96 for 96 DPI.

    Win8DpiScaling

  4. Set Win8DpiScaling to 0 if you want to disable DPI scaling, or set it to 1 for enabling custom DPI scaling. When Win8DpiScaling is set to 1, you can then change the DPI scaling level by modify the LogPixels value.
  5. When it’s done, close the Registry Editor and reboot your computer.

How to Disable Sticky / Filter Keys Permanently in Windows 10

November 4th, 2016 by Admin

Windows 10 sticky or filter keys ruining your gaming experience? For example, if you accidentally press the Shift key on your keyboard five times in a row, then the Sticky Keys window pops up and asks you if you want to turn on Sticky Keys feature. In this tutorial we’ll show you how to disable / turn off the annoying Sticky & Filter Keys permanently in Windows 10.

filter-keys-popup

How to Disable Sticky / Filter Keys Permanently in Windows 10?

  1. Open the Control Panel and change the view to Large icons, and then click Ease of Access Center.

    ease-of-access-center

  2. Scroll down to the Explore all settings section, then click Make the keyboard easier to use.

    make-keyboard-easier-to-use

  3. In the window that shows up, uncheck the boxes for “Turn on Sticky Keys” and “Turn on Filter Keys” to turn off the Sticky / Filter Keys features.

    disable-sticky-filter-keys

  4. To prevent Windows from popping up the Sticky / Filter Keys popup dialog, you also need to disable the corresponding keyboard shortcuts.

    • Disable Sticky Keys Keyboard Shortcut

      Click the Set up Sticky Keys link. In the Sticky Keys setup screen, uncheck the box for “Turn on Sticky Keys when SHIFT is pressed five times“.

      disable-sticky-keys-popup

    • Disable Filter Keys Keyboard Shortcut

      Click the Set up Filter Keys link. In the Filter Keys setup screen, uncheck the option for “Turn on Filter Keys when right SHIFT is pressed for 8 seconds“.

      disable-filter-keys-popup

  5. Click OK to save your changes. Now you’ve successfully turned off both Sticky Keys and Filter Keys permanently in Windows 10. You will never be disturbed by the annoying window that pops up asking you for turning on the Sticky / Filter Keys.