Archive for the ‘Windows 10’ category

How to Securely Delete Files in Windows 10 without Third Party Software

March 18th, 2019 by Admin

When you delete a file, Windows only marks the file as deleted and it continues existing on your hard drive, even after you empty it from Recycle Bin. The deleted files can be recovered using data recovery software until they’re overwritten. In this tutorial we’ll show you how to use Microsoft’s command-line utility to securely delete, shred and wipe your files in Windows 10, so they can’t be recovered.

Part 1: Securely Delete Specific Folders or Files

To get started, download the SDelete utility from Microsoft’s website. After extracting the download file, copy the resulting .exe files to the System32 directory: C:\Windows\System32.

Open the elevated Command Prompt and you can securely and permanently delete any folder or file by running this command:
sdelete.exe -p 3 -s "your_folder_or_file"

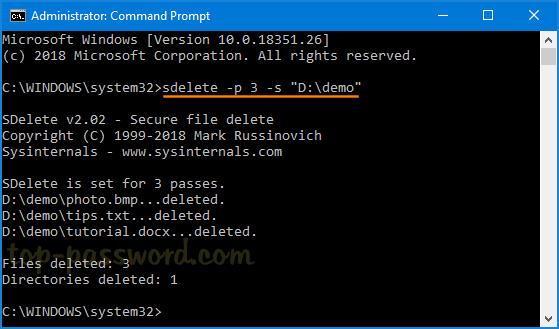
By default, SDelete will overwrite the given file only once. You can use the –p option to specify the number of times to overwrite the data.

Part 2: Securely Wipe & Overwrite Free Space on Entire Drive

How can I overwrite the files that have been previously deleted without using the SDelete utility? To securely wipe all files and folders you have already deleted, simple run the following command to overwrite all free space on your drive. Replace D with the drive you want to clean up.
sdelete.exe -c:D

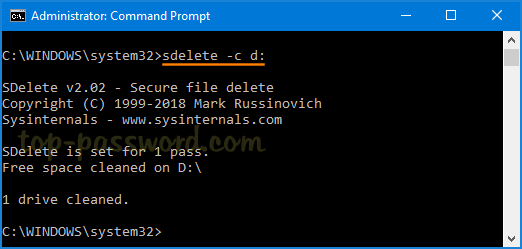
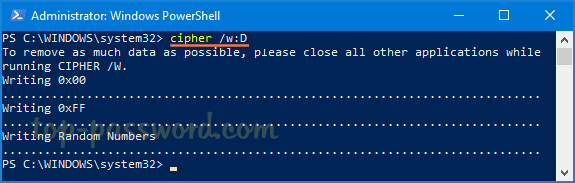
This command will only wipe the free space to prevent recovery of deleted files, and it won’t affect any files on your drive, so it’s safe. There is a similar built-in console tool called cipher.exe which also lets you wipe the free disk space, but it’s much slower than SDelete.
cipher /w:D

Conclusion

Using the SDelete utility you can securely delete files and wipe free space in Windows 10 to prevent any sensitive data from falling into the wrong hands. Despite SDelete does not have a graphical user interface, it is still easy for anyone to use.

3 Steps to Turn Windows 10 PC into a Wi-Fi Mobile Hotspot

March 13th, 2019 by Admin

Can I make my Windows 10 laptop a Wi-Fi hotspot? Need to share your PC’s internet connection with other device over Wi-Fi? In this tutorial we’ll walk you through the steps to turn Windows 10 computer into a Wi-Fi mobile hotspot without using third-party software.

Before getting started, make sure your PC has an internal or external wireless adapter. The Wi-Fi mobile hotspot will allow up to eight devices to get online simultaneously.

How to Turn Windows 10 PC into a Wi-Fi Mobile Hotspot

  1. Open the Settings app, and then go to Network & Internet.

  2. Click “Mobile hotspot” in the pane on the left. Toggle on “Share my Internet connection with other devices” to enable the mobile hotspot feature. The system will generate a random name and password for this hotspot, and you can change those by clicking the Edit button.

  3. Change the network name and password, select either 2.4-GHz or 5-GHz network band and click OK.

    Now your Windows 10 PC is acting as a Wi-Fi hotspot, and you can connect to it using your mobile phone or other computers.

That’s it!

What is difference between a BIOS password and a Windows password?

March 12th, 2019 by Admin

Can’t get past the password screen while the computer is booting? When you ran into this situation, it’s possible that you forgot the BIOS password or Windows password on your PC. In order to determine which type of password it is, you need to know the differences between a BIOS password and a Windows password.

BIOS Password:

BIOS (or UEFI) is non-volatile firmware used to perform hardware initialization before calling the boot loader to start the OS. BIOS has a setup utility which provides the ability to view and manage your computer’s hardware settings, such as changing the boot order or enabling CPU virtualization.

Through the BIOS Setup Utility, you can set up two different types of passwords:

  • Setup password: The computer will prompt for this password only when you are trying to access the BIOS Setup Utility. This password is also called “Admin password” or “Supervisor password” which is used to prevent others from changing your BIOS settings.
  • System Password: This will be prompted before the operating system can boot up. This password might also be called “User password” or “Power-on password” and it can stop someone powering up your computer.

If you forget any of these passwords, the reset process can be difficult or impossible. Depending on the motherboard of the computer in question, you can clear a lost BIOS password through jumper settings or removing the CMOS battery.

Windows Password:

Windows allows you to create separate accounts for different people to share a single PC. Each person can set a unique Windows password for their accounts to prevent unauthorized access.

If you forgot your Windows password and can’t log in to your PC, just boot your PC with PCUnlocker Live CD or USB and you can remove the password with ease.

Conclusion

BIOS password adds a hardware-level layer of security and locks the early stages of the startup process. After the BIOS passes the control to OS, you’ll see the Windows logo displayed on the screen. When your PC boots to the welcome/lock screen, you can click on the user name and sign in with a Windows password.

How to Rollback NVIDIA Driver to Previous Version in Windows 10

March 11th, 2019 by Admin

Get a blue screen while installing NVIDIA driver? The latest NVIDIA driver has made all your games run at extremely low fps? Updating NVIDIA drivers can boost your gaming performance, but it might cause incompatible issue as well. In this tutorial we’ll show you how to roll back NVIDIA driver to previous version in Windows 10.

How to Rollback NVIDIA Driver to Previous Version in Windows 10

  1. Open Device Manger. Expand the Display adapters, right-click on your NVIDIA graphics card under this category and then select Properties.

  2. The Device Properties dialog box will now pop up. Select the Driver tab, and then click on the Roll Back Driver button.

    Note: If the button is greyed out, it means there is no old driver version that Windows can roll back to. In this case, you have to download the old driver from NVIDIA official website and install it manually.

  3. In the Driver Package rollback dialog box, Select any reason why you’re rolling back, and click Yes to confirm. Just wait for the driver to being restored to previously installed version.

  4. When the rollback is done, you can check the driver version and date. If the date and version information decreases, then you’ve successfully rolled back the NVIDIA driver.

That’s it!

Easy Ways to Update NVIDIA Display Driver in Windows 10

March 8th, 2019 by Admin

It’s not always necessary, but occasionally you’ll have to update NVIDIA display driver to the latest version. For instance, NVIDIA display driver keeps crash or your game asks for graphics driver update. In this tutorial we’ll show you easy ways to update NVIDIA display driver in Windows 10.

Method 1: Update NVIDIA display driver through Device Manager

  1. Open Device Manager and expand the Display adapters category, you’ll see the manufacturer and model of your graphics card. Just right-click it and select Update driver.

  2. Click on the “Search automatically for updated driver software” option.

  3. It will search online for the latest driver from Windows Update and install it on your Windows 10 PC.

This method can help you get the best drivers for your NVIDIA graphics card. But there is still a good chance that a newer driver is available on the device’s manufacturer website.

Method 2: Update NVIDIA display driver manually

  1. Open the NVIDIA Driver Downloads page with your web browser. Select your specific product type/series and operating system, then click on Search.

  2. Click on Download.

  3. After the download is complete, double-click on it to start NVIDIA Package Launcher. When it asks you for a location to save the NVIDIA driver files, just click OK to proceed.

  4. Once the system check is passed, select the “NVIDIA Graphics Driver” option and click on “Agree and Continue“.

  5. Select “Express (Recommended)” and click on Next to begin installing the driver files.

  6. When the installer has completed, you will see a window similar to the screenshot below.

    Now you’ve successfully updated your NVIDIA display driver to the latest version in Windows 10.

Windows 10: How to Change OS Name in Dual Boot Menu

March 5th, 2019 by Admin

If you’ve installed two or more Windows operating systems on a computer, booting your PC will bring you to a menu where you can choose an operating system.

As you can see above, two operating systems installed on my PC are listed with the same name. If you want to use a more friendly OS name, here are 2 simple ways to change operating system name in Windows 10 dual-boot menu.

Method 1: Change OS Name in Dual Boot Menu from Command Prompt

  1. Open the Command Prompt as administrator. Type bcdedit and hit Enter.

  2. Have a look at the “Windows Boot Loader” sections, you can see the identifier and description for each operating system installed on your computer. Make note of the identifier for the OS you want to rename.

  3. Next, run the following command. The “New name” is the desired OS name which you want to see in the boot menu.
    bcdedit /set {identifier} description "New name"

  4. Restart your computer and you will see the new name listed for the operating system in the Windows 10 boot screen.

Method 2: Change OS Name in Dual Boot Menu from PowerShell

  1. Open the PowerShell as administrator and use the same command bcdedit to find out the identifier of the operating system you want to rename.
  2. To rename your OS, type the following command. Note that you must use quotes around the identifier.
    bcdedit /set '{identifier}' description "New name"

  3. When it’s done, reboot your PC and the new operating system name should appear in the boot entry at startup.

3 Steps to Enable Dark Mode for Windows 10 Mail App

March 4th, 2019 by Admin

Starting with Windows 10 version 1903, the built-in Mail app includes an option to switch between the light mode and dark mode. The dark mode can help you prevent eye strain especially when using Mail app at night. In this tutorial we’ll walk you through the steps to enable dark mode for Windows 10 Mail app.

How to Enable Dark Mode for Windows 10 Mail App

Click on the Start button and you can then launch the Mail app in the right-side tile area of your Start menu.

When the Mail app launches, click on the Settings icon at the bottom-left. It will show all the options in the right sidebar. You have to click on Personalization.

Under the Colors section, you’ll see three options – Light Mode, Dark mode, and Use my Windows mode. If you turn on Dark Mode, the background for the Mail app will now be dark.

Note: If you choose the “Use my Windows mode”, the Mail app will use the system-wide default app mode which could be configured in the Settings app: 2 Ways to Enable Dark Theme (Mode) in Windows 10.

How to Enable High-Performance GPU for Windows 10 Apps or Games

February 25th, 2019 by Admin

Is there a way to set preferred GPU for specific applications in Windows 10? Most Windows 10 computers come with 2 GPU (or graphics chips) installed – an integrated GPU and a dedicated GPU. For graphic intensive applications like games, you can force it to use the dedicated GPU to improve gaming performance. In this tutorial we’ll show you how to enable high-performance GPU for Windows 10 apps or games.

How to Enable High-Performance GPU for Windows 10 Apps and Games

  1. Open up the Settings app and navigate to System -> Display. Scroll down to the bottom and click on the “Graphics settings” link.

  2. Now, you can customize the graphics performance preference of any specific applications. For universal app, select the app from the list, and then click on Add.

    For classic app, just click on Browse to locate the .exe file of the desktop program you want to set default GPU for.

  3. Select the app you’ve added, and then click on the Options button to open the configuration dialog.

  4. Windows 10 considers the integrated GPU as the power-saving GPU, and the high performance GPU is the dedicated GPU or external GPU. Select High performance and click on Save.

  5. If your app or game is currently running, you may need to restart it to use the preferred GPU you just set. You can open Task Manager to view which GPU an application is using.

Best Ways to Password Protect Notepad Text Files in Windows 10

February 23rd, 2019 by Admin

Is there any simple way to protect a .txt file with password? Despite everybody knows how to encrypt a word file, most users don’t know how to password protect a plain text file. In this tutorial we’ll show you the best ways to password protect Notepad text files in Windows 10.

Method 1: Password Protect Notepad Text Files with EFS

EFS is the Windows built-in encryption tool which could be used to encrypt individual files and folders on NTFS drives. If you want to add an extra layer of security to your Notepad text files, here’s how to encrypt them with EFS in just a couple of clicks.

  1. Right-click on the Notepad text file you want to encrypt, and select Properties from the context menu.
  2. On the General tab, click Advanced. Next, check the box “Encrypt contents to secure data” and click OK.

  3. A window will pop up asking you whether or not you want to encrypt the file and its parent folder. Select the “Encrypt the file only” and click OK.

  4. The text file you’ve encrypted with EFS will show its file name in green color.

Keep in mind that EFS is only available on Pro, Enterprise, and Education editions of Windows 10. If you’re using Windows 10 Home, you’re out of luck.

Method 2: Password Protect Notepad Text Files with 7-Zip

Notepad doesn’t offer a way to encrypt a .txt file, but you can save the text document into a password-protected zip archive. The freeware 7-Zip lets you password protect your Notepad text files easily.

  1. Click here to download 7-Zip. The file is only 1.4 MB big and installs quickly.
  2. Once installed, right-click on your Notepad text file from Windows Explorer, and then select 7-Zip -> Add to archive option.

  3. When the Add to Archive window pops up, change the Archive format to Zip and enter the password that will protect your text files, and click OK.

  4. You’ll get a password protected .zip archive which contacting your text files. Make sure you remember the password to avoid losing access to the encrypted text files.

Method 3: Password Protect Notepad Text Files with Lock My Folders

If you often have to read or modify text files, Lock My Folders should be your perfect companion for password protecting your .txt file. Encryption is done on filesystem level and is transparent for both users and applications, including text editors.

  1. To start, download and install Lock My Folders. After launching, you’ll be prompted to set a master password which will be used to encrypt / decrypt your files. In order to create an auto-encryption secure folder, click on the Add button. Type the folder name and choose a location for the folder to be created.

  2. Now you can open the secure folder from Windows Explorer. Any files you saved into this folder will be automatically encrypted before writing to physical disk.

    If you use Notepad to open the encrypted .txt file inside the secure folder, it will get transparently decrypted without user interaction so you can view the plain text again.

  3. After dealing with the text files, you can lock the secure folder to prevent it from being accessed. Just right-click on the secure folder in Windows Explorer and select “Lock My Folder“. Additionally, a system reboot or shutdown will put your secure folder into the locked status automatically.

  4. When you need to decrypt and access the secure folder again, you have to enter the correct master password.

  5. If you forgot the master password, all files inside the secure folder remain encrypted and inaccessible. Not only does this stop outside parties from hacking their way into your text files, it also protects in the event that your PC is stolen.

Conclusion

Encryption is the most reliable way to protect your Notepad text files. There are many other tools that can be used to encrypt .txt files, but the above methods should be the easiest and most powerful.

Prevent Windows 10 from Disconnecting Network during Sleep

February 20th, 2019 by Admin

Windows 10 disconnects network during sleep? Is there a way to keep network connection active even when the PC is in sleep mode? In this tutorial we’ll show you 3 ways to prevent Windows 10 from disconnecting network during sleep.

Method 1: Keep Network Connection Active When in Sleep Mode (On Battery & Plugged in)

Open the Power Options. Locate and expand the “Network connectivity in Standby” setting. By default, this setting is hidden and you can make it shown with this trick.

Click to select Enable for both “On battery” and “Plugged in“. Once saving the changes, your computer should stay connected to the network when in sleep mode.

Method 2: Prevent Sleep Mode from Disconnecting Network to Save Battery Power

Open the Settings app and navigate to System -> Power & sleep. On the right-side pane, click the option “When my PC is asleep and on battery power, disconnect from the network” and change it to Never.

Note that this option is only available for Windows 10 laptops and tablets with built-in battery.

Method 3: Use GPO to Allow Network Connectivity during Connected-Standby

  1. Open the Local Group Policy Editor and browse to:
    Computer Configuration -> Administrative Templates -> System -> Power Management -> Sleep Settings
  2. On the right pane, you can find the two settings: “Allow network connectivity during connected-standby (on battery)” and “Allow network connectivity during connected-standby (plugged in)“. Double-click on each of them to modify.

  3. Select Enabled and click OK.

  4. Finally make a rebooting to apply the policy settings. Note: These changes will make the “Network connectivity in Standby” setting in the Power Options greyed out and you’re also unable to change the setting for “When my PC is asleep and on battery power, disconnect from the network” in the Settings app.

If your computer still loses network connection in sleep mode, open the Device Manager and access the Properties of your Ethernet/Wi-Fi adapter. Make sure the “Allow the computer to turn off this device to save power” option is unchecked.