Archive for the ‘Windows 10’ category

Fix: “Network connectivity in Standby” Missing from Power Options in Windows 10

February 20th, 2019 by Admin

Lost network connectivity after your PC enters into standby mode? How can I prevent standby mode from disconnecting WIFI? If you want to take control over network connectivity in standby, just follow this tutorial to add the “Network connectivity in Standby” option to the Power Options in Windows 10.

Method 1: Add “Network connectivity in Standby” to Power Options Using Registry Editor

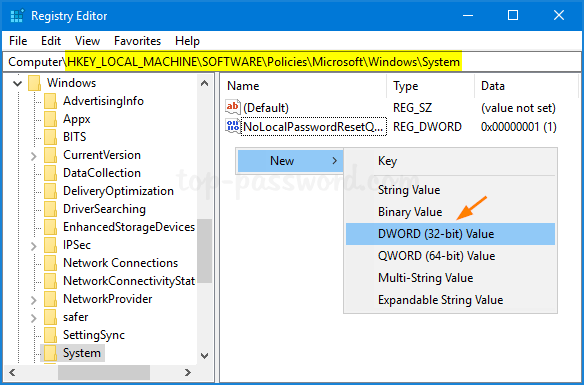
  1. Open Registry Editor.
  2. Paste the following path into the Registry Editor’s address bar and hit Enter, then double-click the DWORD Attributes on the right side pane to modify.

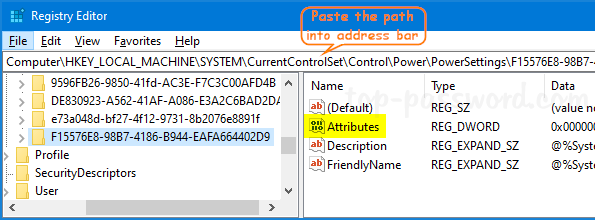
  3. In order to restore the missing option “Network connectivity in Standby”, you have to change its value from 1 (default) to 2. Click OK.

  4. Close Registry Editor and open the Power Options. If you enable “Network connectivity in Standby” for both “On battery” and “Plugged in“, Windows will keep internet connection active while in sleep mode.

Method 2: Add “Network connectivity in Standby” to Power Options Using Command Prompt

  1. Open the Command Prompt as administrator.
  2. Type the following command and hit Enter. This will add the “Networking connectivity in Standby” in Power Options immediately.
    powercfg -attributes F15576E8-98B7-4186-B944-EAFA664402D9 -ATTRIB_HIDE

    If you want to hide the “Networking connectivity in Standby” option later on, run this command instead:

    powercfg -attributes F15576E8-98B7-4186-B944-EAFA664402D9 +ATTRIB_HIDE

That’s it!

3 Steps to Change Default Font for Mail App in Windows 10

February 14th, 2019 by Admin

The default font in Windows 10 Mail is too small? Starting with Windows 10 version 1903, Microsoft added a new option for the Mail app (v16.0.11231.20082) that lets you customize the font for incoming and outgoing mail. In this tutorial we’ll walk you through the steps to change default font for built-in Mail app in Windows 10.

3 Steps to Change Default Font for Mail App in Windows 10

  1. Open the Mail app by clicking the Start button in the screen’s bottom-left corner and then choosing Mail.

  2. Click the gear icon to open its Settings pane, and then select Default Font.

  3. Select an account from the drop-down box and then customize the font face, font size, and color you wish to set as the default for the Mail app, and click Save.

    If you want to use the same font for all your email accounts, just check the “Apply to all accounts” option. The Reset button will restore the font settings back to the default.

That’s it!

Add User to Remote Desktop Users Group in Windows 10

February 13th, 2019 by Admin

By default, only the administrative users are allowed to remotely connect to your Windows 10 PC through remote desktop connection (RDP). In this tutorial we’ll show you different ways to add non-Administrative user to Remote Desktop Users group in Windows 10 and grant remote desktop access.

Method 1: Add User to Remote Desktop Users Group via Settings App

  1. Open the Settings app and go to System -> Remote Desktop. Click on the Select users that can remotely access this PC link on the right side.

  2. When the Remote Desktop Users dialog opens, click on Add.

  3. Click on Advanced.

  4. Click on Find Now and then select any user account you want to add to the “Remote Desktop Users” group, and click OK.

  5. Click OK and you’re done.

Method 2: Add User to Remote Desktop Users Group via lusrmgr.msc

  1. Press the Windows key + R to open the Run box, then type lusrmgr.msc and hit Enter.

  2. Expand Local Users and Groups -> Groups in the left pane, then double-click the “Remote Desktop Users” group in the right pane.

  3. In the Remote Desktop Users Properties window, click on Add.

  4. Click on Advanced.

  5. Click on the Find Now button, then select a user account you want to add as a member of the Remote Desktop Users group and click OK.

  6. Click OK and you’ve successfully added a non-Administrative user to Remote Desktop Users group.

Method 3: Add User to Remote Desktop Users Group via Command Prompt

  1. Open up the Command Prompt as administrator.
  2. Type the following command and hit Enter. Replace the “UserName” with the actual user account you want to add to Remote Desktop Users group.

    net localgroup "Remote Desktop Users" "UserName" /add

    If you need to remove a user from the Remote Desktop Users group, run this command:

    net localgroup "Remote Desktop Users" "UserName" /delete

Method 4: Add User to Remote Desktop Users Group via PowerShell

  1. Open up the elevated PowerShell.
  2. To grant Remote Desktop access to a user, you can add it to the Remote Desktop Users group by executing this command:

    Add-LocalGroupMember -Group "Remote Desktop Users" -Member "UserName"

    When you want to remove a user from Remote Desktop Users, run the following command:

    Remove-LocalGroupMember -Group "Remote Desktop Users" -Member "UserName"

That’s it!

3 Methods to Suspend or Resume BitLocker Protection in Windows 10

February 11th, 2019 by Admin

If you’ve enabled BitLocker with TPM, performing a firmware (BIOS or UEFI) update will be interpreted as a boot attack and the computer will require you to enter BitLocker recovery key during boot. To get around this issue, you can suspend BitLocker protection before updating BIOS/UEFI. When the update is complete you can resume BitLocker. That way, you won’t have to enter the recovery key at all. In this tutorial we’ll show you 3 ways to suspend or resume BitLocker protection in Windows 10.

Method 1: Suspend or Resume BitLocker Protection from Control Panel

  1. Open the Control Panel and set the View by option to Large icons, then click on BitLocker Drive Encryption.

  2. Click the Suspend protection link next to your desired BitLocker encrypted drive.

  3. Click Yes to confirm.

  4. Now, your drive will now list its status as suspended with a exclamation point inside a yellow triangle over the drive logo. When you need to resume BitLocker protection, right-click on your drive in File Explorer and then select Resume BitLocker protection.

Method 2: Suspend or Resume BitLocker Protection from Command Prompt

  1. To get started, open the Command Prompt as administrator.
  2. In order to suspend BitLocker protection, type the following command and press Enter. Replace C: with the drive letter of your BitLocker drive you want to suspend.

    manage-bde -protectors -disable C:

  3. When you need to resume BitLocker protection, execute the following command and you’re done.

    manage-bde -protectors -enable C:

Method 3: Suspend or Resume BitLocker Protection from PowerShell

  1. Open Windows PowerShell as administrator. Type the command below to suspend BitLocker protection for your desired drive.

    Suspend-BitLocker -MountPoint "C:"

  2. To resume BitLocker protection for your suspended drive, run the following command:

    Resume-BitLocker -MountPoint "C:"

That’s it!

4 Ways to Find Number of Cores in your CPU on Windows 10

January 31st, 2019 by Admin

How to find out how many physical cores and logic cores your CPU has? Need to check the CPU core before you buy a new laptop? In this tutorial we’ll show you 4 simple ways to find number of physical cores and logical cores in your CPU on Windows 10.

Physical Core VS. Logical Core

A physical core is an actual physical processor core in your CPU. Each physical core has its own circuitry and its own L1 (and usually L2) cache can read and execute instructions separately (for the most part) from the other physical cores on the chip. A CPU with two physical cores is called a dual-core processor and four physical cores is called a quad-core processor.

A logical core (also known as logical processors) is more of a programming abstraction than an actual physical entity. Logical cores are the abilities of a single physical core to run multiple tasks or threads simultaneously. For example, if you have a quad core CPU and each of its physical cores can run two threads at a time, then you have 8 logical cores.

Method 1: Check Number of CPU Cores Using Task Manager

Press the Ctrl + Shift + Esc keys simultaneously to open the Task Manager. Go to the Performance tab and select CPU from the left column. You’ll see the number of physical cores and logical processors on the bottom-right side.

Method 2: Check Number of CPU Cores Using msinfo32 Command

Press the Windows key + R to open the Run command box, then type msinfo32 and hit Enter.

It should open up the System Information app. Select Summary and scroll down until you find Processor. The details will tell you both how many cores and logical processors your CPU has.

Method 3: Check Number of CPU Cores Using Command Prompt or PowerShell

Open the Command Prompt or PowerShell. Type the following command and press Enter:
WMIC CPU Get DeviceID,NumberOfCores,NumberOfLogicalProcessors

The output of the command tells you how many cores and how many logical processors are found in each CPU on your computer.

Method 4: Check Number of CPU Cores Using Third-Party Software

If you would like to find out the detail information about your CPU, try the third-party freeware CPU-Z. After running the app, you can see the number of physical cores and threads (logical cores) at the bottom.

That’s it!

How to Disable Windows 10 Timeline with Group Policy

January 24th, 2019 by Admin

Timeline is a new feature introduced since Windows 10 April 2018 Update, which will record all your PC activities so that you can resume them later, from where you left off. If you don’t use this feature, here is how to disable Timeline with group policy to stop Windows 10 from collecting your activity history.

Method 1: Disable Timeline in Windows 10 with Group Policy

  1. Open the Local Group Policy Editor and browse to:
    Computer Configuration\Administrative Templates\System\OS Policies

    Next, double-click on the “Enables Activity Feed” policy in the right pane to edit it.

  2. Select Disabled and click OK.

    From now on Windows 10 will no longer collect activities on your device.

Method 2: Disable Timeline in Windows 10 with Registry Editor

  1. Open Registry Editor and navigate to:
    HKEY_LOCAL_MACHINE\SOFTWARE\Policies\Microsoft\Windows\System

    On the right pane, right-click blank area and select New -> DWORD (32-bit) Value.

  2. Name the new entry as EnableActivityFeed, and leave its value data as 0.

  3. Restart Windows 10 and the Timeline feature should now be disabled. If you need to enable Timeline again, just change the value of EnableActivityFeed to 1 and you’re done.

How to Import Passwords into Chrome from Firefox in Windows 10

January 18th, 2019 by Admin

When you start moving to Chrome as your primary web browser, the first thing to do is to move all your passwords and bookmarks from the old browser to the new one. Since Chrome 66, it makes password importing & exporting much easier for inexperienced users. In this tutorial we’ll walk you through the steps to import passwords into Chrome from Firefox in Windows 10.

How to Import Passwords into Chrome from Firefox in Windows 10

  1. Open Chrome and click the three dots menu button appeared in the upper right corner, then select Bookmarks -> Import bookmarks and settings.

  2. The following pop-up will appear. You can select Mozilla Firefox from the drop-down list and click on Import. Make sure the “Saved passwords” is checked.

  3. After a while, the migration process will be completed.

This method works only if both Chrome and Firefox are installed on the same computer. If you need to export Firefox saved password from an old PC, and then import them into Chrome on a new PC, a third-party software like Password Recovery Bundle can help you keep track of your passwords saved in different web browsers.

How To Stop Firefox Quantum from Updating Automatically

January 8th, 2019 by Admin

How can I disable automatic updates in Firefox Quantum? It could be frustrating for Firefox to push the update notifications and interrupt what you’re reading.

Starting with Firefox version 63, Mozilla has removed the ability to disable updates completely. When you click on the Menu button at the top right corner and select Options.

Scroll down to the Firefox Updates section, you’re left with two options: Automatically install updates, Check for updates but let you choose to install them. The option “Never check for updates” is no longer available.

If you don’t like Firefox frequently installing the updates, here is a simple way to prevent Firefox Quantum from updating the version automatically in Windows 10 / 8 / 7.

Part 1: Stop Firefox Quantum from Updating Automatically

  1. Open Windows Explorer and type %appdata%\Mozilla\Firefox\Profile in the address bar and press Enter.

  2. The name of your default profile folder should start with eight random characters and end with .default. Just open the Firefox profile folder, then right-click on the prefs.js file and select Edit.

  3. Add the following line to the file and save your changes.
    user_pref("app.update.enabled", false);

  4. Now, Firefox Quantum should never download and install updates automatically.

Part 2: Install Firefox Updates Manually

After disabling automatic updates in Firefox Quantum, you can decide how often and when you want Firefox to install updates. Here’s how to install Firefox updates manually:

  1. Open up Firefox and click on the Menu button in the upper right hand corner, and then select Help from the drop-down menu.

  2. Click on About Firefox.

  3. You can see the exact version number of Firefox you’re running. If a new version of Firefox is available, you can click on the “Check for updates” button to download and install it.

That’s it!

2 Ways to Find Your Firefox Profile Location in Windows

January 7th, 2019 by Admin

Firefox stores all your settings (including home page, bookmarks and passwords) in a profile folder that keeps your personal information separate from the Firefox program. When Firefox keeps crashing or your PC can’t boot, your information won’t be lost (at least your Firefox saved passwords could be recovered). In this tutorial we’ll show you 2 ways to find your Firefox profile location in Windows 10 / 8 / 7.

Method 1: Find Your Profile Folder When Firefox is Running

  1. After opening Firefox, click on the Menu button (the icon with three lines) in the upper right side of the address bar, and then select Help.

  2. Select Troubleshooting Information.

  3. When the Troubleshooting Information tab appears, click on the Open Folder button under the Application Basics section.

  4. This will launch Windows Explorer and display your current Firefox profile directory.

Method 2: Find Your Profile Folder without Opening Firefox

  1. Press the Windows key + R to open the Run command. Type the following and press Enter.
    %APPDATA%\Mozilla\Firefox

  2. After Windows Explorer opens to that directory, double-click on the profile.ini file to open it with Notepad or other text editor.

  3. You can view the relative or absolute path for all your Firefox profiles. But there is only one default profile. In my example, the default profile is located under the directory: %APPDATA%\Mozilla\Firefox\Profiles\einxo22v.default.

That’s it