Archive for the ‘Windows 10’ category

Make a Desktop Shortcut to Switch User Accounts in Windows 10

October 9th, 2018 by Admin

Looking for a straightforward way to switch user accounts? Normally we can switch between users by clicking the user name icon on the top left of Start Menu and then selecting another account from the list. But this method is not quite effective.

In this tutorial we’ll show you how to make a desktop shortcut for quickly switching user account in Windows 10, saving you a click or two along the way.

Make a Desktop Shortcut to Switch User Accounts in Windows 10

  1. Right-click on any empty spot of your desktop, and then select New -> Shortcut.
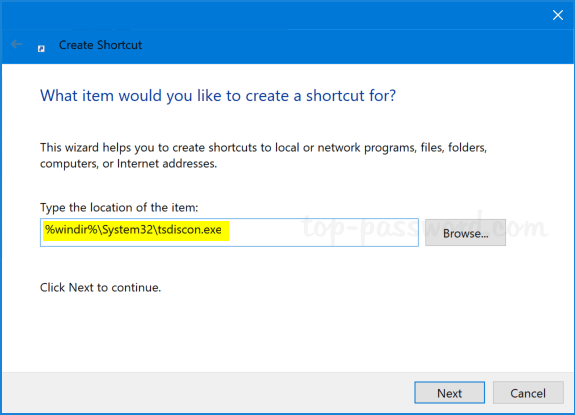
  2. When the Create Shortcut wizard opens, enter the full path of the Session Disconnection Utility (C:\Windows\System32\tsdiscon.exe) into the location box, and click on Next.

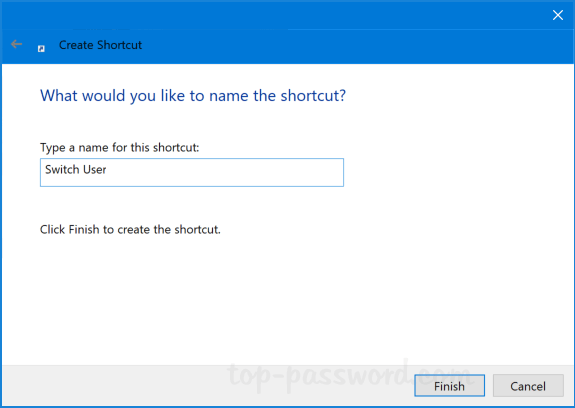
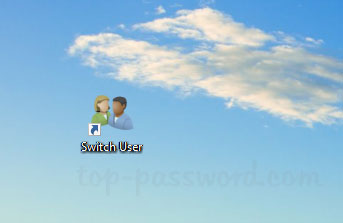
  3. Name the shortcut “Switch User”, and click on Finish.

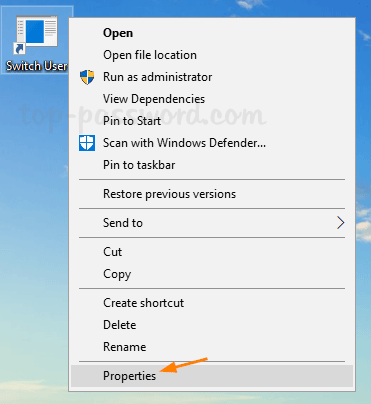
  4. Next, right-click on the new shortcut you created, and then select Properties.

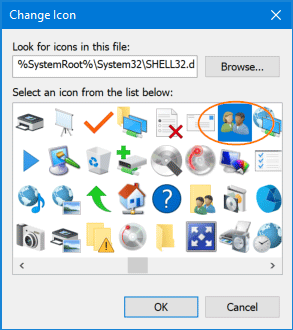
  5. Go to the the Shortcut tab and click on Change Icon.

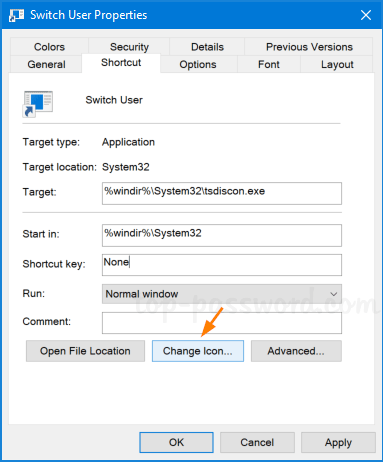
  6. By default, tsdiscon.exe contains no icons. So pick the icon of your choice and click OK.

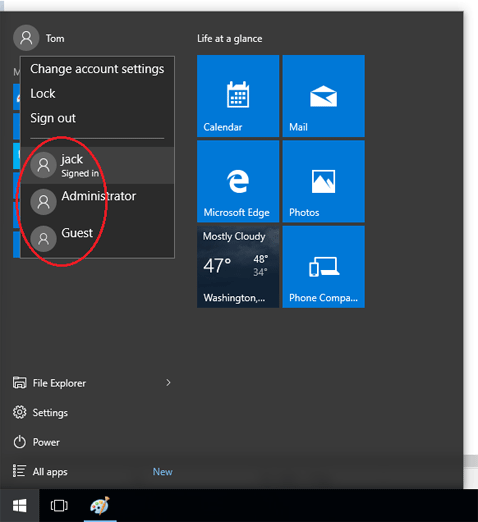
  7. Now, double-clicking the “Switch User” desktop shortcut will take you directly to the User Selection screen, in case you have disabled the Lock screen.

That’s it!

How to Set up Windows Hello to Log into Windows 10

October 8th, 2018 by Admin

Windows Hello is a new sign-in option that lets you log into Windows 10 using facial recognition, without having to enter a password. If your Windows 10 laptop or tablet has a built-in camera, you can set up Windows Hello in just a few simple steps.

How to Set up Windows Hello to Log into Windows 10

  1. Press Windows + I keyboard shortcut to open the Settings app. Click on Accounts and then select Sign-in options in the left sidebar. Scroll down to the Windows Hello section and click on Set up.

  2. At the bottom of the Windows Hello setup page, click on Get started. The camera will scan your face and you need to keep looking directly at the camera for several seconds.

  3. Once it completes, you’ll be asked to set up a PIN as an alternative sign-in option in case Windows 10 has trouble recognizing your face. Click on Set up PIN.

  4. You’ll be asked to enter the current Windows 10 password to verify your identity.

  5. Once verified, you can create a PIN code to use in place of Windows Hello.

  6. You’re all done! Whenever you get to the Windows 10 sign-in screen, you will see a small eye and text saying it is looking for you. Just look at your camera and it will log you in automatically.

Setting up PIN is mandatory for using Windows Hello in Windows 10. If you remove the PIN login later, the system will turn off Windows Hello automatically.

Fix: “Open with” Missing from Windows 10 Right-Click Context Menu

October 2nd, 2018 by Admin

How can I restore “Open With” context menu in Windows 10? The “Open With” option lets you open files with any program of your choice, especially useful if the file extension is unknown or it’s associated to a program that doesn’t exist. In this tutorial we’ll show you how to add the missing “Open With” option back to Windows 10 right-click context menu.

Fix: “Open with” Missing from Windows 10 Right-Click Context Menu

  1. Open the Run by pressing Windows key + R. Type regedit and press Enter to open Registry Editor.

  2. Navigate to the following key:
    HKEY_CLASSES_ROOT\*\shellex\ContextMenuHandlers

    Right-click on the ContextMenuHandlers and select New -> Key from the popup menu.

  3. Name the new key as Open With and then highlight it. Double-click on the (Default) value in the right-hand pane.

  4. Copy and paste the following text into the Value data edit box, and click OK.
    {09799AFB-AD67-11d1-ABCD-00C04FC30936}

  5. Close Registry Editor. Now you’ve successfully added “Open with Notepad” to right-click context menu for all file types.

How to Set .PS1 Script to Open with PowerShell By Default

September 30th, 2018 by Admin

When you double-click a .ps1 file from File Explorer, Windows 10 will open it in Notepad rather than executing the script with PowerShell. If you want to set .ps1 script to open with PowerShell by default, you have to change the file type association.

Method 1: Associate .PS1 to Open in PowerShell

  1. Right-click any .ps1 file in File Explorer, and then select Open with from the context menu.

  2. If the PowerShell program isn’t listed, click on More apps.

  3. Check the box labeled “Always use this app to open .ps1 files“, and click on “Look for another app on this PC“.

  4. When the Open with dialog box appears, drill down to the directory C:\Windows\System32\WindowsPowerShell\v1.0 and select the powershell.exe file. Click Open.

  5. Now you’ve successfully set PowerShell as the default program for opening .ps1 file type.

Method 2: Change Default Program for Opening PowerShell Script

Need to associate all types of PowerShell script (.ps1, .psm1, .psd1, etc.) to open with PowerShell by default? You can do it with a simple registry tweak.

  1. Open the Registry Editor. Copy the following line and paste it into the address bar, then press Enter.

    HKEY_CLASSES_ROOT\Microsoft.PowerShellScript.1\Shell\Open\Command

    Next, double-click the (Default) value in the right pane.

  2. In the Edit String window, copy and paste the following command into the Value data field. Click OK.

    "C:\Windows\System32\WindowsPowerShell\v1.0\powershell.exe" "%1"

  3. Close Registry Editor. From now on, any file type of PowerShell script will be opened in PowerShell instead of the Notepad program.

Add “Run with PowerShell (Admin)” Context Menu for .PS1 Files

September 29th, 2018 by Admin

How to add “Run as administrator” to PS1 file context menu in Windows 10? Before you can run PowerShell script with admin rights, you have to launch the elevated PowerShell console firstly. To simplify this process, you can add “Run with PowerShell (Admin)” to the right-click context menu for .PS1 files.

How to Add “Run with PowerShell (Admin)” Context Menu for .PS1 Files

  1. Open the Registry Editor. Paste the following registry location into the address bar, and then press Enter.

    HKEY_CLASSES_ROOT\Microsoft.PowerShellScript.1\Shell

    Right-click on the Shell key and select New->Key, name it “Run with PowerShell (Admin)“. Underneath that, create another subkey called “Command“.

  2. Select the Command subkey in the left pane, and then double-click the “(Default)” string in the right pane.

  3. Copy and paste the following command into the Value data field, and click OK.

    "C:\Windows\System32\WindowsPowerShell\v1.0\powershell.exe" "-Command" ""& {Start-Process PowerShell.exe -ArgumentList '-ExecutionPolicy RemoteSigned -File \"%1\"' -Verb RunAs}"

  4. Close Registry Editor. Now you should see a new context menu entry called “Run with PowerShell (Admin)” when you right-click any .PS1 script.

Fix: Windows 10 Photos App Not Working

September 27th, 2018 by Admin

Unable to open the Photos app and it keeps crashing? The Photos app is the default photo viewer in Windows 10. If it has stopped working and you’re unable to open image files, try the following methods to fix the Photos app issues.

Method 1: Reinstall Windows 10 Photos App

If your Photos app doesn’t work normally or it can’t even start, getting the latest version of the Photos app may fix your issue. Follow these steps to reinstall the Photos app in Windows 10:

  1. Press the Windows key + X to open the Quick Link menu, and then select Windows PowerShell (Admin).

  2. Copy and paste the following command and then press Enter to uninstall the built-in Photos app:

    Get-AppxPackage *Microsoft.Windows.Photos* | Remove-AppxPackage

  3. Once done, you need to reinstall the Photos app. To do it, go to the Microsoft Store app and search for the “Photos” app, click on Get to download and install it on your computer.

Method 2: Restore Windows 10 to Previous State

If the Photos app was working prior to the issue, you can restore Windows 10 to a previous date before the issues began. Here’s how:

  1. Press the Windows key + R on your keyboard to open the Run command. Type SystemPropertiesProtection and press Enter.

  2. Once System Properties dialog is opened, click on System Restore.

  3. When you see the System Restore wizard, click on Next.

  4. Now you can view all recent system restore points available on your Windows 10 system. Choose the restore point before your Photos app stops working, and click on Next.

  5. Click on Finish to confirm your restore point and your PC will automatically reboot to begin the restore process.

That’s it!

How to Delete One or More System Restore Points in Windows 10

September 26th, 2018 by Admin

By default, Windows 10 will automatically create a restore point when you install a device driver or Windows update, so you can later reverse system changes if Windows 10 becomes unstable.

Restore points could take up a lot of disk space, so if your PC is running well, there’s not much sense in keeping many old restore points. In this tutorial we’ll show you 3 ways to delete one or more system restore points to save disk space in Windows 10.

Method 1: Delete All System Restore Points in System Protection

Use the Windows key + R keyboard shortcut to open the Run command. Type SystemPropertiesProtection and press Enter.

This will open the System Protection page in the System Properties window. Now select a drive you want to delete all old restore points from, and click on Configure.

Click on the Delete button. When the warning dialog pops up, click Continue to confirm.

Method 2: Delete All But the Most Recent Restore Point via Disk Cleanup

Right-click on a local drive and then select Properties from the context menu.

Under the General tab, click on Disk Cleanup.

Next, click on Clean up system files.

Go to the the More Options tab, click on the Clean up button under the “System Restore and Shadow Copies” section.

When the Disk Cleanup confirmation box opens, click on Delete and Windows 10 will delete all your restore points while keeping the most recent one.

Method 3: Delete Individual System Restore Point via Command Line

Open the Administrative Command Prompt. Execute the following command to list all system restore points created for all drives on your computer. Keep an eye on the creation date and shadow copy ID for each system restore point.
vssadmin list shadows

To delete a specific restore point, type the following command and press Enter.
vssadmin delete shadows /Shadow={shadow copy ID}

If you want to delete all restore points for all your drives, just run this command instead:
vssadmin delete shadows /all

That’s it!

Easy Ways to Open System Properties in Windows 10

September 25th, 2018 by Admin

The System Properties window is commonly used to configure options such as your computer name, system restore, remote desktop and so on. In this tutorial we’ll show you 3 easy ways to open System Properties in Windows 10.

Method 1: Open System Properties by Right-clicking This PC Icon

Right-click the This PC icon on your desktop and then select Properties.

Click Advanced system settings in the left menu.

Windows 10 will immediately open the System Properties window.

Method 2: Open System Properties via Cortana Search

On the Windows 10 taskbar, enter “advanced system” inside the Cortana search box. When the search results are loaded, click on “View advanced system settings“.

Method 3: Open System Properties via Run or Command Line

Press Windows + R keys together, type the command “sysdm.cpl” in the Run dialog box and press Enter. Alternatively, you can open Command Prompt and type the same command to open System Properties.

If you want to directly open any specific tabs in the System Properties window, just type one of the following commands:

  • SystemPropertiesComputerName
  • SystemPropertiesHardware
  • SystemPropertiesAdvanced
  • SystemPropertiesProtection
  • SystemPropertiesRemote

For example, if you execute the command “SystemPropertiesAdvanced” via Run or Command Prompt, it will open the Advanced tab in System Properties.

That’s it!

3 Ways to Fix Camera App Not Working in Windows 10

September 21st, 2018 by Admin

Can’t find or start the Camera app after Windows 10 update? If the Camera app stops working or there is something wrong, here are 3 simple ways to fix it and get the Camera app back to working.

Method 1: Change Privacy Settings for Camera App

If the Camera app is not working any more, you have to check out the privacy settings that might block the Camera app from accessing your webcam.

To do so, open the Settings app and click on the Privacy category. Select Camera under the App permissions section on the left. On the right panel, you have to turn on the setting “Allow apps to access your camera“. Scroll down to locate the Camera app and grant permission for it to access the webcam.

Method 2: Reinstall Camera App

Reinstalling the Camera app can restore anything to its initial state, and this may be the most effective way to fix the issue of Camera not working. To uninstall the Camera app, right-click on the Start button and choose Windows PowerShell (Admin). Enter the following command:
Get-AppxPackage *Microsoft.WindowsCamera* | Remove-AppxPackage

Once you’ve done this, re-download the Windows Camera app from the Store and see if it’s fixed.

Method 3: Roll Back or Update Webcam Driver

Incompatible or outdated driver could also cause the Camera app to not function. If the problem started after recent Windows 10 upgrade, try to roll back your webcam driver to the previous version:

  1. Just open the Device Manager, right-click on your webcam device and select Properties.

  2. Go to the Driver tab and then click on Roll Back Driver.

  3. Select the appropriate reason why you want to roll back to old drivers, and click Yes.

  4. Reboot your computer and check if the Camera app is working or not.

If rolling back doesn’t work, try to install the latest driver for your webcam. Here’s how:

  1. Right-click on the webcam in the Device Manager, and then select Update driver.

  2. Click the Search automatically for updated driver software option.

  3. It will download the latest version of the driver available and install it automatically. After completing the above steps, open the Camera app and hopefully this time it starts successfully.

That’s it!

4 Ways to Open the Camera App in Windows 10

September 20th, 2018 by Admin

Windows 10 has a built-in app called Camera that lets you use your webcam to take pictures and record videos. In this tutorial we’ll show you 4 easy ways to open the built-in Windows Camera app in Windows 10.

Method 1: Open Windows 10 Camera App via Cortana Search

Click on the Cortana search box from the taskbar and type in the word camera. You can then access the Camera app from the result.

Method 2: Open Windows 10 Camera App from Start Menu

Click the Start button to open the Start Menu. Scroll down the list of apps to the letter C and you can find the Camera app.

Method 3: Open Windows 10 Camera App via Run

Press the Windows key + R at the same time to bring up the Run command. Type microsoft.windows.camera: and press Enter.

This will open the built-in Camera app immediately.

Method 4: Open Windows 10 Camera App from Command Prompt

If you’re at the Command Prompt, just type the following command and hit Enter to launch the Camera app.
start microsoft.windows.camera:

Still Can’t Find or Start Camera App

If you’re unable to open the Camera app using the above methods, it’s possible that the Camera app was uninstalled from your computer. In that case, you then need to install a fresh copy from Windows Store.

That’s it!