Archive for the ‘Windows 10’ category

3 Ways to Change PowerShell Execution Policy in Windows 10

September 19th, 2018 by Admin

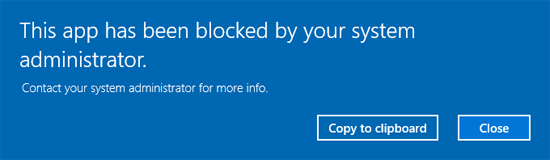
PowerShell script cannot be loaded because the execution of scripts is disabled on this system? By default, Windows restricts running PowerShell scripts, as a security mechanism. To verify the PowerShell execution policy on your computer, you can use the Get-ExecutionPolicy cmdlet.

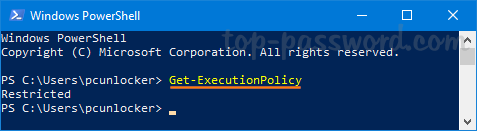
If the execution policy is displayed as Restricted, you can change it to other settings as shown below.

  • Restricted – No scripts can be run. Windows PowerShell can be used only in interactive mode.
  • AllSigned – Only scripts signed by a trusted publisher can be run.
  • RemoteSigned – Downloaded scripts must be signed by a trusted publisher before they can be run.
  • Unrestricted – No restrictions. All PowerShell scripts can be run.

In this tutorial we’ll show you how to change PowerShell execution policy in Windows 10 using command line, group policy or registry tweak.

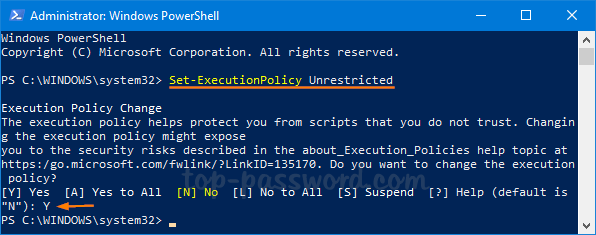
Method 1: Change PowerShell Execution Policy with Command Line

Open the PowerShell as administrator. You can use the Set-ExecutionPolicy command to set the PowerShell execution policy as per your requirement.

Set-ExecutionPolicy Unrestricted

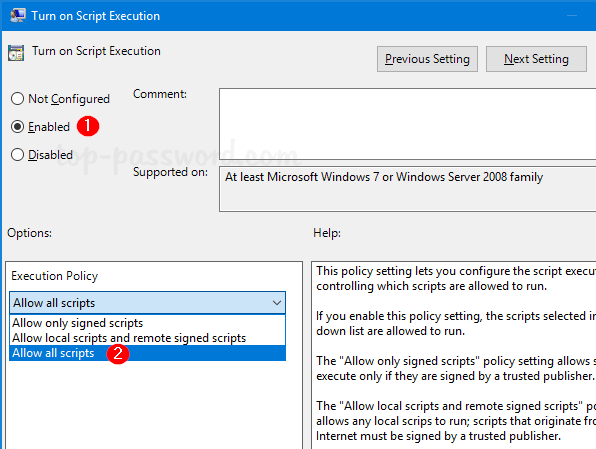
Method 2: Change PowerShell Execution Policy with Group Policy

Open the Local Group Policy Editor and navigate to Computer Configuration -> Administrative Templates -> Windows Components -> Windows PowerShell. Double-click a setting called “Turn on Script Execution” on the right pane.

Select the Enabled option. Beneath it, you can click the drop-down list to set the execution policy to “Allow all scripts“. Click OK to save your changes.

Method 3: Change PowerShell Execution Policy with Registry Editor

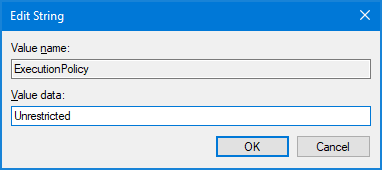
Open Registry Editor and browse to the following registry key by copying and pasting it in the address bar and pressing Enter. Next, double-click the string ExecutionPolicy on the right pane.

HKEY_LOCAL_MACHINE\SOFTWARE\Microsoft\PowerShell\1\ShellIds\Microsoft.PowerShell

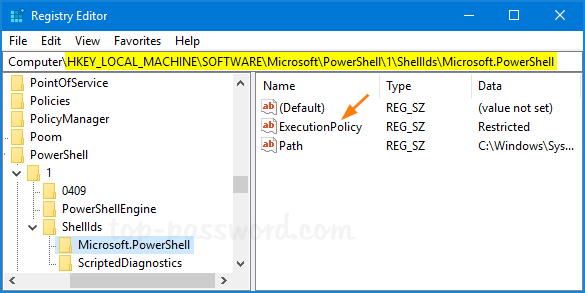
Set the value data to one of the following values: Restricted, AllSigned, RemoteSigned, Unrestricted, Undefined. Click OK and then close Registry Editor.

That’s it!

How to Disable PowerShell with Software Restriction Policies GPO

September 18th, 2018 by Admin

Is there a way to block PowerShell from running through group policy? Windows PowerShell comes pre-installed in Windows 10 and it’s a command-line shell designed especially for programmers and IT professionals. If you’re a standard Windows user, you may want to get rid of it. In this tutorial we’ll show you how to disable PowerShell for all user accounts in Windows 10, using Software Restriction Policies GPO.

Part 1: Find the PowerShell Executable Program

  1. After launching Windows PowerShell, press the Ctrl + Shift + Esc keys simultaneously to bring up the Task Manager window. Go to the Details tab, scroll down to find the process called powershell.exe. Right-click on it and select “Open file location“.

  2. Windows Explorer will open the folder where the powershell.exe file is located. Note down the full path as we’ll need it later.

Part 2: Disable PowerShell with Software Restriction Policies

  1. Open the Local Group Policy Editor and navigate to:
    Computer Configuration > Windows Settings > Security Settings > Software Restriction Policies

    Right-click on Software Restriction Policies on the left console tree, and then select New Software Restriction Policies.

  2. Select the newly-created “Additional Rules” node. Right-click any empty space in the right pane and choose “New Hash Rule“.

  3. Click the Browse button to select the powershell.exe file we’ve located previously, and set the Security level to Disallowed. Click OK.

  4. If you also want to block the Windows PowerShell ISE from running, just repeat the above steps to add a new rule to block powershell_ise.exe.
  5. Reboot your computer for the policies to take effect. When you try to run PowerShell you should receive the following error message “This app has been blocked by your system administrator“.

    Renaming the PowerShell executable file couldn’t bypass the above message as well.

How to Find Apps by Alphabet in Windows 10 Start Menu

September 17th, 2018 by Admin

Start Menu in Windows 10 is completely different from the earlier versions. All the apps shown in the Start Menu are sorted with alphabets, so you can quickly find your desired app by clicking the first letter in Windows 10 Start Menu.

Find Apps by Alphabet in Windows 10 Start Menu

The following steps will demonstrate how to locate the built-in Camera app in Windows 10.

  1. Click the Start button to bring up the Start menu. You’ll see a long list of apps installed on your computer. Just click any letter (for example ‘A‘) to display the alphabet list.

  2. Next, click the letter that the name of the desired app begins with. Since the name of the “Camera” app starts with the letter ‘C’, we choose ‘C‘ in this case.

  3. You’ll be directed to a list of all programs that start with the letter you selected. From there you can launch your desired app with ease.

Adjust the Position of Any App in the Start Menu

If you want to bring your most used app to the top of the list in the Start Menu, here’s how to adjust its position:

  1. Use the Windows key + R keyboard combination to open the Run box, paste the following path and pass Enter to open the start menu folder.
    %AppData%\Microsoft\Windows\Start Menu\Programs
  2. Locate the shortcut of your most used app, rename it by adding the letter ‘A‘ to the beginning of the shortcut name.
  3. When you’re done, open the Start Menu and you should see the most used app shown in the top of the app list.

Show Encrypted or Compressed NTFS files in Color on Windows 10

September 16th, 2018 by Admin

By default, Windows displays all folders and files names in black letters. To help you identify an EFS or compressed folder or file, you can turn on “Show encrypted or compressed NTFS files in color” for your account in Windows 10. EFS encrypted files will show its name in green, while compressed NTFS files will show the name in blue.

Method 1: Show Encrypted or Compressed NTFS files in Color via Folder Options

  1. Press Windows Key + E to open File Explorer. Select the View tab from the File Explorer Ribbon and then click on Options.

  2. When the Folder Options window opens, click the View tab and check the option named “Show encrypted or compressed NTFS files in color“.

  3. Click Apply followed by OK. Now Windows 10 will show compressed or encrypted folders or files names in blue or green color.

Method 2: Show Encrypted or Compressed NTFS files in Color via Registry Editor

  1. Open the Registry Editor and navigate to the following key:
    HKEY_CURRENT_USER\Software\Microsoft\Windows\CurrentVersion\Explorer\Advanced

    Next, double-click the 32-bit DWORD ShowEncryptCompressedColor in the right pane.

  2. Set the value data to 1 and click OK.

  3. Close Registry Editor. Windows 10 makes the file names colorful in order to help you identify the encrypted or compressed file and folder easily.

Different Ways to Open Programs and Features in Windows 10

September 13th, 2018 by Admin

If you want to get installed programs list or uninstall an application, you have to access the Programs and Features panel. In this tutorial we’ll show you different ways to quickly open Programs and Features in Windows 10.

Method 1: Open Programs and Features from Control Panel

Launch the Control Panel and set the display to Large icons, then click Programs and Features.

Method 2: Open Programs and Features via Run

Press Windows + R keys simultaneously to launch the Run box. Type appwiz.cpl and click OK to open Programs and Features.

Method 3: Open Programs and Features from Command Prompt

If you’re running a Command Prompt or PowerShell, just execute the appwiz.cpl command. This will get you the Programs and Features window.

Method 4: Open Programs and Features from Win+X Menu

Right-click on the Start button or press the Windows key + X keyboard combination. When the WinX menu opens, select Apps and Features.

This will open the Apps & Features pane in the new Settings app. On the right panel, look for the “Related settings” section and you can click the “Programs and Features” link to access the traditional Uninstall Programs window.

Method 5: Create a Programs and Features Shortcut on the Desktop

If you want to open Programs and Features with just a single click, follow these steps to create a desktop shortcut for quick access:

  1. Right-click any vacant area in the desktop, and select New -> Shortcut.

  2. Copy-paste the following command into the “Type the location of the item” field, and click Next.
    %WinDir%\System32\appwiz.cpl

  3. Name the shortcut “Programs and Features” or whatever you like, and then click Finish.

  4. Now, you can double-click the new shortcut on your desktop to access Programs and Features easily, or assign a keyboard shortcut to launch it.

Quick Ways to Open Game Controllers Settings in Windows 10

September 13th, 2018 by Admin

If you want to install a game controller or calibrate your joystick, you have to access the Game Controllers Settings. In this tutorial we’ll show you different ways to open Game Controllers Settings in Windows 10.

Method 1: Open Game Controllers Settings via Run Command

press the Windows key and R to bring up the Run command, type joy.cpl and press Enter. This will launch the Game Controllers window immediately.

Method 2: Open Game Controllers Settings via Windows 10 Search

Click the Cortana Search box in the taskbar, enter “game controller” and you can then click the “Set up USB game controller” option from the search result.

Method 3: Open Game Controllers Settings via Control Panel

Open the Control Panel in Large icons, click on Devices and Printers.

Locate your joystick. Right-click on it and select “Game controller settings” from the popup menu.

It will display the Game Controllers Settings dialog.

Method 4: Create a Desktop Shortcut to Open Game Controllers Settings

If you need to access the Game Controllers Settings regularly, follow the step-by-step instructions to create a desktop shortcut on Windows 10:

Right click any blank area on the desktop, then select New -> Shortcut from the context menu.

Copy and paste the following path into the location box, and click Next.
%SystemRoot%\System32\joy.cpl

Give a name for your Game Controllers shortcut.

Click Finish and you’re done!

How to View Installed Certificates in Windows 10 / 8 / 7

September 12th, 2018 by Admin

How can I get a list of installed certificates on Windows? Is there a way to check if my certificate has the private key attached? In this tutorial we’ll show you easy ways to view all certificates installed on your Windows 10 / 8 / 7 computer, so you can check the certificate status, export, import, delete or request new certificates.

Method 1: View Installed Certificates for Current User

  1. Press the Windows key + R to bring up the Run command, type certmgr.msc and press Enter.

  2. When the Certificate Manager console opens, expand any certificates folder on the left. In the right pane, you’ll see details about your certificates. Right-click on them and you can export or delete it.

    By default, the EFS certificate could be found under the “Personal” -> “Certificates” folder. Double-click on the EFS certificate and you can know if it has the private key attached. Without the private key, you’re unable to decrypt your EFS files.

Method 2: View Installed Certificates for Local Computer

  1. Press the Windows key + R to bring up the Run command, type mmc and press Enter to open Microsoft Management Console.

  2. Click the File menu and then select Add/Remove Snap-in.

  3. Select Certificates from the list of snap-ins, and click Add.

  4. In the next dialog box, select Computer account and click Next.

  5. Select Local computer and click Finish.

  6. Now you’ll back at the “Add or Remove Snap-ins” window, just click OK.

  7. When you open any certificates folder, you will see that the certificates are displayed in the right pane.

Configure File Explorer to Automatically Open Previous Folder at Logon

September 11th, 2018 by Admin

In this tutorial we’ll show you how to configure Windows 10 to remember your currently opened folder windows, and automatically restore them at the next logon. This feature lets you quickly get back to the previous files you’re working after logging off or restart the computer.

Method 1: Configure Windows 10 to Restore Previous Folder Windows via Folder Options

  1. To get started, you need to open the Folder Options in Windows 10.

  2. Go to the View tab. In the list of Advanced settings, scroll down to check the option labelled “Restore previous folder windows at logon” and click OK.

  3. Now when you log off, restart or shutdown, Windows 10 will automatically open the previously opened folder windows at the next logon.

Method 2: Configure Windows 10 to Restore Previous Folder Windows via Registry

The “Restore previous folder windows at logon” option can also be configured with a registry tweak. Follow these steps:

  1. Open the Registry Editor and navigate to the following location:
    HKEY_CURRENT_USER\Software\Microsoft\Windows\CurrentVersion\Explorer\Advanced

    Double-click the 32-bit DWORD entry PersistBrowsers on the right pane. If PersistBrowsers is missing, you need to create it manually.

  2. Enter 1 into the Value data box and click OK.

  3. Sign out or restart Windows 10 for your registry settings to take effect.

How to Restore “Close All Tabs” Warning in Microsoft Edge

September 9th, 2018 by Admin

How to get back closing all tabs warning in Microsoft Edge? To avoid accidentally closing multiple tabs at once, Microsoft Edge will show a warning prompt “Do you want to close all tabs” when you try to close the browser.

If you’ve checked the “Always close all tabs” option, Edge will no longer show you the prompt from the next time. This tutorial will walk you through the steps to restore the “close all tabs” warning in Microsoft Edge for your Windows 10 account.

How to Restore “Close All Tabs” Warning in Microsoft Edge

  1. Open the Registry Editor. Copy and paste the following path into the Registry Editor’s address bar to quickly jump to the “Main” key. Then double-click the DWORD AskToCloseAllTabs on the right pane.

    HKEY_CURRENT_USER\Software\Classes\Local Settings\Software\Microsoft\Windows\CurrentVersion\AppContainer\Storage\microsoft.microsoftedge_8wekyb3d8bbwe\MicrosoftEdge\Main

    If the AskToCloseAllTabs value doesn’t exist, right-click on an empty spot and select New -> DWORD (32-bit) Value. Name it AskToCloseAllTabs.

  2. Change its value data to 1 if you want to enable “Do you want to close all tabs” prompt in Microsoft Edge.

  3. Once you’ve completed the steps, re-launch Microsoft Edge. The next time you try to close Edge with multiple tabs, you will get “Do you want to close all tabs?” prompt for confirmation.

How to Show “Run as different user” on Windows 10 Start Menu

September 6th, 2018 by Admin

How can I run an application (such as SQL Server Management Studio) as a different user? Run as different user is a hidden feature in the depth of Windows. Previously we’ve covered 3 ways to run program as different user. Here we’ll show you a simple way to add “Run as different user” command to the Start Menu in Windows 10.

How to Show “Run as different user” on Windows 10 Start Menu

  1. Open the Registry Editor. Navigate to the following key:
    HKEY_CURRENT_USER\Software\Policies\Microsoft\Windows\Explorer

    If the “Explorer” subkey is missing, right-click on the “Windows” key and select New -> Key. Name it “Explorer” (without the quotes).

  2. Next, right-click on the “Explorer” subkey and select New -> DWORD (32-bit) Value. Name it ShowRunAsDifferentUserInStart.

  3. Double-click the created value, set its value data to 1, then click OK.

  4. Close the Registry Editor. After restarting Windows 10, the next time you right-click any app on the Start Menu, the “Run as a different user” command will appear on the context menu that appears.