Archive for the ‘Windows 10’ category

How to Remove “Open PowerShell window here” Context Menu in Windows 10

September 5th, 2018 by Admin

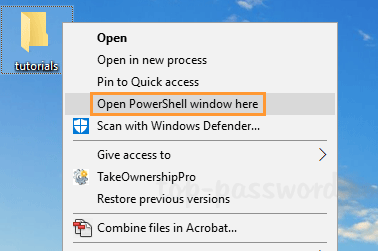
On Windows 10, you can access the “Open PowerShell window here” context menu by holding down the SHIFT key and then right-clicking a folder. This lets you quickly open PowerShell in the current folder without having to change the working directory.

If you’re a fan of using Command Prompt rather than Windows PowerShell, let’s see how to remove “Open PowerShell window here” context menu in Windows 10.

How to Remove “Open PowerShell window here” Context Menu in Windows 10

  1. Use the Windows key + R keyboard shortcut to open the Run command. Type regedit and hit Enter.

  2. Go to the following location in the Registry Editor window that appears:
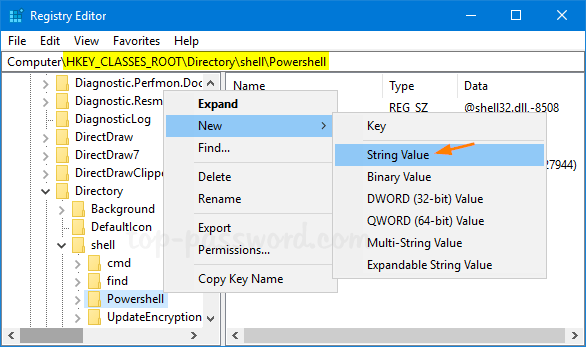
    HKEY_CLASSES_ROOT\Directory\shell\Powershell

    By default, the “Powershell” key is protected and none of its values can be modified. You have to take ownership of this registry key and assign full permissions to your account.

  3. Right-click the “Powershell” key in the left pane and then select New -> String Value.

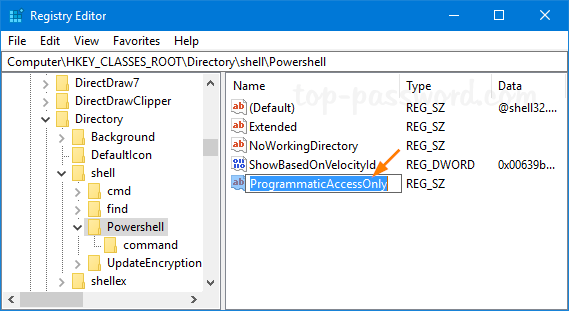
  4. Name the new string “ProgrammaticAccessOnly“, and leave its value data empty.

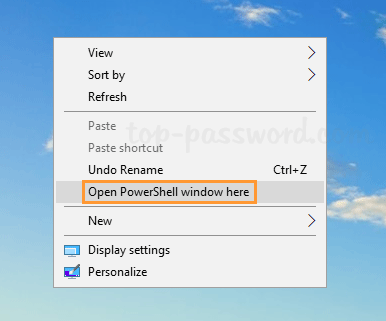
  5. Now you’ve successfully removed “Open PowerShell window here” in the context menu when you press SHIFT and then right-click any folder.

If you want to continue removing “Open PowerShell window here” from the right-click menu for Drives and Directory background, repeat the steps above for the following registry keys:

HKEY_CLASSES_ROOT\Directory\Background\shell\Powershell
HKEY_CLASSES_ROOT\Drive\Background\shell\Powershell

Whenever you need to restore the “Open PowerShell window here” context menu, just delete the ProgrammaticAccessOnly entry from the above registry locations and you’re done.

How to Delete Custom or Built-in Power Plan in Windows

August 23rd, 2018 by Admin

How do I delete a power plan that I no longer need? Windows allows you to use the built-in power plans (Balanced, Power Saver, and High Performance) or create a new power plan from scratch. This tutorial will show you 2 methods to delete custom or built-in power plan in Windows 11 / 10 / 8 / 7.

Method 1: Delete Custom Power Plan Using Control Panel

  1. Press the Windows and R keys together to open the Run dialog box. Type powercfg.cpl and press Enter to access one of the Control Panel applets – Power Options.

  2. To delete a custom power plan, you first have to choose another power plan as the active one. Then click on the link “Change plan settings” next to the custom power plan you want to delete.

  3. In the next window, click on Delete this plan link at the bottom.

  4. Click OK to confirm the operation.

  5. After deleting the power plan, it will disappear from the Power Options window.

Method 2: Delete Custom or Built-in Power Plan Using Command Prompt

In addition to deleting custom power plan, this method also allows you to delete built-in power plans in Windows 10 / 8 / 7. Follow these steps:

  1. Open the Command Prompt as administrator. Run the powercfg /list command and it will list all existing power plans in your system along with their GUIDs.

    If the power plan you want to delete is active, then you have to set another plan as active by running this command:
    powercfg -setactive GUID

  2. Now, you can delete the desired power plan using the following command.
    powercfg -delete GUID

  3. When it’s done, the selected power plan is deleted and you cannot use it anymore.

How to Create a Power Plan in Windows 11 / 10 / 8 / 7

August 22nd, 2018 by Admin

A power plan lets you customize how long it takes your computer to turn off monitor / hard drive, or go into sleep after your computer is idle. In this tutorial we’ll walk you through the steps to create a power plan in Windows 11 / 10 / 8 / 7 to customize how your computer uses power.

How to Create a Power Plan in Windows 11 / 10 / 8 / 7?

  1. Press the Windows key + R to bring up the Run dialog, type powercfg.cpl and press Enter to open the Power Options window.

  2. Click the “Create a power plan” link in the left navigational menu.

  3. Select an existing power plan as the base for your new plan, type in a plan name you want and click Next.

  4. Choose how long before your monitor turns off and how long before your computer goes to sleep. You can either set a certain amount of time, or set it to never. Finally click on Create.

  5. When you come back to the Power Options window, you can see that new power plan is automatically set as active.

That’s it!

How to Prevent Users from Removing Printers in Windows 10 / 8 / 7

August 21st, 2018 by Admin

Is there a way to block users from deleting the printers in a public computer? This tutorial will show you how to use group policy or registry trick to prevent users from removing local and network printers in Windows 10 / 8 / 7.

Method 1: Use GPO to Prevent Users from Removing Printers

  1. Press the Windows key + R to launch the Run dialog box, type in gpedit.msc and press Enter. This will open the Local Group Policy Editor.

  2. Navigate to User Configuration –> Administrative Templates –> Control Panel –> Printers, and then double-click “Prevent deletion of printers” from the right pane.

  3. Select Enabled and click OK.

  4. If a user tries to delete any printers from your computer, a message will appear saying “This operation has been cancelled due to restrictions in effect on this computer. Please contact your system administrator“.

Method 2: Use Registry Editor to Prevent Users from Removing Printers

If you have the standard or home edition of Windows, you can modify the registry instead to prevent the deletion of existing printers on your computer.

  1. Press the Windows key + R to launch the Run dialog box, type in regedit and press Enter. This will open the Registry Editor.

  2. Go to the following registry location:
    HKEY_CURRENT_USER\Software\Microsoft\Windows\CurrentVersion\Policies\Explorer

    Double-click the DWORD entry “NoDeletePrinter” from the right panel, change the Value Data field to 1, then click OK.

  3. Now close the Registry Editor and reboot your computer. If you don’t want to prevent users from deleting printers any longer, just change the NoDeletePrinter value to 0 and you’re done!

Rotate Your Screen in Windows – Fix Screen Sideways or Upside Down

August 11th, 2018 by Admin

How can I change the screen orientation back to normal when it appears sideways or upside down? Is there a keyboard shortcut to turn Windows 10 screen 90 degrees or 180 degrees? In this tutorial we’ll show you 3 simple ways to rotate your computer’s screen in Windows 10 / 8 / 7.

Method 1: Rotate Your Screen in Windows with Keyboard Shortcut

While hold down the Ctrl and Alt keys, pressing the Left, Right, or Down arrow key could rotate the screen a different direction. To restore the screen back to its normal upright rotation, just press Ctrl + Alt + the Up arrow.

Method 2: Rotate Your Screen via Windows Display Settings

Right-click on the desktop and choose “Display settings“. If you’re running Windows 7, select the “Screen Resolution” option instead.

Click the Orientation drop-down menu, and then choose your preferred screen orientation — Landscape, Portrait, Landscape (flipped), or Portrait (flipped).

A confirmation message will let you decide whether to use the changed orientation or revert back to the current one.

Method 3: Rotate Your Screen in Windows with Intel / AMD Graphics

If your computer comes with have Intel graphics cards, right-click on your desktop and select Graphic Option, then navigate to Rotation and you can change the rotation of the display by 90, 180, and 270 degrees. Note: the “Rotate to 0 degrees” option will get your screen orientation back to normal.

If you have an AMD graphics card, right-click on the desktop and select “Catalyst Control Center“. You can also find the similar option to rotate the display on your PC or laptop. That’s it!

Change Priority of Wired / Wireless Network Adapter in Windows 10 / 8 / 7

August 9th, 2018 by Admin

When your computer comes with more than one network adapter (such as Ethernet and Wi-Fi), Windows will use priorities to decide which adapter to use. If both Ethernet and Wi-Fi are connected at the same time, we should give priority to LAN over WI-FI as the wired connection is faster. In this tutorial we’ll show you the simple way to change priority of wired / wireless network adapter in Windows 10 / 8 / 7.

Method 1: Change Network Adapter Priority in the Adapter and Binding tab

If you’re running Windows 8 / 7, you can adjust the priority of wired / wireless network adapter from the “Adapter and Binding” tab. Follow these steps:

  1. Press the Windows key + R to open the Run command, type ncpa.cpl and hit Enter to open the Network Connections window.
  2. You should see a list of network adapters. Press the Alt button (if the menu bar is not already visible) and click on the Advanced menu, and then choose Advanced Settings.

  3. Click the Adapters and Bindings tab. Under Connections, you’ll notice that “Local Area Connection 2” has the highest priority. You can use the up or down arrow button on the right side to change the priority.

  4. Click OK. Traffic will go over the network adapter with the highest priority first (when connected) when all adapters are connected.

However, the “Adapter and Binding” tab was already removed in Windows 10, and you have to use PowerShell cmdlet to change the network adapter priority.

Method 2: Change Network Adapter Priority Using Windows PowerShell

By default, Windows uses the interface metric to determine which network adapter has the highest priority. Adapters with a lower metric number are prioritized over adapters that have a higher number. Here’s how to change network adapter priority using Windows PowerShell:

  1. Open Windows PowerShell as administrator. Type the following command and press Enter.
    Get-NetIPInterface

    The ifIndex column lists a unique number of each adapter, while the InterfaceMetric column lists the priority of the adapter. As you can see from the screenshot above, Wi-Fi has a higher connection priority over Ethernet.

  2. Now, you can use the following command to modify the priority for Ethernet.
    Set-NetIPInterface -InterfaceIndex "ifIndex" -InterfaceMetric "InterfaceMetric"

    In my example, I want to assign higher priority to Ethernet over Wi-Fi, so set its metric to a number smaller than 10 (Wi-Fi’s metric number).

  3. Close the elevated PowerShell window and you’re done!

Change Cloud-delivered Protection Level in Windows 10

August 7th, 2018 by Admin

By default, Windows Defender is set in a low protection level so you’ll get less false positives. In this tutorial we’ll show you how to increase the cloud-delivered protection level in Windows 10 to make Windows Defender more proactive in scanning and detecting suspicious files.

How to Change Cloud-delivered Protection Level in Windows 10?

  1. To get started, you need to open the Local Group Policy Editor. Use the Windows key + R keyboard shortcut to open the Run command, enter gpedit.msc and press Enter.

  2. Navigate to the following path:
    Computer Configuration > Administrative Templates > Windows Components > Windows Defender Antivirus > MAPS

    and then double-click the “Join Microsoft MAPS” policy on the right side.

  3. Select Enabled and then move to the drop-down box to select “Advanced MAPS“. Click OK.

  4. Switch to the MpEngine folder on the left panel. On the right panel double-click on the policy “Select cloud protection level“.

  5. Select Enabled and then pick up the “High+ blocking level” option to increase the cloud protection level on your Windows 10 computer.

  6. Click OK and restart your computer. Windows Defender will scan and block suspicious files more proactively.

Note: After you’ve applied GPO to change the cloud protection level, the option to turn off cloud-delivered protection in Windows Defender will be greyed out.

That’s it!

Turn On / Off Cloud Based Protection in Windows 10

August 6th, 2018 by Admin

Windows Defender is a free antivirus software built into Windows 10, which runs real-time protection in the background. When Windows Defender finds a suspicious file, it will send the data to the cloud service so it can decide whether or not to block it.

If you are highly concerned about your privacy, you may consider disabling the cloud based protection. In this tutorial we’ll show you how to turn on or off cloud based protection in Windows 10.

How to Turn On / Off Cloud Based Protection in Windows 10?

Open Windows Defender and then click on the Settings (gear) icon at the bottom left corner.

Click on the “Virus & threat protection settings” link under the “Virus & thread protection notifications” section.

Turn on (default) or off “Cloud-delivered protection” for what you want. If you’ve enabled cloud protection, make sure “Automatic sample submission” are also turned On.

That’s it!

How to Reset or Reinstall Network Adapter in Windows 10

August 4th, 2018 by Admin

Have you messed up your network adapter settings on a laptop? Unable to solve network connection problems? Since Windows 10 Anniversary Update, it offers a simple way to reset all your network settings to default, so you can set up everything about your network from scratch.

In this tutorial we’ll show you 2 easy ways to reset or reinstall Ethernet(wired) and wireless network adapters in Windows 10. After going through the steps below, your computer will reset all your network settings and forget saved Wi-Fi passwords. All your network connections need to be reconfigured.

Method 1: Reset or Reinstall Network Adapter from the Settings App

  1. Press the Windows key + I together on your keyboard to open the Settings app. Click on Network & Internet.

  2. Choose the Status tab on the left. Scroll down on the right until you see the “Network reset” option, and then click it.

  3. The next window will explain what will happen if you reset your network settings. Click the “Reset now” button when you’re ready.

  4. When the popup window asks you for confirmation, click Yes.

  5. Windows 10 will inform you that your PC will automatically shut down in 5 minutes. Close the notification and make sure you save anything you’re working on.

Method 2: Reset or Reinstall Network Adapter Using Command Prompt

  1. Click the Start button. Type cmd and right-click Command Prompt from the search result, then select Run as administrator.

  2. Execute the following command:
    netcfg -d

  3. This will reset your network settings and reinstall all the network adapters. When it’s done, reboot your computer.