Archive for the ‘Windows 10’ category

Enable ClickLock to Simplify Drag & Drop with Touchpad

August 3rd, 2018 by Admin

ClickLock is a built-in feature in Windows that lets you drag and drop files without the need of holding down the mouse button. This feature comes to handy if you have trouble holding down the left mouse button and moving the mouse at the same time. In this tutorial we’ll show you how to enable ClickLock on Windows 10 / 8 / 7 to simplify drag & drop with touchpad.

If you use a touchpad (or trackpad) on your laptop, the drag-and-drop operation requires you to use both your hands on touchpad to click and drag. After turning on ClickLock, put the cursor on your selected files and hold down the left click for a while, then start moving your cursor to drag and click again to drop.

How to Enable ClickLock on Windows 10 / 8 / 7?

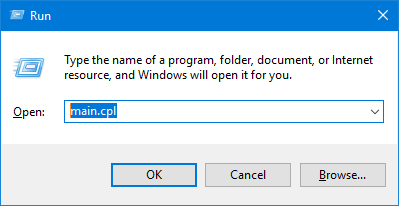
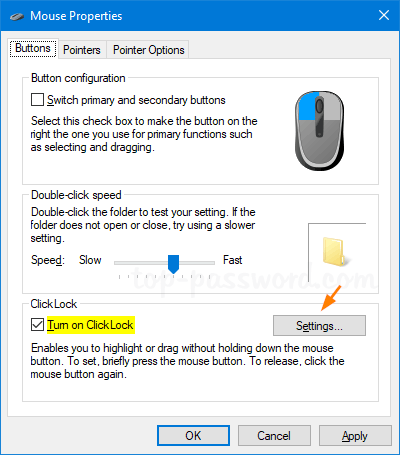
  1. Press the Windows key + R to launch the Run window. Type main.cpl and press Enter to open the Mouse Properties dialog.

  2. In the Buttons tab, check the “Turn on ClickLock” option and then click the Settings button.

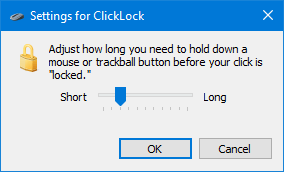
  3. The popup window allows you to adjust how long you need to hold down the left touchpad button before your click is locked.

  4. Once you have done this, click OK and then Apply.

3 Ways to Find Saved Wi-Fi Passwords on Windows 10

August 2nd, 2018 by Admin

How can I see the Wi-Fi passwords of a previously connected wireless connection? Is there a way to look up the saved Wi-Fi password on my computer so I can connect my phone to the same network? In this tutorial we’ll show you 3 simple ways to find all your saved Wi-Fi passwords on Windows 10 computer.
Method 1: Find Wi-Fi Password of Your Current Network Connection

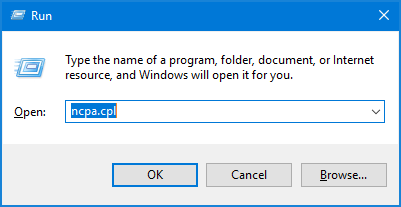
  1. Press the Windows key + R to bring up the Run box. Type ncpa.cpl and press Enter to open up the Network Connections window.

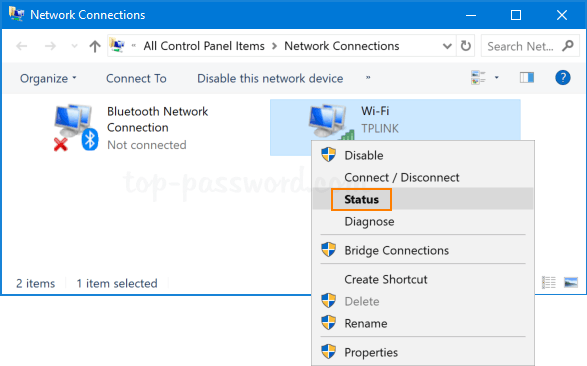
  2. Right-click on your wireless network adapter, and select Status from the drop-down menu.

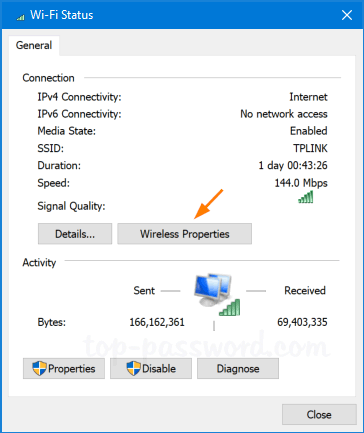
  3. Click the Wireless Properties button.

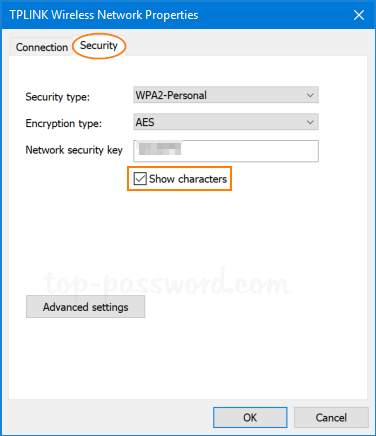
  4. Go to the Security tab. Click the Show characters check box, and the saved Wi-Fi password will be revealed.

Method 2: Find All Saved Wi-Fi Passwords Using Command Line

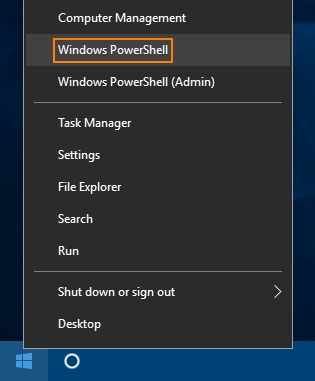
  1. Right click on Start button (Windows Logo) and then select Windows PowerShell.

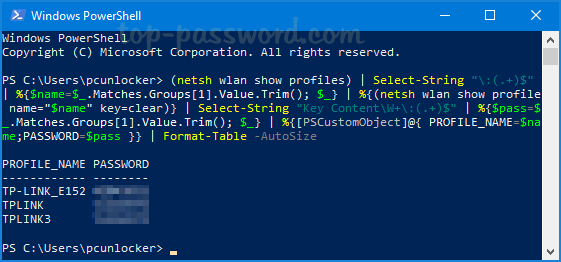
  2. Copy and paste the following command in the PowerShell console and hit Enter.
    (netsh wlan show profiles) | Select-String “\:(.+)$” | %{$name=$_.Matches.Groups[1].Value.Trim(); $_} | %{(netsh wlan show profile name=”$name” key=clear)} | Select-String “Key Content\W+\:(.+)$” | %{$pass=$_.Matches.Groups[1].Value.Trim(); $_} | %{[PSCustomObject]@{ PROFILE_NAME=$name;PASSWORD=$pass }} | Format-Table -AutoSize

  3. You’ll get a list of Wi-Fi passwords to all wireless networks you’ve accessed before.

Method 3: Find All Saved Wi-Fi Passwords Using Third-Party Software

If you have a Windows PC that’s currently connected to the Wi-Fi network or previously connected to it, you can look up all the saved Wi-Fi passwords using the software – WirelessKeyView.

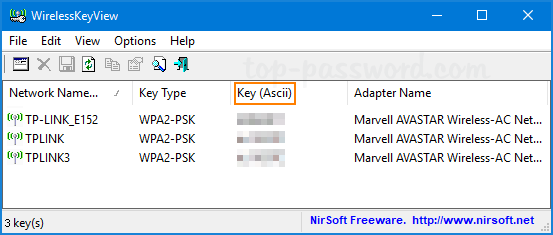
WirelessKeyView is a free portable tool created by NirSoft that can be used to recover all wireless network security keys/passwords (WEP/WPA) stored in Windows 10 / 8 / 7. Once you open up the program, it will show you the details of all Wi-Fi networks configured on your PC.

As you can see from the above screenshot, the Wi-Fi passwords are shown under the “Key (Ascii)” column. You can export your wireless passwords into a file for safe keeping.

3 Ways to Open Network Connections in Windows 10

August 2nd, 2018 by Admin

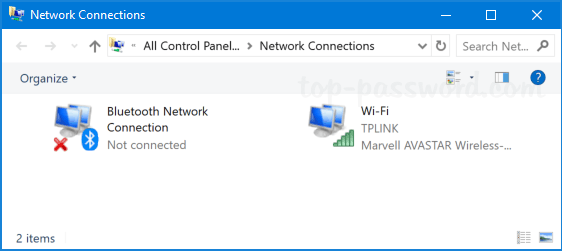
Network Connections is the most commonly used Control Panel applet for network administrators. From there you can view and manage all your wired / wireless adapters in one place. In this tutorial we’ll show you 3 quickest ways to open Network Connections in Windows 10.

Method 1: Open Network Connections via Run or Command Prompt

Press the Windows key and the R key at the same time to open the Run box. Type ncpa.cpl and hit Enter and you can access Network Connections immediately.

A similar way of opening Network Connections is to run ncpa.cpl at the Command Prompt.

Method 2: Open Network Connections via Taskbar

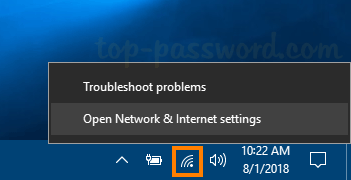
Right-click the network icon which is located at the notification area of taskbar, and then select “Open Network & Internet settings” from the popup menu.

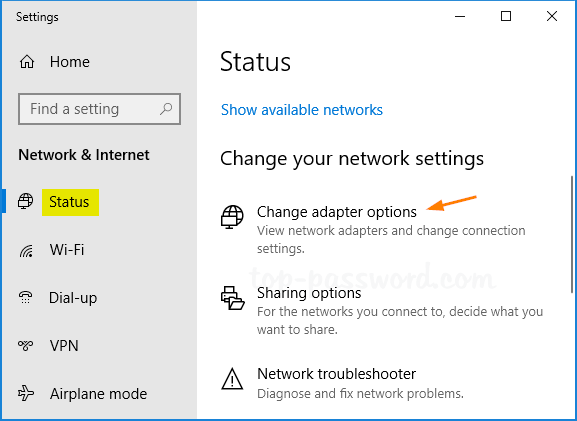
In the resulting pop-up window, click the “Change adapter options” in the right pane.

It will open Network Connections in no time.

Method 3: Open Network Connections via Control Panel

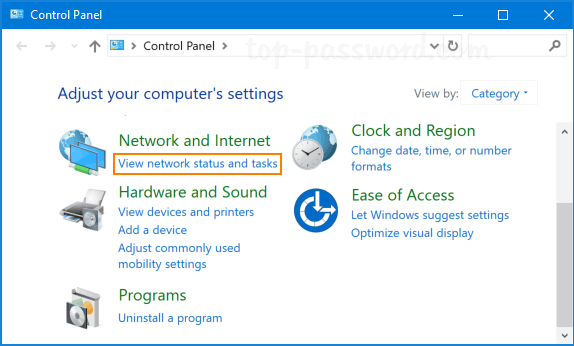
Open the Control Panel in category view, click the “View network status and tasks” link beneath the “Network and Internet” heading.

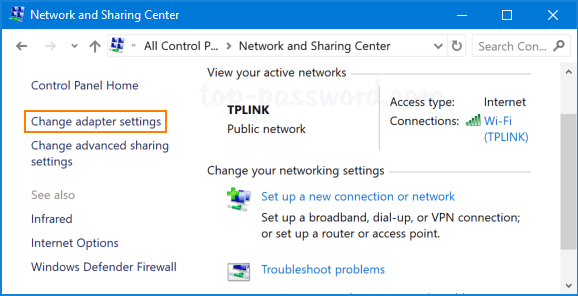
In the resulting window, click “Change adapter settings” on the left-hand side.

Now you can view a list of network connections on your system.

Disable Autocorrect and Highlight Misspelled Words in Windows 10

August 1st, 2018 by Admin

Windows 10 comes with a spell checking feature which will automatically autocorrect and highlight misspelled words that you typed in the apps like Microsoft Edge, Internet Explorer, Facebook, etc. This feature is turned on by default on every fresh Windows 10 installation.

But the built-in spell checker may not work as good as you expect. In this tutorial we’ll show you how to disable Autocorrect and Highlight Misspelled Words in Windows 10.

Steps to Disable Autocorrect and Highlight Misspelled Words in Windows 10

Press the Windows + I key combination to open the Settings app. Click on Devices.

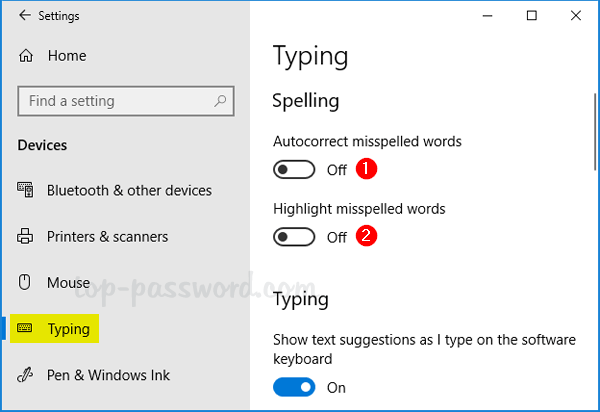
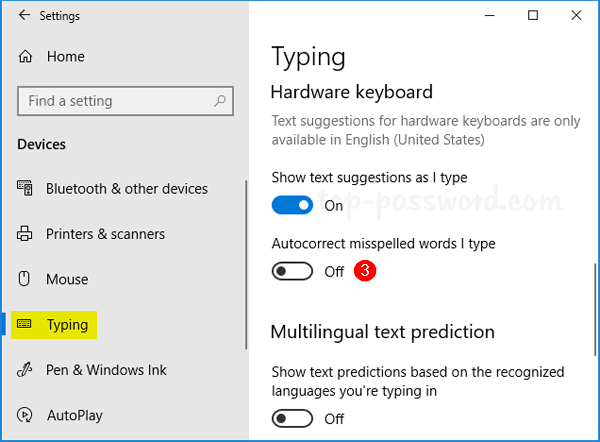
Select the Typing menu in the left-hand column. Turn off the following two options under the Spelling section as shown below.

  • Autocorrect misspelled words
  • Highlight misspelled words

Scroll down to the Hardware keyboard section, toggle the “Autocorrect misspelled words I type” setting to Off.

Close the app you want to use without spell checking and reopen it for the changes to take effect.

3 Ways to Disable Game Bar and Game DVR in Windows 10

July 31st, 2018 by Admin

Windows 10 has a native feature called Game DVR which lets you use the Game Bar to record game clips in the background. However, Game DVR is turned on by default and it could slow your computer performance and lower your FPS. If you experience FPS issue or crash in your game, here are 3 ways to disable Game Bar and Game DVR in Windows 10.

Method 1: Disable Game Bar and Game DVR via Settings App

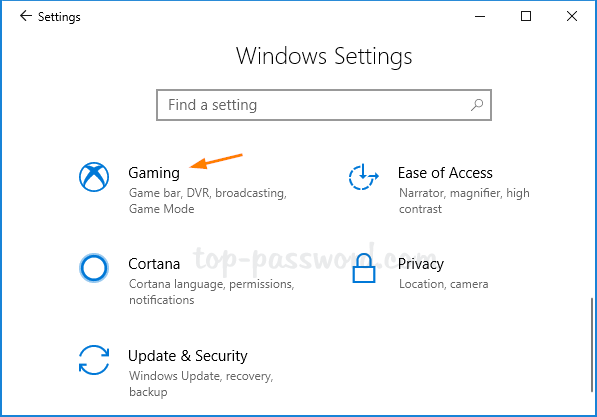
  1. Open the Settings app by pressing the Windows key + I on your keyboard. Then click on Gaming.

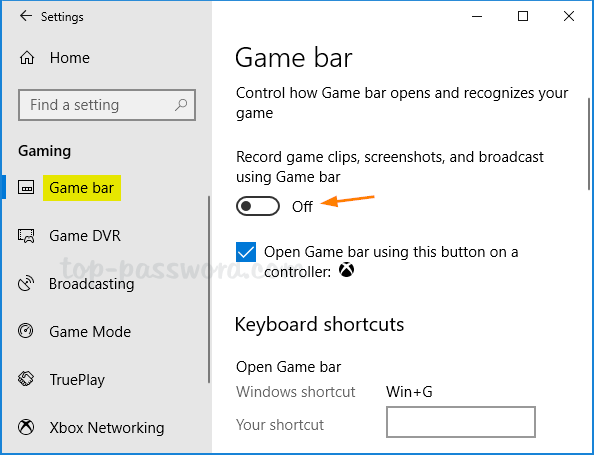
  2. Select the Game bar menu on the left. Ensure the “Record game clips, screenshots, and broadcast using Game bar” is set to Off.

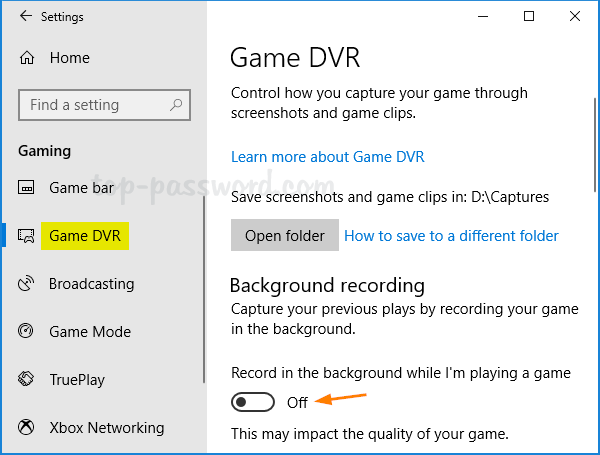
  3. Next, switch to the Game DVR menu and Set the “Record in the background while I’m playing a game” to Off.

Method 2: Disable Game Bar and Game DVR using Registry Editor

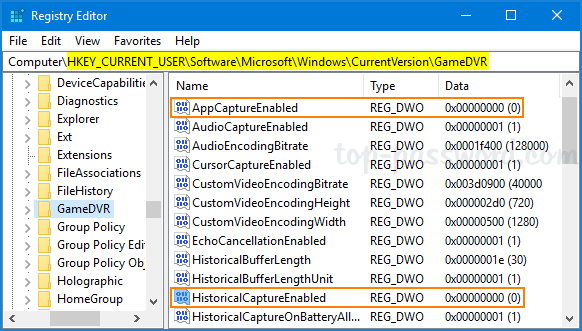
  1. Open the Registry Editor and navigate to the following key:
    HKEY_CURRENT_USER\Software\Microsoft\Windows\CurrentVersion\GameDVR
  2. In order to turn off Game Bar, double-click the DWORD entry AppCaptureEnabled on the right pane, and set its value data to 0. A value of 1 will enable it.
  3. Next, double-click the DWORD HistoricalCaptureEnabled and change the value data to 0 for turning off Game DVR. A value of 1 will enable it.

Method 3: Disable Game Bar and Game DVR via Group Policy

  1. Press the Windows key + R to open the Run command dialog. Type gpedit.msc and hit Enter.
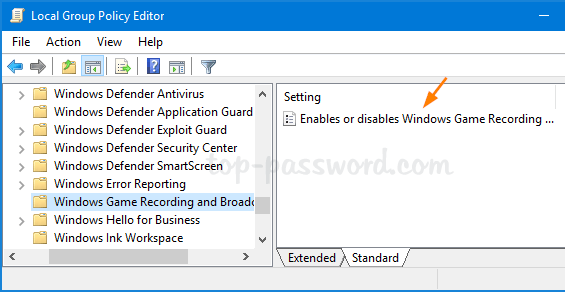
  2. In the Local Group Policy Editor window, expand to Computer Configuration\Administrative Templates\Windows Components\Windows Game Recording and Broadcasting.

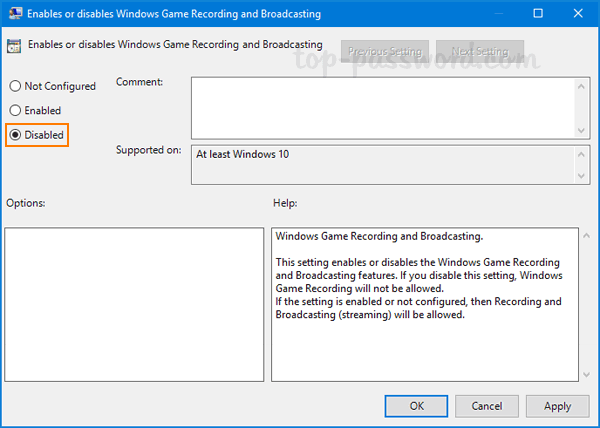
    Double-click the “Windows Game Recording and Broadcasting” policy on the right to modify.

  3. Select Disabled and click OK.

  4. Restart or log off for your GPO settings to take effect.

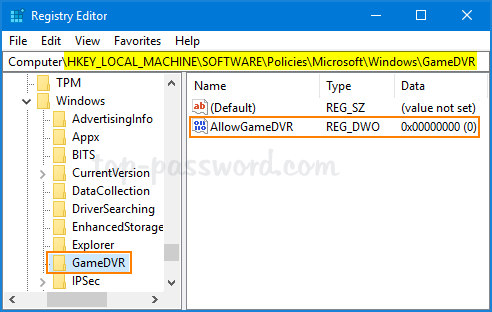
If you’re running Windows 10 Home edition, Local Group Policy Editor is not available. But you can apply the same GPO by making changes to the registry:

Open Registry Editor and go to HKEY_LOCAL_MACHINE\SOFTWARE\Policies\Microsoft\Windows. Create a subkey named GameDVR, and then create a DWORD (32-bit) entry called AllowgameDVR, and set the value data to 0.

That’s it!

How to Record Games or Apps Using Windows 10’s Game DVR

July 30th, 2018 by Admin

Windows 10 has a hidden, built-in video capture tool that can record a game, or even record your screen inside regular apps as well. In this tutorial we’ll show you how to use Game DVR to record games or apps in Windows 10.

How to Record Games or Apps Using Windows 10’s Game DVR?

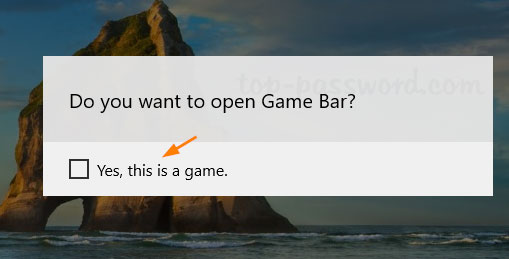
While the game or app you want to record is in focus, press the Windows key + G to bring up the Game bar. Select the “Yes, this is a game” check box if prompted.
Now you can click the Record button to start your recording session, or you can use the keyboard shortcut – Windows key + Alt + R.

A small timer will appear at the top-right corner of the screen to indicate that you’re recording and display the elapsed time. To stop the recording, press the Windows key + Alt + R again and click on the Stop button.

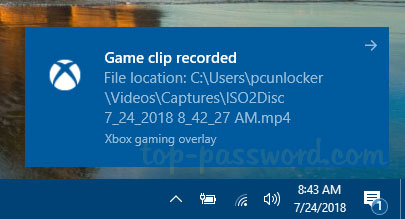
You will now see a ‘Game clip recorded‘ notification letting you know where your recorded video is stored.

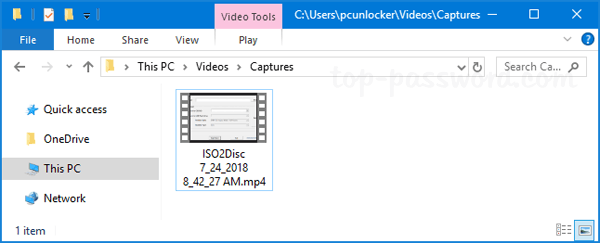
By default, Game DVR automatically saves the videos in the default location: C:\Users\username\Videos\Captures. When running out of disk space on system(C:), you can move the Game DVR Captures folder to another location.

How to Find and Change Game DVR Save Location in Windows 10

July 29th, 2018 by Admin

Game DVR is part of the Xbox app on Windows 10, intended for recording games. By default, the game clips and screenshots you made with Game DVR are stored in the “Captures” folder inside “Videos” in your account. In this tutorial we’ll show you how to find and change the default save location for Game DVR in Windows 10.

Part 1: Find the Default Location of Game DVR Captures Folder

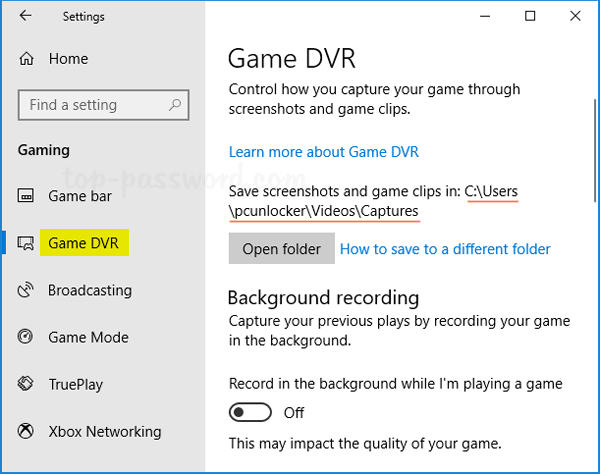
Press the Windows logo key + I to launch the Settings app, then click on Gaming.

Select the “Game DVR” category at the left side. You can then see the default location where the Game DVR tool will save your screenshots and game clips. By default, it should be C:\Users\username\Videos\Captures.

Part 2: Change the Save Location for Windows 10’s Game DVR

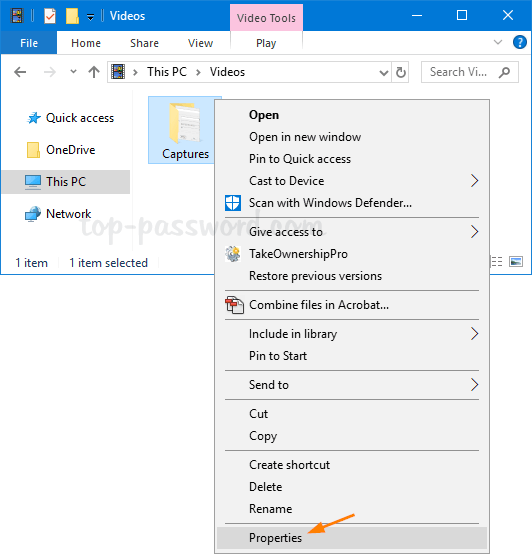
Open File Explorer and browse to the default save location you’ve found with the above steps. Then right-click the Captures folder and select Properties.

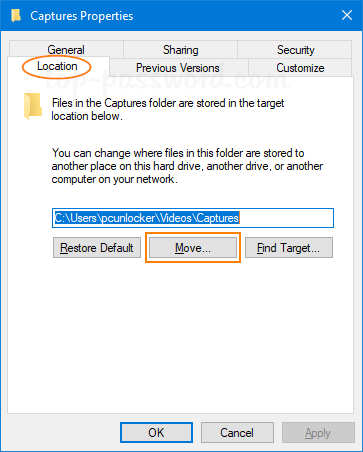
Select the Location tab and click on the Move button.

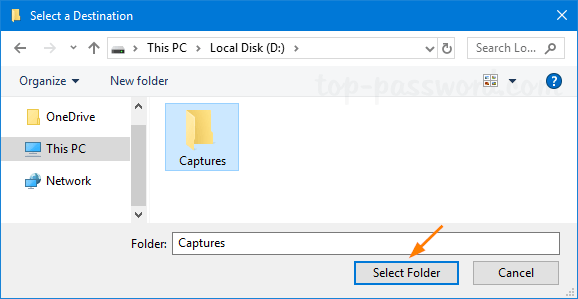
Select a new location for the Captures folder.

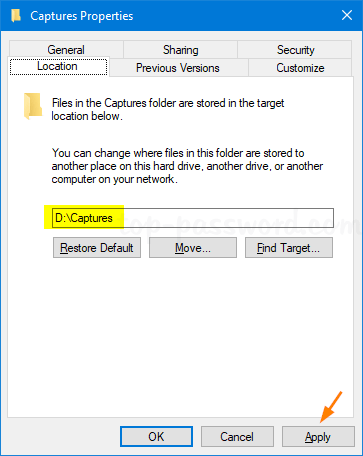
Click Apply.

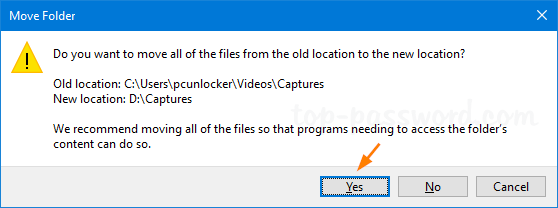
You will be prompted whether you would like to move the screenshots and game clips from the old location to the new location. Simply click Yes to confirm.

Now you’ve successfully changed the default Game DVR save location.

How to Forget a WiFi Network Saved in Windows 10

July 25th, 2018 by Admin

How to force Windows 10 to ask for a WiFi password? After changing the password for your wireless network via the router, your computer may not be able to connect to the WiFi network automatically. Because it’s still using an out-dated password, and you have to forget it now. In this tutorial we’ll walk you through the simple steps to forget a WiFi network saved in Windows 10.

How to Forget a WiFi Network Saved in Windows 10?

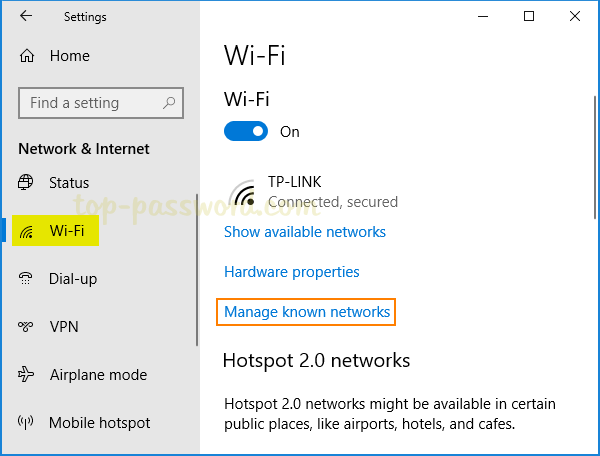
  1. Open the Settings app by pressing the Windows key + I keyboard combination. Click on Network & Internet.

  2. Select Wi-Fi in the left-hand pane. There you will see a link “Manage known networks“. Click on it.

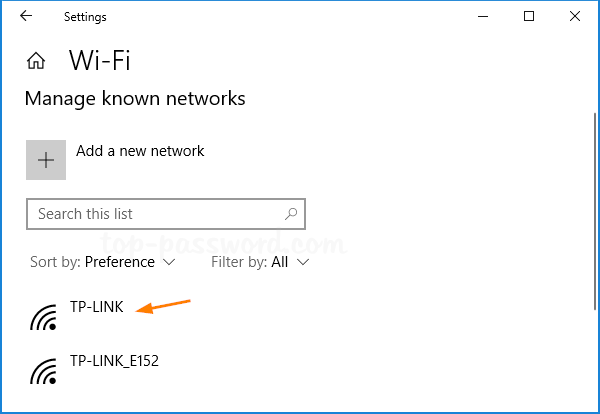
  3. You’ll see a complete list with all the Wi-Fi networks you’ve ever connected to. Just click the network you want to forget.

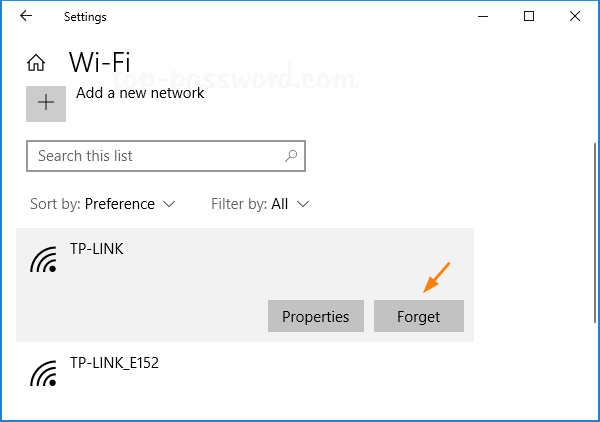
  4. Click Forget from the popup menu.

    This will remove your selected network profile and forget the saved WiFi password. You can repeat the same steps to forget other WiFi networks.

The next time you connect to a WiFi network, Windows 10 will prompt you for its password and set up the network profile from scratch. If you want to forget a network using Command Prompt or Registry Editor, please check out How to Delete Wireless Network Profiles in Windows 10 / 8 / 7. That’s it!

How to Factory Reset Windows 10 from Settings App

July 20th, 2018 by Admin

If your Windows 10 computer starts to run slow or crash frequently, an easy solution is to simply reset your PC to factory default that will quite often solve the issue. This tutorial will walk you through all the steps necessary to perform a factory reset of Windows 10 from the Settings app.

How to Factory Reset Windows 10 from Settings App

Press the Windows + I keys to launch the Settings app, then click Update & Security.

In the left pane, select the Recovery tab. In the right pane, click Get started under the “Reset this PC” heading.

You’ll see a blue dialog box that gives you two choices:

  • Keep my files – This option will remove all apps and settings but keep your personal files intact.
  • Remove everything – This option will format / erase your hard drive so you’ll lose all files and apps.

Keep My Files

If you’ve chosen the “Keep my files” option, it will not only remove all your apps installed from Windows Store, but also uninstall the programs shown on the screen. Click Next to confirm.

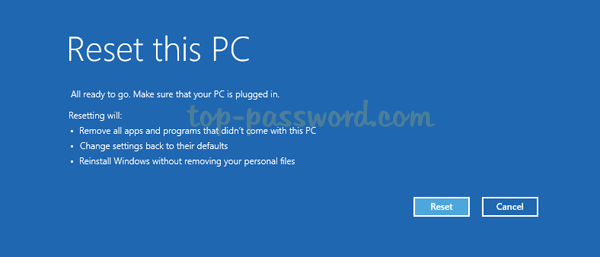
The final step is to click on Reset. Your PC will then reboot automatically and begin the factory reset process.

Remove Everything

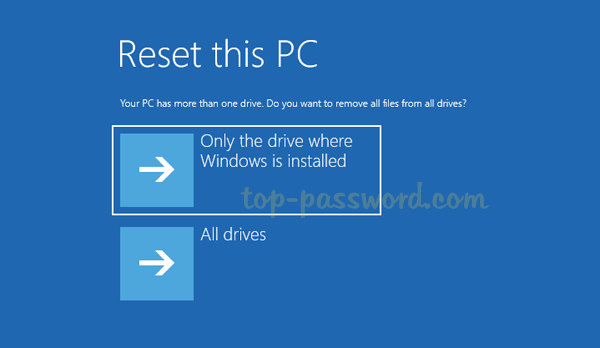
If you’ve chosen the “Remove everything” option, the next screen will let you choose to remove everything from the drive where Windows is installed, or all drives connected to your PC.

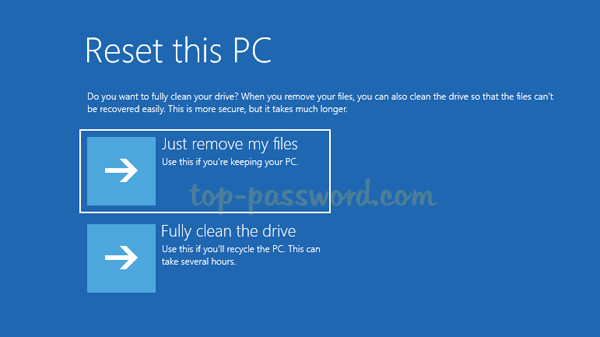
After choosing the drive, you will be asked to “Just remove my files” or “Remove files and clean the drive“. The second option will securely erase your drives and make your files unrecoverable, and it’s a good option if you plan to sell or give away your PC. If you keep the computer, choose the first option for speed.

This is your last chance before your computer is wiped. Click on Reset and Windows will then restart and begin the factory reset process immediately.

That’s it!