Archive for the ‘Windows 10’ category

How to Disable Changing Geographic Location in Windows 10

May 24th, 2018 by Admin

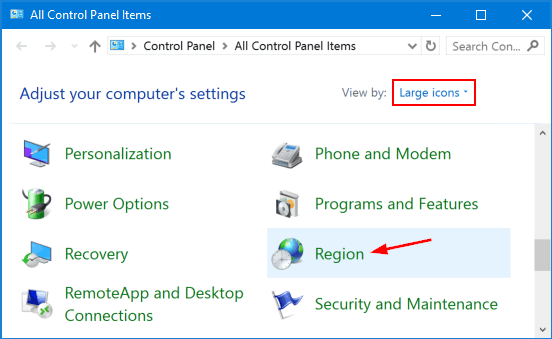
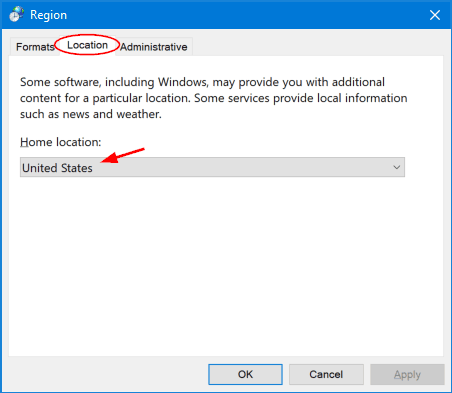
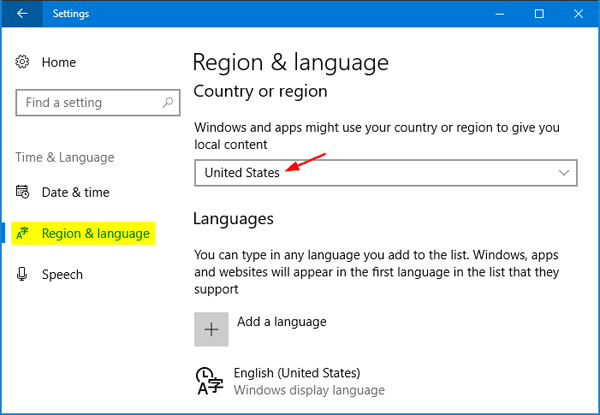
Geographic location is is an indication of the country or region in which you are residing. This could be used by Weather app to display the current weather and temperature in your location. If you want to lock the geographic location in Windows 10 and prevent users from changing it, then this tutorial will help you.

Method 1: Disable Changing Geographic Location Using Group Policy

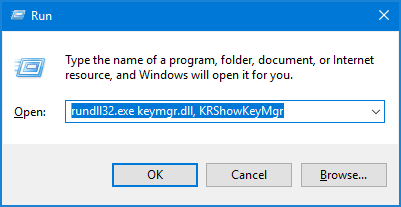
  1. Press Windows Key + R to bring up the Run command, type gpedit.msc and press Enter.

  2. In the Local Group Policy Editor window, expand to the following location:
    Computer Configuration -> Administrative Templates -> System -> Locale Services

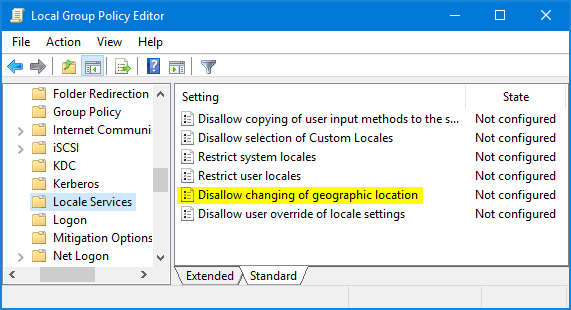
    Then double-click on Disallow changing of geographic location in the right pane.

  3. In order to disable changing location in Windows 10, select Enabled and click OK.

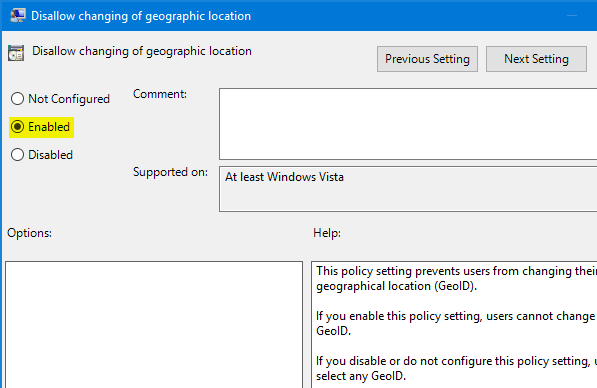
  4. That’s it. Now restart your system and no one will be able to change the geographic location from either Control Panel or the Settings app.

Method 2: Disable Changing Geographic Location Using Registry Editor

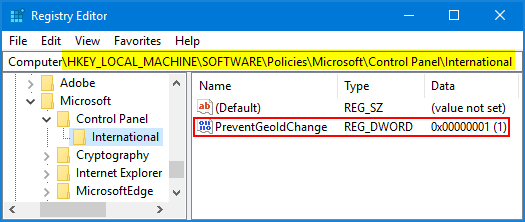
  1. Open the Registry Editor, and navigate to the following key:

    HKEY_LOCAL_MACHINE\SOFTWARE\Policies\Microsoft\Control Panel\International

    If both “Control Panel” and “International” keys don’t exist, you have to create them manually.

  2. In the right pane, create a new 32-bit DWORD value as PreventGeoIdChange, and set its value data to 1 if you want to disallow changing of geographic location in Windows 10.

  3. Close Registry Editor and reboot your computer to make the changes take effect.

2 Ways to Change Region Location on Windows 10

May 23rd, 2018 by Admin

The region location in Windows 10 is used by apps to provide localized content. For example, the built-in news or weather app shows you local news or weather forecast for your country, and the Windows Store shows local apps in the first place. By default, the region location is configured during Windows 10 installation but you can change it later. Here are 2 simple ways to change region location on Windows 10.

Method 1: Change Region Location on Windows 10 Using Control Panel

  1. Open the Control Panel in Large icons view, and then click Region.

  2. In the Region window, go to the Location tab. You can select a new country from the “Home location” drop-down list.

  3. Click OK to confirm changing the region location.

Method 2: Change Region Location on Windows 10 Using Settings App

  1. Press the [Windows] + [L] keys to access the Settings app, and then click Time & language.

  2. Choose the Region & language tab in the left side. On the right, click the “Country or region” drop-down list and select the new country you want applied.

  3. Restart your computer to force all apps to use the new region location.

Remove Logoff or Sign out Option from Start Menu in Windows

May 22nd, 2018 by Admin

How can I remove “Sign out” from the Start Menu in Windows 10? Is there a way to prevent users from logging off a public computer? In this tutorial we’ll show you how to remove Logoff or Sign out option from the Start Menu in Windows 10 / 8 / 7.

Method 1: Remove Logoff or Sign out Option from Start Menu Using GPO

  1. Open the Local Group Policy Editor and navigate to the following setting:
    User Configuration > Administrative Templates > Start Menu and Taskbar

    Then double-click on the “Remove Logoff on the Start Menu” policy in the right side panel.

  2. Select Enabled and click Apply.

  3. Restart your computer and the “Log off” or “Sign out” option should have been removed from the Start Menu.

Method 2: Remove Logoff or Sign out Option from Start Menu Using Registry Editor

  1. Start the Registry Editor window, and then navigate to the following key:
    HKEY_CURRENT_USER\SOFTWARE\Microsoft\Windows\CurrentVersion \Policies\Explorer

    If the Explorer subkey doesn’t exist, create it (from the Edit menu, select New -> Key and type “Explorer” without the quotes) and navigate to that subkey.

  2. Right-click the blank area in the right pane, and then select New -> DWORD (32-bit) Value.

  3. Name the created value StartMenuLogoff, and then set it to 1 to disable Logoff or Sign out option in the Start Menu.

  4. Restart you computer and Logoff or Sign out option is no longer available in the Start Menu.

How to Prevent Windows Users from Changing Date and Time

May 21st, 2018 by Admin

How to block access to changing the time for Windows 10? Is there a way to lock the system date and time on a public or shared computer? Here’s how to use group policy to prevent users from changing date and time in Windows 10 / 8 / 7 / Vista / XP.

How to Prevent Windows Users from Changing Date and Time?

By default, only administrative accounts are able to change the system time. Follow these steps to prevent specific user or even administrators from changing date and time in Windows 10 / 8 / 7 / Vista / XP.

  1. Press the Windows key + R together to open the Run command. Type secpol.msc and hit Enter to open the Local Security Policy window.

  2. On the left-hand side, drill down to Local Policies -> User Rights Assignment. On the right, double-click the “Change the system time” setting to modify.

  3. In the Properties window, select any specific user or group that you want to block from changing the system date / time, and click on Remove.

  4. Click Apply and then OK. Restart your computer for this policy to take effect. The next time you try to change the date and time from Control Panel, you’ll get the error message “Unable to continue. You do not have permission to perform this task.

    This setting will also prevent you from changing the system date/time using the Settings app in Windows 10. If you’re running Windows 10 Home, you have to add Local Group Policy Editor to Windows 10 Home before running the secpol.msc command.

How to Show Day of Week in Windows 10 Taskbar Clock

May 18th, 2018 by Admin

By default, Windows doesn’t add the day of the week (for example, Monday, Tuesday, etc) to the system tray clock. Here are 2 simple ways to make Windows 10 show day of week in the taskbar notification area.

Method 1: Set Taskbar Clock to Show Day of Week Using Control Panel

  1. Open the Control Panel in Large icons view, and click Region.

  2. In the Region window, click the Additional settings button in the bottom right corner.

  3. Switch to the Date tab, and then add the “ddd, ” string at the beginning of the Short date field. Click OK and you’re done!

  4. You will now see the day of the week to displayed in the taskbar clock.

Method 2: Set Taskbar Clock to Show Day of Week Using Registry Editor

  1. Open the Registry Editor and then navigate to the following key:
    HKEY_CURRENT_USER\Control Panel\International
  2. Double-click the sShortDate entry in the right side of the Registry Editor window.

  3. In the Edit String window, Add the “ddd, ” string at the beginning of the Value data field and click OK.

  4. Close Registry Editor and log off or restart Windows to take effect. The system tray clock will display the day of week.

This tip also works on Windows 8, 7, Vista and XP. Hope you find this small tip useful!

How to Switch Left and Right Mouse Button Functions in Windows 10

May 17th, 2018 by Admin

Left mouse clicking acts like right click? How to change mouse to left handed in Windows 10? By default, Windows sets your left mouse button as the primary button which is used for selecting and dragging. If your system brings up the right-click context menu when left clicking an items on the desktop, it’s likely that the primary button is changed to the right mouse button. In this tutorial we’ll show you 3 easy ways to switch left and right mouse button functions in Windows 10.

Method 1: Switch Left and Right Mouse Button Functions from Settings App

  1. Press the Windows + I key combination to open the Settings app, and click Devices.

  2. Choose the Mouse tab on the left side. On the right side, you can select Left or Right from the “Select your primary button” drop-down list.

  3. When finished, close the Settings app. This change will take effect immediately.

Method 2: Switch Left and Right Mouse Button Functions from Control Panel

  1. Open the Control Panel in Large icons view, and click Mouse.

  2. By default, the “Switch primary and secondary buttons” option is unchecked. In case you’re left handed and want to change the mouse primary button to be the right button, just check that option and click OK.

  3. Now you can check if the left or right mouse clicking works as you expect.

Method 3: Switch Left and Right Mouse Button Functions from Registry Editor

  1. Open the Registry Editor, and then navigate to the following key:
    HKEY_CURRENT_USER\Control Panel\Mouse
  2. On the right side panel, double-click the SwapMouseButtons entry and set its value data depend on which button you would use as the primary button.
    • 0 = Set left mouse button as primary
    • 1 = Set right mouse button as primary

  3. When finished, close Registry Editor. You have to log off or restart Windows before the changes take effect.

Using CMD to Create Undeletable Folder in Windows 10

May 16th, 2018 by Admin

How can I prevent a folder from being inadvertently deleted by myself? Worry about that your kids may accidentally delete your important documents? To avoid this situation, you can use a simple CMD trick to create undeletable and unrenamable folder in Windows 10.

How to Create Undeletable Folder in Windows 10 Using CMD?

The following keywords are reserved by Windows to name the internal devices, and you’re unable to create, delete or rename a folder that has its name from one of these words (case insensitive):

CON, PRN, AUX, CLOCK$, NUL, COM1, COM2, COM3, COM4, COM5, COM6, COM7, COM8, COM9, LPT1, LPT2, LPT3, LPT4, LPT5, LPT6, LPT7, LPT8, and LPT9

Fortunately, you can use the Command Prompt in Windows 10 to create folders with reserved names. Follow these steps:

  1. Open the Command Prompt as administrator.
  2. At the Command Prompt, enter the drive name like D: or E: where you wish to create the undeletable folder and press Enter.
  3. Next, type “md con\” command to create a folder with a reserved name “con” and press Enter.

    Now, open File Explorer and try to delete or rename the “con” folder, you’ll get the error message like “Could not find this item” or “invalid file handle“.

  4. As of the Fall Creators Update, Windows 10 can’t let you even browse the files inside the “con” folder.

    In order to move any important files into or outside of this undeletable folder, you may also have to do it by running the “move” command at the Command Prompt.

Deleting the Undeletable Folder:

Now you might be wondering – how to delete undeletable folder using CMD? Although, it is impossible to manually delete the folder using File Explorer, you can delete that folder by typing “rd /s /q con\” at the elevated Command Prompt.

This trick works also on Windows 8.1, Windows 8/7/Vista/XP. Try it yourself to create one such folder which can neither be deleted nor be renamed.

Configure When to Turn Off Screen in Windows 10

May 11th, 2018 by Admin

How to turn off my laptop screen without shutting down Windows 10? Is there any way to turn the display off without making it sleep? This tutorial will show you how to make Windows 10 turn off screen automatically when your PC is inactive for a certain period of time, or configure your PC to turn off screen when Power button is pressed.

Part 1: Turn off Screen Automatically After a Specified Period of Inactivity

You can specify how long your PC is inactive before Windows 10 turns off display automatically. After your PC is idle for the configured period of time, you’ll get the black screen. Follow these steps:

  1. Press the Windows logo key + I to open the Settings app, then click System.

  2. Select Power & sleep on the left side. Under the Screen section on the right side, you can set Windows 10 to automatically turn off display after 5 or 10 minutes of inactivity.

    If your computer has a battery, the system will allow you to separately set a period of time for the screen turn off action on battery.

Part 2: Turn off Screen Manually by Pressing Power Button

If you want to turn off screen any time you like, you can configure Windows 10 to turn off display (without putting into sleep mode) when you press the Power button. Here’s how:

  1. Open the Control Panel and change the View by option to Large icons, then click Power Options.

  2. Click the Choose what the power button does link in the top-left corner.

  3. Click on the Change settings that are currently unavailable link.

  4. Set the “When I press the power button” option to turn off the display while on battery or plugged in. Click Save changes.

Now, whenever you want to turn off display, just press the Power button once. Of course, you can still force Windows to shutdown by holding the Power button for a few seconds.

How to Clear Saved Credentials for Network Share or Remote Desktop Connection

May 9th, 2018 by Admin

When you try to access protected file shares on the network or launch RDP sessions, you’ll be prompted to save the passwords. If you checked the option to remember your credentials, Windows will store your passwords for the next connection.

In this tutorial we’ll show you 2 simple ways to clear saved credentials for network share, remote desktop connection or mapped drive in Windows 10 / 8 / 7.

Method 1: Clear Network Saved Credentials Using Control Panel

  1. Open the Control Panel and select Large icons in the View by menu. Click User Accounts.

  2. Click the “Manage your credentials” option at the top left.

  3. Select the Windows Credentials type and you’ll see the list of credentials you have saved for network share, remote desktop connection or mapped drive.

  4. Click one of the entries in the list and expand it, you can then click the Remove option to clear it.

Method 2: Clear Network Saved Credentials Using the Run Command

  1. Press the Windows key + R together to open the Run box. Type the following command and hit Enter.
    rundll32.exe keymgr.dll, KRShowKeyMgr

  2. You’ll see the Stored Usernames and Passwords window. To remove a saved network credential you can select one of the entries and click Remove.

That’s it!