Archive for the ‘Windows 10’ category

Fix: Desktop Icons Show Only Text in Windows 10

November 16th, 2016 by Admin

“All Desktop icons shows only text, my start menu doesn’t work, and my taskbar only show the icons on the right! I tried it in Safe Mode, and still the same! Please help me!!”

All your desktop shortcuts are showing text only, without any icons? However, you can still click the shortcut text to open Windows Explorer or your application. In this tutorial we’ll show you a simple way to fix the desktop icons missing problem in Windows 10.

desktop-showing-text-without-icon

How to Fix: Desktop Icons Show Only Text in Windows 10?

  1. Press the Windows key + R to open the Run box. Type regedit and press Enter.
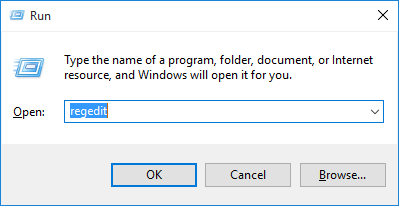
    regedit-via-run

  2. In the left pane of Registry Editor, navigate to the following key:
    HKEY_LOCAL_MACHINE\SOFTWARE\Microsoft\Windows\CurrentVersion\Explorer\Shell Icons
  3. Right-click on Shell Icons and select either Delete or Rename (rename it to whatever you want).

    rename-shell-icons-key

  4. Reboot your computer and you’ll find all your desktop icons are coming back. It’s that simple!

Tutorial: Change Screen Resolution in Windows 10

November 13th, 2016 by Admin

With a lower resolution all the texts and images appear larger. Likewise, at a higher resolution, the items look sharper and smaller. When you install Windows 10, it automatically sets the recommended screen resolution fix to the screen. But sometimes your game or software might won’t work with the default resolution, so here we’ll show you how to change screen resolution in Windows 10.

How to Change Screen Resolution in Windows 10?

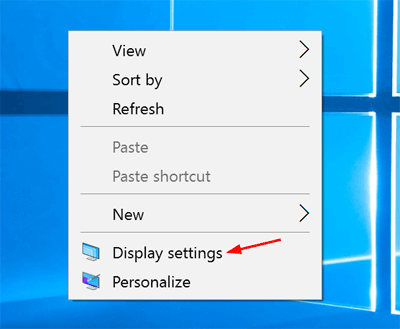
  1. Right-click any empty space on your desktop. Select Display settings from the context menu.

    display-settings

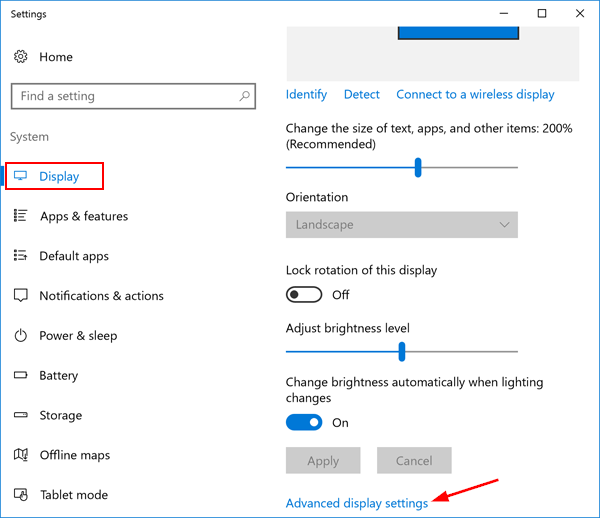
  2. In the right pane, you can see the options to change the text size, brightness and orientation. Scroll down and click on Advanced display settings.

    advanced-display-settings

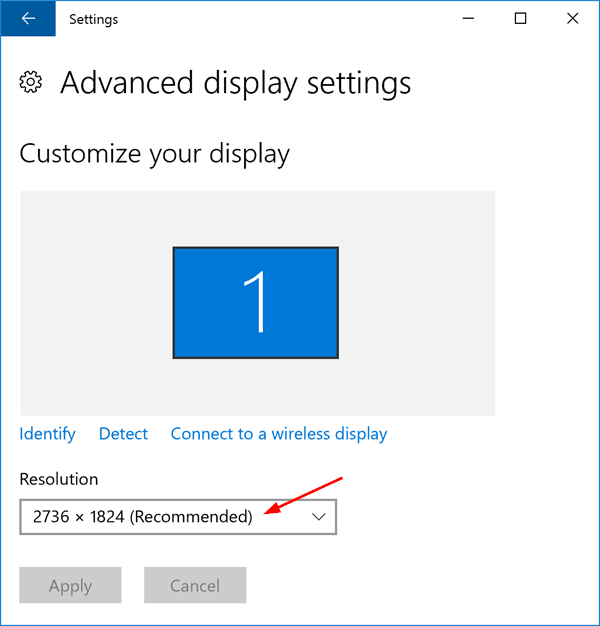
  3. Click on the drop-down box under Resolution to view all supported resolutions, and select one of the listed resolutions and then click Apply button.

    custom-screen-resolution

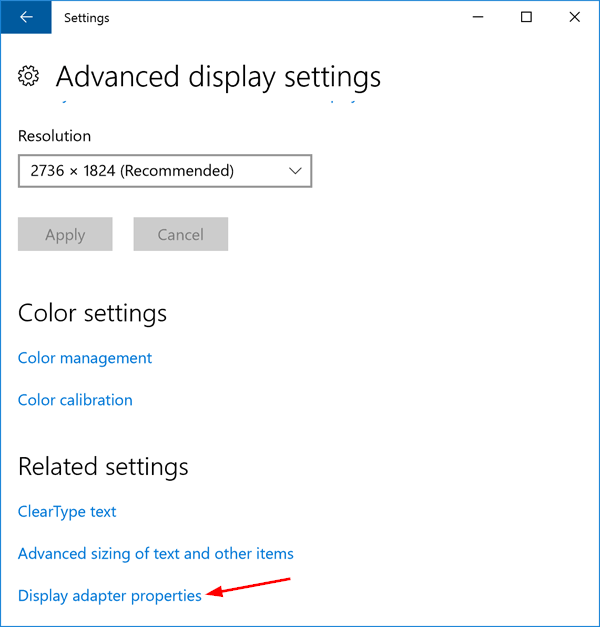
  4. If your desired resolution is not shown in the drop-down box, scroll down to the bottom and click Display adapter properties.

    display-adapter-properties

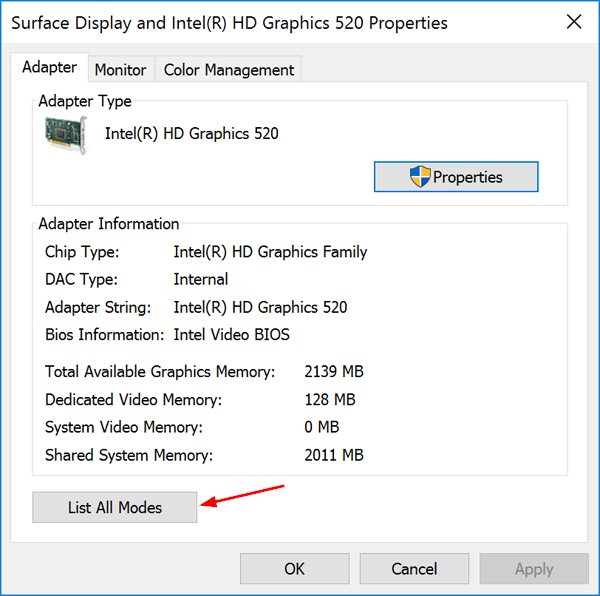
  5. In the display adapter’s Properties dialog box, select the Adapter tab, and then click List All Modes.

    list-all-modes

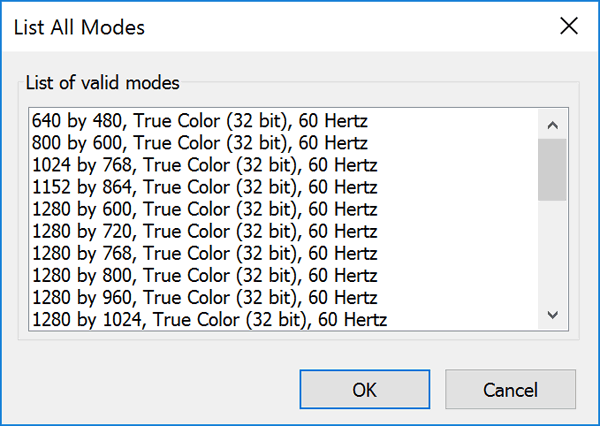
  6. This will open a new window listing every single resolution that your display can support. Select a resolution and click OK and then Apply.

    valid-screen-resolution

How to Restore Desktop Icons in Windows 10

November 11th, 2016 by Admin

All your desktop icons were missing after restarting your computer? How can I get those icons showing up again? It’s a known issue in Windows 10 that all of a sudden the icons on your desktop might disappear without warning. In this tutorial we’ll show you 3 methods to restore missing / disappeared desktop icons (including This PC, Network, Control Panel and Recycle Bin) in Windows 10.

Method 1: Make sure Show Desktop icons is enabled

Right-click on any empty space on your desktop. From the context menu, select View and then check for the Show desktop icons at the bottom. You should be able to see all of your desktop icons.

show-desktop-icons

Method 2: Turn off tablet mode

If you’ve accidentally enabled tablet mode, Windows 10 will display the Start Screen instead of the desktop every time you sign into your account, so you will see no desktop icons showing up on your screen. Switching back and forth between Desktop mode and Tablet mode would fix your problem.

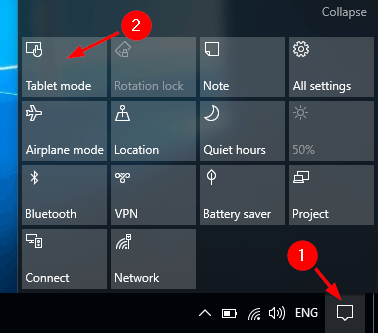
tablet-mode-in-action-center

To disable Tablet mode, click the Action Center icon (looks like a speech balloon) on the taskbar, and then click on the Tablet mode button. Your system will then change back to desktop mode. Hopefully all your desktop icons are restoring back.

Method 3: Restore Most Common Desktop icons

If your default desktop icons (like This PC, Control Panel etc.) are missing, you can make them visible from the Settings app. To get started, press the Windows key + I hotkey to open the Settings window. Click Personalization. Next select Themes tab on the left, click the Desktop icon settings link on the right. From the popup window, you can check all desktop icons and click OK.

Now Windows 10 should display the common desktop icons on the screen. That’s about it, I hope this article helped you to get your desktop icons back. If you have any comments, or questions, just reach for the comments below.

Fix: Windows 10 Opens Right-Click Context Menu to Left Side

November 11th, 2016 by Admin

In Windows 10, the right-click context menu will open to the left side of the cursor as default. If you’re accustomed to seeing the context menu on the right side, you can tweak this behavior easily. This tutorial shows you 2 simple ways to make Windows 10 display right-click context menu on the right side instead of the left side.

open-context-menu-to-left-side

Method 1: Make Windows 10 Open Context Menu to The Right in Tablet PC Settings

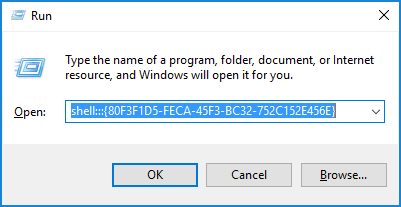
  1. Press the Windows key + R to open the Run box. Type the following command and press Enter.
    shell:::{80F3F1D5-FECA-45F3-BC32-752C152E456E}

    open-tablet-settings-via-run

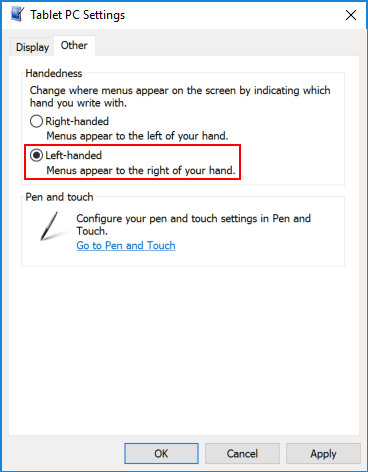
  2. When the Tablet PC Settings dialog opens, click Other tab. Check the Left-handed option and click OK.

    tablet-pc-settings

  3. Sign out of your account or restart your computer. Windows 10 will open the right-click context menu to the right side of your cursor.

Method 2: Make Windows 10 Open Context Menu to The Right Using Registry Editor

  1. Press the Windows key + R to open the Run box. Type regedit and press Enter.

    regedit-via-run

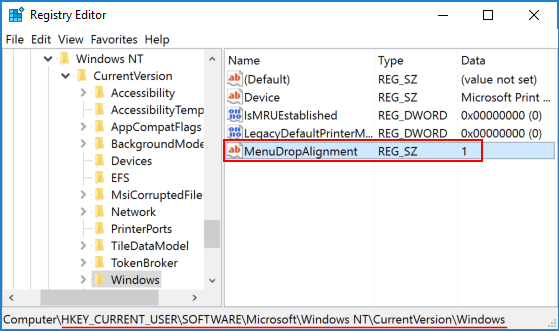
  2. In the left pane of Registry Editor, navigate to the following key:
    HKEY_CURRENT_USER\Software\Microsoft\Windows NT\CurrentVersion\Windows

    MenuDropAlignment

    You should see a value named MenuDropAlignment in the right pane (If it doesn’t exist, create a new string value named MenuDropAlignment). Double-click on it to modify.

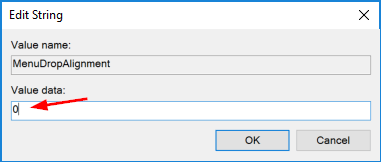
  3. In order to make context menu open to the right side, type 0 in the Value data field and click OK.

    edit-MenuDropAlignment

    If you want Windows to show context menu to the left side, just set MenuDropAlignment back to 1.

  4. After you edit the value, you need to sign out and sign in back to your Windows account or restart your computer. Windows should place the context menu on the right side.

How to Change DPI Scaling Settings in Windows 10

November 5th, 2016 by Admin

A lower DPI will make screen elements (for example, icons, fonts and windows) appear smaller and a higher setting will make them appear bigger. By default Windows has system-wide scaling setting of 96 DPI. In this tutorial we’ll show you 3 ways to change Windows 10 DPI settings to the scaling level you want.
Method 1: Change Windows 10 DPI Settings from Settings

  1. Right-click an empty area on your desktop, and then select Display settings from the context menu.

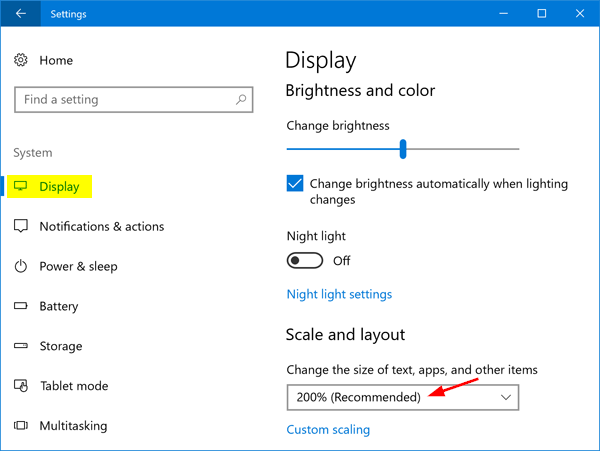
  2. The Settings app will open the Display tab. In the right pane, click on the drop-down menu to “Change the size of text, apps, and other items” and select the DPI percentage you want to set for your display.

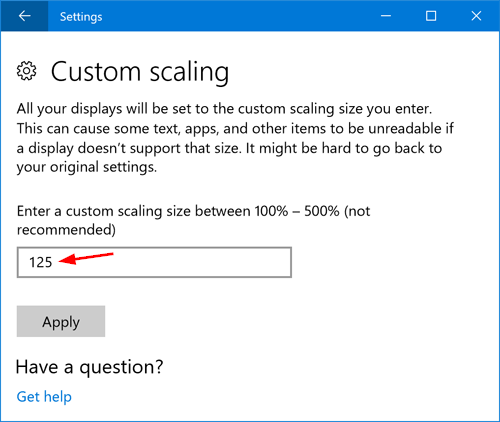
  3. Just underneath that you’ll see a link labelled “Custom scaling“. If you don’t like the default scale levels, you can click that link to set a custom scaling percent from 100 to 500.

  4. When you’re done, sign out and sign in to see the DPI changes.

Method 2: Change Windows 10 DPI Settings from Control Panel

  1. Open the Control Panel in Large icons view. Click Display.

    display

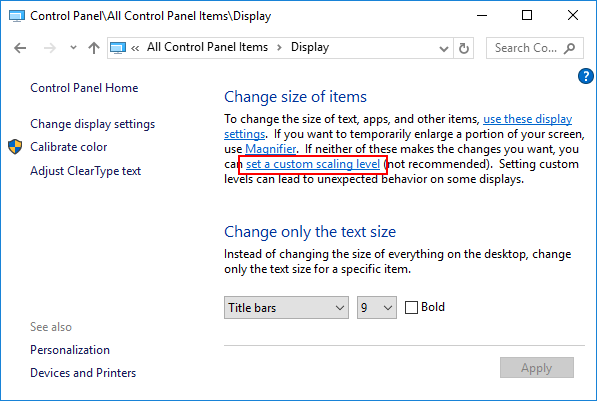
  2. Under Change size of items, click on the set a custom scaling level link.

    set-custom-scaling-level

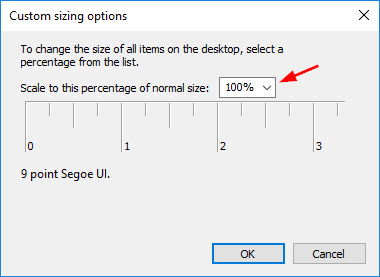
  3. This brings up the familiar old Custom sizing options dialog. From there, you can select the scaling percentage you want from the drop-down menu, or drag the ruler left or right to the scaling percentage that suits your monitor.

    custom-sizing-options

  4. Click OK and sign out for the new DPI settings to take effect.

Method 2: Change Windows 10 DPI Settings Using Registry Editor

  1. Press the Windows key + R to open the Run box. Type regedit and hit Enter to access Registry Editor.

    regedit-via-run

  2. Navigate to the following registry key in the left pane.
    HKEY_CURRENT_USER\Control Panel\Desktop
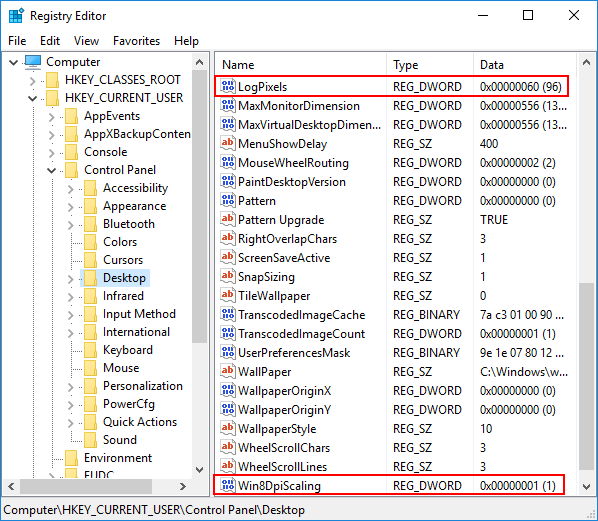
  3. In the right pane you’ll see two settings labeled Win8DpiScaling, LogPixels. In my example, LogPixels is set to (decimal) 96 for 96 DPI.

    Win8DpiScaling

  4. Set Win8DpiScaling to 0 if you want to disable DPI scaling, or set it to 1 for enabling custom DPI scaling. When Win8DpiScaling is set to 1, you can then change the DPI scaling level by modify the LogPixels value.
  5. When it’s done, close the Registry Editor and reboot your computer.

How to Disable Sticky / Filter Keys Permanently in Windows 10

November 4th, 2016 by Admin

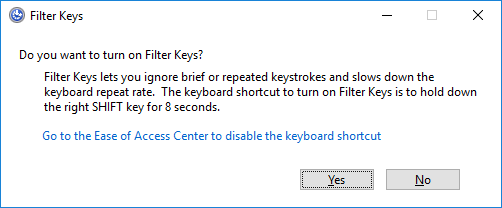
Windows 10 sticky or filter keys ruining your gaming experience? For example, if you accidentally press the Shift key on your keyboard five times in a row, then the Sticky Keys window pops up and asks you if you want to turn on Sticky Keys feature. In this tutorial we’ll show you how to disable / turn off the annoying Sticky & Filter Keys permanently in Windows 10.

filter-keys-popup

How to Disable Sticky / Filter Keys Permanently in Windows 10?

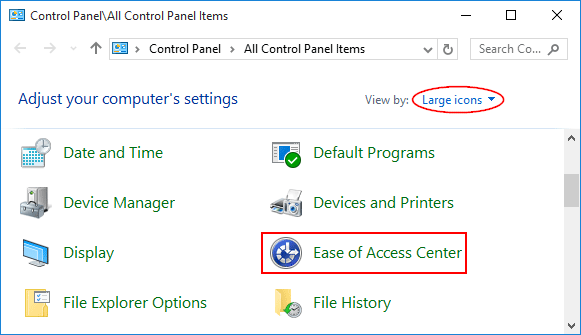
  1. Open the Control Panel and change the view to Large icons, and then click Ease of Access Center.

    ease-of-access-center

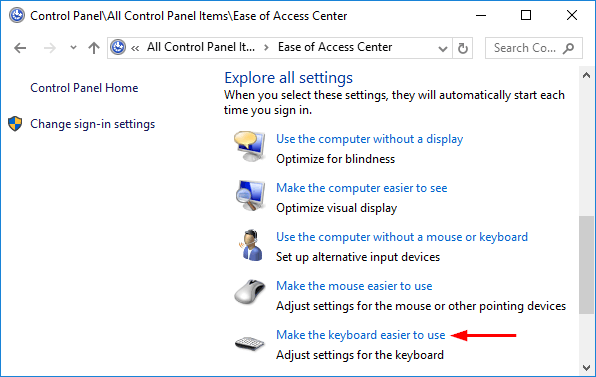
  2. Scroll down to the Explore all settings section, then click Make the keyboard easier to use.

    make-keyboard-easier-to-use

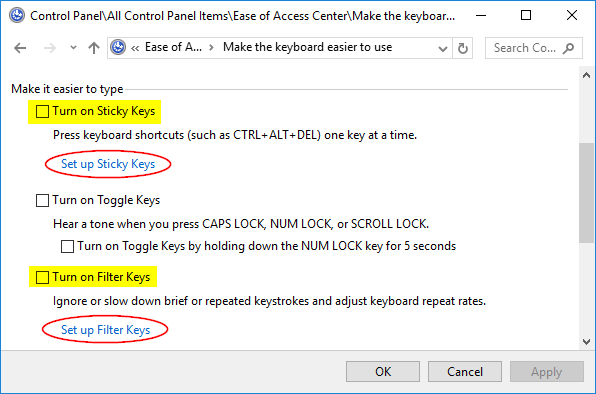
  3. In the window that shows up, uncheck the boxes for “Turn on Sticky Keys” and “Turn on Filter Keys” to turn off the Sticky / Filter Keys features.

    disable-sticky-filter-keys

  4. To prevent Windows from popping up the Sticky / Filter Keys popup dialog, you also need to disable the corresponding keyboard shortcuts.

    • Disable Sticky Keys Keyboard Shortcut

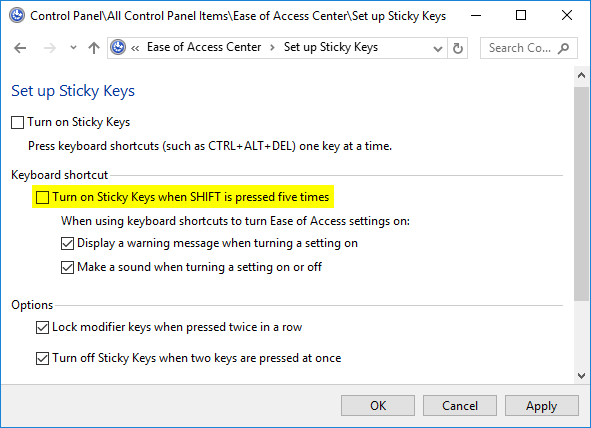
      Click the Set up Sticky Keys link. In the Sticky Keys setup screen, uncheck the box for “Turn on Sticky Keys when SHIFT is pressed five times“.

      disable-sticky-keys-popup

    • Disable Filter Keys Keyboard Shortcut

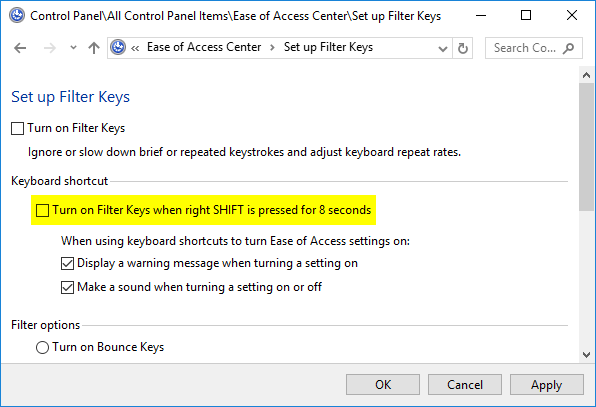
      Click the Set up Filter Keys link. In the Filter Keys setup screen, uncheck the option for “Turn on Filter Keys when right SHIFT is pressed for 8 seconds“.

      disable-filter-keys-popup

  5. Click OK to save your changes. Now you’ve successfully turned off both Sticky Keys and Filter Keys permanently in Windows 10. You will never be disturbed by the annoying window that pops up asking you for turning on the Sticky / Filter Keys.

2 Ways to Recover BitLocker Recovery Key for Surface Pro

November 3rd, 2016 by Admin

Surface Pro keeps asking you for BitLocker recovery key at startup? If you’re locked out of the tablet, there is no way to backup your files even if you boot it from Linux/WinPE bootable media, because Surface Pro has BitLocker encryption turned on by default. In this tutorial we’ll show you 2 ways to find, retrieve and recover the BitLocker recovery key for Surface Pro tablet.

Method 1: Recover Surface Pro BitLocker Recovery Key from Command Prompt

If you can still log on to your Surface Pro tablet as administrator, you can find and recover BitLocker recovery key easily, by using the Command Prompt. Here’s how:

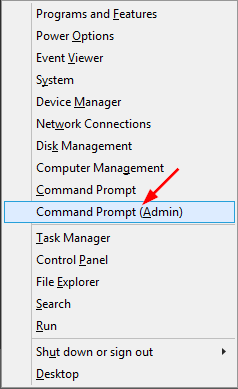
  1. Press the Windows key + X to open the Power User menu. Select “Command Prompt (Admin)“.
  2. At the Command Prompt, type the following command and press Enter.
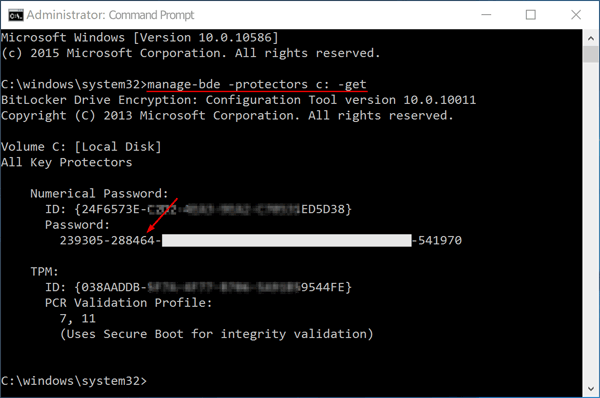
    manage-bde -protectors C: -get

    recover-bitlocker-recovery-key-from-cmd

  3. You’ll see the output screen similar to the picture above. The 48-digit password is the BitLocker recovery key that was used to encrypt your hard drive. Write it down on a piece of paper that you keep somewhere safe, or store in an external USB flash drive.

Method 2: Recover Surface Pro BitLocker Recovery Key from Microsoft Account

When you’re locked out of Surface Pro, you still have chance to recover the BitLocker recovery key from Microsoft account. The first time you log into Surface Pro with Microsoft account, the BitLocker recovery key is automatically uploaded to iCould. Here’s how to find it:

  1. Using a working PC or phone connected to the Internet, open the the Microsoft OneDrive Recovery Key page and sign in with the same Microsoft account you used on your Surface Pro.
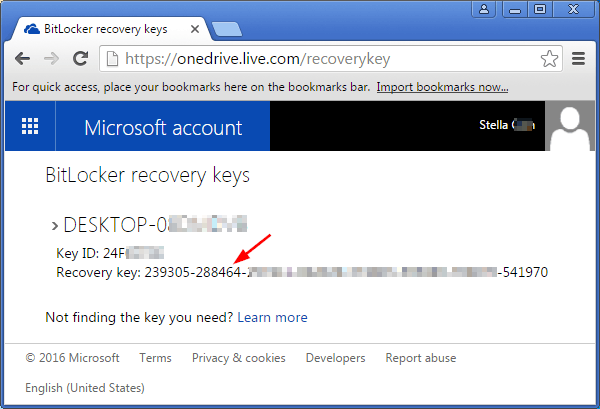
  2. After logging into your online Microsoft account, you’ll see the actual key ID and long BitLocker recovery key number. You can either write the key down or print it out to a piece of paper.

    onedrive-bitlocker-recovery-key

If your Surface Pro is displaying a BitLocker recovery screen each time it boots but you’re still unable to find the recovery key, you might have to reset Windows to factory defaults. You’ll be able to use your tablet again, but you’ll lose all the files stored on it.

2 Ways to Mount and Unmount VHD / VHDX from Command Line

November 2nd, 2016 by Admin

Virtual hard disk (VHD / VHDX) is a disk image file format for storing the complete contents of a hard drive. In this tutorial we’ll show you how to mount and unmount VHD / VHDX file from Command Prompt and PowerShell.

Method 1: Mount and Unmount VHD/VHDX from Command Prompt

This method allows you to mount and unmount VHD/VHDX file in all versions of Windows, including Windows 10 / 8 / 7 and Windows Server.

  1. Open the Command Prompt in Administrator mode.

    winx

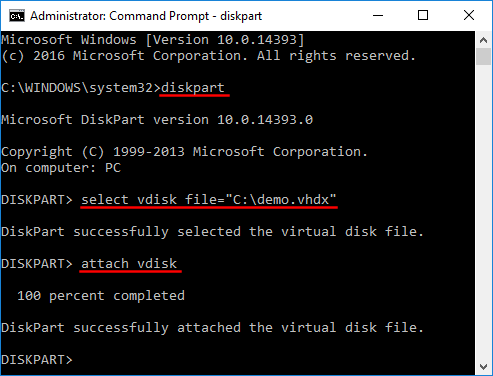
  2. At the Command Prompt, type diskpart and press Enter to access the command-line disk partitioning utility.
  3. Before mounting or unmounting virtual disk, you need to specify the location of your vhd/vhdx file. Type the following command and hit Enter.
    select vdisk file="[location of vhd]"
  4. You can now mount or mount your VHD/VHDX file using the below commands:

    • To mount VHD/VHDX file, type attach vdisk and press Enter. You can see a new virtual hard drive in your Disk Management and Windows Explorer.

      mount-vhd-from-command-line

    • To unmount a virtual hard disk, type detach vdisk and press Enter.

Method 2: Mount and Unmount VHD/VHDX from PowerShell

In Windows Server 2016 / 2012 / 2008, you can also mount and unmount VHD/VHDX file using the PowerShell cmdlet. Here’s how:

  1. Open the PowerShell as Administrator.
  2. When the command-line window opens, you can run the Mount-VHD cmdlet to mount your vhd/vhdx file.
    Mount-VHD –Path "[location of vhd]"
  3. To unmount your virtual hard disk, just run the Dismount-VHD cmdlet instead.
    Dismount-VHD –Path "[location of vhd]"

If you get the error message like “Mount-VHD is not recognized as the name of a cmdlet“, you need to add a feature named “Hyper-V Module for Windows PowerShell” to your server.

Bypass Windows Admin Password on Panasonic Toughbook

November 2nd, 2016 by Admin

Haven’t used your Toughbook for a long time and forgot the admin password? Not being able to log into your own computer is annoying. Luckily there is a bootable CD that can help you get back into your Panasonic Tougbook – PCUnlocker. Here we’ll walk you through the steps of bypassing Windows 10/7 admin password on Panasonic Toughbook.

Note: This method requires you to change the boot priority order in the Panasonic Toughbook. If you’ve forgotten the BIOS password, please try the backdoor password Biostar, or contact Panasonic customer support for help.

Part 1: Create A Bootable USB Drive

To get started, download the PCUnlocker Enterprise and save the .zip file to the local hard drive of your current PC. Double-click the zip file and drag the pcunlocker.iso file and drop it to your desktop.

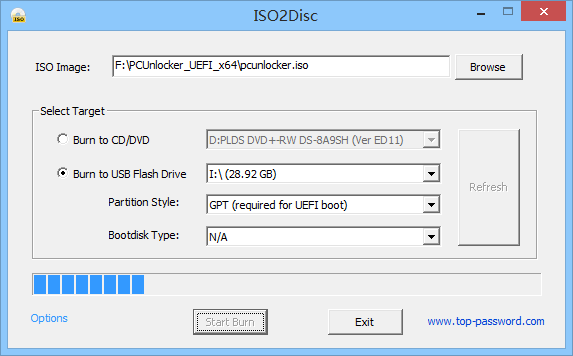
Download the free USB/CD creator software ISO2Disc. Launch ISO2Disc, then click the Browse button to select the pcunlocker.iso file on your desktop. Choose your USB drive from the device list. If your Panasonic Toughbook is running Windows 10, select the “GPT (required for UEFI boot)” option. Otherwise choose the default option “MBR (required for legacy/CSM boot)“.

Click Start Burn. It begins creating a bootable USB drive and installing PCUnlocker onto it.

Part 2: Reset Panasonic Toughbook Password

Plug the USB drive into the USB port of Panasonic Toughbook. While turning on the machine, hold down the F2 key (or DEL key) until you see the UEFI/BIOS Setup screen. Under the UEFI/BIOS Setup, select the Boot tab and move your USB drive to the top of boot priority order. Save your changes and exit.

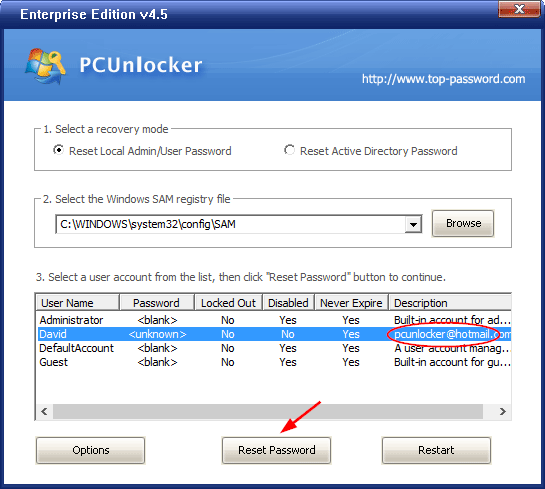
After booting from USB, it will load the WinPE OS temporarily. When you get to the PCUnlocker program, select the administrator account and click on Reset Password button. This will remove your lost Windows password and restore your account’s properties to default: unlocked, enabled and never expire.

Reboot your machine and unplug the USB drive. Boot into the UEFI/BIOS again and change the boot priority order back to hard drive first. You can then boot Panasonic Toughbook into Windows desktop without entering a password.