Archive for the ‘Windows 10’ category

Enable / Disable Lock Workstation Feature in Windows 10 / 8 / 7 and Vista

February 2nd, 2016 by Admin

In previous post we’ve covered 3 ways to lock a Windows computer. If you are unable to lock your Windows system or want to disable the computer lock option completely, here’s how you can enable / disable lock workstation feature in Windows 10, 8, 7 and Vista. When the lock feature is disabled, you will be unable to lock your computer by either pressing Windows + L, Ctrl + Alt + Del, or clicking the Lock option from the Start menu.
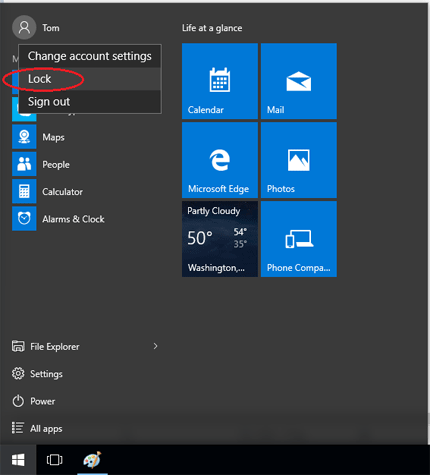
account-lock-option

How to Enable / Disable Lock Workstation Feature?

  1. Press the Windows + R key combination to bring up a run box, type gpedit.msc and hit Enter.
  2. When the Local Group Policy Editor opens navigate to:
    User Configuration\System\Ctrl+Alt+Del Options
  3. On the right hand side you should see a setting called “Remove Lock Computer“. Double-click on it.
  4. Then change the radio button over to Enabled if you want to disable the lock workstation feature.
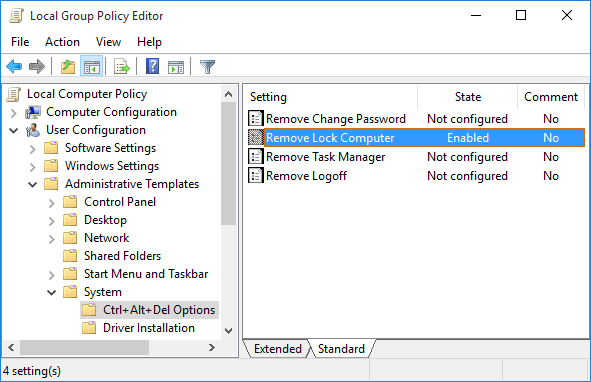
    ctrl-alt-del-options

    To enable this feature later, just change it to Disabled or Not Configured. Click OK to save your changes.

  5. Now you will need to enforce the updated policy to take effect on your PC, to do this press the Windows + R key combination, when the Run box open run:
    gpupdate /force
  6. Once you press enter you Local Group Policy will be automatically updated. Windows will no longer show the lock option when that you press the Windows key + L or Ctrl+Alt+Delete keyboard combination.
2 Options to Remove the Lock Option from Windows Start Menu

February 1st, 2016 by Admin

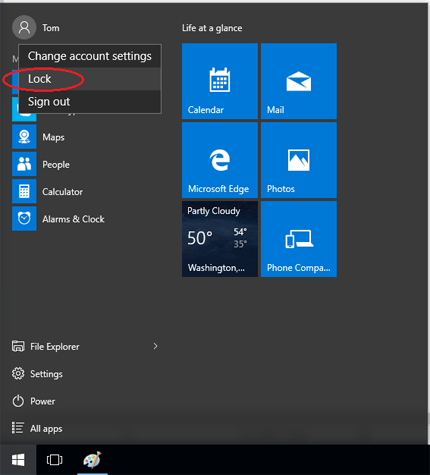
No matter what version of Windows you are running, you can find the lock option in the Start Menu (or Start Screen) that allows you to lock your computer. In this tutorial we’ll show you 2 ways to disable / remove the lock option from Windows 11, 10, 8 and 7 Start menu.

account-lock-option

Method 1: Remove the Lock Option with Group Policy

Follow this method and you can remove the lock option from the user tile menu on the Start menu (or Start screen) in Windows 11, 10, 8.1 or 8.

  1. Press the Windows key + R to open the Run box. Type gpedit.msc and press Enter.
  2. When the Local Group Policy Editor opens, expand the tree to the following path:
    Local Computer Policy\Computer Configuration\Administrative Templates\Windows Components\File Explorer
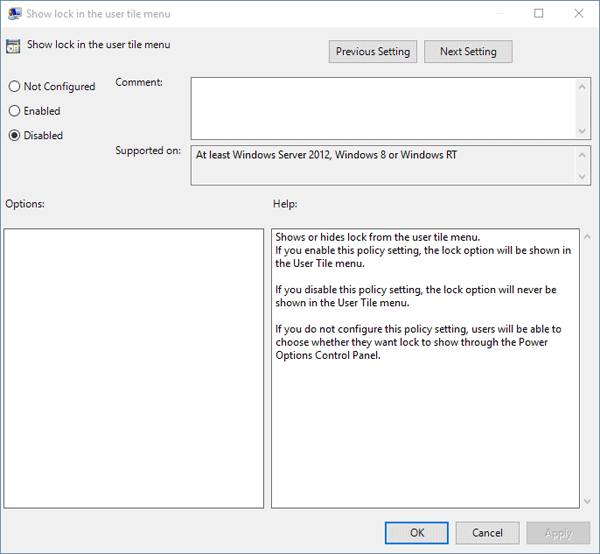
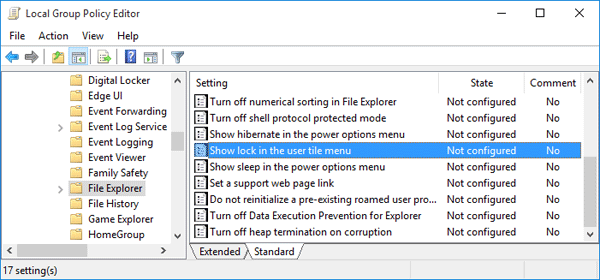
  3. In the right-hand pane you should now see a variety of settings. Double-click on the “Show lock in the user tile menu” setting and its properties screen will open.

    show-lock-in-user-menu

  4. Set it to Disabled and click OK.

    disable-lock-in-user-menu

    Now close the Local Group Policy Editor window. You’ll see the lock option is disabled or removed from the Start menu.

Method 2: Remove the Lock Option with Registry Hack

If the Group Policy Editor is not available in your computer or you’re running Windows 7, then use this registry hack to disable the lock option from your Windows Start menu.

  1. Press the Windows key + R to open the Run box. Type regedit and press Enter.
  2. When the Registry Editor opens, browse down to the following key:
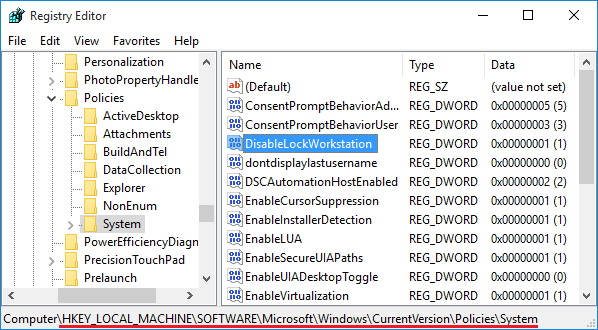
    HKEY_LOCAL_MACHINE\SOFTWARE\Microsoft\Windows\CurrentVersion\Policies\System
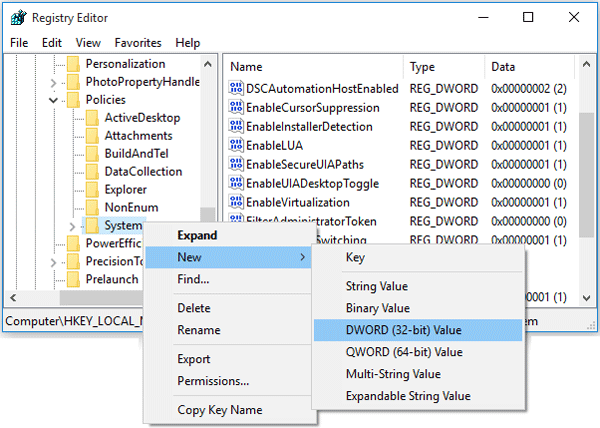
  3. Right-click on the System key on the left pane and select New -> DWORD (32 bit) Value.

    new-dword-value

  4. Name it DisableLockWorkstation and set the value to 1 in order to disable the lock option in the Start menu.

    disable-lock-workstation

    If you want to show / enable the lock option later on, just change the value to 0.

  5. Close the Registry Editor and you will see the lock option turns gray or disappeared from the Start menu.

Hide / Clear Most Used Programs in Windows 10, 8 and 7 Start Menu

February 1st, 2016 by Admin

My frequently used programs are missing from the Start menu. Can this be corrected and if so how? Thanks in advance.

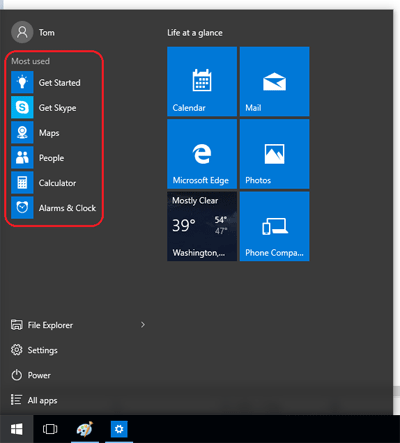
By default, Windows keeps track of programs you use frequently and puts them on the Start menu (or Start screen) for convenience. For privacy purposes, some of you may want to clear the most used programs from the list. In this tutorial we’ll show you how to hide / clear the most frequently / recently used programs in Windows 10, 8 and 7.

most-used-apps

The first part is for Windows 10 users and the second is for Windows 8 / 8.1 users, so you will have to scroll down if you use Windows 7 – the last part is for this operating system.

Part 1: Clear Most Used Programs from Windows 10 Start Menu

  1. Press the Windows key + I to bring up the Settings app. If you’re using a tablet without a keyboard, click the Start button and then select Settings.
  2. Click on Personalization.

    settings

  3. At the Personalization window, click on the Start tab on the left-hand side. On the right pane, you’ll see a few options for configuring what is shown on the Start Menu and how the Start Menu is displayed.
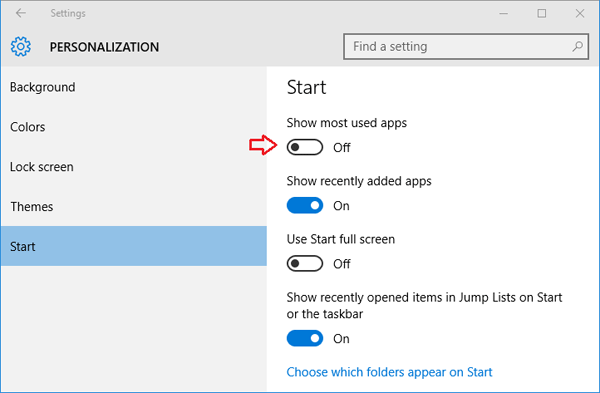
  4. From there, set toggle button under “Show most used apps” to Off in order to make Start menu hide the apps you use often.

    hide-show-most-used-apps

Part 2: Clear Most Used Programs from Windows 8 Start Screen

  1. Right-click on an empty space on the Taskbar and select Properties.
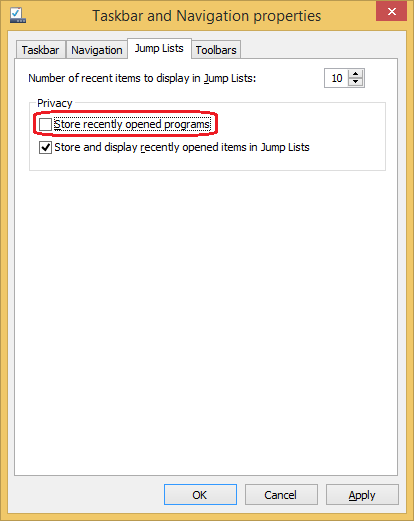
  2. Click on the Jump Lists tab, uncheck the “Store recently opened programs” box.

    jump-lists

  3. Click Apply and then click OK.

Part 3: Clear Most Used Programs from Windows 7 Start Menu

  1. Right-click on an empty space on the Taskbar and select Properties.
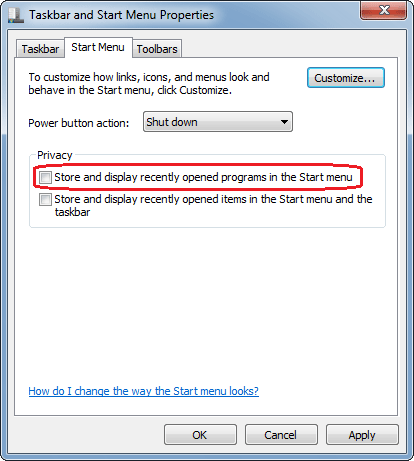
  2. Click on the Start Menu tab, uncheck the “Store and display recently opened programs in the Start menu” box.

    hide-recently-opened-apps

    If you also want to hide your recently opened documents/files from the Start menu, uncheck the “Store and display recently opened items in the Start menu and the taskbar” box as well.

  3. Click Apply and then click OK.

How to Modify / Edit Hosts File in Windows 10 / 8

January 28th, 2016 by Admin

The hosts file is basically a plain text file that is used to map host names to IP addresses. It is located deep down in the Windows folder: C:\Windows\System32\Drivers\etc. In this tutorial we’ll show you how to modify / edit the hosts file in Windows 10 or 8, and use it to block opening of one or more particular websites.

Part 1: Edit Hosts File

You can use any text editor to open the hosts file. But you’ll get the “Access is denied” error when you try to save your changes back to the hosts file. By default, the hosts file is protected from user changes. Before editing, you need to take ownership of the hosts file so you have full permissions to it. Here’s how:

  1. Download and install the freeware TakeOwnershipPro on your local computer. After installing, it will add a TakeOwnershipPro shortcut to the right-click context menu.
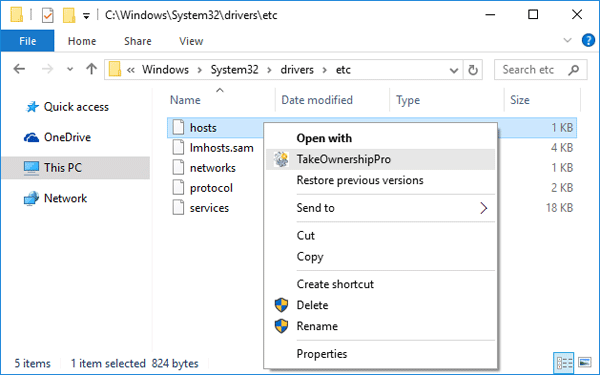
  2. Browse to the folder C:\Windows\System32\Drivers\etc. Right-click on the hosts file and select “TakeOwnershipPro” from context menu.

    take-ownership

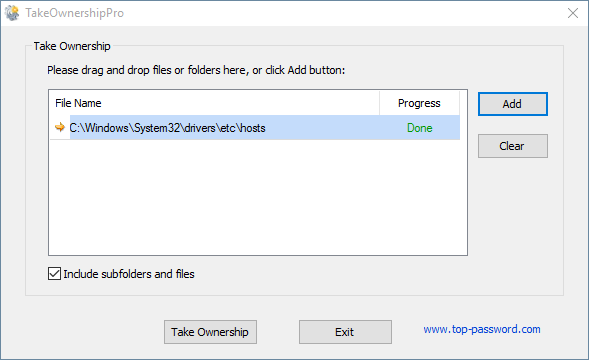
  3. When the popup window says the process of taking ownership is done. Click Exit to close it.

    TakeOwnershipPro

  4. Now the hosts file is ready to be modified.

Part 2: Block A Particular Website

The hosts file could be used to block access to any websites that you don’t want to visit. For example, lets say you want to prevent your computer from accessing the youtube.com website, simply add the following line to the end of the hosts file:

127.0.0.1 youtube.com

hosts

Once you’ve made the necessary changes, save it back to the hosts file and restart your computer for the changes to take effect.

Part 3: Prevent hijacking

Beware, the hosts file can also be used by viruses or malware to redirect you to phishing and other dangerous sites. To help prevent hijacking or unauthorized changes to the hosts file, consider making it read-only. Simply navigate to the hosts file with Windows Explorer: C:\Windows\System32\drivers\etc. Then right-click the hosts file, select Properties, check the Read-only attribute, and click OK.

5 Quick Ways to Open Task Manager in Windows 10 / 8

January 28th, 2016 by Admin

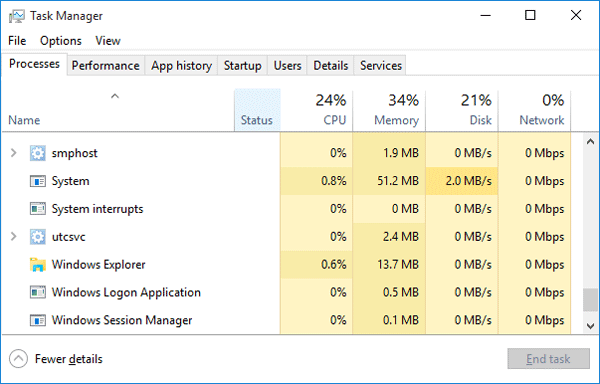
Task Manager is one of the most-used system utilities in Windows. We usually use it to check the overall performance of our computers or close a program that stops responding (hangs). There are multiple ways you can launch Task Manager. In this tutorial we’ll show you 5 quickest ways to open the Task Manager in Windows 10 and Windows 8.

task-manager

Option 1: Press Ctrl + Shift + Esc

Just press Ctrl + Shift + Esc key combination on your keyboard and it can open the Task Manager directly. This keyboard shortcut is a global hotkey, means it is available from any app you running and even when your Explorer shell is not running! This should be the simplest way to launch Task Manager.

Option 2: Right-click Taskbar

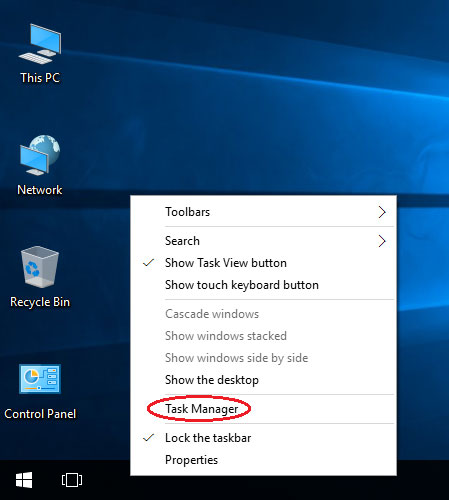
Right-click the empty space on the taskbar, and then select “Task Manager” from the context menu. The Task Manager will launch immediately.

taskbar

This method allows you to use the mouse only and simply ignore the keyboard, making it the likely preferred method of those who like using the mouse instead of the keyboard.

Option 3: Run taskmgr Command

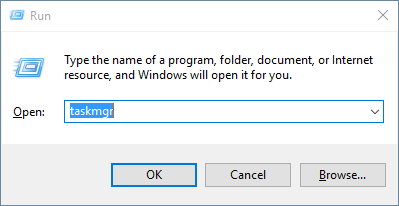
Press the Windows key + R to open the Run box. Type taskmgr and hit Enter. It will also start the Task Manager.

run-box

If you’re at the Command Prompt, run the taskmgr command and you can also bring up the Task Manager.

Option 4: Ctrl+Alt+Del

Press the Ctrl + Alt + Del keys together on the keyboard, the security screen should open. Click on the “Task Manager” option.

ctrl-alt-del

This action will open the Task Manager. This method is pretty helpful if your system is unresponsive for whatever reason.

Option 5: Win+X Menu

While all previous options are available in previous versions of Windows like Windows 7, Vista, XP etc, this method is exclusive for Windows 10 and Windows 8.

quick-access-menu

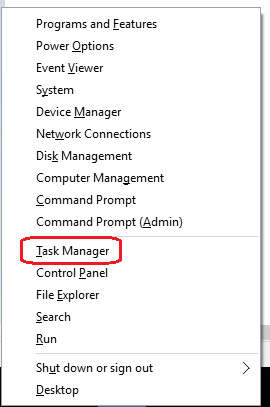
Press the Windows key + X keys together on the keyboard, pick the “Task Manager” item from the power user menu and it will open Task Manager.

Enable / Disable Fast User Switching in Windows 11, 10, 8, 7 and Vista

January 28th, 2016 by Admin

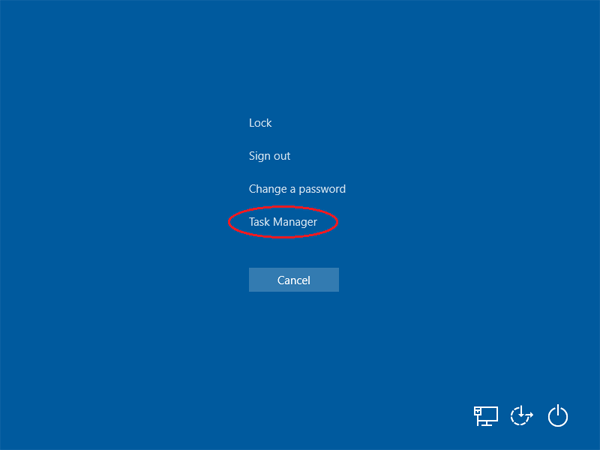
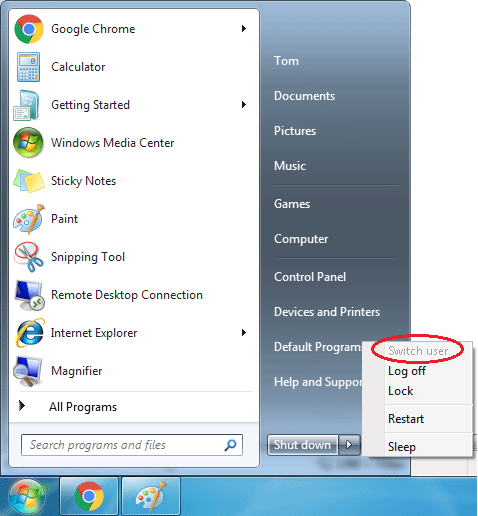
Fast user switching is disabled or missing on your Windows 10 system? Unable to switch to a different account as the “Switch user” option is greyed out?

win7-switch-user

In this tutorial we’ll show you 2 ways to enable or disable Fast User Switching in Windows 11, 10, 8, 7 and Vista.

Method 1: Using Local Group Policy Editor

  1. Press the Windows key + R to open the Run dialog box. Type gpedit.msc and press Enter.
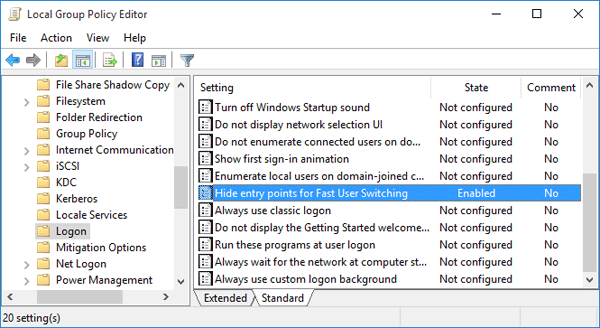
  2. The Local Group Policy Editor console should open. In the left pane, expand the following nodes:
    Local Computer Policy\Computer Configuration\Administrative Templates\System\Logon
  3. In right-side pane, double-click on the “Hide entry points for Fast User Switching” policy and its properties screen will open.

    hide-fast-user-switch

  4. If you want to turn off / disable the Fast User Switching feature, set it to Enabled. Or click Disabled or “Not configured” to re-enable Fast User Switching.

By disabling the Fast User Switching feature, the “Switch user” option will be greyed out or removed from Windows logon screen,Start menu and the Task Manager.

Method 2: Using Registry Trick

Since Group Policy Editor doesn’t come with the Home and Starter editions of Windows, here is another method to enable / disable Fast User Switching using Registry Editor:

  1. Press the Windows key + R to open the Run dialog box. Type regedit and press Enter.
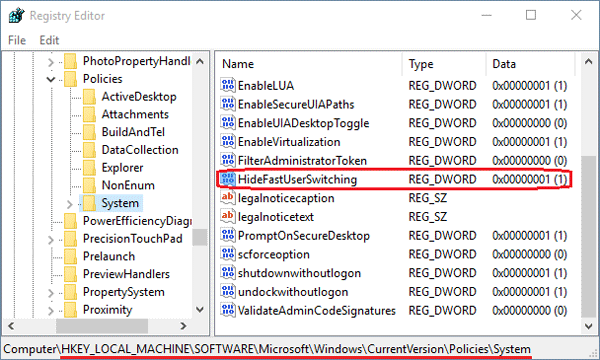
  2. In the Registry Editor window, navigate to the following key:
    HKEY_LOCAL_MACHINE\SOFTWARE\Microsoft\Windows\CurrentVersion\Policies\System
  3. In the right-side pane, search for the value named HideFastUserSwitching. If it doesn’t exist, you can create one by right-clicking in the empty space on the right pane and choose New –> DWORD (32-bit) Value.

    hide-fast-user-switching

  4. Set the Value data for HideFastUserSwitching to 1 if you want to disable the Fast User Switching feature. To re-enable it, change that value to 0.
  5. Close the Registry Editor. You will have to log off and then log back on for the changes to take effect.

5 Ways to Switch Users in Windows 10 without Log off

January 27th, 2016 by Admin

Fast User Switching is a nice feature for Windows users to quickly switch to another user account, without having to log off or close all running programs of the currently logged-on user. In this tutorial we’ll show you 5 quick ways to switch between multiple user accounts in Windows 10.

Note: Don’t restart or shutdown your computer while another user account is still logged in, or that account will lose any work that isn’t saved.

Option 1: Switch Users from Start Menu

  1. Click the Start button.
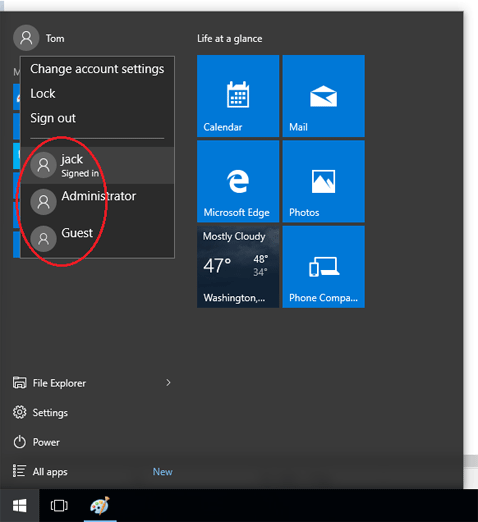
  2. From top-left corner of the Start Menu, click your user account who is currently logged in. You’ll see a drop-down menu that lists all other user accounts available in your system.

    win10-switch-user

  3. click on the user account you want to switch to. You will now be taken directly to the sign-in screen of the selected account.
  4. Enter your password and you can log on. Use the same method and you can switch back to your original account.

Option 2: Switch Users from Lock Screen (Windows + L)

  1. Press the Windows key + L simultaneously (i.e. hold down the Windows key and tap L) on your keyboard and it will lock your computer.
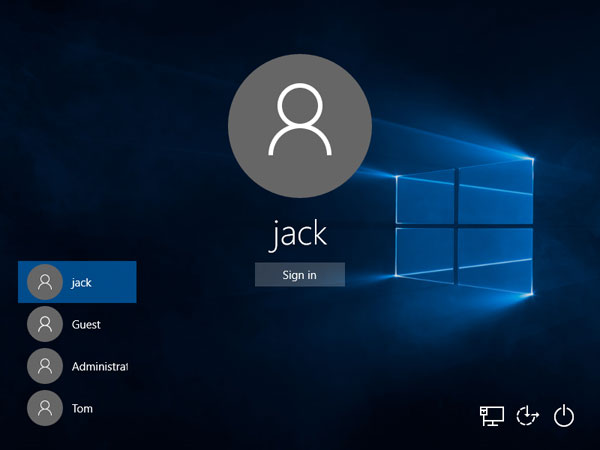
  2. Click the lock screen and you’ll be back on the sign-in screen. Select and log in to the account you want to switch to.

    windows-L

Option 3: Switch Users by Pressing Alt + F4

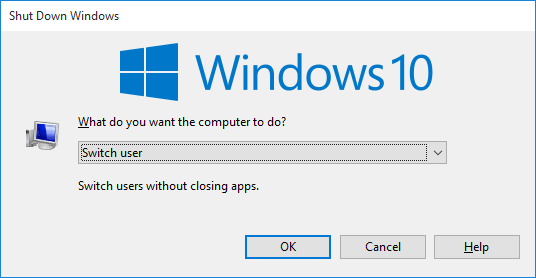
  1. The Alt + F4 keyboard shortcut has been around about as long as Windows has, as a shortcut to close the window that’s in focus. If your desktop has the focus, then pressing Alt + F4 will bring up the Shut Down Windows dialog. If the focus is not in your desktop, press the Windows key + D to hide all programs or click your desktop background.
  2. Select Switch user from the drop-down menu, and click/tap on OK or press Enter.

    alt-f4

  3. You will now be taken to the lock screen to unlock. When you’re back at the sign-in screen, you can select and sign in to the account you want to switch to.

Option 4: Switch Users by Pressing Ctrl + Alt + Del

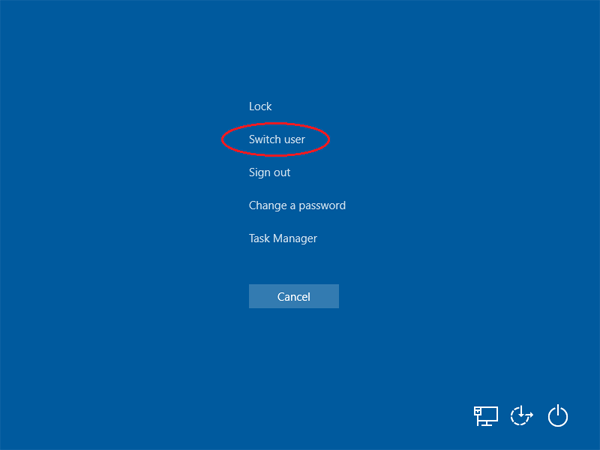
  1. Press Ctrl + Alt + Del at the same time to open the security screen.
  2. Click on Switch user. You will now be taken directly to the sign-in screen to select and sign in to the account you want to switch to.

    ctrl-alt-del

Option 5: Switch Users from Task Manager

  1. Open the Task Manager in Windows 10. You can launch it by right-clicking the taskbar and then selecting “Task Manager“, or pressing the Ctrl + Shift + Esc keyboard combination.
  2. By default, the Task Manager will open in compact view. Click the “More Details” button at the bottom to access the full Task Manager.
  3. Click on the Users tab, select a user that you want to switch to, and click on the “Switch user” button.

    task-manager

  4. You can then switch and sign in to your selected account.

How to Know Your Windows is 32-bit or 64-bit

January 23rd, 2016 by Admin

All versions of Windows are available in two different flavors: 32-bit and 64-bit. For most people, whether they use a 32-bit or 64-bit version of Windows doesn’t make a difference. But it’s necessary to find out your running Windows is 32-bit or 64-bit when performing certain tasks, such as install drivers for your new device. Here are 3 simple ways to know your Windows is 32-bit or 64-bit.

Method 1: Right-click on My Computer

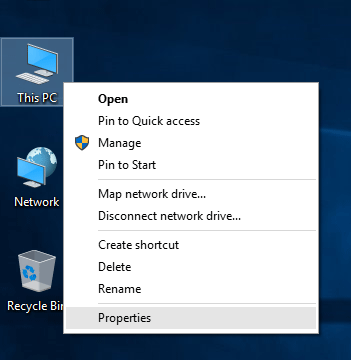
Simply right-click on “My Computer” (or “This PC” if you’re running Windows 10) icon on your desktop, and then select Properties from the drop-down context menu.

my-computer-properties

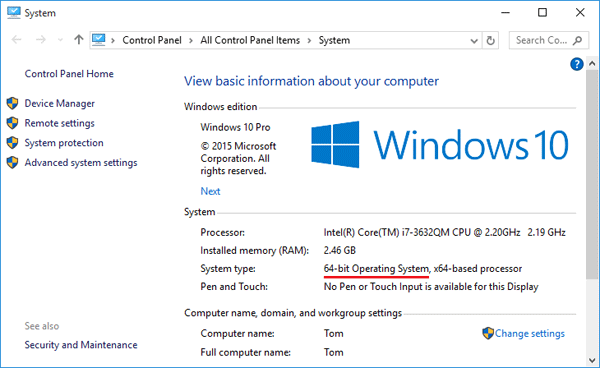
The System Control Panel will now open. In this screen you will see various information about your computer and Windows. The System type field indicates whether your computer are running a 32-bit or 64-bit version of Windows.
system-info

Method 2: Use the MSINFO32 Command

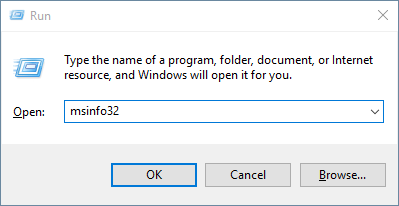
Press the Windows key + R on your keyboard to open the Run dialog. Type msinfo32 and hit Enter.

msinfo32

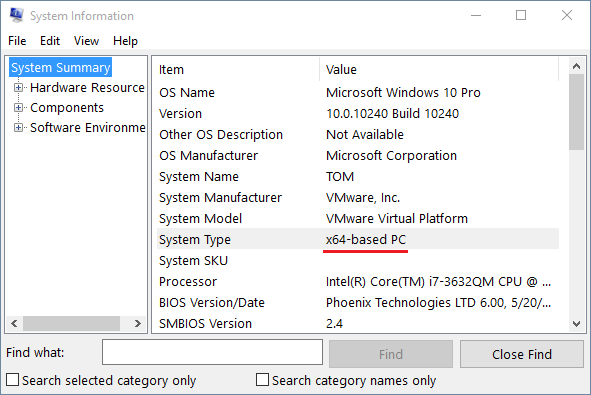
This opens the System Information window which shows details of almost everything in the system. Click the System Summary node on the left, then locate the System Type entry. If it’s x64-based PC, you’re running 64-bit Windows. If it’s x86-based PC, your Windows is 32-bit.

system-information

Method 3: Check the Program Files (x86) Folder

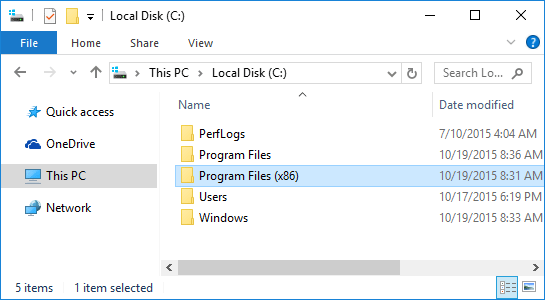
For purposes of backward compatibility, 64-bit version of Windows needs to run both 64-bit and 32-bit programs. 32-bit application are installed in the “Program Files (x86)” folder but native 64-bit application run in the normal “Program Files” folder.

program-files-x86

So if you can see the “Program Files (x86)” folder under the root path of your system partition, your Windows is 64-bit. Otherwise it’s 32-bit OS.

Windows 10 Downgrade: Revert Back to Previous Windows 8 or 7

January 20th, 2016 by Admin

Microsoft offers Windows 10 as a free upgrade for Windows 8 and Windows 7 users. You only have one month to decide if you want to keep Windows 10 or not after upgrading from Windows 8 or 7. If you find out some things don’t work properly or the new OS is not suitable for your taste, you can downgrade or revert back to your previous Windows 8 or 7 system.

How to Revert Windows 10 Back to Previous Operating System?

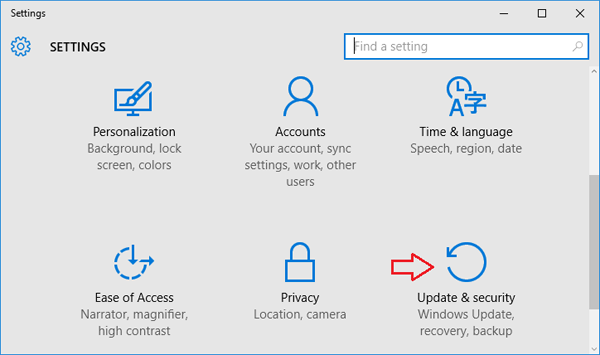
  1. Press the Windows key + I to launch PC Settings app. You can also open it by clicking the Start button at the bottom left of the screen and then select Settings.
  2. Click Update & security.

    pc-settings

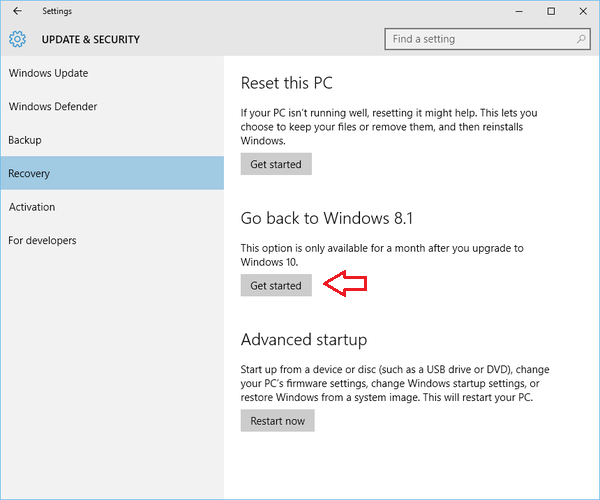
  3. Select the Recovery tab from the left side. If you’re eligible to downgrade you should see an option that says Go back to Windows 8.1 or Go back to Windows 7. If you see it, click Get started to go through the downgrade process.

    windows-10-downgrade

  4. The whole process should not take longer than 10 minutes or so, and your system will be just as it was before Windows 10.

If you don’t see this downgrade option, that’s possible because it’s been too long since you upgraded to Windows 10. Windows 10 will automatically remove these installation files after 30 days.

3 Ways to Change Computer Name in Windows 10

January 19th, 2016 by Admin

How can I change the name of my Windows 10 computer from Command Prompt? Whatever the reason you want to rename your computer, here’s our step-by-step tutorial on how to change computer name in Windows 10, from Control Panel, PC Settings and Command Prompt.

Method 1: Change Computer Name from Control Panel

  1. To begin, you have to open the Control Panel. Simply press the Windows key + X to open the Quick Access menu and click “Control Panel“.

    open-control-panel

  2. Set the View by option to Large icons. Click on System.

    control-panel

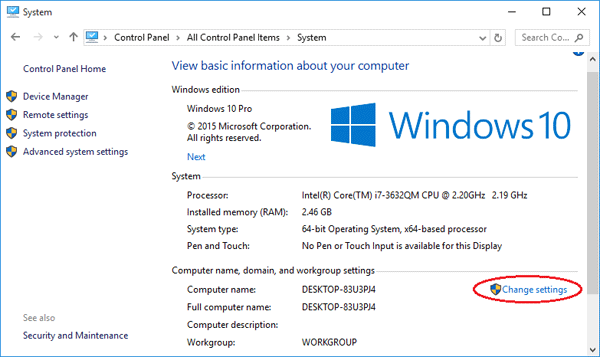
  3. Scroll down to the “Computer name, domain, and workgroup settings” section, click on Change settings.

    system-info

  4. The System Properties screen will open with the “Computer Name” tab already selected. Click on the Change… button.

    system-properties

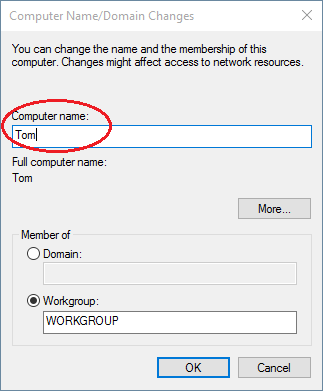
  5. Now type the new name you want in the “Computer name” box and click OK.

    change-computer-name

  6. A restart will be required to complete the name change, and after that, you’re all set!

Method 2: Change Computer Name from PC Settings

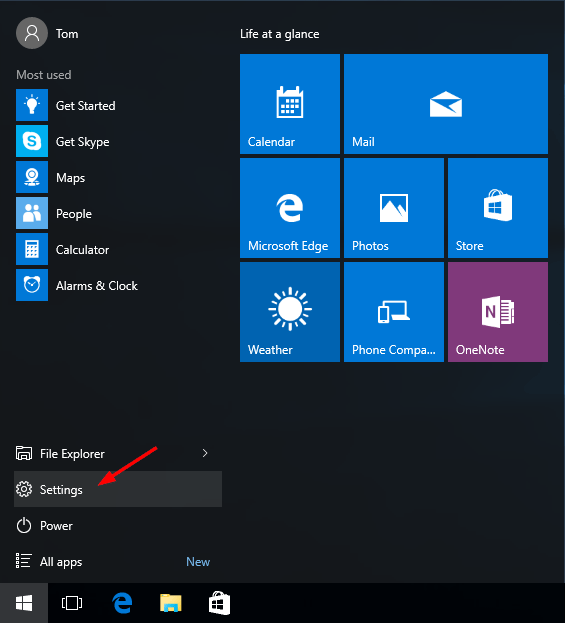
  1. Click on Start to access the Start Menu. Select Settings.

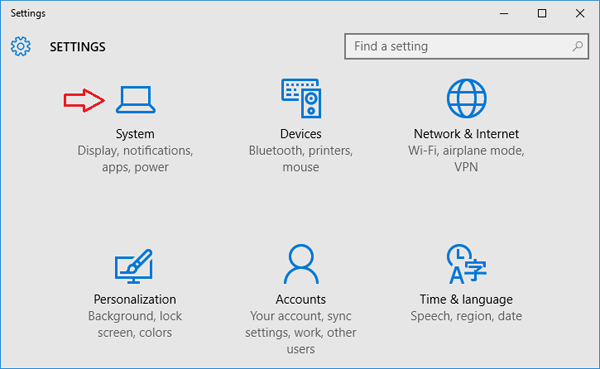
  2. When the PC Settings app opens, click on System.

    pc-settings

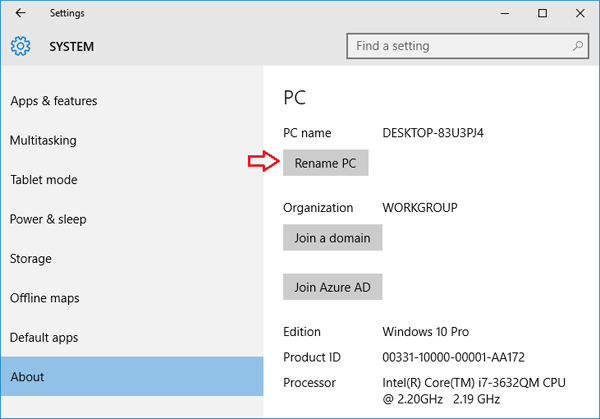
  3. Go to the About section and then click on “Rename PC“.

    about-system

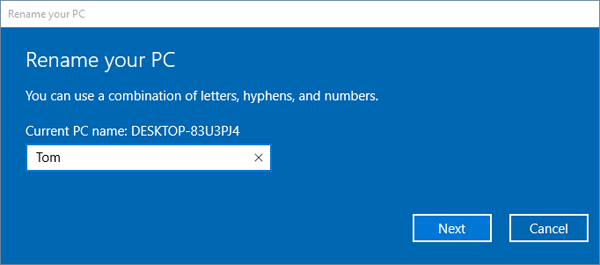
  4. Type the new name you want to use and click on Next.

    rename-your-pc

  5. You will be prompted to restart your PC to apply your new settings, click on Restart Now to proceed.

Method 3: Change Computer Name from Command Prompt

Looking for a way to change Windows 10 host name via command line? Here’s how to rename Windows 10 computer name from Command Prompt (cmd):

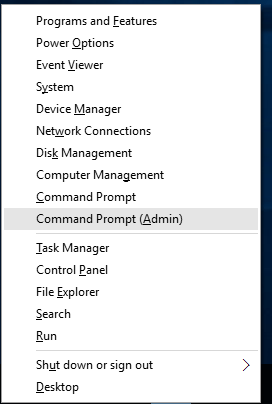
  1. Press the Windows key + X to open the Quick Access menu. Click on Command Prompt (Admin).

    command-prompt-admin

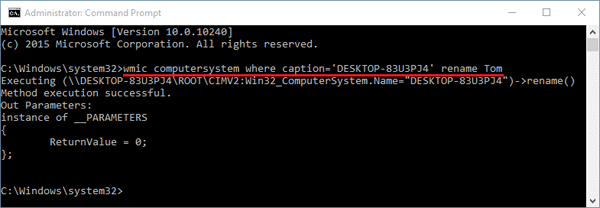
  2. In the Command Prompt, you can use the WMIC computersystem command to change your computer name easily, assuming you know the current computer name.
    WMIC computersystem where caption='current_pc_name' rename new_pc_name

    Replace current_pc_name with your current computer name, and new_pc_name with your desired new computer name.

    rename-pc-name-from-command

  3. After running the command, you need to reboot the computer to make the changes effective.

This method works on Windows 10, 8, 7, Vista, XP and Windows Server 2012/2008/2003. This command can also be used from a batch file to rename any Windows computer, including domain-joined machines.

Besides changing the name of a local computer, you can also use WMIC command to rename a remote computer on the same network. For example, if want to rename a remote PC named Jon-Laptop to Jon-Tech and you know the login credentials, then type this command in the Command Prompt:

WMIC /node:"Jon-Laptop" /user:Admin /password:password123 computersystem call rename "Jon-Tech"

The value following /node: indicates the name of the remote computer on the LAN. The value following /user: must be an admin account on the remote computer.