Archive for the ‘Windows 7’ category

3 Different Ways to Turn Off Windows 10 / 8 / 7 Password

May 12th, 2017 by Admin

Could I log in to Windows without a password? How can I disable password at login screen? Looking for a way to turn off Windows password because you’ve forgotten it? In this tutorial we’ll show you 3 different ways to turn off Windows 10 / 8 / 7 password.

Option 1: Turn Off Windows Password by Deleting the Password

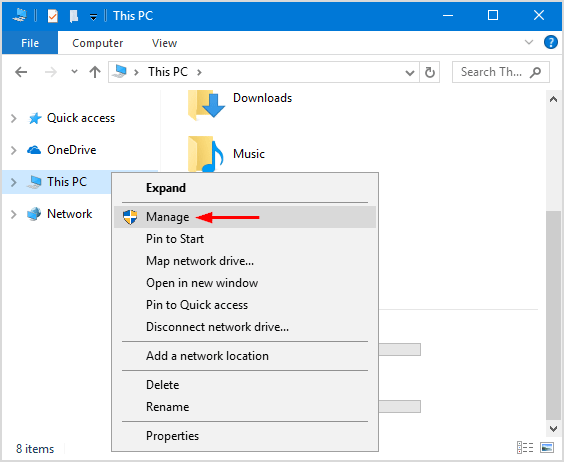
Right-click on My Computer shortcut on your desktop. If you’re running Windows 10, right-click This PC shortcut in the left navigation pane of File Explorer. Next choose Manage from the context menu.
manage-this-pc

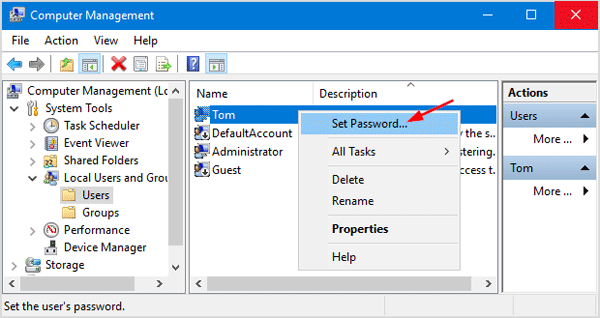
When the Computer Management window appears, navigate to Local Users and Groups -> Users. Right-click your local account and select Set Password. When get the warning prompt, click on Proceed to continue.
set-windows-password

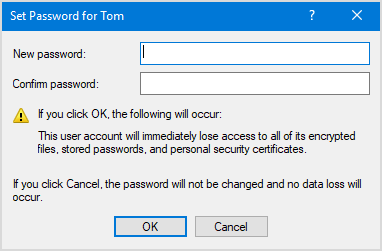
Type the new password and confirm. Click OK to remove the existing password for your Windows account.
set-password-for-windows-user

Option 2: Turn Off Windows Password by Enabling Automatic Logon

This method allows you to disable Windows login screen without changing or deleting your password. After enabling automatic logon, Windows will automatically sign into your account every time you turn on or restart your computer. Here’s how:

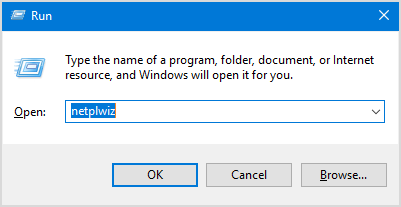
Press the Windows logo key + R to open the Run dialog box. Type netplwiz and press Enter.
netplwiz

Uncheck the box “Users must enter a user name and password to use this computer“, and then select your Windows account from the list. Click OK.
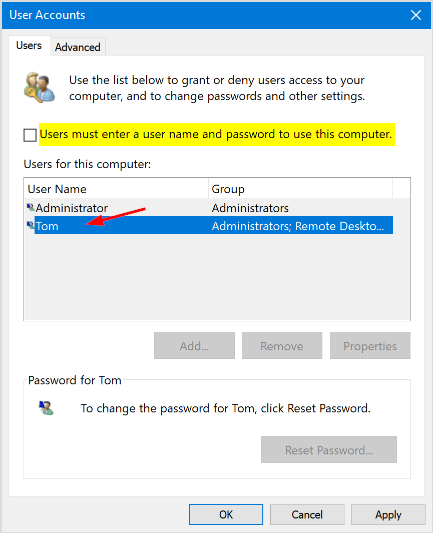
enable-automatic-logon

Type your current password twice and click OK.
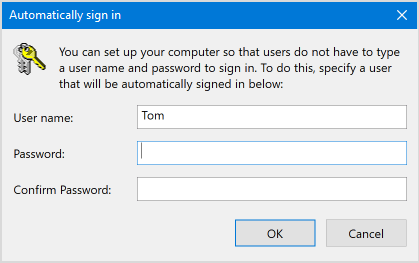
automatically-sign-in-to-windows

From now on, Windows will automatically log into your selected account with the password you provided.

Option 3: Turn Off Windows Password When You’re Locked Out of Computer

If you have physical access to a machine then there is nothing to prevent you from gaining administrative access. When you forgot your Windows administrator password or need to access a locked or disabled account, you can take use of PCUnlocker to log back in to your computer without reinstalling Windows.

To get started, you need to prepare a PCUnlocker Live CD (or USB) on another PC you have access to. Download the ISO image of PCUnlocker and burn it to a blank CD (or USB thumb drive) using ISO2Disc.
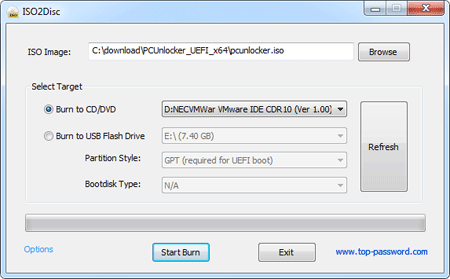
Boot your locked computer from PCUnlocker Live CD (or USB). Once you’re at the PCUnlocker screen, select one of your local accounts and click on Reset Password button.

When the Change Password dialog box opens, just leave the password field empty and click OK. This will turn off Windows password completely.
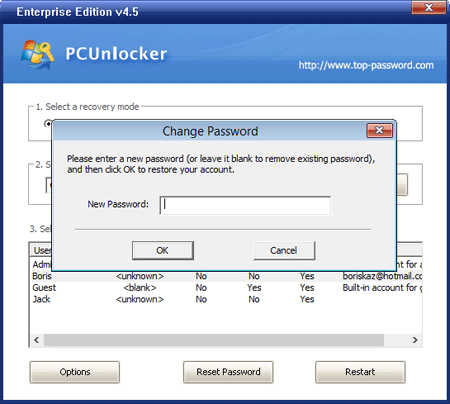
Reboot your computer and you can then sign into Windows account without being prompted for a password.

Fix: Windows Defender is Turned off by Group Policy

April 12th, 2017 by Admin

“This app is turned off by group policy.” This is the message I am getting when I am trying to access Windows Defender. How can I sort out this issue?

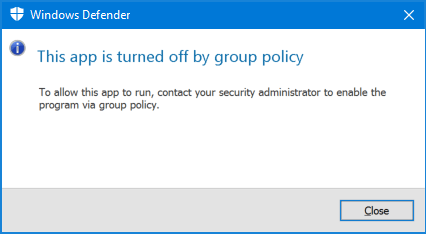
When your computer infected by any malware or virus, this may cause Windows Defender to be turned off. It’s also possible that Windows Defender gets automatically disabled after installing anti-virus software. In such situation, you’ll get the following error message when you open Windows Defender:

“This app is turned off by group policy. To allow this app to run, contact your security administrator to enable the program via group policy”

defender-turned-off-by-group-policy

In this tutorial we’ll show you 2 simple ways to fix the issue “Windows Defender is turned off by group policy” by enabling Windows Defender again in Windows 10 / 8 / 7.

Method 1: Fix “Windows Defender is Turned off by Group Policy” Using Group Policy

  1. Press the Windows key + R together to open the Run box. Type gpedit.msc and hit Enter.

    gpedit

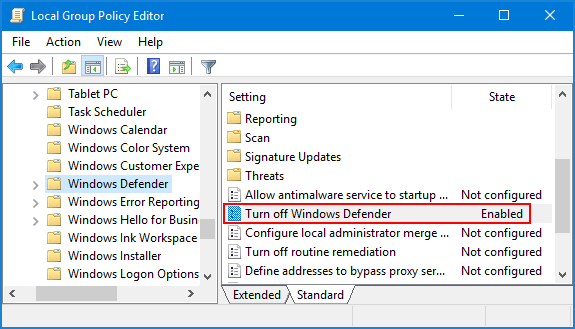
  2. When the Local Group Policy Editor window appears, navigate to: Computer Configuration > Administrative Templates > Windows Components > Windows Defender.
  3. Now locate the Turn off Windows Defender setting in the right pane, and double-click on it to modify.

    turn-off-windows-defender

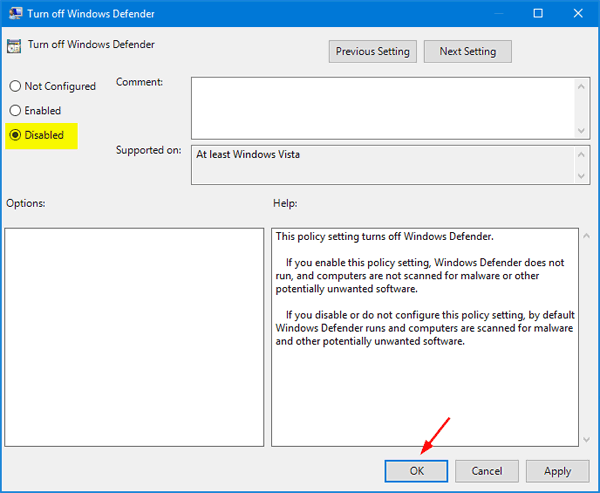
  4. In order to turn on Windows Defender, select Disabled and click OK.

    turn-on-windows-defender

    Reboot your computer. The next time you try to open Windows Defender and you should no longer get “This app is turned off by group policy” message.

Method 2: Fix “Windows Defender is Turned off by Group Policy” Using Registry Editor

  1. Press the Windows key + R together to open the Run box. Type regedit and hit Enter to open Registry Editor.

    regedit

  2. In the left pane of Registry Editor, navigate to the key below:
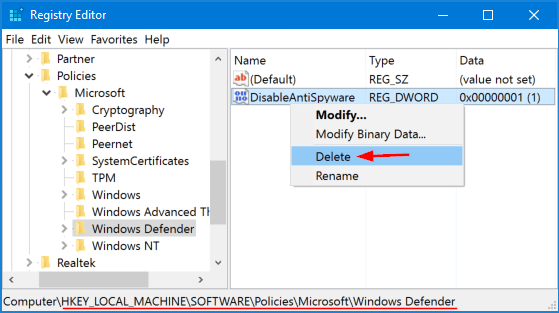
    HKEY_LOCAL_MACHINE\SOFTWARE\Policies\Microsoft\Windows Defender
  3. Right-click on the DisableAntiSpyware value in the right pane, and then select Delete.

    DisableAntiSpyware

  4. Close Registry Editor and reboot your PC to take effect. Now you won’t receive the error “This app is turned off by group policy” when you try to launch Windows Defender.

Stop Windows from Adding “- Shortcut” Text When Creating Shortcuts

April 6th, 2017 by Admin

In Windows 10/8/7, you can create a shortcut by right-clicking on an existing folder or file, and then selecting “Send To” -> “Desktop (Create shortcut)“. But this will automatically append the “- Shortcut” text to the end of the shortcut’s filename. If you want to keep the filename short, here’s a registry trick to stop Windows from adding “-Shortcut” text when creating shortcuts.

new-shortcut-with-shortcut-text

Tips: If you want to remove shortcut icon from your desktop shortcuts, please check out this tutorial: How to Remove Shortcut Arrow from Desktop Icons in Windows 10 / 8 /7.

How to Stop Windows from Adding “- Shortcut” Text When Creating Shortcuts?

  1. To get started, press the Windows key + R at the same time to open the Run dialog box. Type regedit and press Enter.

    regedit

  2. Once the Registry Editor loads, navigate to the following location in the left pane:
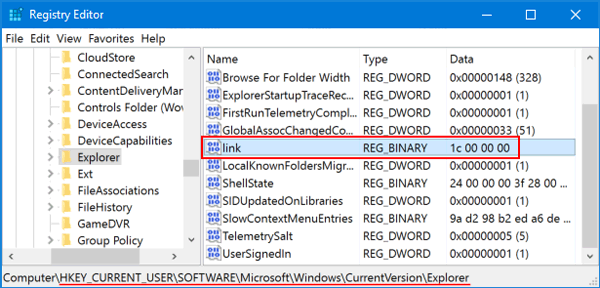
    HKEY_CURRENT_USER\SOFTWARE\Microsoft\Windows\CurrentVersion\Explorer
  3. On the right-hand side, double-click on the link value to modify. If you don’t see that value, right-click on empty space and select New -> Binary Value, then name the new value link.

    explorer-link-registry

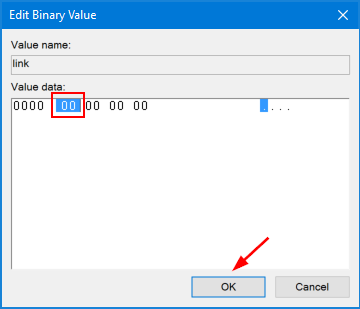
  4. In the Value data box, replace the current value with 00 00 00 00 and click OK. Note that the current value you see will vary based on the specific version of Windows you’re running.

    edit-binary-value

  5. Close Registry Editor and restart your computer (a logoff is not sufficient to make the registry changes take effect). This time, you’ll see that your new shortcut is created without the “-Shortcut” text appended to the end.
How to Auto Hide Windows 11 / 10 / 8 / 7 Taskbar with Ease

April 4th, 2017 by Admin

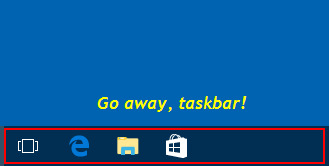
Windows Taskbar has an auto-hide feature that can hide the taskbar when not in use. When this feature is turned on, the taskbar disappears whenever you click elsewhere, or whenever your cursor moves away from it. To make the taskbar appear again, you have to move your cursor to the bottom of the screen or press Windows + T keyboard shortcut. In this tutorial we’ll show you how to automatically hide the taskbar in Windows 11, 10, 8 and 7.
hide-windows-taskbar

Part 1: Auto Hide Taskbar in Windows 11

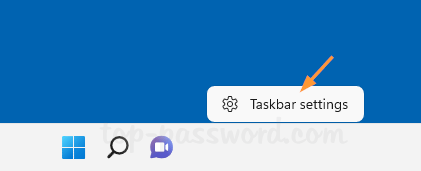
Right-click the empty space on the taskbar and select Taskbar settings.

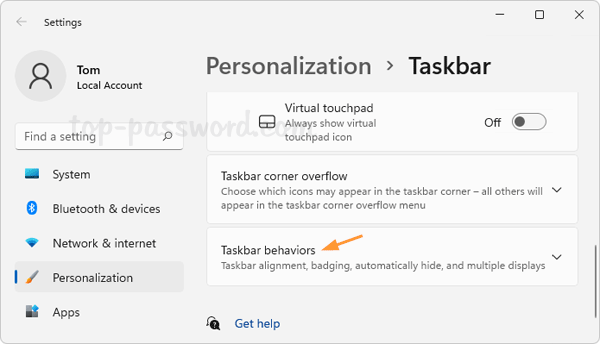
The Settings app will launch to the related page. Click Taskbar behaviors to expand the settings.

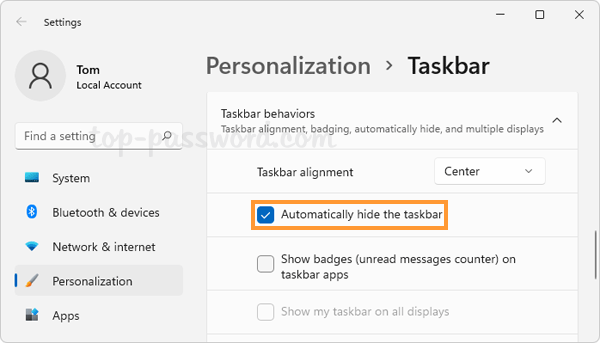
Check the “Automatically hide the taskbar” option.

Part 2: Auto Hide Taskbar in Windows 10

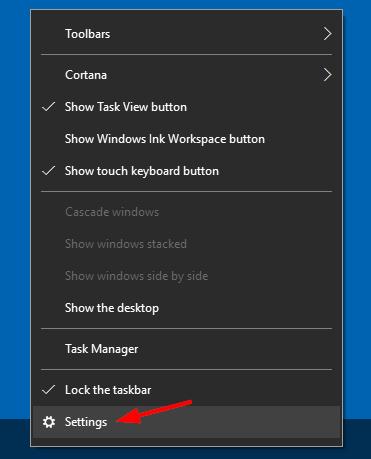
Right-click a blank spot on the taskbar, and then click Settings from the context menu.

open-settings-from-taskbar-menu

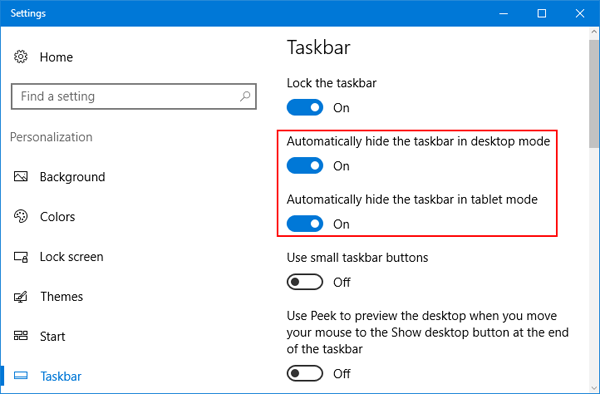
This will open the Taskbar panel in the Settings app. You’ll see two options: Automatically hide the taskbar in desktop mode, and Automatically hide the taskbar in tablet mode. Toggle one or both of these options.

hide-taskbar-in-desktop-tablet-mode

Part 3: Auto Hide Taskbar in Windows 8 and Windows 7

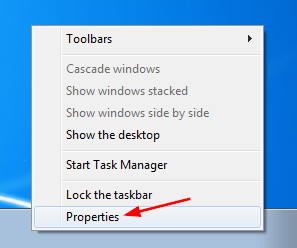
Right-click a blank spot on the taskbar, and then select Properties in the context menu.

taskbar-properties

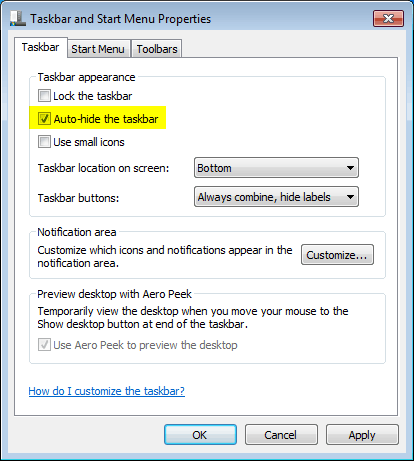
This will open the “Taskbar and Start Menu Properties” window. Under the Taskbar tab, check the “Auto-hide the taskbar” option and click Apply.

auto-hide-the-taskbar

That’s it!

How to Prevent Users from Changing Screen Saver in Windows 10 / 8 / 7

March 29th, 2017 by Admin

Is there a way to lock the screen saver settings so they cannot be changed by others? If you share your computer with other family members or friends, you might want to lock out your favorite screensaver so that nobody will be able to change it. In this tutorial we’ll show you 2 simple ways to prevent users from changing screen saver in Windows 10 / 8 / 7.

Note: Preventing users from changing screen saver doesn’t turn off or prevent the current screen saver from running. If you want to prevent screen saver changes for an individual user, just log on as that user and perform the following instructions.

Method 1: Prevent Users from Changing Screen Saver Using Group Policy

  1. Press the Windows key + R at the same time to open the Run command box. Type gpedit.msc and hit Enter.
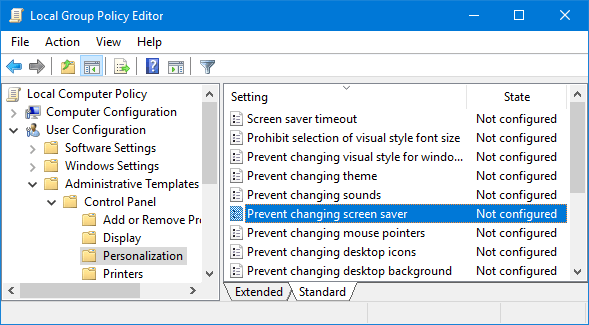
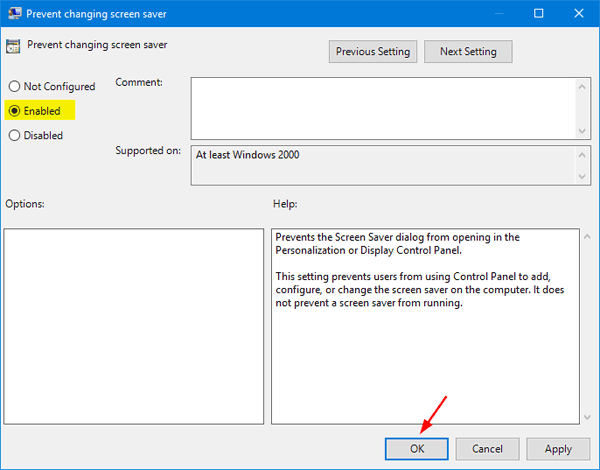
  2. This will open the Local Group Policy Editor. Navigate to: User Configuration > Administrative Templates > Control Panel > Personalization, and then double-click on the Prevent changing screen saver setting on the right pane.

    prevent-changing-screen-saver

  3. In the properties window that opens, choose the Enabled option and then click OK. This change will take effect immediately, so you don’t need to restart your computer.

    lock-screen-saver-settings

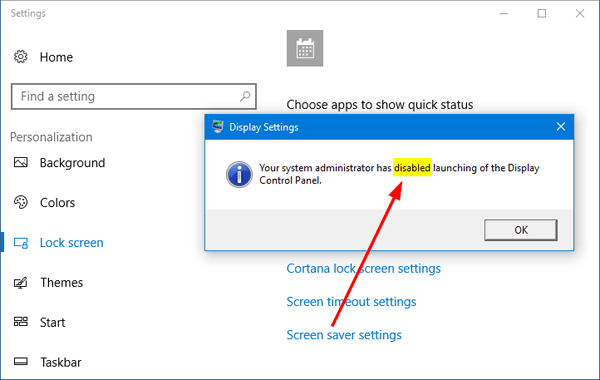
  4. Now, if you try to change the screen saver settings, you’ll see an error message that says “Your System Administrator has disabled launching of the the Display Settings Control Panel“.

    unable-change-screen-saver

Method 2: Prevent Users from Changing Screen Saver Using Registry Hack

If you have the Home edition of Windows 10/8/7, Local Group Policy Editor is not available and you have to use the following registry hack to prevent users from changing screen saver.

  1. Press the Windows key + R at the same time to open the Run command box. Type regedit and hit Enter.
  2. In the left pane of Registry Editor, navigate to the following key:
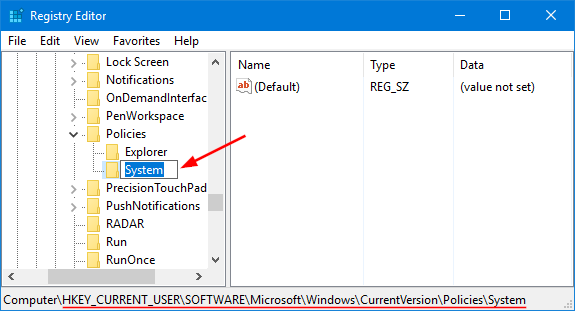
    HKEY_CURRENT_USER\Software\Microsoft\Windows\CurrentVersion\Policies\System

    If the System key doesn’t exist, you’ll need to create one. Right-click the Policies key and choose New -> Key. Name the new key System.

    create-system-key

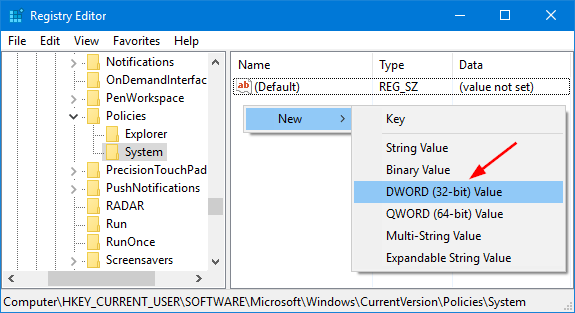
  3. Once the System key is selected in the left pane, right-click the empty space in the right pane and select New -> DWORD (32-bit) Value.

    new-dword-value

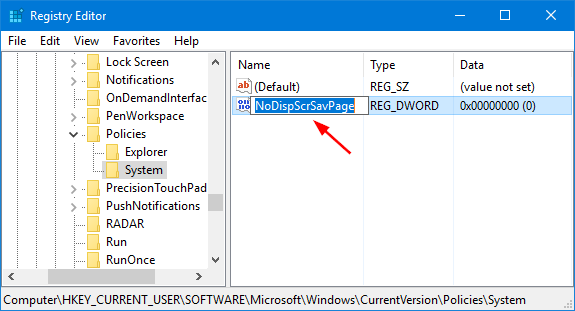
  4. Name the new value NoDispScrSavPage.

    NoDispScrSavPage

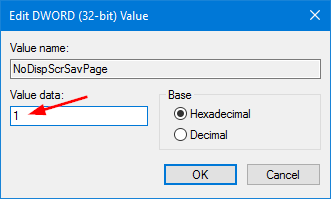
  5. Double-click on NoDispScrSavPage. In the properties window that opens, change the value from 0 to 1 in the “Value data” box and then click OK.

    edit-dword-value

  6. Close Registry Editor. The next time other users try to change the screen saver, the action will be denied by the system. To reverse the change later, just simply delete the NoDispScrSavPage value and you’re done.

How to See Currently Logged in Users in Windows 10 / 8 / 7

March 11th, 2017 by Admin

How can I get a list of users currently logged on? If you’re wondering how to find out how many users are currently logged into your Windows 10 computer, there are several ways to view who’s logged on. In this tutorial we’ll explain 2 methods to get a list of currently logged in users in Windows 10 / 8 / 7.

Method 1: See Currently Logged in Users Using Query Command

  1. Press the Windows logo key + R simultaneously to open the Run box. Type cmd and press Enter.
  2. When the Command Prompt window opens, type query user and press Enter. It will list all users that are currently logged on your computer.

    query-user

Method 2: See Currently Logged in Users Using Task Manager

  1. Right-click on the taskbar and select Task Manager to launch Task Manager. If you’re using Windows 10/8, you might need to click the More details button at the bottom to see active processes.
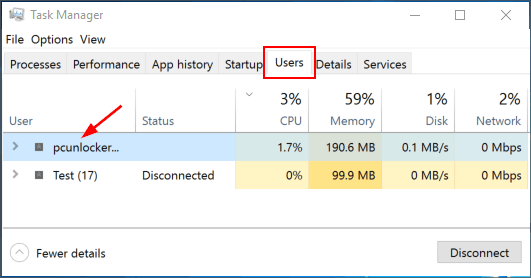
  2. Click the Users tab at the top of Task Manager, you can see a list of currently logged in users and their status.

    view-currently-logged-in-users

How to Hide or Remove Drive Letter in Windows 10 / 8 / 7

March 5th, 2017 by Admin

How to delete a drive letter for a device that is no longer connected? Look for a way to hide all drive letters in Windows Explorer? This tutorial shows you how to hide or remove drive letters in Windows 10, 8 and 7.

Part 1: Hide Drive Letters

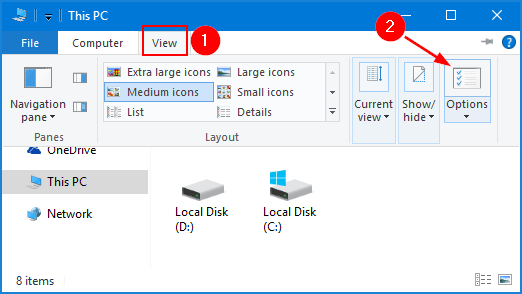
  1. Open File Explorer, click the View tab from the ribbon toolbar and then click Options.

    ribbon-toolbar

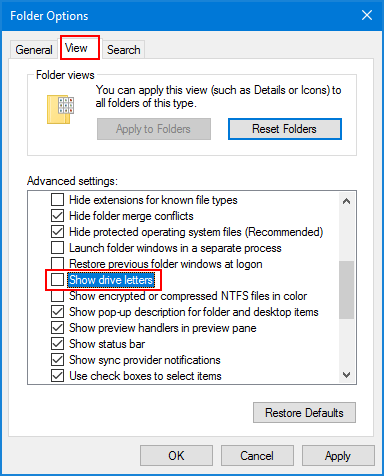
  2. In the Folder Options window, select the View tab. Under the Advanced settings, uncheck the “Show drive letters” option and click OK.

    show-drive-letters

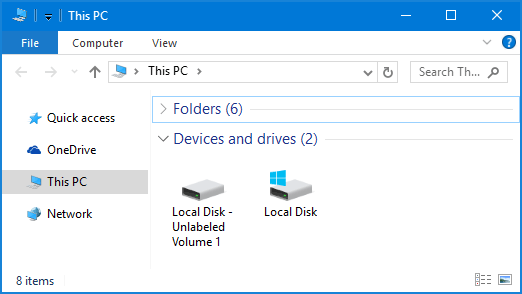
  3. You’ll find the drive letters of all your partitions are disappeared.

    drive-letters-missing

    If you want to restore the drive letters, just repeat the above steps and check the “Show drive letters” option.

Part 2: Remove Drive Letter for Windows Partition

This method allows you to remove / delete drive letter that was assigned to your partition. The partition will be invisible to all your Windows accounts and will continue to exist with its content intact.

  1. First, you need to open the Disk Management tool. In Windows 10/8, just press Windows key + X and select Disk Management. If you’re using Windows 7, right-click My Computer icon on your desktop and select Manage, you can then find Disk Management in the left pane.
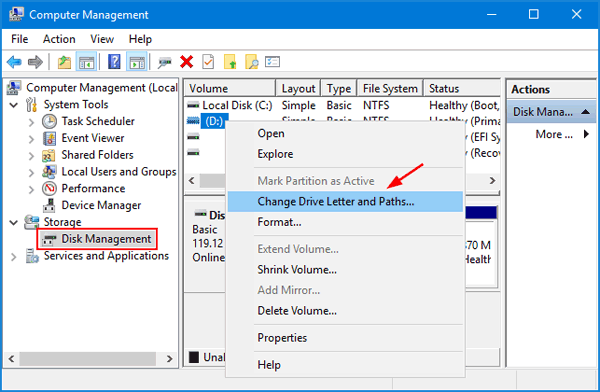
  2. Right-click the partition you want to remove drive letter, then select Change Drive Letter and Paths.

    change-drive-letters-and-paths

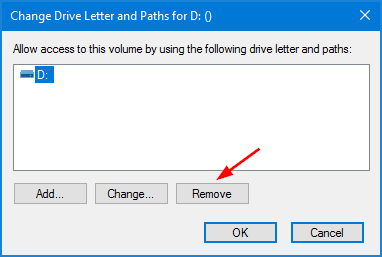
  3. In the resulting dialog box, click Remove.

    remove-drive-letter

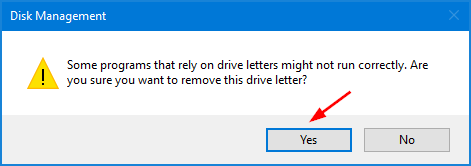
  4. You are asked to confirm the removal of the drive letter. Click Yes.

    confirm-drive-letter-removal

  5. The partition is now hidden and it is no longer accessible from the operating system you are currently using. If you assign a drive letter to that partition later, the partition will be visible again and all your files remain intact.

How to Change System Cooling Policy in Windows 10 / 8 / 7

February 17th, 2017 by Admin

System Cooling Policy allows you to specify the cooling mode you want to use for your Windows-based computer, for which you have two options: Active and Passive.

  • The Active setting increases fan speed before slowing the processor to main cooling. You’ll get the best performance by leaving the System Cooling Policy set to Active.
  • The Passive setting slows the processor before increasing fan speed. If the fan is always running and you would like to make it quieter, you can choose to opt for the passive mode.

In this tutorial we’ll show you how to change the system cooling policy in Windows 10, 8 and 7.

How to Change System Cooling Policy in Windows 10 / 8 / 7?

  1. Open the Control Panel in Large icons view. Click Power Options.

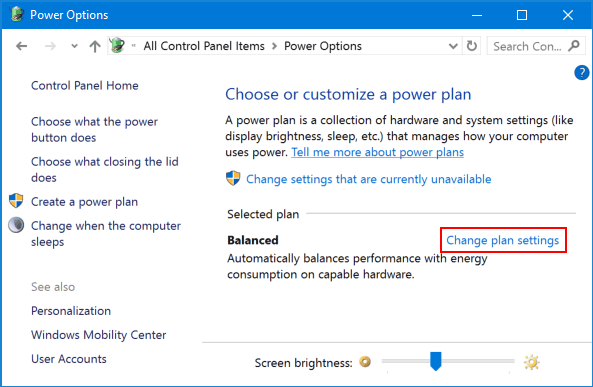
  2. In the right pane, for the power plan that you have selected to use, click Change plan settings.

    change-power-plan-settings

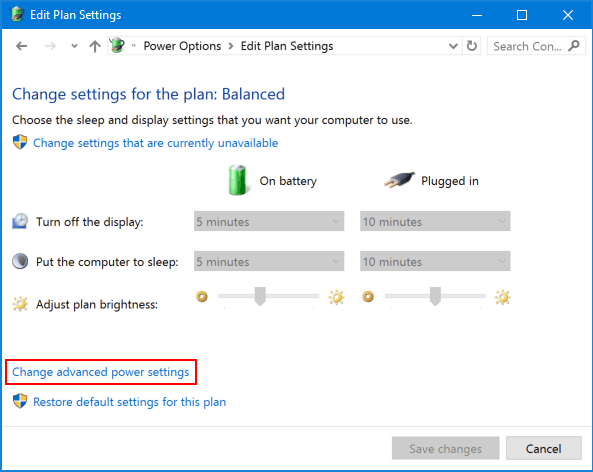
  3. Click Change advanced power settings.

    advanced-power-settings

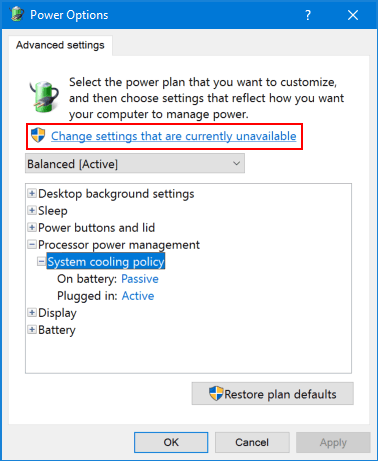
  4. Click the link labeled Change settings that are currently unavailable.

    change-power-settings-unavailable

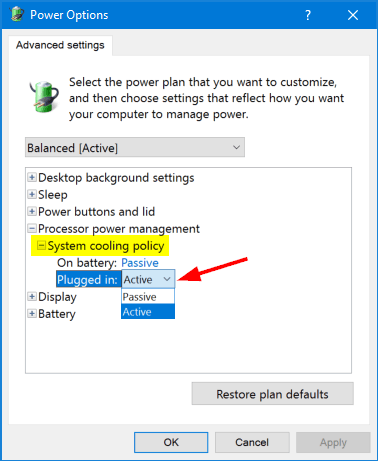
  5. In the Power Options dialog box, expand Processor power management and you’ll see the System cooling policy setting. Set the System cooling policy to Active or Passive, then click OK.

    system-cooling-policy

If the System Cooling Policy setting is not showing in the Power Options dialog box, you can restore it using a registry hack: Fix: System Cooling Policy Missing in Power Options.

Fix: System Cooling Policy Missing in Power Options

February 17th, 2017 by Admin

System Cooling Policy is missing in Windows? System Cooling Policy lets you change the cooling mode of your system. If you couldn’t see the System Cooling Policy option under the Power Options of Control Panel, you need to tweak the registry settings. In this article we’ll show you how to restore the missing System Cooling Policy option in Windows 10, 8 and 7.

Fix: System Cooling Policy Missing in Power Options

  1. Open Notepad. Copy and paste the code below into Notepad, then save it as a .reg file.

    Windows Registry Editor Version 5.00
    [HKEY_LOCAL_MACHINE\SYSTEM\CurrentControlSet\Control\Power\PowerSettings\54533251-82be-4824-96c1-47b60b740d00\94D3A615-A899-4AC5-AE2B-E4D8F634367F]
    "Attributes"=dword:00000002

  2. Double-click on the .reg file to import the settings into the registry. Click Yes when asked to confirm.

    import-reg-file

  3. Open the Control Panel and access the Power Options, you’ll see that the System Cooling Policy is shown under the.Processor power management node.

    system-cooling-policy

If you want to remove the System Cooling Policy option again, repeat the steps above to import the following registry settings.

Windows Registry Editor Version 5.00
[HKEY_LOCAL_MACHINE\SYSTEM\CurrentControlSet\Control\Power\PowerSettings\54533251-82be-4824-96c1-47b60b740d00\94D3A615-A899-4AC5-AE2B-E4D8F634367F]
"Attributes"=dword:00000001

That’s it!