Archive for the ‘Windows 7’ category

2 Options to Remove the Lock Option from Windows Start Menu

February 1st, 2016 by Admin

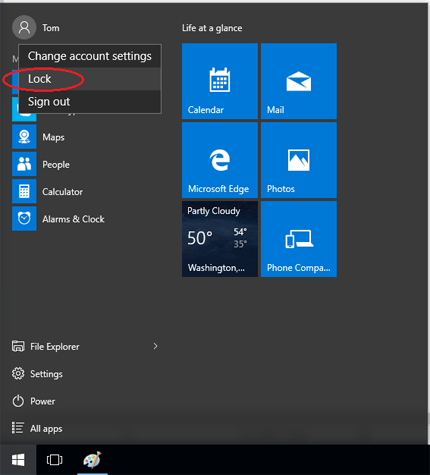
No matter what version of Windows you are running, you can find the lock option in the Start Menu (or Start Screen) that allows you to lock your computer. In this tutorial we’ll show you 2 ways to disable / remove the lock option from Windows 11, 10, 8 and 7 Start menu.

account-lock-option

Method 1: Remove the Lock Option with Group Policy

Follow this method and you can remove the lock option from the user tile menu on the Start menu (or Start screen) in Windows 11, 10, 8.1 or 8.

  1. Press the Windows key + R to open the Run box. Type gpedit.msc and press Enter.
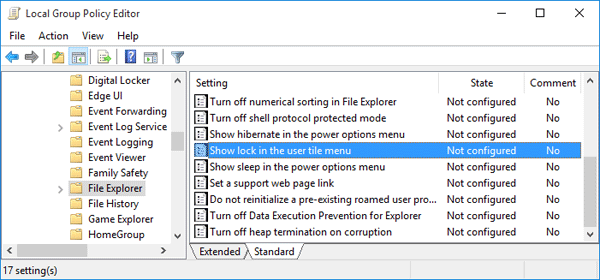
  2. When the Local Group Policy Editor opens, expand the tree to the following path:
    Local Computer Policy\Computer Configuration\Administrative Templates\Windows Components\File Explorer
  3. In the right-hand pane you should now see a variety of settings. Double-click on the “Show lock in the user tile menu” setting and its properties screen will open.

    show-lock-in-user-menu

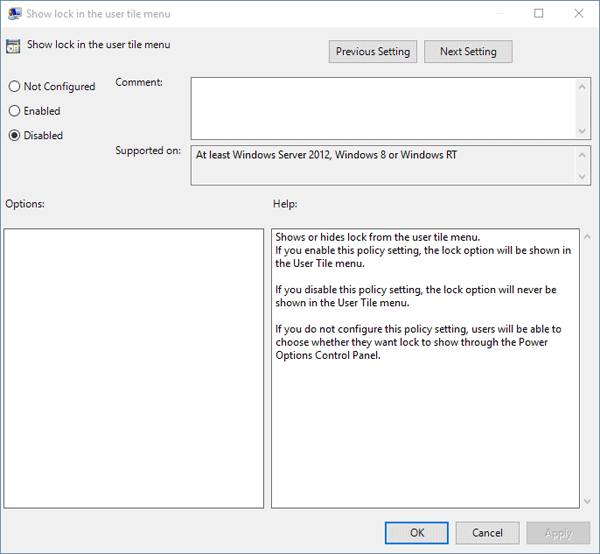
  4. Set it to Disabled and click OK.

    disable-lock-in-user-menu

    Now close the Local Group Policy Editor window. You’ll see the lock option is disabled or removed from the Start menu.

Method 2: Remove the Lock Option with Registry Hack

If the Group Policy Editor is not available in your computer or you’re running Windows 7, then use this registry hack to disable the lock option from your Windows Start menu.

  1. Press the Windows key + R to open the Run box. Type regedit and press Enter.
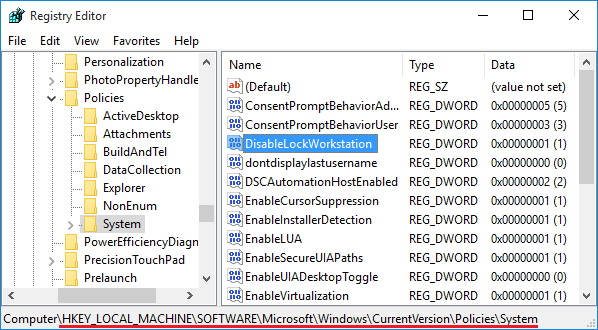
  2. When the Registry Editor opens, browse down to the following key:
    HKEY_LOCAL_MACHINE\SOFTWARE\Microsoft\Windows\CurrentVersion\Policies\System
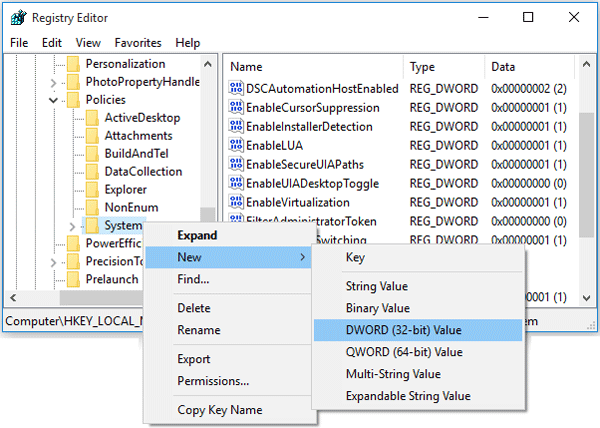
  3. Right-click on the System key on the left pane and select New -> DWORD (32 bit) Value.

    new-dword-value

  4. Name it DisableLockWorkstation and set the value to 1 in order to disable the lock option in the Start menu.

    disable-lock-workstation

    If you want to show / enable the lock option later on, just change the value to 0.

  5. Close the Registry Editor and you will see the lock option turns gray or disappeared from the Start menu.

Hide / Clear Most Used Programs in Windows 10, 8 and 7 Start Menu

February 1st, 2016 by Admin

My frequently used programs are missing from the Start menu. Can this be corrected and if so how? Thanks in advance.

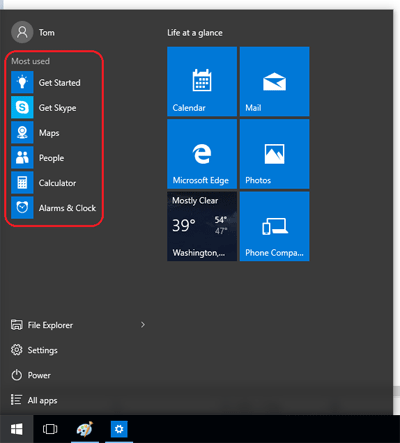
By default, Windows keeps track of programs you use frequently and puts them on the Start menu (or Start screen) for convenience. For privacy purposes, some of you may want to clear the most used programs from the list. In this tutorial we’ll show you how to hide / clear the most frequently / recently used programs in Windows 10, 8 and 7.

most-used-apps

The first part is for Windows 10 users and the second is for Windows 8 / 8.1 users, so you will have to scroll down if you use Windows 7 – the last part is for this operating system.

Part 1: Clear Most Used Programs from Windows 10 Start Menu

  1. Press the Windows key + I to bring up the Settings app. If you’re using a tablet without a keyboard, click the Start button and then select Settings.
  2. Click on Personalization.

    settings

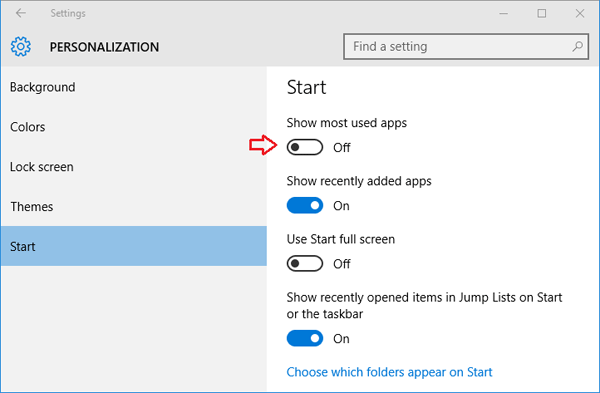
  3. At the Personalization window, click on the Start tab on the left-hand side. On the right pane, you’ll see a few options for configuring what is shown on the Start Menu and how the Start Menu is displayed.
  4. From there, set toggle button under “Show most used apps” to Off in order to make Start menu hide the apps you use often.

    hide-show-most-used-apps

Part 2: Clear Most Used Programs from Windows 8 Start Screen

  1. Right-click on an empty space on the Taskbar and select Properties.
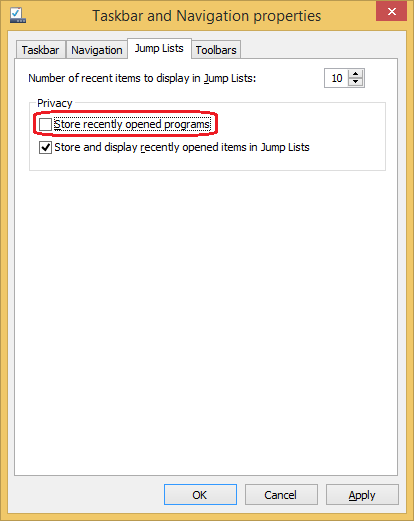
  2. Click on the Jump Lists tab, uncheck the “Store recently opened programs” box.

    jump-lists

  3. Click Apply and then click OK.

Part 3: Clear Most Used Programs from Windows 7 Start Menu

  1. Right-click on an empty space on the Taskbar and select Properties.
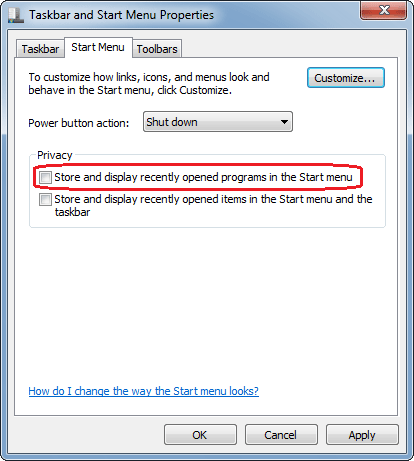
  2. Click on the Start Menu tab, uncheck the “Store and display recently opened programs in the Start menu” box.

    hide-recently-opened-apps

    If you also want to hide your recently opened documents/files from the Start menu, uncheck the “Store and display recently opened items in the Start menu and the taskbar” box as well.

  3. Click Apply and then click OK.

Enable / Disable Fast User Switching in Windows 11, 10, 8, 7 and Vista

January 28th, 2016 by Admin

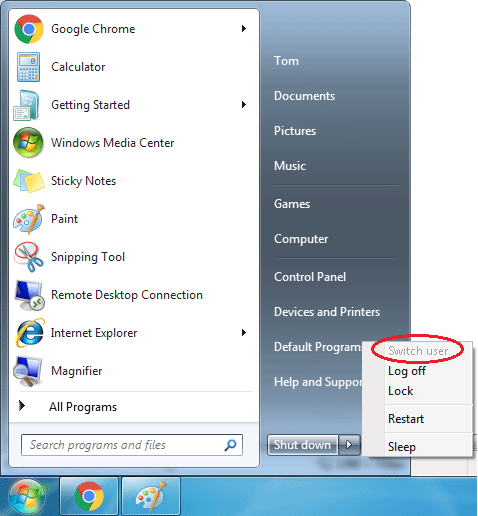
Fast user switching is disabled or missing on your Windows 10 system? Unable to switch to a different account as the “Switch user” option is greyed out?

win7-switch-user

In this tutorial we’ll show you 2 ways to enable or disable Fast User Switching in Windows 11, 10, 8, 7 and Vista.

Method 1: Using Local Group Policy Editor

  1. Press the Windows key + R to open the Run dialog box. Type gpedit.msc and press Enter.
  2. The Local Group Policy Editor console should open. In the left pane, expand the following nodes:
    Local Computer Policy\Computer Configuration\Administrative Templates\System\Logon
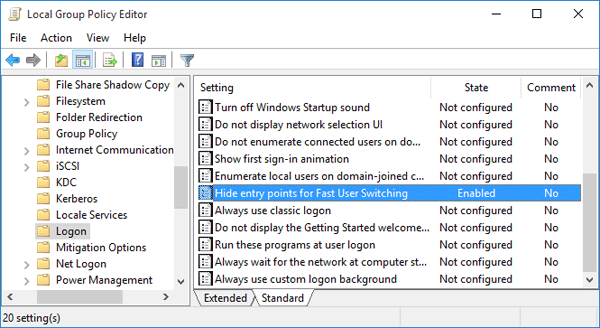
  3. In right-side pane, double-click on the “Hide entry points for Fast User Switching” policy and its properties screen will open.

    hide-fast-user-switch

  4. If you want to turn off / disable the Fast User Switching feature, set it to Enabled. Or click Disabled or “Not configured” to re-enable Fast User Switching.

By disabling the Fast User Switching feature, the “Switch user” option will be greyed out or removed from Windows logon screen,Start menu and the Task Manager.

Method 2: Using Registry Trick

Since Group Policy Editor doesn’t come with the Home and Starter editions of Windows, here is another method to enable / disable Fast User Switching using Registry Editor:

  1. Press the Windows key + R to open the Run dialog box. Type regedit and press Enter.
  2. In the Registry Editor window, navigate to the following key:
    HKEY_LOCAL_MACHINE\SOFTWARE\Microsoft\Windows\CurrentVersion\Policies\System
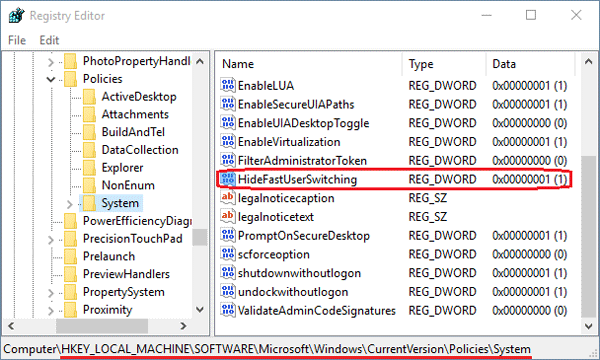
  3. In the right-side pane, search for the value named HideFastUserSwitching. If it doesn’t exist, you can create one by right-clicking in the empty space on the right pane and choose New –> DWORD (32-bit) Value.

    hide-fast-user-switching

  4. Set the Value data for HideFastUserSwitching to 1 if you want to disable the Fast User Switching feature. To re-enable it, change that value to 0.
  5. Close the Registry Editor. You will have to log off and then log back on for the changes to take effect.
How to Know Your Windows is 32-bit or 64-bit

January 23rd, 2016 by Admin

All versions of Windows are available in two different flavors: 32-bit and 64-bit. For most people, whether they use a 32-bit or 64-bit version of Windows doesn’t make a difference. But it’s necessary to find out your running Windows is 32-bit or 64-bit when performing certain tasks, such as install drivers for your new device. Here are 3 simple ways to know your Windows is 32-bit or 64-bit.
Method 1: Right-click on My Computer

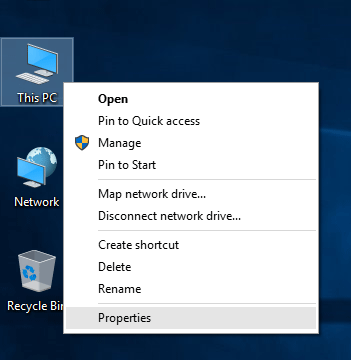
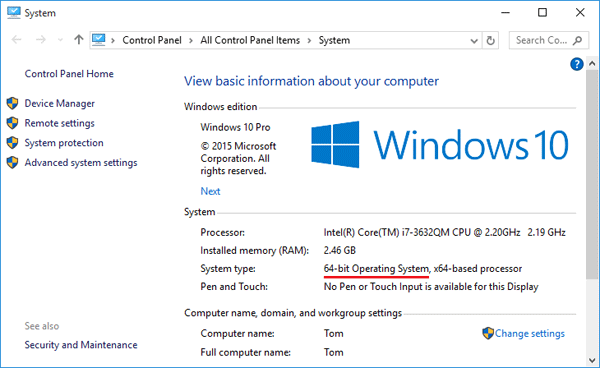
Simply right-click on “My Computer” (or “This PC” if you’re running Windows 10) icon on your desktop, and then select Properties from the drop-down context menu.

my-computer-properties

The System Control Panel will now open. In this screen you will see various information about your computer and Windows. The System type field indicates whether your computer are running a 32-bit or 64-bit version of Windows.

system-info

Method 2: Use the MSINFO32 Command

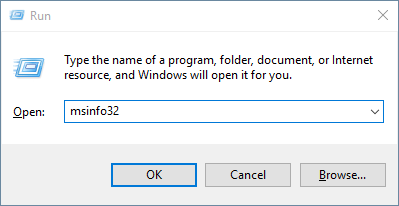
Press the Windows key + R on your keyboard to open the Run dialog. Type msinfo32 and hit Enter.

msinfo32

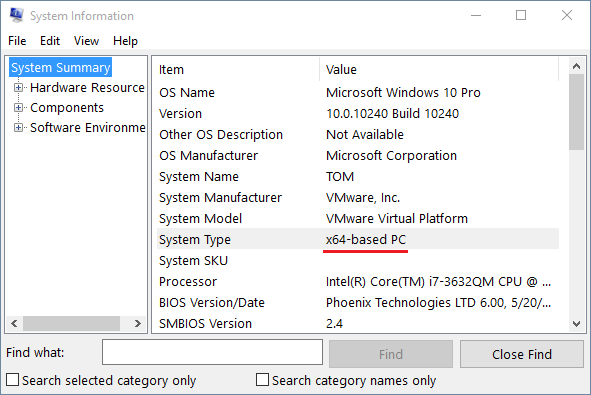
This opens the System Information window which shows details of almost everything in the system. Click the System Summary node on the left, then locate the System Type entry. If it’s x64-based PC, you’re running 64-bit Windows. If it’s x86-based PC, your Windows is 32-bit.

system-information

Method 3: Check the Program Files (x86) Folder

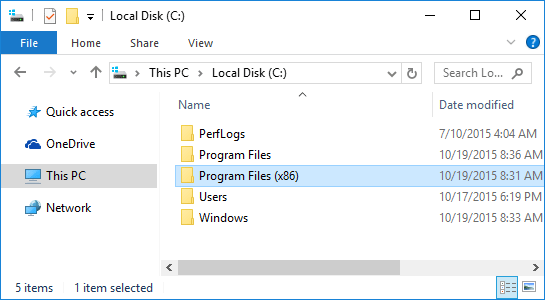
For purposes of backward compatibility, 64-bit version of Windows needs to run both 64-bit and 32-bit programs. 32-bit application are installed in the “Program Files (x86)” folder but native 64-bit application run in the normal “Program Files” folder.

program-files-x86

So if you can see the “Program Files (x86)” folder under the root path of your system partition, your Windows is 64-bit. Otherwise it’s 32-bit OS.

Windows 10 Downgrade: Revert Back to Previous Windows 8 or 7

January 20th, 2016 by Admin

Microsoft offers Windows 10 as a free upgrade for Windows 8 and Windows 7 users. You only have one month to decide if you want to keep Windows 10 or not after upgrading from Windows 8 or 7. If you find out some things don’t work properly or the new OS is not suitable for your taste, you can downgrade or revert back to your previous Windows 8 or 7 system.

How to Revert Windows 10 Back to Previous Operating System?

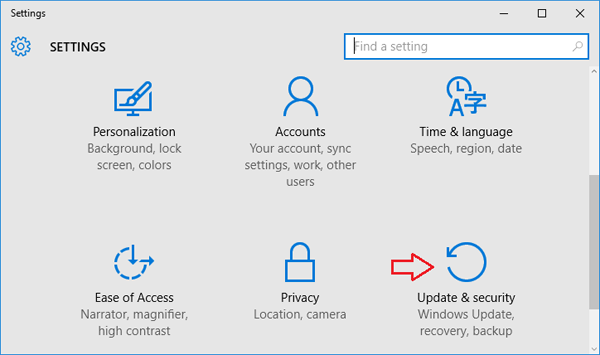
  1. Press the Windows key + I to launch PC Settings app. You can also open it by clicking the Start button at the bottom left of the screen and then select Settings.
  2. Click Update & security.

    pc-settings

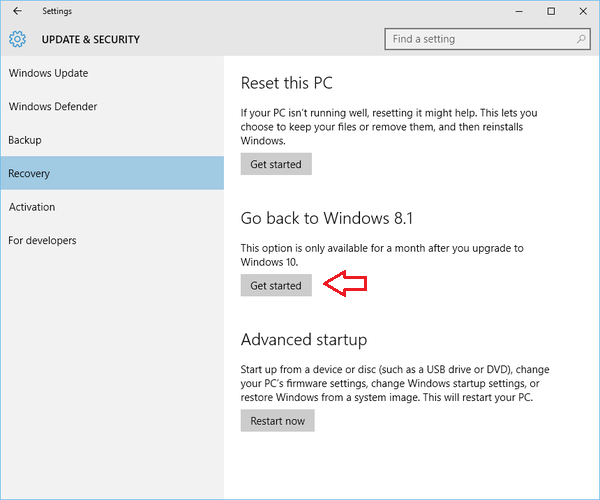
  3. Select the Recovery tab from the left side. If you’re eligible to downgrade you should see an option that says Go back to Windows 8.1 or Go back to Windows 7. If you see it, click Get started to go through the downgrade process.

    windows-10-downgrade

  4. The whole process should not take longer than 10 minutes or so, and your system will be just as it was before Windows 10.

If you don’t see this downgrade option, that’s possible because it’s been too long since you upgraded to Windows 10. Windows 10 will automatically remove these installation files after 30 days.

How to Restore Local Security Policy to Default in Windows 10, 8, 7, Vista and XP

December 14th, 2015 by Admin

Did you mess with the local security policy? Or a certain program changed the security policy that caused some strange issues? Luckily there is a simple way to reset / restore your local security policy settings to default in Windows 10, 8, 7, Vista and XP, if you mess up.

How to Restore Local Security Policy to Default in Windows 10, 8, 7, Vista and XP?

This method uses the default security configuration templates to reset the local policies (including account lockout and password complexity requirements policy). Here’s how to reset local security policy settings to their default values:

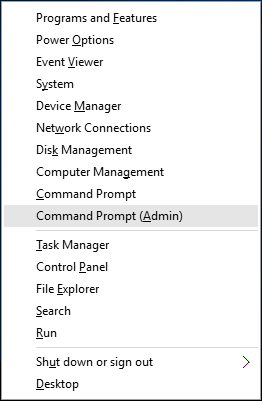
  1. Open an elevated Command Prompt. In Windows 10 and 8, press the Windows + X key combinations to open the Quick Access menu and choose Command Prompt (Admin). In Windows 7 or Vista, click the Start menu, then select All Programs -> Accessories, right-click on Command Prompt and select “Run as administrator”.
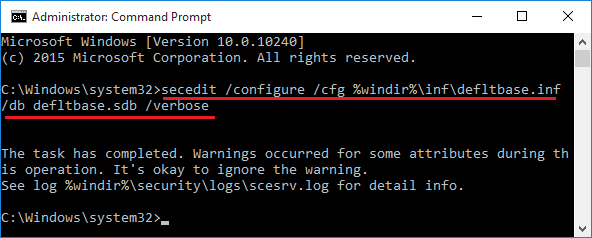
  2. Now copy and paste the following command into the Command Prompt. Hit Enter.
    secedit /configure /cfg %windir%\inf\defltbase.inf /db defltbase.sdb /verbose

    If you are running Windows XP and need to reset the security settings to their default values, use this command instead:
    secedit /configure /cfg %windir%\repair\secsetup.inf /db secsetup.sdb /verbose

    reset-local-security-policy

  3. This will take a few minutes to reset all the policies back to the Windows defaults. you’ll have to restart the computer to see the changes.