Archive for the ‘Windows 7’ category

Forgot System Restore / Startup Repair Password in Windows 7

July 30th, 2014 by Admin

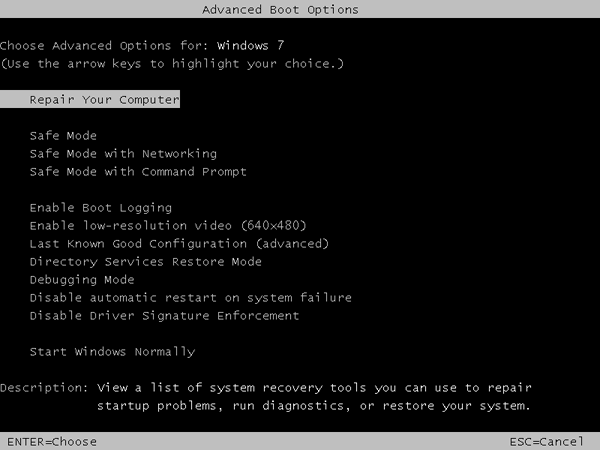
Need to repair or restore Windows 7 to a previous state but you can’t login with System Recovery Options? The System Recovery Options menu is a collection of repair and diagnostic tools for Windows like Startup Repair, System Restore, and more. It can be accessed by pressing and holding the F8 key when starting a computer. Once the Advanced Boot Options screen appears, highlight “Repair your computer” and press Enter.

advanced-boot-options

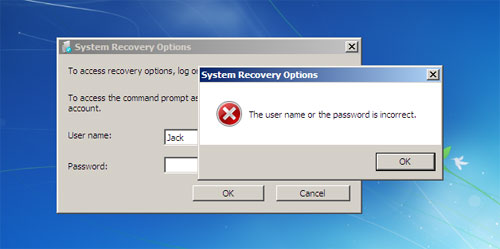
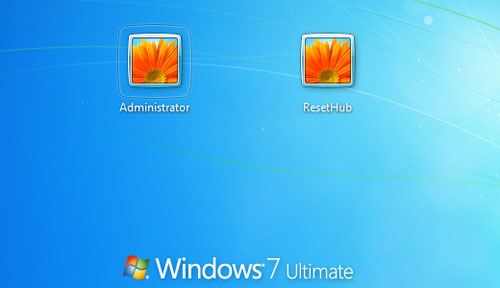
After a while, the System Recovery Options window will show up which prompts you to select the keyboard input method that you prefer, and subsequently asks you to log on as a local administrator account before running the Startup Repair or System Restore tool. But you’ll be stuck at the logon screen if you couldn’t remember the administrator password.

system-recovery-password

Just take it easy! Simply boot your computer from PCUnlocker Live CD and it enables you to remove forgotten Startup Repair password quickly. The PCUnlocker utility exists as a bootable ISO image, which needs to be burned to a blank CD or placed on a bootable USB drive. It could be used to reset lost administrator password on Windows 8, 7, Vista and XP.

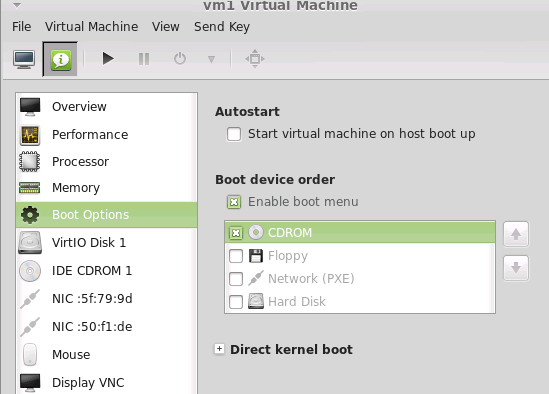
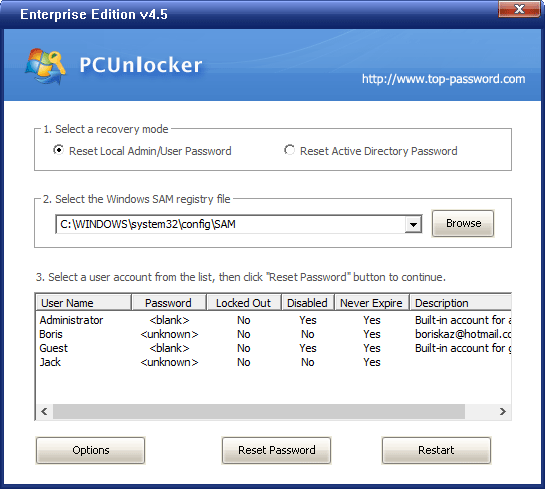
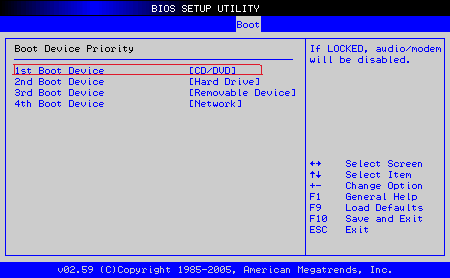
Once you’ve created a PCUnlocker Live CD, put it in the CD drive of the Windows 7 computer that you’re trying to reset the password for. Power on the computer and make the CD-ROM to boot first in the BIOS. If all goes well, you should be booting into a mini Windows Preinstallation Environment (PE). PCUnlocker is launched automatically after the system has booted, and it searches your Windows installation and displays a list of local accounts stored in your SAM database.

Choose your administrator account and click on “Reset Password” button. The program will remove your forgotten password and tweak the account’s properties so you can later login without a password. Take out the Live CD and reboot your computer. Repeatedly press F8 key to access the Advanced Boot Options screen again, and you can then log on with a blank password and continue to perform a Startup Repair or System Restore. Done!

How to Reset Sony Vaio Windows 7 Password with USB Drive

July 5th, 2014 by Admin

Can’t get past the login screen because you’ve forgotten Windows 7 administrator password? You just need to get back into your Sony Vaio laptop so you can get on with your day? Well, this problem can be solved with a bootable utility called PCUnlocker. Rather than cracking a Windows password, PCUnlocker bypasses it and lets you log into the computer without typing a password.

PCUnlocker can run from either a bootable CD or a USB drive. In this tutorial we’ll show you how to reset Sony Vaio Windows 7 password with a USB drive.

How to Reset Sony Vaio Windows 7 Password with USB Drive?

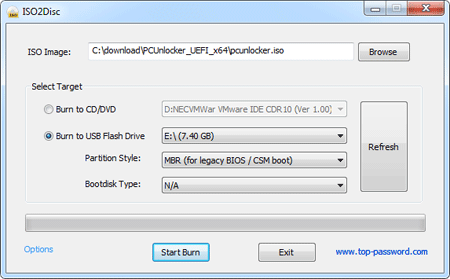
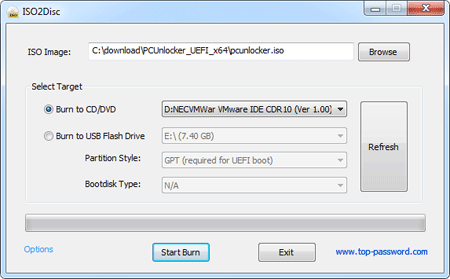
First of all, use a spare computer to download the ISO image of PCUnlocker. Burn the ISO to your USB drive with ISO2Disc, a tool for creating bootable USB drives.

When the bootable USB drive is ready, close the ISO2Disc program and unplug the USB drive. Later insert the USB drive into your affected Sony Vaio laptop.

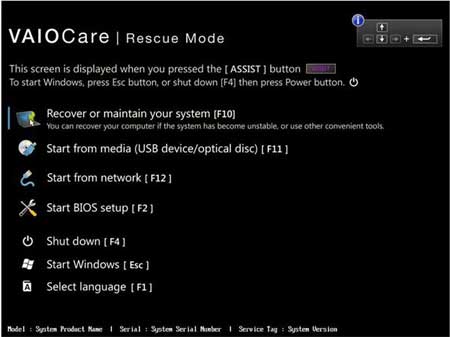
Now you need to change the boot order in your computer’s BIOS. While turning on the machine, press and hold the F2 or F3 key to enter into BIOS Setup. If your model has the physical Assist button, press the Assist button while your computer is turned off. This will bring up the VAIOCare Rescue Mode menu and you can then press F2 to start BIOS Setup.

In the BIOS Setup, go to the Boot tab, make sure that External Device Boot is Enabled under Boot Configuration, and then change boot priority to boot from USB first. Save your changes and exit BIOS. The laptop will automatically boot from your created USB drive.

After the WinPE operating system is loaded into memory, the computer will start the PCUnlocker utility. It displays a list of Windows local accounts existing in your Windows 7 installation.

Choose an account and click on Reset Password button. The application will unlock / reset your forgotten Windows 7 user password immediately. Restart your computer and disconnect the USB drive, you can then boot into Windows 7 without being required to enter a password!

How to Prevent A Program from Ever Running in Windows

June 13th, 2014 by Admin

If you have kids you may don’t want them to run certain applications like Skype or BitTorrent on your computer. Today we take a look at a setting in Local Group Policy that allows you to prevent specified programs from ever running in Windows. This is also useful if you don’t want other people to open applications on your work computer.

How to Prevent A Program from Ever Running in Windows?

  1. The first thing you must do is open the Local Group Policy Editor. You won’t find a menu entry for this tool. Instead you start the tool by pressing Windows + R to bring up the Run box and then entering the command gpedit.msc.

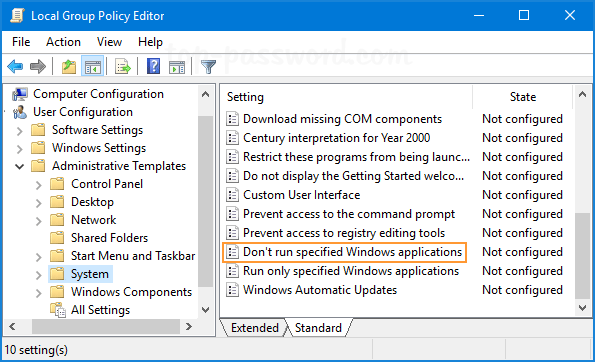
  2. Navigate to User Configuration -> Administrative Templates -> System in the left panel, and double click on Don’t run specified Windows applications.

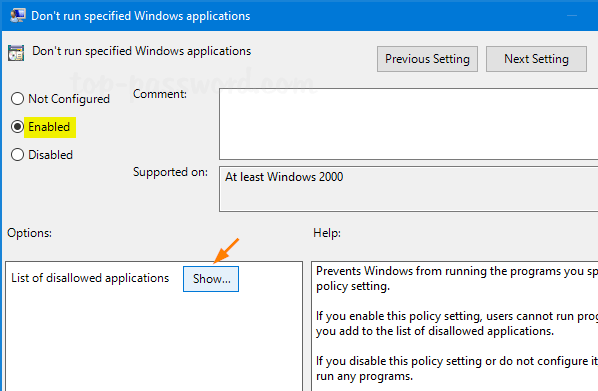
  3. In the pop up window, first set it to Enabled, then under the Options section click on the Show button next to List of disallowed applications.

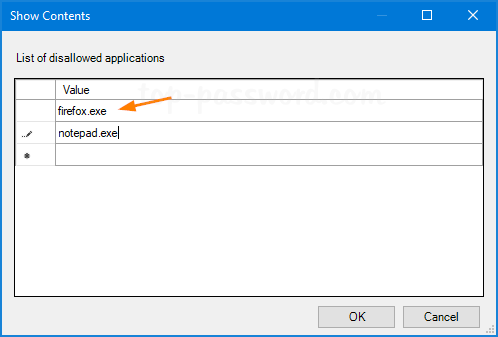
  4. A Show Contents dialog comes up where you can type in the apps you want to block users from running. In the Value column, type the application executable name (don’t use the full path), e.g. firefox.exe, notepad.exe.

  5. The change takes effect immediate right after you click OK or Apply. From this point on, if a user tries to access an application that is not on the specified list they will get the following warning message.

This is a nice feature for preventing unwanted programs from running in Windows. However, Local Group Policy Editor is not available in Home versions of Windows 7/8/10. This trick only prevents users from accessing applications that are started by Windows Explorer process, but you can still run the disallowed programs in the Command Prompt. If you need a reliable and more secure solution, I would recommend you to use the professional privacy protection program – Protect My Folders.

Offline Change Windows Password with Trinity Rescue Kit

April 10th, 2014 by Admin

How to change Windows password after you’ve forgotten your password? You can easily change the password of any user account from the Control Panel with admin privileges. However, if you’re locked out of your computer, you need to use a boot CD to change the account password offline.

Trinity Rescue Kit (TRK) is a free live Linux CD that aims specifically at recovery and repair operations on Windows machines. It has integrated the chntpw tool which allows you to edit / change a Windows user password offline. In this tutorial we’ll show you how to change Windows password offline with Trinity Rescue Kit.

Note: TRK is a command-line utility which doesn’t come with a GUI interface. If you’re not a Linux geek, I would recommend you to use the PCUnlocker Live CD which is a Windows PE bootdisk with graphical interface.

Offline Change Windows Password with Trinity Rescue Kit

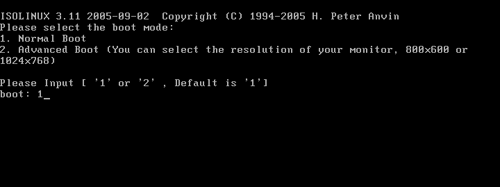
  1. Download the ISO image of Trinity Rescue Kit and burn it to your CD. After you have burned a disc, place it in the CD/DVD drive of your locked computer and get the machine to boot from Trinity Rescue CD.
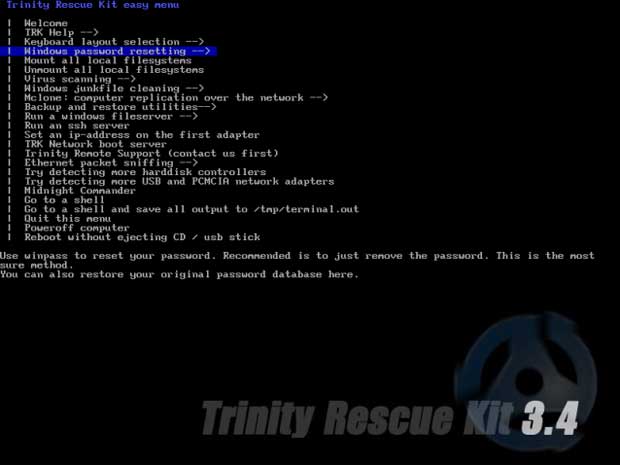
  2. When TRK loads you get a list of tasks TRK can perform. Navigate down to the 4th option (Windows Password Resetting) using the arrow keys and press Enter once it is highlighted.

    Windows-Password-Resetting

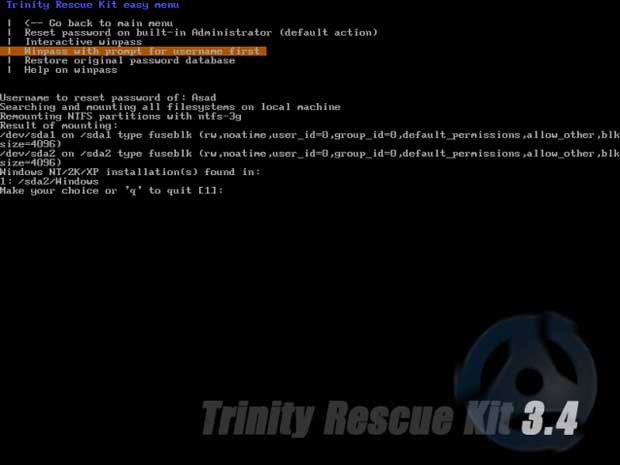
  3. Once you select that option, you get a list of ways you can select to reset your lost password. Here we select the Winpass prompts for username first option (Winpass is actually just an automated script for the chntpw tool). TRK will ask you the username whose password you want to reset.

    Winpass-prompts-for-username

  4. At this point, TRK will search your hard drive for all currently Windows installations and list them. You’ll need to select the relevant installation here. If you have only one OS installed, then merely press 1 and hit Enter.
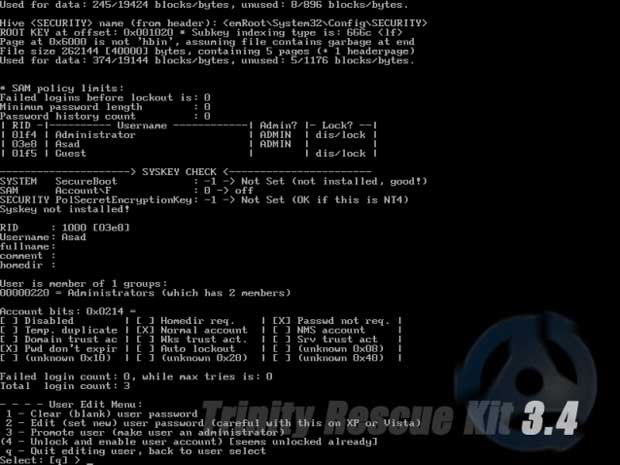
  5. Now, at the final stage, you will get yet another list of options. Here, choose the “Edit (set new) user password” option. Press 2 to change your Windows password offline.

    chntpw-change-windows-password

  6. Now reject the TRK CD and restart the computer. You can log on to Windows with your new password!

Forgot Windows 7 Password on Mac without A Reset Disk

March 19th, 2014 by Admin

Lost or forgot Windows 7 password on your Mac and don’t have a reset disk? There are many Windows password recovery tools (such as Ophcrack, Offline NT Password & Register Editor) that could be used to crack Windows 7 password on a PC, but the major issue is that they are incompatible with Mac EFI Firmware.

mac-boot-into-windows

PCUnlocker is a recovery boot CD which can be used to remove Windows 8, 7, Vista and XP passwords on any PC and Mac. In this tutorial we’ll show you how to reset lost Windows 7 password on Mac using the PCUnlocker program.

How to Reset Windows 7 Password on Mac?

Step 1: Download the PCUnlocker program on your current computer. The downloaded file is a zip file. Decompress it and you’ll see an ISO image file named pcunlocker.iso, which contains a WinPE boot image along with the PCUnlocker application.

Step 2: Now you have to burn the ISO image to a blank CD. In Apple Mac, just open the Disk Utility (navigate to Finder > Applications > Utilities) and click on the Burn button, it allows you to burn ISO file. If your current computer is Windows machine, you can use the freeware ISO2Disc to make a bootable CD (or USB drive) from the ISO image.

Step 3: The next step is to boot your Mac from the CD you’ve burned. Just shut down your Mac, then turn it back on. When you hear the Mac startup Chime, press and hold the Option/Alt key. You’ll be shown all the bootable drives on your Mac, including the CD drive. Use the arrow key to choose the CD-ROM and press the Enter key.

Step 4: Your Mac will load the Windows PE OS from the CD. Once the PCUnlocker launches, you could see a list of local accounts that are found in your Windows 7 SAM registry file. Just choose your desired account and click on Reset Password button. The program will reset your forgotten Windows 7 user password instantly.

Step 5: Click on Restart button and remove the CD. Now you can boot your Mac into Windows 7 successfully without being asking for a password! Enjoy it!

How to Recover Windows Password with Cain & Abel

February 13th, 2014 by Admin

There are chances that you might get locked out of your computer because of forgotten the administrator password. So you then need to find some programs to crack / recover your password. As far as password recovery utilities go, Cain & Abel is by far one of the best freeware out there. This tutorial will walk through recovering Windows 7/Vista/XP password with Cain & Abel.

How to Recover Windows Password with Cain & Abel?

Forgot your administrator password and can’t log in? Cain & Abel needs to be installed, so you must have another working computer to recover your password. First of all, remove the hard drive from your locked machine and then attach it to a working computer as a secondary drive. Then follow these steps to recover Windows password:

  1. Visit the Cain & Abel website and download the Windows NT/2000/XP version of the program. Install the program on your computer. During installation, you’ll also be prompted to install WinPcap, which is fine.
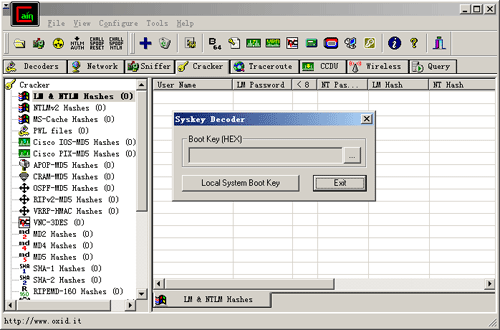
  2. Click on the “Tools” menu and select “Syskey Decoder”. On the Syskey Decoder dialog, click on the “…” button to locate the SYSTEM file of your locked Windows installation. By default, the SYSTEM file is located in C:\Windows\System32\Config. The program will immediately display the decoded boot key which is required for cracking your Windows password.

    decode-syskey

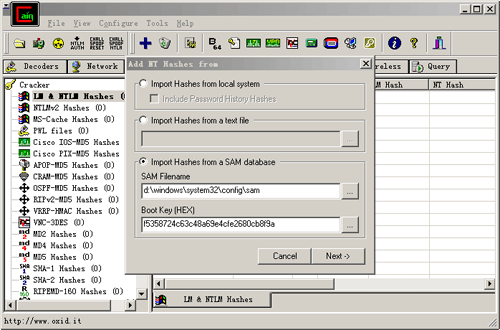
  3. Click on the “Cracker” tab. On the left, click on the “LM & NTLM Hashes” and then click the big blue plus sign on the Cain toolbar. Make sure the “Import Hashes from a SAM database” button is checked. Choose the SAM file of your locked Windows installation and enter the boot key that you’ve got in the step above.

    import-hashes-from-sam

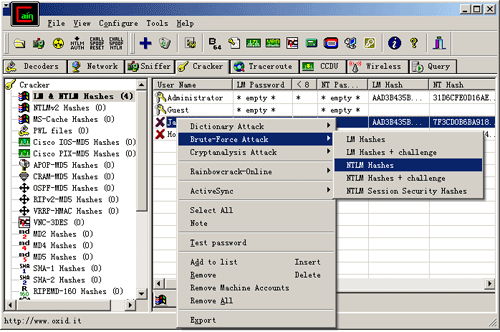
  4. Click Next. All the user accounts will be loaded to the right. Right-click on the user account you need the password for, choose Brute-Force Attack -> NTLM Hashes.
    Cain-Abel-NTLM

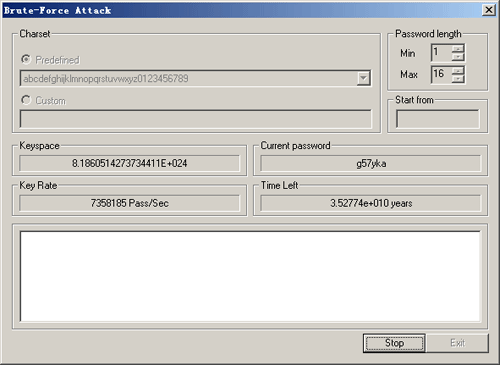
  5. Now check predefined under charset and select the suitable dictionary to use and click start.

    brute-force-attack

    That’s it! Just wait for Cain & Abel to recover the password!

If you have no way of getting the SAM and SYSTEM files from your Windows PC, you will not be able to use Cain & Abel to recover your password. If you have no luck with Cain & Abel, I recommend you to use PCUnlocker Live CD which can remove your forgotten Windows password instantly.

PC Unlocker – Unlock Forgotten Computer Password Easily

January 10th, 2014 by Admin

How to unlock your computer password when you forgot it? The PC is locked and you can not log into Windows. Hence you can not install any software to unlock it. As you already know you can just re-install Windows, but it involves in installing almost any software again from scratch and it may also cause data loss.

Luckily, there is a powerful PC unlocker software that will allow you to reset forgotten Windows 8/7/Vista//XP password. It’s called PCUnlocker, which can be downloaded as an ISO file and burned onto a CD or USB drive. After that boot your locked computer from the PCUnlocker Live CD or USB drive, this tool has a very understandable user interface which allows you to unlock Windows password instantly.

Here are step-by-step instructions on how to unlock computer password with PCUnlocker:

Step #1: First of all, you have to download the ISO image of PCUnlocker using an alternate computer you can still log on. Once the download is complete, unzip the download file and you’ll get the bootable ISO image: pcunlocker.iso. Burn it to a blank CD (or USB drive) using the freeware ISO2Disc or ImgBurn.

Step #2: Now turn on your password protected computer that you’re trying to unlock. Insert the burned PCUnlocker disc and set the boot sequence to CD (or USB drive) first in the computer BIOS.

Step #3: Once your computer boots from the CD (or USB drive), it begins to load the Windows PE system. After the booting procedure is complete, you’ll see the PCUnlocker program which displays a list of Windows user accounts existing in your Windows SAM database.

Step #4: Choose a user account and then click on “Reset Password” button. Confirm your operation and the program will instantly reset the password and also unlock your user account if it was locked out or disabled.

Step #5: The last step is to restart the computer and remove the PCUnlocker Live CD/USB drive. When booting to the Windows logon screen, left the password box empty and you can then log on your computer immediately.

Have you ever tried to log into a Windows computer for a few minutes and you finally realize that you forgot the password? Using the PC unlocker software you can unlock any computer password quickly and easily.