Archive for the ‘Windows 7’ category

How to Disable “Low Disk Space” Warning in Windows 10 / 8 / 7

March 29th, 2020 by Admin

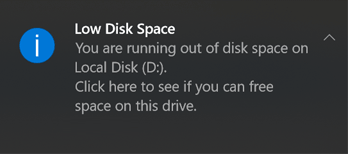
When any drive on your computer has less than 10% free disk space, a “Low Disk Space” warning will pop up at the bottom right side of the screen constantly. If this warning is not about the system (C:) drive and you want to get rid of it, here is a registry tweak to disable the annoying “Low Disk Space” warning in Windows 10 / 8 / 7.

How to Disable “Low Disk Space” Warning in Windows 10 / 8 / 7

  1. Press the Windows key + R to open the Run command box, type “regedit” (no quotes) and press Enter.

  2. This should open the Registry Editor window. Navigate to the following key:
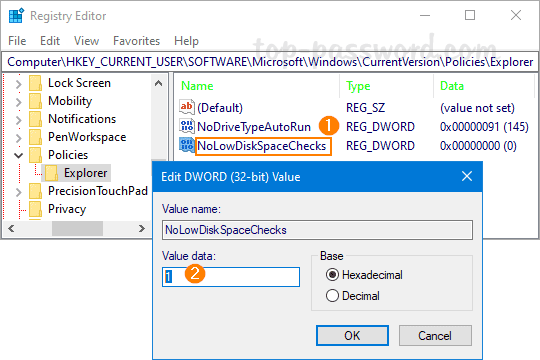
    HKEY_CURRENT_USER\SOFTWARE\Microsoft\Windows\CurrentVersion\Policies\Explorer

    Right-click the blank area on the right pane and select New -> DWORD (32-bit) Value.

  3. Name the value NoLowDiskSpaceChecks and double-click it to modify. In the Value Data box, type “1” (no quotes) and click OK.

  4. Close Registry Editor and restart your computer, Windows will stop giving you low disk space warnings. If you want to turn on the low disk space notifications later, just right-click on the NoLowDiskSpaceChecks value and delete it.

How to Create System Restore Points with Command Prompt or PowerShell

January 6th, 2020 by Admin

By default, Windows will automatically create a restore point before you make a major change to the OS, such as installing a new driver or app. In order to make more frequent backup, you need to create restore points manually or schedule the task to run daily or weekly. In this tutorial we’ll show you how to create system restore points in Windows 10 using Command Prompt or PowerShell.

Part 1: Turn On System Protection

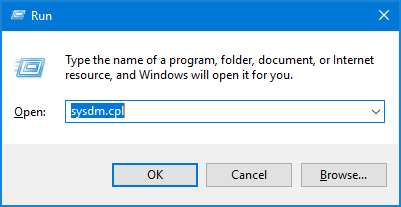
Before getting started, you need to check if system protection is enabled. Press the Windows key + R to open the Run box and type “sysdm.cpl” to open the System Properties window.
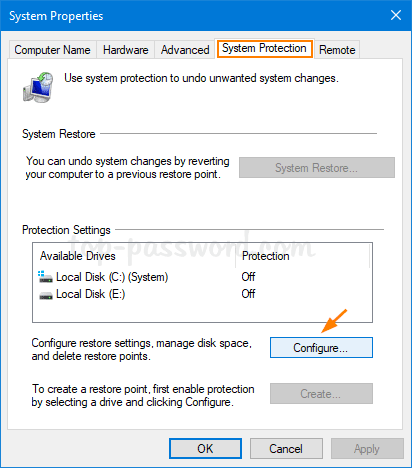
Go to the System Protection tab and click on the Configure button.

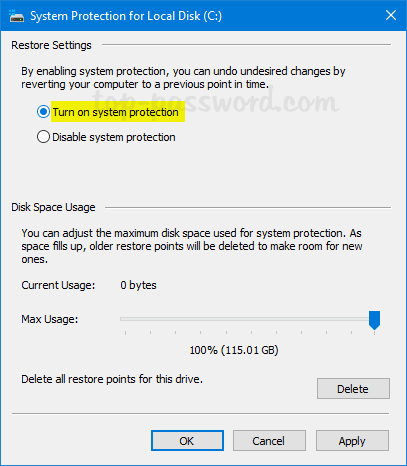
Select “Turn on system protection” and click OK.

Part 2: Disable System Restore Point Frequency

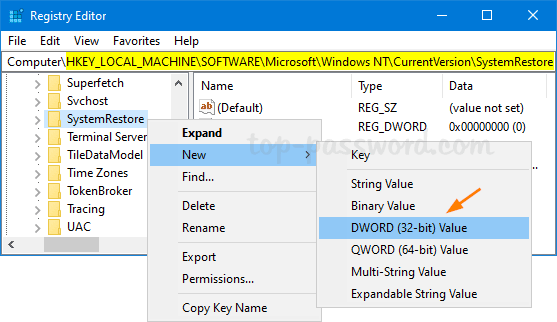
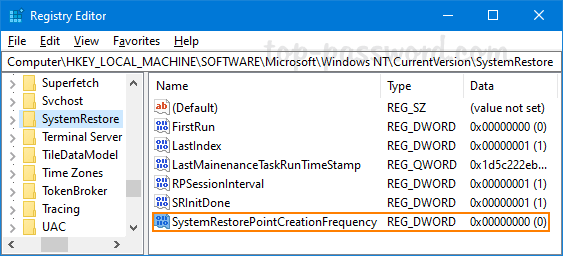
By default, Windows allows you to create only one restore point every 24 hours. To remove this limitation, open Registry Editor and navigate to: HKEY_LOCAL_MACHINE\SOFTWARE\Microsoft\Windows NT\CurrentVersion\SystemRestore. Right-click on the SystemRestore key in the left pane and select New ->DWORD (32-bit) Value.

Give the new DWORD a name SystemRestorePointCreationFrequency and leave its value data to 0.

Part 3: Create System Restore Point with CMD or PowerShell

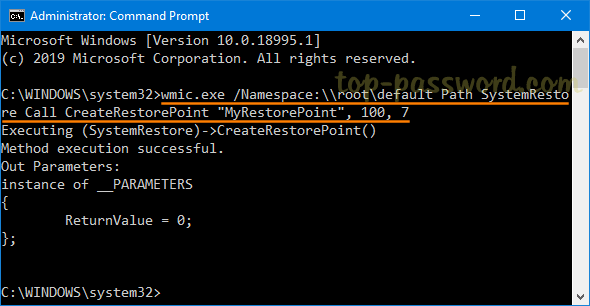
Open an elevated Command Prompt and type the following command:
wmic.exe /Namespace:\\root\default Path SystemRestore Call CreateRestorePoint "MyRestorePoint", 100, 7

or launch Windows PowerShell as administrator and enter:
powershell.exe -ExecutionPolicy Bypass -NoExit -Command "Checkpoint-Computer -Description "MyRestorePoint" -RestorePointType "MODIFY_SETTINGS""

Once pressing Enter, a new system restore point will be created immediately. You can use Task Scheduler to make your system run the above command to create restore points automatically during startup.

2 Ways to Run a Windows Program in Compatibility Mode

December 19th, 2019 by Admin

Your old program doesn’t work properly or can’t run at all after upgrading to Windows 10? To get some older programs to run on a modern version of Windows, you may need to turn on compatibility mode. In this tutorial we’ll show you 2 simple methods to run a Windows program in compatibility mode.

Method 1: Enable Compatibility Mode for a Program in Properties

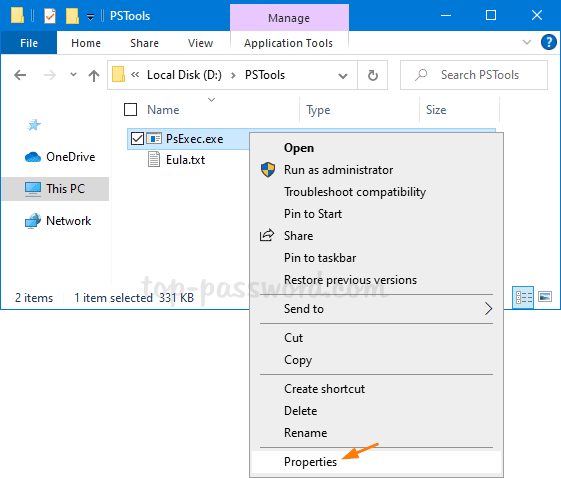
Right-click your program’s shortcut or the .exe file, and then select Properties from the context menu.

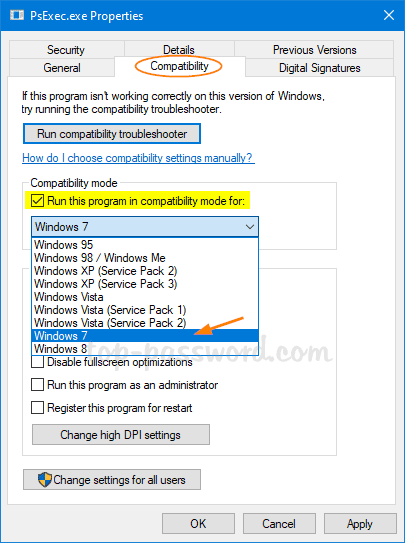
Under the Compatibility tab, check the “Run this program in compatibility mode for” option, and then choose which version of Windows you want to use.

For example, if your program doesn’t run properly on Windows 10 but did run properly on Windows 7, then select “Windows 7” from the drop-down menu. This will force the program to run in Windows 7 compatibility mode.

Method 2: Enable Compatibility Mode for a Program Using Command Prompt

First of all, you need to know which compatibility mode you want your program to run with. The following tables show the values for different compatibility modes.

Description Value Data
Windows 8 WIN8RTM
Windows 7 WIN7RTM
Windows Vista SP2 VISTASP2
Windows Vista SP1 VISTASP1
Windows Vista VISTARTM
Windows XP SP3 WINXPSP3
Windows XP SP2 WINXPSP2
Windows 98 WIN98

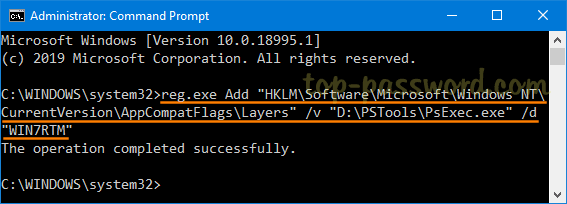
Next, Open an elevated Command Prompt and run the following command. Replacing "D:\PSTools\PsExec.exe" with the full path of your .exe file, and “WIN7RTM” with your desired compatibility mode.
reg.exe Add "HKLM\Software\Microsoft\Windows NT\CurrentVersion\AppCompatFlags\Layers" /v "D:\PSTools\PsExec.exe" /d "WIN7RTM"

Once this is done, your program will run in compatibility mode by default.

4 Ways to Check Your Computer Uptime in Windows 10 / 8 / 7

November 26th, 2019 by Admin

Have you ever wondered how long your PC has been up and running? How can I find out when Windows was last restarted? In this tutorial we’ll show you 4 simple ways to check your computer uptime in Windows 10 / 8 / 7. This is useful when troubleshooting problems or checking the last boot time due to a power outage.

Method 1: Check Windows Uptime Using Task Manager

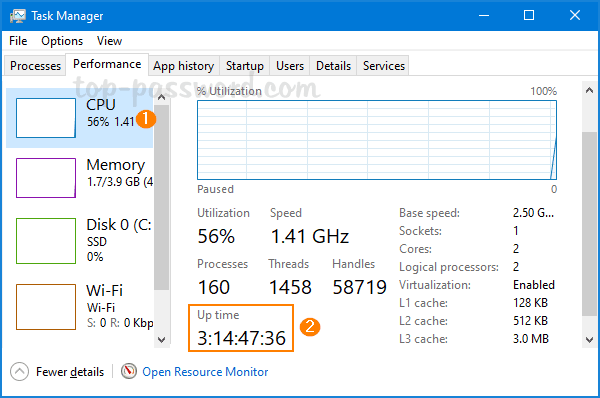
Press the Ctrl + Shift + Esc keyboard shortcut to start Task Manager. Go to the Performance tab and select your CPU device. You can see system uptime located toward the bottom of the window.

In the example above, my computer has been running for over three days.

Method 2: Check Windows Uptime Using PowerShell

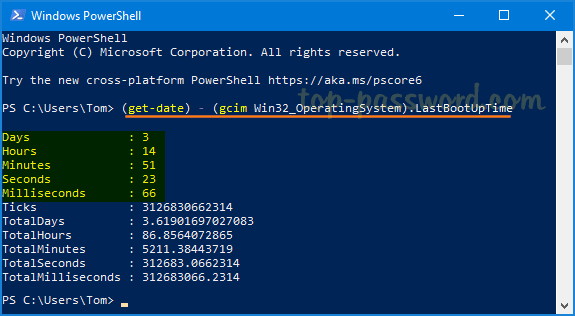
Open Windows PowerShell and type the following command:
(get-date) – (gcim Win32_OperatingSystem).LastBootUpTime

Once pressing Enter, you’ll get the uptime information on a list format with the days, hours, minutes, seconds and milliseconds.

Method 3: Check Windows Uptime Using Network Settings

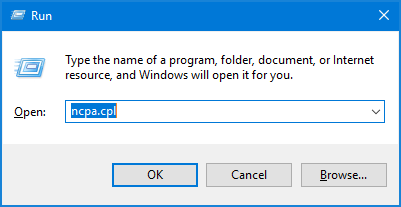
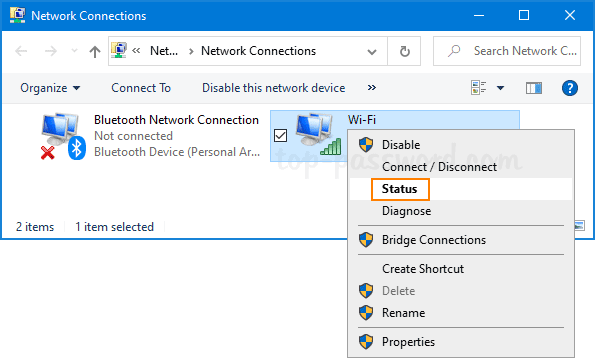
Press the Windows key + R together to launch the Run box. Type ncpa.cpl and hit Enter to open the Network Connections window.

Right-click on an active network adapter and then select Status from the popup menu.

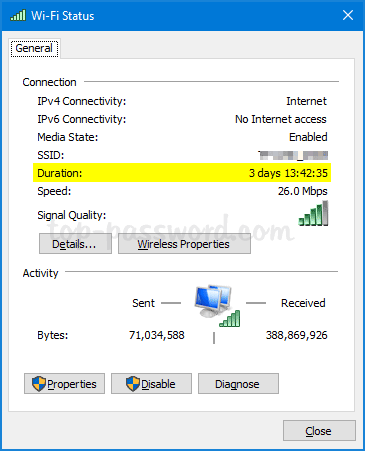
Look for the “Duration” field which indicates how long the network has been connected for, and that’s equivalent to your computer uptime.

Method 4: Check Windows Uptime Using Command Prompt

Open Command Prompt and run this command to check your system’s last boot time.
systeminfo | find "System Boot Time"

You can subtract the last boot time with the current time to determine the number of days, hours, and minutes the computer has been running.

How to Turn off Windows Installer to Block MSI Package

November 20th, 2019 by Admin

Is there a way to prevent users from installing .msi package? Windows Installer is a background service that manages installing and uninstalling MSI-based programs. To block MSI installer, you can turn off Windows Installer using group policy or registry tweak.

Method 1: Disable Windows Installer Using GPO

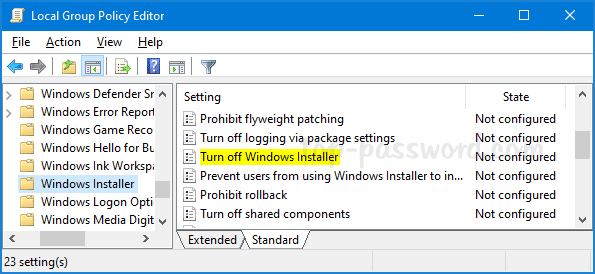
  1. Open Local Group Policy Editor and expand Computer Configuration -> Administrative Templates -> Windows Components -> Windows Installer. Double-click the policy named “Turn off Windows Installer” in the right pane.

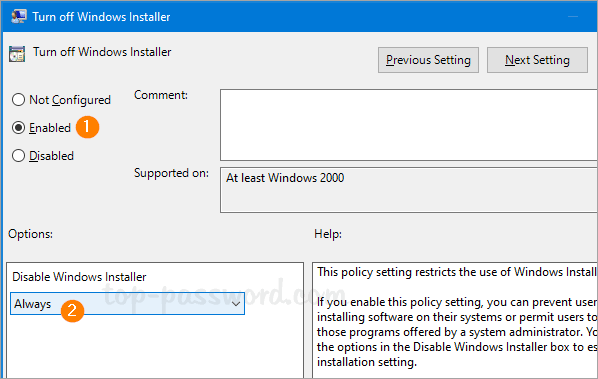
  2. Select Enabled. Click the “Disable Windows Installer” drop-down list and select Always.

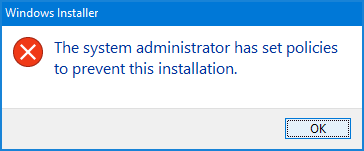
  3. Click OK and restart your system to apply the changes. The next time you try to run any .msi package, you’ll get the error message “The system administrator has set policies to prevent this installation.

Method 2: Disable Windows Installer Using Registry Tweak

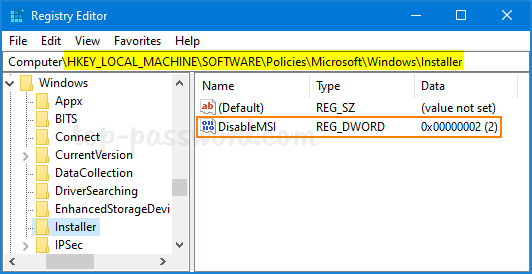
  1. Open Registry Editor and browse to: HKEY_LOCAL_MACHINE\Software\Policies\Microsoft\Windows\Installer. If the Installer subkey doesn’t exist, you have to create it first.
  2. Double-click the 32-bit DWORD DisableMSI in the right pane, and set the value to 2.

  3. Close Registry Editor and reboot Windows to make the changes take effect. If you need to enable Windows installer again, just set the value of DisableMSI to 0 and you’re done.

How to Clear or Flush DNS Cache in Windows 10, 8, 7

October 18th, 2019 by Admin

Have you ever encountered the error DNS_PROBE_FINISHED_NXDOMAIN or ERR_NAME_NOT_RESOLVED when accessing a website? Your browser displays a 404 error or tell you “The site can’t be reached“? These problems usually happen when your DNS cache is corrupted or out of update, so Windows can’t resolve the domain name of the website you’re visiting into IP address correctly. Clearing the DNS cache is the most effective way to resolve DNS related problems. Here’s how you can view, clear / flush DNS cache in Windows 10, 8, 7.

Part 1: View DNS Cache

Open an elevated Command Prompt and run the following command:
ipconfig /displaydns >C:\dnscache.txt

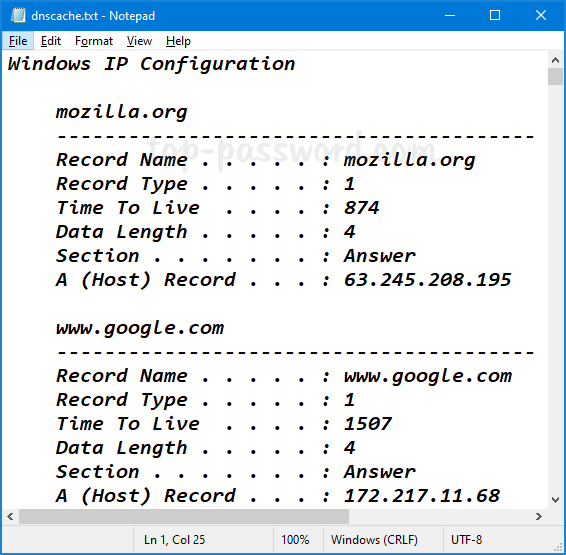
The above command will export the local DNS cache to a text file: C:\dnscache.txt. Just open it with Notepad and you can see the IP addresses for the respective domains or hosts you’ve ever visited.

As you can see in the above screenshot, Windows will check the DNS cache and send my request to the IP address 172.217.11.68 when I try to visit google.com.

Part 2: Clear or Flush DNS Cache

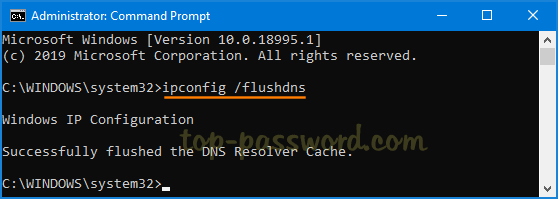
When you need to clear or flush DNS cache, just open the Command Prompt as administrator and type this command:
ipconfig /flushdns

Once pressing Enter, the DNS Resolver cache will be cleared immediately. Windows will start creating new and up-to-date DNS records for any websites you visit thereafter.

The Easy Way to Disable or Enable Guest Browsing Mode in Chrome

October 8th, 2019 by Admin

Chrome’s guest mode is a nice feature that lets you surf the web without leaving any browsing history or cookies on the computer. You can download files as usual in guest mode, but you cannot add bookmarks or install extensions. In this tutorial we’ll show you how to disable or enable guest browsing mode in Chrome for Windows 10 / 8 / 7.

How to Disable or Enable Guest Browsing Mode in Chrome

  1. Press the Windows key + R keyboard combination to open the Run dialog box. Type in regedit and hit Enter to open Registry Editor.

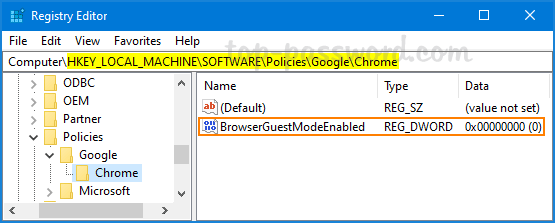
  2. In the left-hand pane, navigate to HKEY_LOCAL_MACHINE\SOFTWARE\Policies\Google\Chrome. By default, both the “Google” and “Chrome” keys don’t exist. You have to create them manually.
  3. While the “Chrome” key is selected, right-click on the blank area in the right-hand pane, and create a 32-bit DWORD BrowserGuestModeEnabled and leave its value data to 0.

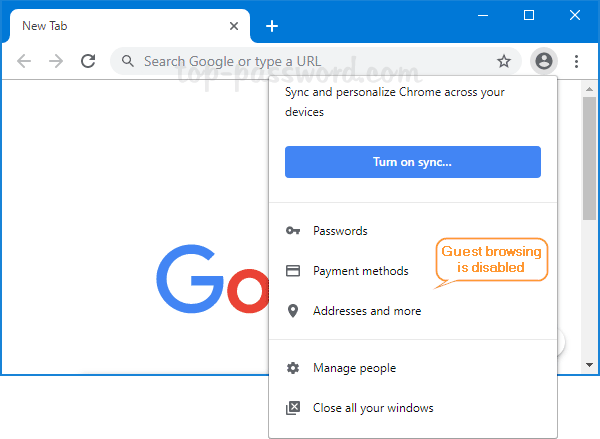
  4. Now, you’ve successfully turned off guest mode in Chrome. Relaunch your Chrome browser and you’ll unable to open a Guest windows any longer.

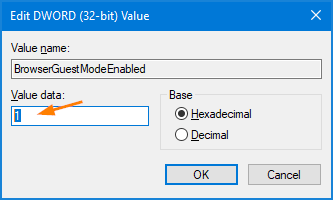
  5. Whenever you need to force Chrome to always start in guest mode, just open the same registry key and change the value of BrowserGuestModeEnabled to 1.

If you don’t want to manage the guest mode settings later, just delete the DWORD BrowserGuestModeEnabled and you’re done.

Easy Ways to Enable Telnet Client in Windows 11 / 10 / 8 / 7

September 29th, 2019 by Admin

Telnet is not recognized as an internal or external command on Windows 10? Starting with Windows 7, telnet is not enabled by default and you have to install it manually. In this tutorial we’ll show you 2 simple ways to enable telnet client in Windows 11 / 10 / 8 / 7.

Method 1: Enable Telnet Client Using Control Panel

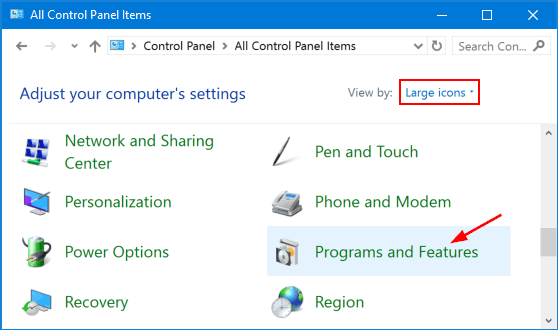
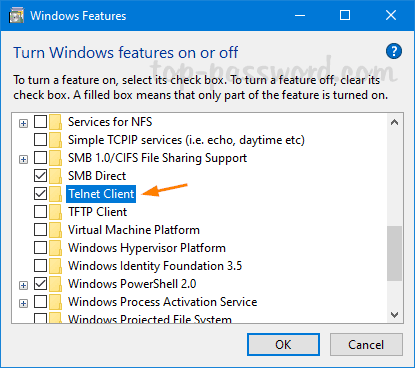
  1. Open the Control Panel with Large icons view, and click on Programs and Features.

  2. Click the “Turn Windows features on or off” option in the left pane.

  3. In the Windows Features window, check the checkbox for Telnet Client and click OK.

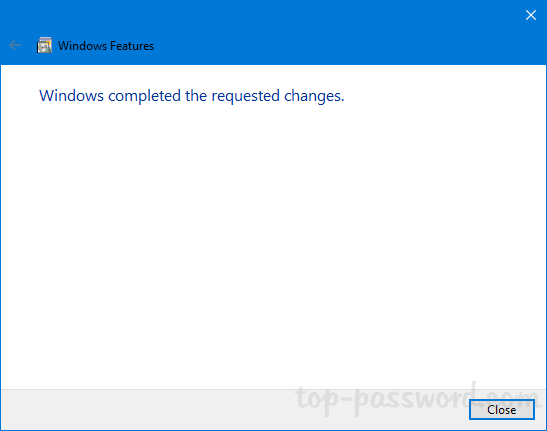
  4. When complete, you’ll see the “Windows completed the requested changes” message.

  5. Now, you can start using the telnet command from the Command Prompt or PowerShell.

Method 2: Enable Telnet Client Using PowerShell or Command Prompt

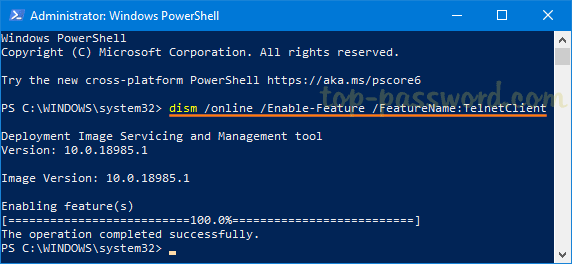
  1. Open Windows PowerShell (or Command Prompt) as administrator.
  2. Type the following command and hit Enter. It will take a while to install telnet on your computer.
    dism /online /Enable-Feature /FeatureName:TelnetClient

    Whenever you need to disable or uninstall telnet, run the below command:
    dism /online /Disable-Feature /FeatureName:TelnetClient

That’s it!

How to Enable Remote Desktop with Registry, PowerShell or Command Prompt

September 19th, 2019 by Admin

Is there a script to remotely enable remote desktop on Windows Server 2016? Previously we’ve covered how to turn on remote desktop protocol (RDP) using the GUI interface, but those methods don’t work in some scenarios where you do not have physical access to the computer on which you want to enable RDP. In this tutorial we’ll show you how to enable remote desktop remotely using Registry, PowerShell or Command Prompt.

Method 1: Enable Remote Desktop Using Registry Tweak

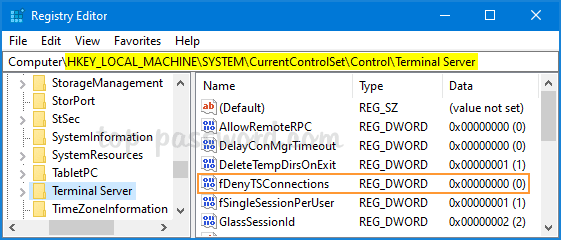
Once you are connected to the remote machine’s registry, navigate to the location: HKEY_LOCAL_MACHINE\SYSTEM\CurrentControlSet\Control\Terminal Server. In the right pane, double-click the DWORD fDenyTSConnections and change its value from 1 to 0.

Reboot your machine and remote desktop should now be accessible. If you need to disable remote desktop in future, just set the value of fDenyTSConnections to 1.

Method 2: Enable Remote Desktop Using PowerShell

Before getting started, you need to establish a session with the remote computer using PowerShell. Once connected, run the following PowerShell commands to enable remote desktop:

Set-ItemProperty -Path 'HKLM:\System\CurrentControlSet\Control\Terminal Server'-name "fDenyTSConnections" -Value 0
Enable-NetFirewallRule -DisplayGroup "Remote Desktop"

The first command will turn on remote desktop, while the second command will activate the firewall rules that allow remote desktop connections.

When you need to disable remote desktop later, run the following commands instead:

Set-ItemProperty -Path 'HKLM:\System\CurrentControlSet\Control\Terminal Server'-name "fDenyTSConnections" -Value 1
Disable-NetFirewallRule -DisplayGroup "Remote Desktop"

Method 3: Enable Remote Desktop Using Command Prompt

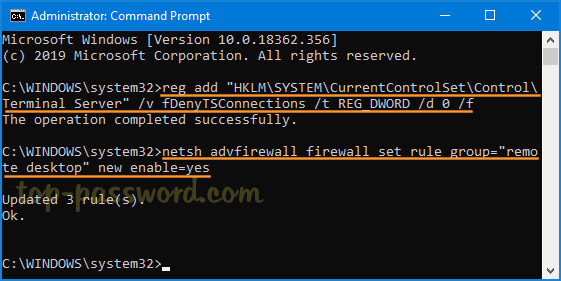
If you can open a remote Command Prompt window via SSH, PsExec or WinRS, run the following commands to enable remote desktop and configure Windows Firewall to allow remote desktop connections:

reg add "HKLM\SYSTEM\CurrentControlSet\Control\Terminal Server" /v fDenyTSConnections /t REG_DWORD /d 0 /f
netsh advfirewall firewall set rule group="remote desktop" new enable=yes

To disable remote desktop, execute the below commands:

reg add "HKLM\SYSTEM\CurrentControlSet\Control\Terminal Server" /v fDenyTSConnections /t REG_DWORD /d 1 /f
netsh advfirewall firewall set rule group="remote desktop" new enable=No

That’s all!

How to Unlock the Keyboard on Windows 10 / 8 / 7 Computer

May 28th, 2019 by Admin

Keyboard is locked and you can’t type anything? If you’ve locked the keyboard unintentionally and couldn’t recall how you did it, just follow this troubleshooting tutorial and you should be able to unlock the keyboard on your Windows 10 / 8 / 7 computer.

Before getting started, you have to find if certain keys or the entire keyboard has broken physically. For external USB / PS2 keyboard, you can connect it to a different computer. If the issue still exists, it is possible that your keyboard is physically damaged. Otherwise, it should be a software issue and you can fix it with the steps below.

Step 1: Turn Off Filter Keys

If your entire keyboard is locked, it’s possible that you’ve turned on the Filter Keys feature accidentally. When you hold down the right SHIFT key for 8 seconds, you should hear a tone and the “Filter Keys” icon appears in the system tray. Just then, you’ll find that the keyboard is locked and you can’t type anything.

To unlock the keyboard, you have to hold down the right SHIFT key for 8 seconds again to turn off Filter Keys, or disable Filter Keys from the Control Panel.

Step 2: Turn Off NumLock

If your keyboard doesn’t type the correct characters, it’s possible that you’ve turned on NumLock or you’re using a incorrect keyboard layout. To fix such issue, you have to disable NumLock or change your keyboard layout by following these tutorials:

Step 3: Reinstall or Update Keyboard Driver

The keyboard may become locked due to a faulty or outdated driver. To get your keyboard back to work, you may need to reinstall or update the keyboard driver. Follow these steps:

Open Device Manager and expand the Keyboards category. Right-click on your computer’s keyboard and select either Update driver or Uninstall device.

If you’ve chosen the “Uninstall device” option, restart your PC. Windows will automatically install the default keyboard driver.

Conclusion

With these troubleshooting tips you should be able to unlock your keyboard most of the time. If you problem still persists, try to contact your computer’s manufacturer or seek help from their forums. For HP Pavilion laptop, you might unlock the keyboard by pressing the Ctrl + PrntScr keyboard shortcut.