Archive for the ‘Windows 8’ category

How to Change Power Button Action in Windows 10 / 8 / 7

June 29th, 2017 by Admin

How to change what power button does in Windows 10? Every desktop/laptop computer has a hardware power button without any exception whatsoever. By default, pressing the power button will put your computer to shut down, but in Windows 10/8 it just puts your PC into sleep. To shut down a computer running Windows 10/8, you might have to press the power button for long duration.

This tutorial shows you a simple way to change the default action of the hardware power button so that when it is pressed, Windows will go into sleep, hibernate, shut down, or even do nothing.

How to Change Power Button Action in Windows 10 / 8 / 7?

  1. Open the Control Panel in Large icons view, and then click Power Options.

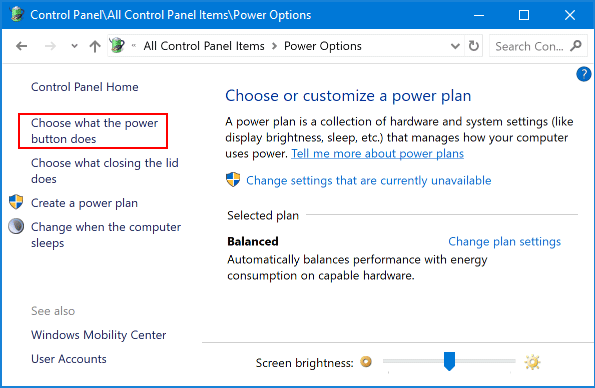
  2. From the Power Options window, click the Choose what the power button does link from the left pane.

    choose-what-power-button-does

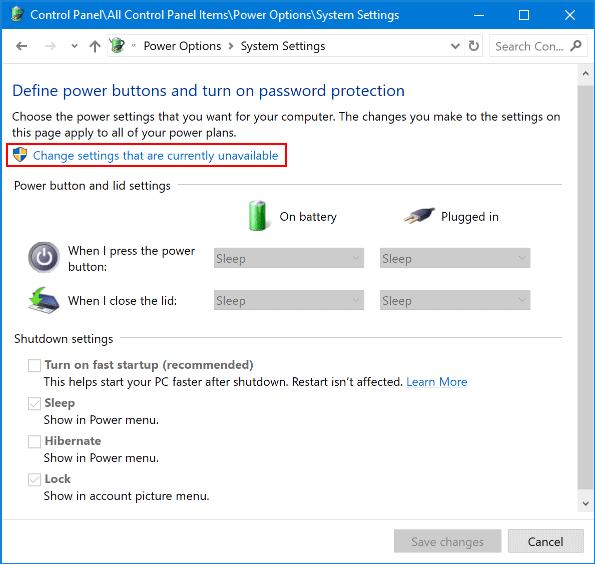
  3. Click on the Change settings that are currently unavailable link.

    change-settings-currently-unavailable

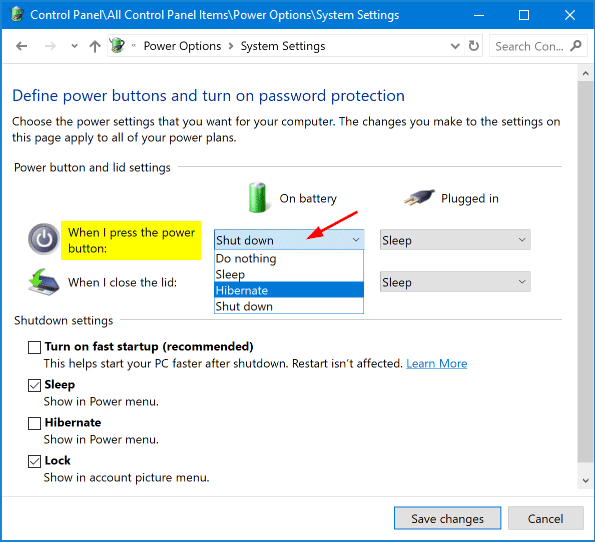
  4. You should see two drop-down menus to configure the default action when you press the power button. One is for when the laptop’s running on battery power, the other for when it’s plugged in.

    change-power-button-action

    Select the action you want (Do nothing, Sleep, Hibernate, Shut down or Turn off the display), and click Save changes.

  5. This change will take effect immediately. Press the hardware power button and it should now function as you expect. That’s it!
2 Methods to Disable Narrator in Windows 10, 8 and 7

June 22nd, 2017 by Admin

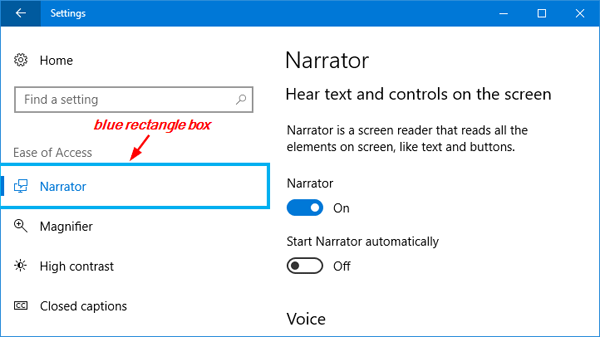
How to turn off Narrator permanently or disable Narrator shortcut key in Windows? When you accidentally press the Windows + Enter (or Windows + Ctrl + Enter in Windows 10) hotkey, this will open up the built-in Narrator app, which puts a blue box to the button or text with keyboard focus.

narrator-blue-box

If you want to quickly exit Narrator, press Caps Lock+Esc. In this tutorial we’ll show you 2 easy methods to turn off / disable Narrator completely in Windows 10, 8 and 7.

Method 1: Disable Narrator Shortcut Key

  1. Press the Windows key + R to open the Run box. Type regedit and press Enter.

    regedit

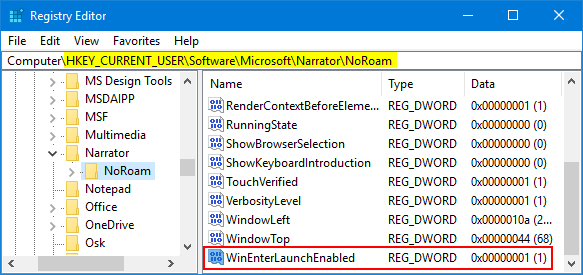
  2. When the Registry Editor opens up, navigate to the following key:
    HKEY_CURRENT_USER\SOFTWARE\Microsoft\Narrator\NoRoam

    disable-narrator-shortcut

    Double-click the WinEnterLaunchEnabled value in the right pane.

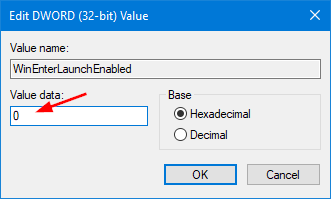
  3. When the Edit DWORD (32-bit) Value dialog box opens, type 0 in the Value data field and click OK.

    WinEnterLaunchEnabled

  4. Now you’ve successfully disabled Narrator shortcut key. Try to press the Windows + Enter or Windows + Ctrl + Enter shortcut, it won’t start Windows Narrator any longer.

After disabling Narrator hotkey, you can still open Windows Narrator using other methods descried in this tutorial. If you want to turn off Narrator permanently, proceed to the next method.

Method 2: Turn Off Narrator Permanently

  1. Open Windows Explorer and navigate to the directory C:\Windows\System32.
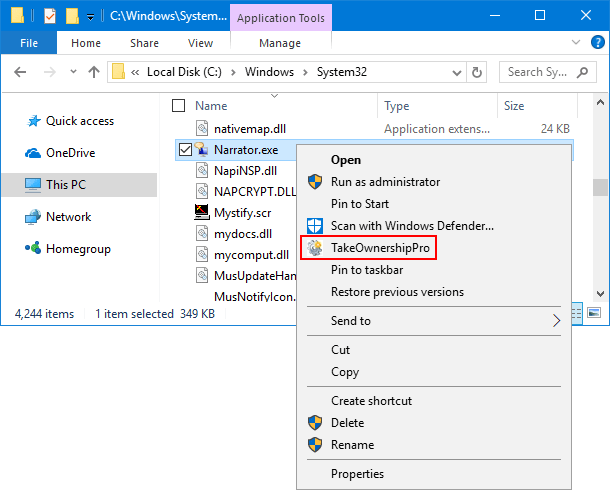
  2. The Narrator.exe file is protected by system, and you need to take ownership of it before making any changes. If you don’t know how to change ownership, you can take use of the freeware TakeOwnershipPro.

    take-ownership-narrator

  3. Right-click on the Narrator.exe file and then select Properties from the context menu.
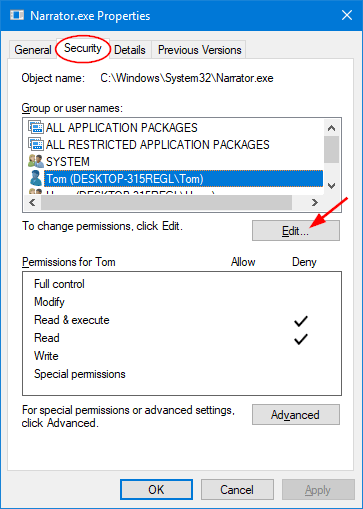
  4. When the Properties window opens, choose the Security tab and click the Edit button to change permissions.

    change-file-permissions

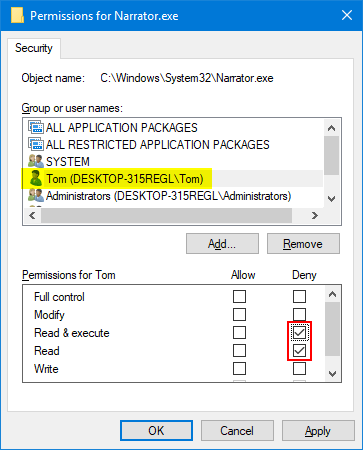
  5. Choose your own user from the list, and then deny the Read & Execute and Read permissions and click OK.

    deny-execute-narrator

  6. Now you’ve turned off Narrator on your Windows computer.

PCUnlocker – Best Alternative to Password Reset Disk

June 16th, 2017 by Admin

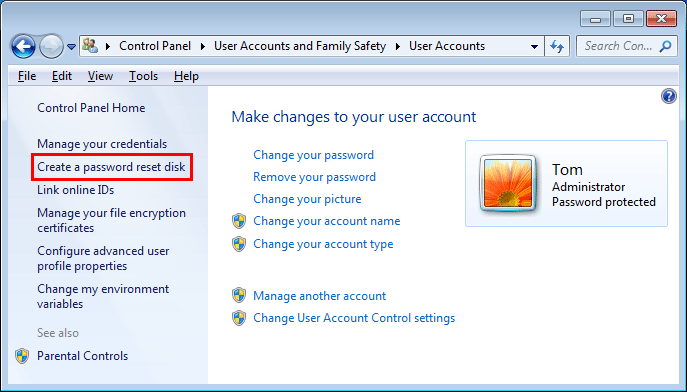
Password reset disk is a special disk that could be used to reset your Windows password if you forget it. Just go to Control Panel > User Accounts and Family Safety > User Accounts, you can click the “Create a password reset disk” link on the left pane to create such a disk.

create-password-reset-disk

A password reset disk contains a single file named userkey.psw, which is an encrypted backup version of your password. You can only make a password reset disk while you still know your password. The process of creating a password reset disk is just like writing down your password on a piece of paper. So, if you’ve already forgotten your password, it’s too late to create a password reset disk. Still have questions about password reset disk? Please check out this article: FAQs for Password Reset Disk in Windows.

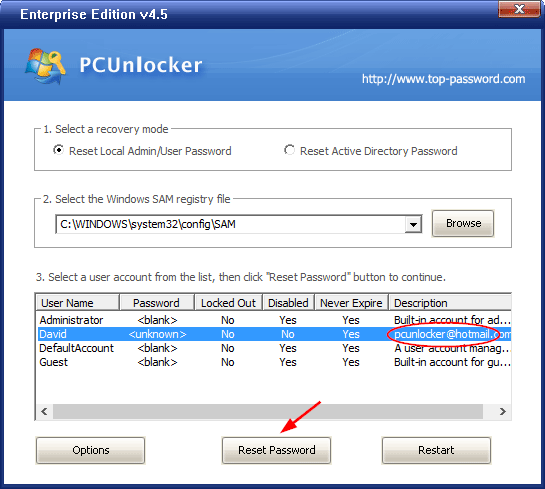
What to do if you forget Windows password but you don’t have a password reset disk? This happens so many times because we only aware that a password reset disk must be created before we forget the password. Fortunately, there are several good alternatives to password reset disk. PCUnlocker is the best alternative that could hep you reset forgotten Windows 10 / 8 / 7 / Vista / XP password instantly.

When you’re locked out of your own computer, just use an alternative PC to download PCUnlocker and create a bootable CD/USB drive. Next, boot your locked PC from CD/USB and it allows you to bypass & reset lost admin password easily.

How to Disable Specific Windows Key Shortcut in Windows

May 18th, 2017 by Admin

How to disable a certain global shortcut key that conflicts with an application-specific hotkey? Sometimes or even frequently though, you may activate a hotkey accidentally? In this tutorial we’ll show you a simple way to disable specific Windows key shortcut in Windows 10, 8 and 7.

How to Disable Specific Windows Key Shortcut in Windows?

  1. Press the Windows logo key + R combination to open the Run box. Type regedit and hit Enter.

    regedit

  2. When the Registry Editor opens, navigate to the following key:
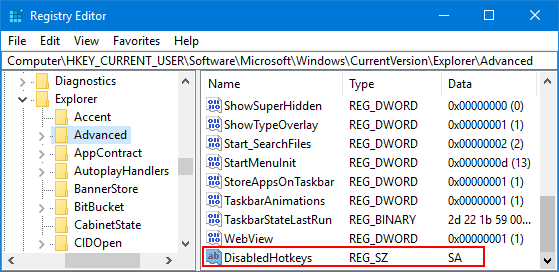
    HKEY_CURRENT_USER\Software\Microsoft\Windows\CurrentVersion\Explorer\Advanced
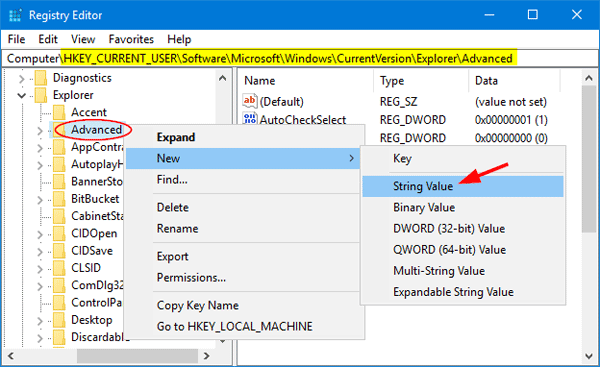
  3. Right-click on the Advanced key in the left pane, and then select New -> String Value from the context menu.

    new-string-value

  4. Name it DisabledHotkeys, and set its value data to the characters of hotkeys you want to disable.

    DisabledHotkeys

    For example, set it to S. This will disable Win + S, Win + Shift + S, and other shortcuts that using Windows key and the disabled characters you specified.
    Set it to SA to disable both Win + S and Win + A hotkeys.
    And so on.

  5. Reboot your computer and the hotkeys you specified will become disabled. If you want to restore the original hotkeys to work, just delete the DisabledHotkeys value and you’re done.

3 Different Ways to Turn Off Windows 10 / 8 / 7 Password

May 12th, 2017 by Admin

Could I log in to Windows without a password? How can I disable password at login screen? Looking for a way to turn off Windows password because you’ve forgotten it? In this tutorial we’ll show you 3 different ways to turn off Windows 10 / 8 / 7 password.

Option 1: Turn Off Windows Password by Deleting the Password

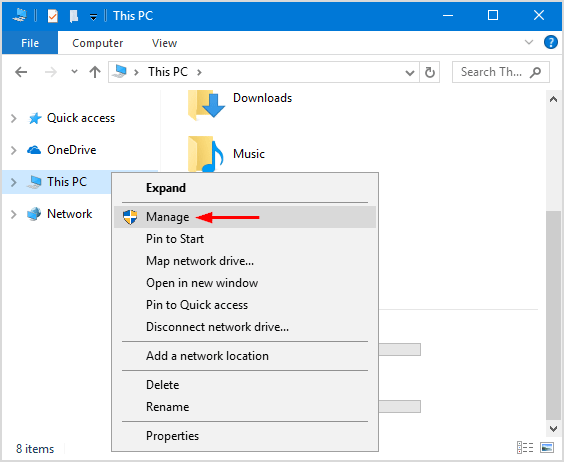
Right-click on My Computer shortcut on your desktop. If you’re running Windows 10, right-click This PC shortcut in the left navigation pane of File Explorer. Next choose Manage from the context menu.

manage-this-pc

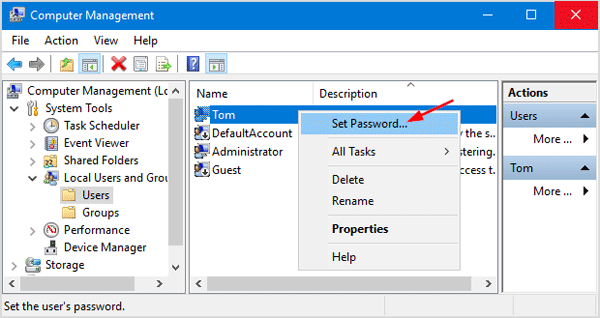
When the Computer Management window appears, navigate to Local Users and Groups -> Users. Right-click your local account and select Set Password. When get the warning prompt, click on Proceed to continue.

set-windows-password

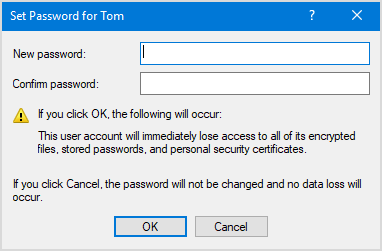
Type the new password and confirm. Click OK to remove the existing password for your Windows account.

set-password-for-windows-user

Option 2: Turn Off Windows Password by Enabling Automatic Logon

This method allows you to disable Windows login screen without changing or deleting your password. After enabling automatic logon, Windows will automatically sign into your account every time you turn on or restart your computer. Here’s how:

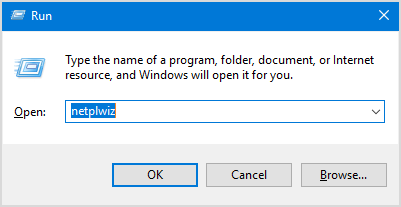
Press the Windows logo key + R to open the Run dialog box. Type netplwiz and press Enter.

netplwiz

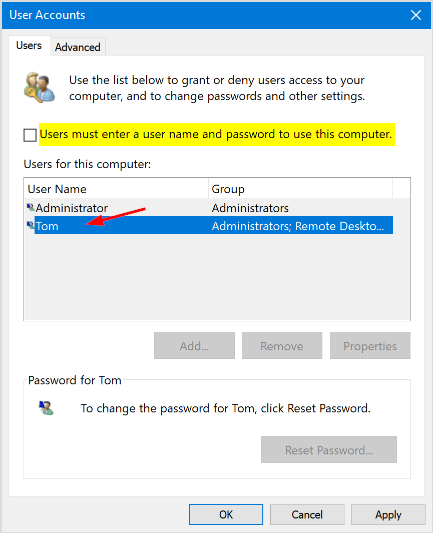
Uncheck the box “Users must enter a user name and password to use this computer“, and then select your Windows account from the list. Click OK.

enable-automatic-logon

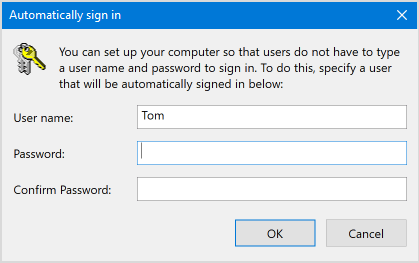
Type your current password twice and click OK.

automatically-sign-in-to-windows

From now on, Windows will automatically log into your selected account with the password you provided.

Option 3: Turn Off Windows Password When You’re Locked Out of Computer

If you have physical access to a machine then there is nothing to prevent you from gaining administrative access. When you forgot your Windows administrator password or need to access a locked or disabled account, you can take use of PCUnlocker to log back in to your computer without reinstalling Windows.

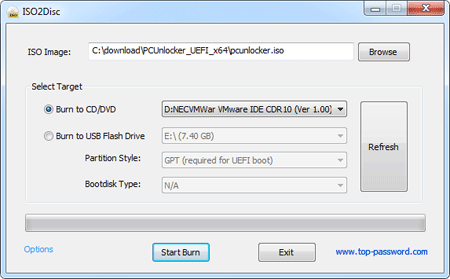
To get started, you need to prepare a PCUnlocker Live CD (or USB) on another PC you have access to. Download the ISO image of PCUnlocker and burn it to a blank CD (or USB thumb drive) using ISO2Disc.

Boot your locked computer from PCUnlocker Live CD (or USB). Once you’re at the PCUnlocker screen, select one of your local accounts and click on Reset Password button.

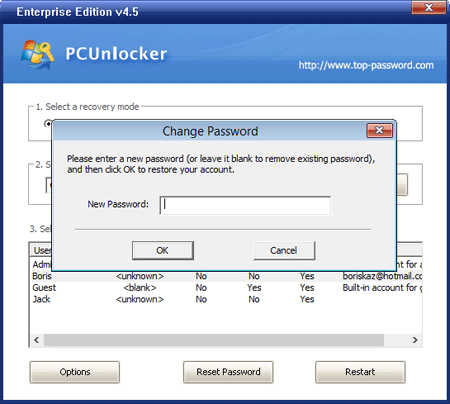
When the Change Password dialog box opens, just leave the password field empty and click OK. This will turn off Windows password completely.

Reboot your computer and you can then sign into Windows account without being prompted for a password.

Fix: Windows Defender is Turned off by Group Policy

April 12th, 2017 by Admin

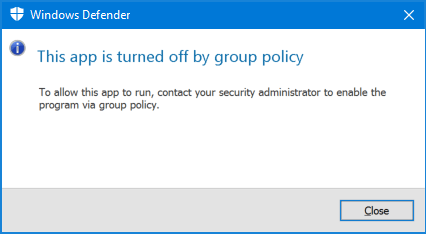
“This app is turned off by group policy.” This is the message I am getting when I am trying to access Windows Defender. How can I sort out this issue?

When your computer infected by any malware or virus, this may cause Windows Defender to be turned off. It’s also possible that Windows Defender gets automatically disabled after installing anti-virus software. In such situation, you’ll get the following error message when you open Windows Defender:

“This app is turned off by group policy. To allow this app to run, contact your security administrator to enable the program via group policy”

defender-turned-off-by-group-policy

In this tutorial we’ll show you 2 simple ways to fix the issue “Windows Defender is turned off by group policy” by enabling Windows Defender again in Windows 10 / 8 / 7.

Method 1: Fix “Windows Defender is Turned off by Group Policy” Using Group Policy

  1. Press the Windows key + R together to open the Run box. Type gpedit.msc and hit Enter.

    gpedit

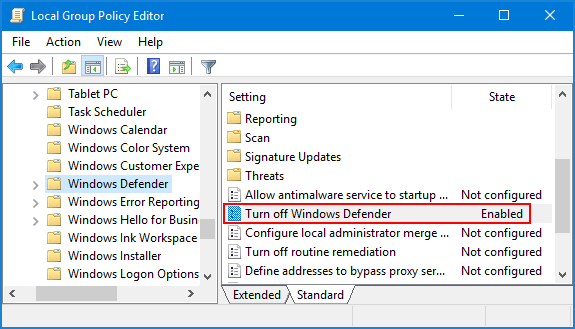
  2. When the Local Group Policy Editor window appears, navigate to: Computer Configuration > Administrative Templates > Windows Components > Windows Defender.
  3. Now locate the Turn off Windows Defender setting in the right pane, and double-click on it to modify.

    turn-off-windows-defender

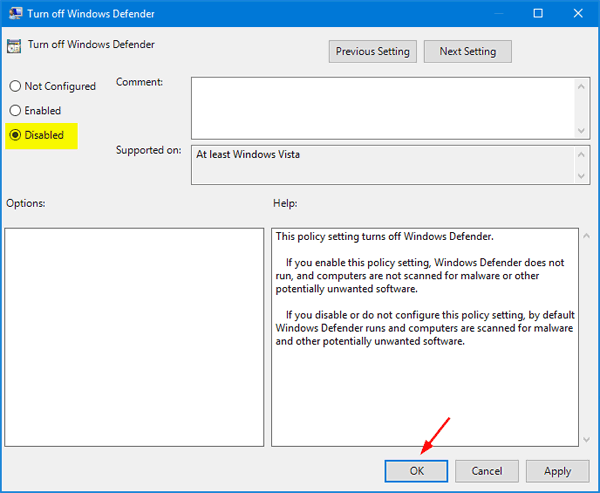
  4. In order to turn on Windows Defender, select Disabled and click OK.

    turn-on-windows-defender

    Reboot your computer. The next time you try to open Windows Defender and you should no longer get “This app is turned off by group policy” message.

Method 2: Fix “Windows Defender is Turned off by Group Policy” Using Registry Editor

  1. Press the Windows key + R together to open the Run box. Type regedit and hit Enter to open Registry Editor.

    regedit

  2. In the left pane of Registry Editor, navigate to the key below:
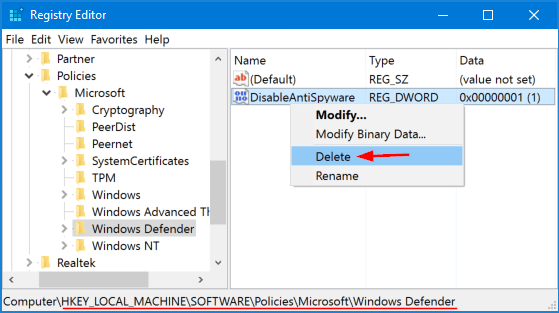
    HKEY_LOCAL_MACHINE\SOFTWARE\Policies\Microsoft\Windows Defender
  3. Right-click on the DisableAntiSpyware value in the right pane, and then select Delete.

    DisableAntiSpyware

  4. Close Registry Editor and reboot your PC to take effect. Now you won’t receive the error “This app is turned off by group policy” when you try to launch Windows Defender.

Stop Windows from Adding “- Shortcut” Text When Creating Shortcuts

April 6th, 2017 by Admin

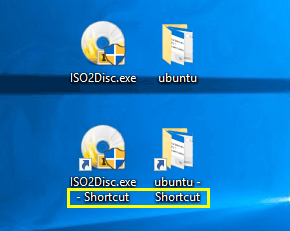
In Windows 10/8/7, you can create a shortcut by right-clicking on an existing folder or file, and then selecting “Send To” -> “Desktop (Create shortcut)“. But this will automatically append the “- Shortcut” text to the end of the shortcut’s filename. If you want to keep the filename short, here’s a registry trick to stop Windows from adding “-Shortcut” text when creating shortcuts.

new-shortcut-with-shortcut-text

Tips: If you want to remove shortcut icon from your desktop shortcuts, please check out this tutorial: How to Remove Shortcut Arrow from Desktop Icons in Windows 10 / 8 /7.

How to Stop Windows from Adding “- Shortcut” Text When Creating Shortcuts?

  1. To get started, press the Windows key + R at the same time to open the Run dialog box. Type regedit and press Enter.

    regedit

  2. Once the Registry Editor loads, navigate to the following location in the left pane:
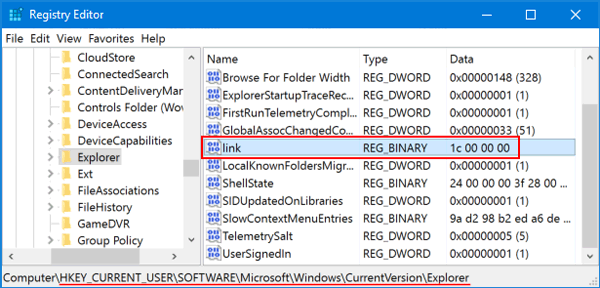
    HKEY_CURRENT_USER\SOFTWARE\Microsoft\Windows\CurrentVersion\Explorer
  3. On the right-hand side, double-click on the link value to modify. If you don’t see that value, right-click on empty space and select New -> Binary Value, then name the new value link.

    explorer-link-registry

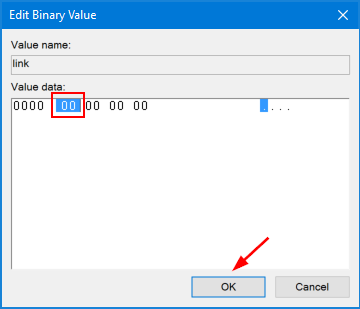
  4. In the Value data box, replace the current value with 00 00 00 00 and click OK. Note that the current value you see will vary based on the specific version of Windows you’re running.

    edit-binary-value

  5. Close Registry Editor and restart your computer (a logoff is not sufficient to make the registry changes take effect). This time, you’ll see that your new shortcut is created without the “-Shortcut” text appended to the end.

How to Auto Hide Windows 11 / 10 / 8 / 7 Taskbar with Ease

April 4th, 2017 by Admin

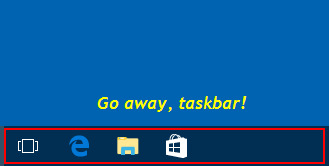
Windows Taskbar has an auto-hide feature that can hide the taskbar when not in use. When this feature is turned on, the taskbar disappears whenever you click elsewhere, or whenever your cursor moves away from it. To make the taskbar appear again, you have to move your cursor to the bottom of the screen or press Windows + T keyboard shortcut. In this tutorial we’ll show you how to automatically hide the taskbar in Windows 11, 10, 8 and 7.

hide-windows-taskbar

Part 1: Auto Hide Taskbar in Windows 11

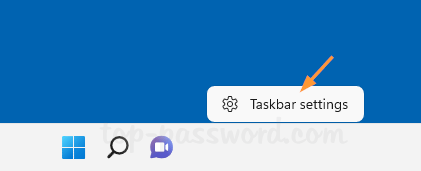
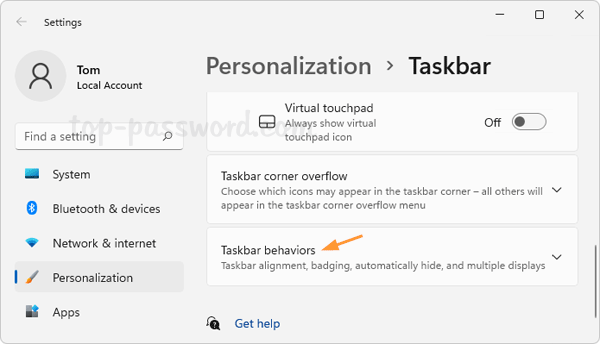
Right-click the empty space on the taskbar and select Taskbar settings.

The Settings app will launch to the related page. Click Taskbar behaviors to expand the settings.

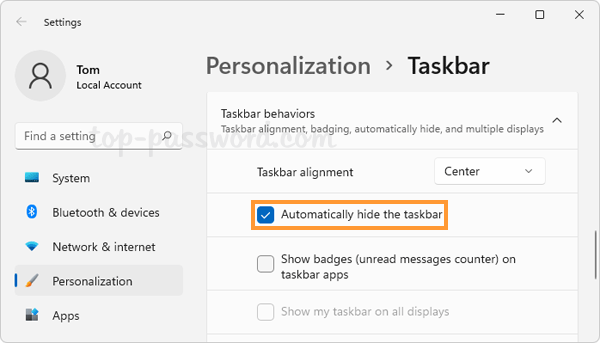
Check the “Automatically hide the taskbar” option.

Part 2: Auto Hide Taskbar in Windows 10

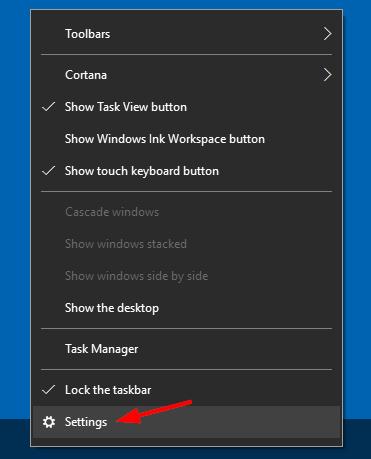
Right-click a blank spot on the taskbar, and then click Settings from the context menu.

open-settings-from-taskbar-menu

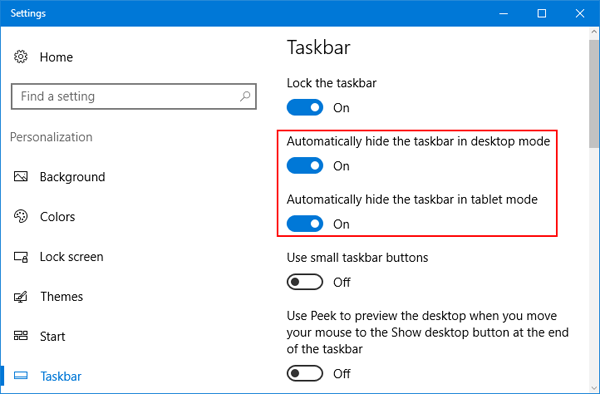
This will open the Taskbar panel in the Settings app. You’ll see two options: Automatically hide the taskbar in desktop mode, and Automatically hide the taskbar in tablet mode. Toggle one or both of these options.

hide-taskbar-in-desktop-tablet-mode

Part 3: Auto Hide Taskbar in Windows 8 and Windows 7

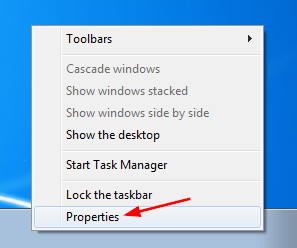
Right-click a blank spot on the taskbar, and then select Properties in the context menu.

taskbar-properties

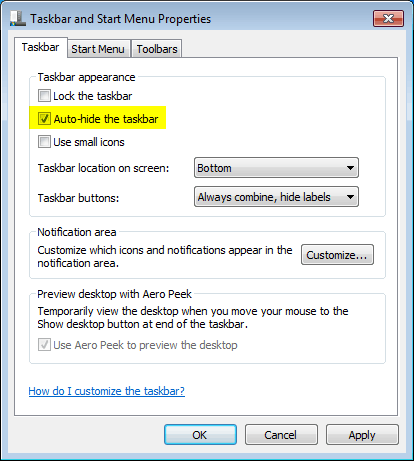
This will open the “Taskbar and Start Menu Properties” window. Under the Taskbar tab, check the “Auto-hide the taskbar” option and click Apply.

auto-hide-the-taskbar

That’s it!
How to Prevent Users from Changing Screen Saver in Windows 10 / 8 / 7

March 29th, 2017 by Admin

Is there a way to lock the screen saver settings so they cannot be changed by others? If you share your computer with other family members or friends, you might want to lock out your favorite screensaver so that nobody will be able to change it. In this tutorial we’ll show you 2 simple ways to prevent users from changing screen saver in Windows 10 / 8 / 7.

Note: Preventing users from changing screen saver doesn’t turn off or prevent the current screen saver from running. If you want to prevent screen saver changes for an individual user, just log on as that user and perform the following instructions.

Method 1: Prevent Users from Changing Screen Saver Using Group Policy

  1. Press the Windows key + R at the same time to open the Run command box. Type gpedit.msc and hit Enter.
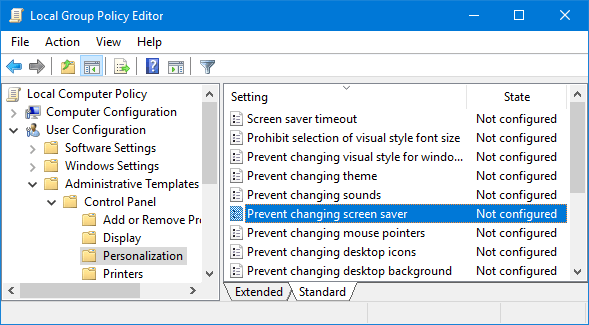
  2. This will open the Local Group Policy Editor. Navigate to: User Configuration > Administrative Templates > Control Panel > Personalization, and then double-click on the Prevent changing screen saver setting on the right pane.

    prevent-changing-screen-saver

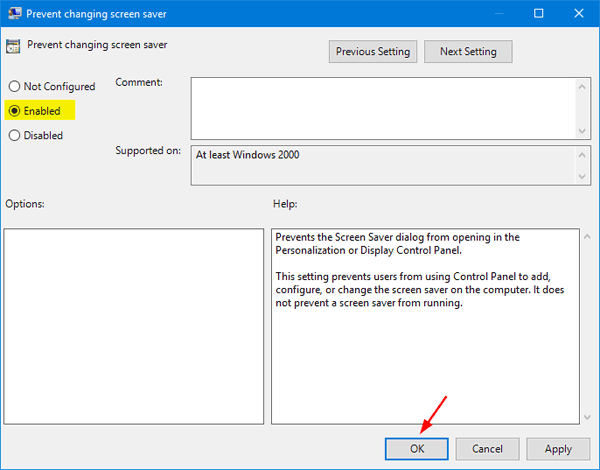
  3. In the properties window that opens, choose the Enabled option and then click OK. This change will take effect immediately, so you don’t need to restart your computer.

    lock-screen-saver-settings

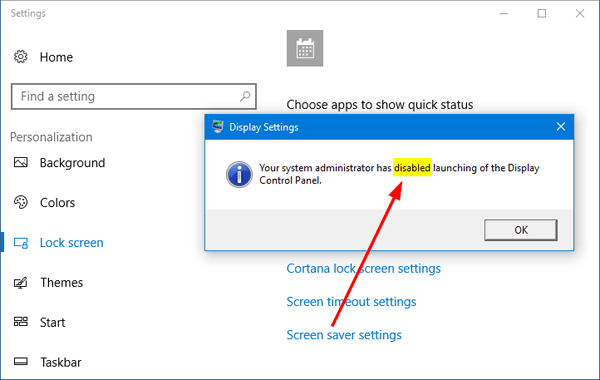
  4. Now, if you try to change the screen saver settings, you’ll see an error message that says “Your System Administrator has disabled launching of the the Display Settings Control Panel“.

    unable-change-screen-saver

Method 2: Prevent Users from Changing Screen Saver Using Registry Hack

If you have the Home edition of Windows 10/8/7, Local Group Policy Editor is not available and you have to use the following registry hack to prevent users from changing screen saver.

  1. Press the Windows key + R at the same time to open the Run command box. Type regedit and hit Enter.
  2. In the left pane of Registry Editor, navigate to the following key:
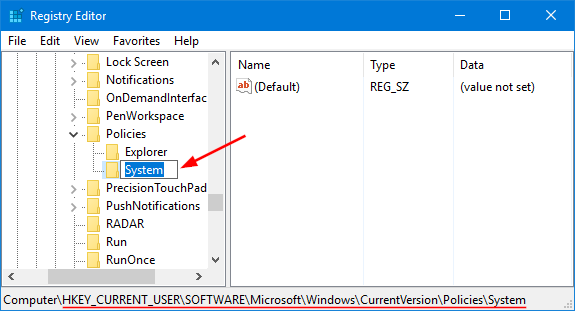
    HKEY_CURRENT_USER\Software\Microsoft\Windows\CurrentVersion\Policies\System

    If the System key doesn’t exist, you’ll need to create one. Right-click the Policies key and choose New -> Key. Name the new key System.

    create-system-key

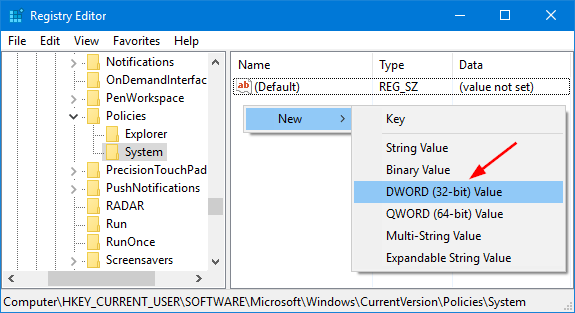
  3. Once the System key is selected in the left pane, right-click the empty space in the right pane and select New -> DWORD (32-bit) Value.

    new-dword-value

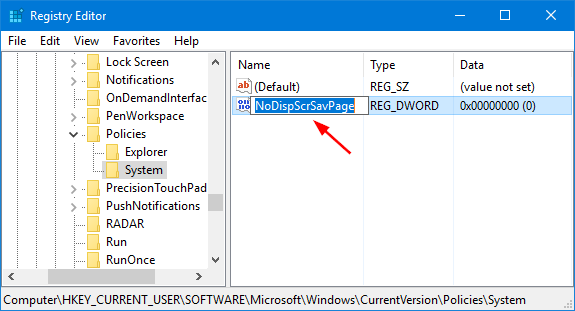
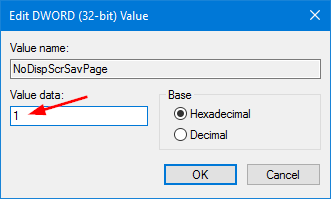
  4. Name the new value NoDispScrSavPage.

    NoDispScrSavPage

  5. Double-click on NoDispScrSavPage. In the properties window that opens, change the value from 0 to 1 in the “Value data” box and then click OK.

    edit-dword-value

  6. Close Registry Editor. The next time other users try to change the screen saver, the action will be denied by the system. To reverse the change later, just simply delete the NoDispScrSavPage value and you’re done.

How to Generate Battery & Energy Report on Windows 10 / 8 Laptop

March 16th, 2017 by Admin

Is there a way to check battery health in Windows 10? How to troubleshoot laptop battery drain issues? There is a hidden tool available in Windows 10/8 that can examine your laptop’s battery usage / health, and give you a detailed report for energy efficiency and battery life problems.

Part 1: Generate a Battery Report

  1. Press the Windows key + X to open the Power User menu, then select the “Command Prompt (Admin)” option.
  2. At the elevated Command Prompt, type the following command line and press Enter:
    powercfg /batteryreport /output "C:\battery_report.html"

    generate-battery-report

  3. It will generate a report file named battery_report.html under the root path of C: drive. Double-click on it to review the report in your default browser e.g. Microsoft Edge, Chrome or Firefox.
  4. The most important details in the battery report are the Design Capacity, Full Charge Capacity and Battery capacity history. If you have a new laptop or tablet, it may actually have a higher current Full Charge Capacity than its Design Capacity. That number will decrease over time as the battery chemistry changes.

    battery-report

  5. Under the “Battery capacity history” section, you can see how your battery’s full charge capacity gradually decreased over time compared to its design capacity. If you see a sudden drop, there’s probably a problem with your battery.
  6. battery-capacity-history

Part 2: Generate a Power Efficiency Diagnostic Report

The Power Efficiency Diagnostics will analyze your system for common energy efficiency and battery life problems, and report any errors, warnings, and informational details found.

  1. Press the Windows key + X to open the Power User menu, then select the “Command Prompt (Admin)” option.
  2. At the elevated Command Prompt, type the following command line and press Enter:
    powercfg /energy /output "C:\energy_report.html"

    generate-energy-report

  3. The program will analyze your computer for 60 seconds then produce an HTML report in the root path of C: drive. When it’s done tracing, you’ll see a generated report named engery-report.html, which shows you everything that’s going on with your power configuration, and gives you some ideas as to what prevents your laptop from automatically entering sleep.

    power-efficiency-diagnostic-report