Archive for the ‘Windows 8’ category

How to See Currently Logged in Users in Windows 10 / 8 / 7

March 11th, 2017 by Admin

How can I get a list of users currently logged on? If you’re wondering how to find out how many users are currently logged into your Windows 10 computer, there are several ways to view who’s logged on. In this tutorial we’ll explain 2 methods to get a list of currently logged in users in Windows 10 / 8 / 7.
Method 1: See Currently Logged in Users Using Query Command

  1. Press the Windows logo key + R simultaneously to open the Run box. Type cmd and press Enter.
  2. When the Command Prompt window opens, type query user and press Enter. It will list all users that are currently logged on your computer.

    query-user

Method 2: See Currently Logged in Users Using Task Manager

  1. Right-click on the taskbar and select Task Manager to launch Task Manager. If you’re using Windows 10/8, you might need to click the More details button at the bottom to see active processes.
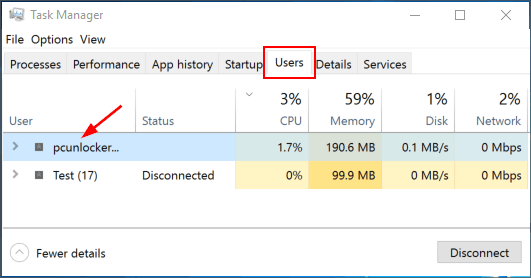
  2. Click the Users tab at the top of Task Manager, you can see a list of currently logged in users and their status.

    view-currently-logged-in-users

How to Hide or Remove Drive Letter in Windows 10 / 8 / 7

March 5th, 2017 by Admin

How to delete a drive letter for a device that is no longer connected? Look for a way to hide all drive letters in Windows Explorer? This tutorial shows you how to hide or remove drive letters in Windows 10, 8 and 7.

Part 1: Hide Drive Letters

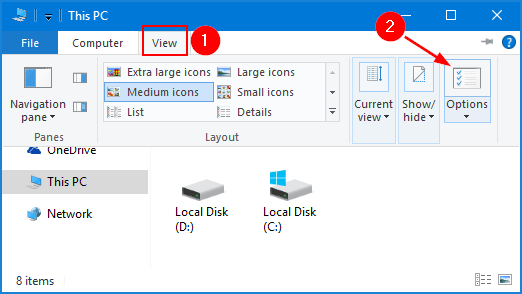
  1. Open File Explorer, click the View tab from the ribbon toolbar and then click Options.

    ribbon-toolbar

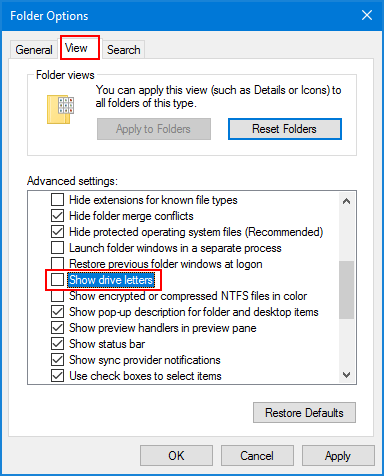
  2. In the Folder Options window, select the View tab. Under the Advanced settings, uncheck the “Show drive letters” option and click OK.

    show-drive-letters

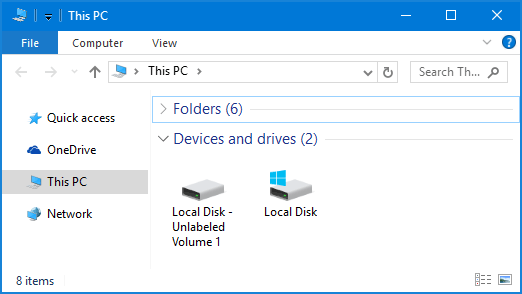
  3. You’ll find the drive letters of all your partitions are disappeared.

    drive-letters-missing

    If you want to restore the drive letters, just repeat the above steps and check the “Show drive letters” option.

Part 2: Remove Drive Letter for Windows Partition

This method allows you to remove / delete drive letter that was assigned to your partition. The partition will be invisible to all your Windows accounts and will continue to exist with its content intact.

  1. First, you need to open the Disk Management tool. In Windows 10/8, just press Windows key + X and select Disk Management. If you’re using Windows 7, right-click My Computer icon on your desktop and select Manage, you can then find Disk Management in the left pane.
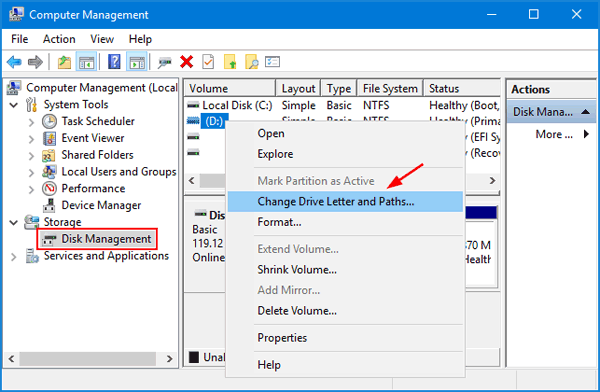
  2. Right-click the partition you want to remove drive letter, then select Change Drive Letter and Paths.

    change-drive-letters-and-paths

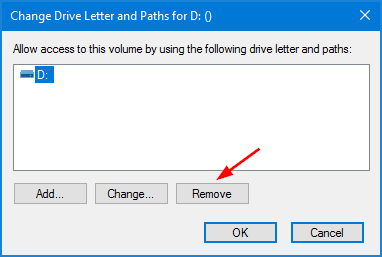
  3. In the resulting dialog box, click Remove.

    remove-drive-letter

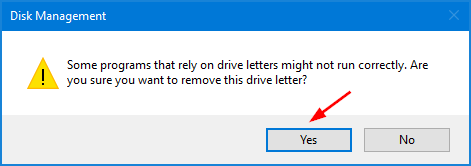
  4. You are asked to confirm the removal of the drive letter. Click Yes.

    confirm-drive-letter-removal

  5. The partition is now hidden and it is no longer accessible from the operating system you are currently using. If you assign a drive letter to that partition later, the partition will be visible again and all your files remain intact.

How to View or Export Edge Saved Passwords in Windows 10

February 22nd, 2017 by Admin

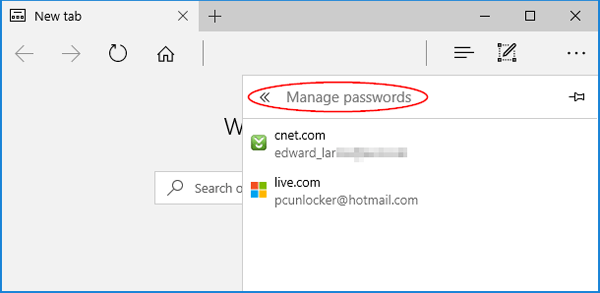
How can I export / backup the passwords saved in Microsoft Edge? Many people save the passwords for different websites so that they don’t have to enter the passwords again and again, but what if you forgot the password?

microsoft-edge-saved-passwords

Microsoft Edge stores all passwords in Windows Vault (also known as Credential Manger). In Windows 10, you can easily find Windows Vault files by accessing the following locations:

  • C:\Users\user_profile_name\AppData\Local\Microsoft\Vault
  • C:\ProgramData\Microsoft\Vault
  • C:\Windows\system32\config\systemprofile\AppData\Local\Microsoft\Vault

All web credentials are stored in an encrypted form and Microsoft Edge doesn’t provide an option to view the saved passwords. In this tutorial we’ll show you a simple way to view & export Microsoft Edge saved passwords using a reliable tool – Password Recovery Bundle.

How to View or Export Edge Saved Passwords in Windows 10?

  1. To get started, click here to download Password Recovery Bundle. Once the download process is complete, double-click the setup file to install it on your Windows 10 computer.
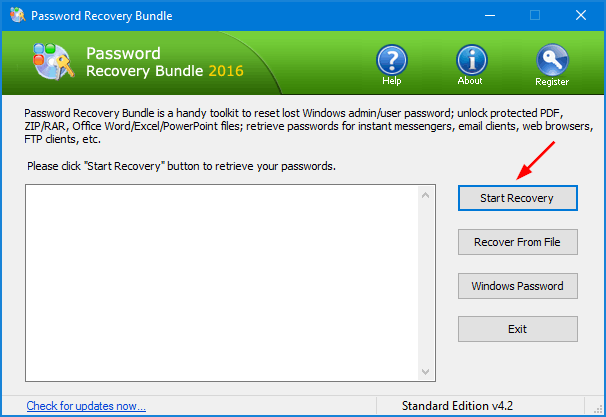
  2. Run the Password Recovery Bundle program. Click the Start Recovery button, and then select “Internet Explorer (Edge) Password” option from the drop-down list.

    password-recovery-bundle

  3. It will decrypt the encrypted Vault files, and show you all saved passwords in both Microsoft Edge and Internet Explorer. Select all passwords and paste them into a text file for safe keeping.

    export-edge-saved-passwords

The most painful part of a computer crash is often the loss of data. It’s an important best practice to keep a backup of Edge saved passwords, especially if you use Microsoft Edge as your primary browser.

How to Change System Cooling Policy in Windows 10 / 8 / 7

February 17th, 2017 by Admin

System Cooling Policy allows you to specify the cooling mode you want to use for your Windows-based computer, for which you have two options: Active and Passive.

  • The Active setting increases fan speed before slowing the processor to main cooling. You’ll get the best performance by leaving the System Cooling Policy set to Active.
  • The Passive setting slows the processor before increasing fan speed. If the fan is always running and you would like to make it quieter, you can choose to opt for the passive mode.

In this tutorial we’ll show you how to change the system cooling policy in Windows 10, 8 and 7.

How to Change System Cooling Policy in Windows 10 / 8 / 7?

  1. Open the Control Panel in Large icons view. Click Power Options.

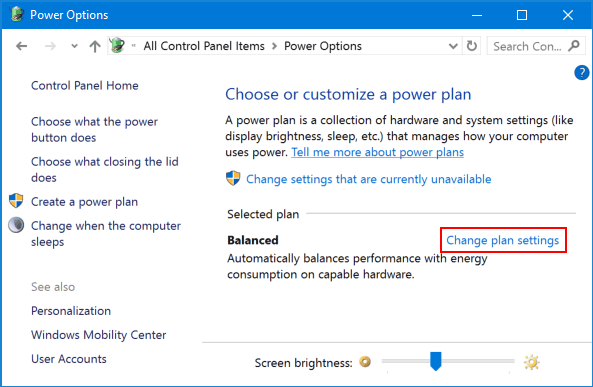
  2. In the right pane, for the power plan that you have selected to use, click Change plan settings.

    change-power-plan-settings

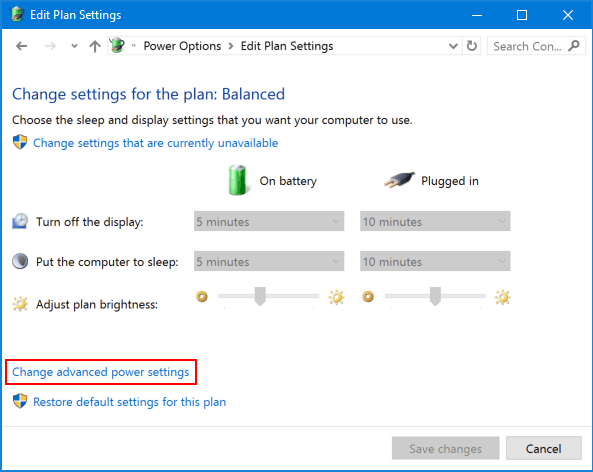
  3. Click Change advanced power settings.

    advanced-power-settings

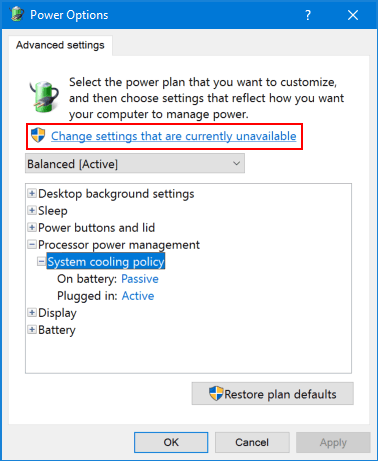
  4. Click the link labeled Change settings that are currently unavailable.

    change-power-settings-unavailable

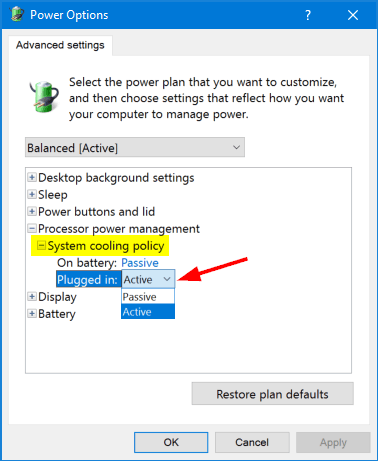
  5. In the Power Options dialog box, expand Processor power management and you’ll see the System cooling policy setting. Set the System cooling policy to Active or Passive, then click OK.

    system-cooling-policy

If the System Cooling Policy setting is not showing in the Power Options dialog box, you can restore it using a registry hack: Fix: System Cooling Policy Missing in Power Options.

Fix: System Cooling Policy Missing in Power Options

February 17th, 2017 by Admin

System Cooling Policy is missing in Windows? System Cooling Policy lets you change the cooling mode of your system. If you couldn’t see the System Cooling Policy option under the Power Options of Control Panel, you need to tweak the registry settings. In this article we’ll show you how to restore the missing System Cooling Policy option in Windows 10, 8 and 7.

Fix: System Cooling Policy Missing in Power Options

  1. Open Notepad. Copy and paste the code below into Notepad, then save it as a .reg file.

    Windows Registry Editor Version 5.00
    [HKEY_LOCAL_MACHINE\SYSTEM\CurrentControlSet\Control\Power\PowerSettings\54533251-82be-4824-96c1-47b60b740d00\94D3A615-A899-4AC5-AE2B-E4D8F634367F]
    "Attributes"=dword:00000002

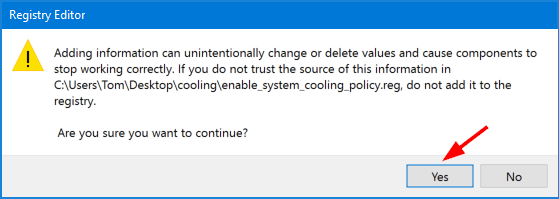
  2. Double-click on the .reg file to import the settings into the registry. Click Yes when asked to confirm.

    import-reg-file

  3. Open the Control Panel and access the Power Options, you’ll see that the System Cooling Policy is shown under the.Processor power management node.

    system-cooling-policy

If you want to remove the System Cooling Policy option again, repeat the steps above to import the following registry settings.

Windows Registry Editor Version 5.00
[HKEY_LOCAL_MACHINE\SYSTEM\CurrentControlSet\Control\Power\PowerSettings\54533251-82be-4824-96c1-47b60b740d00\94D3A615-A899-4AC5-AE2B-E4D8F634367F]
"Attributes"=dword:00000001

That’s it!

Fix Error: “Windows cannot Change the Password” in Windows 10 / 8 / 7

February 15th, 2017 by Admin

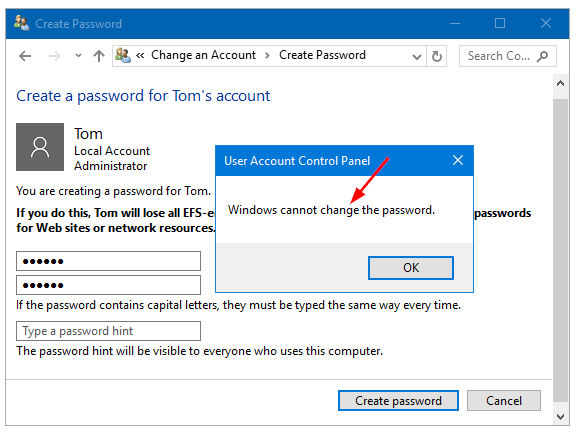
Unable to change Windows password? When you try to change or set a Windows password from Control Panel, you might get a popup message saying “Windows cannot change the password“.

windows-cannot-change-password

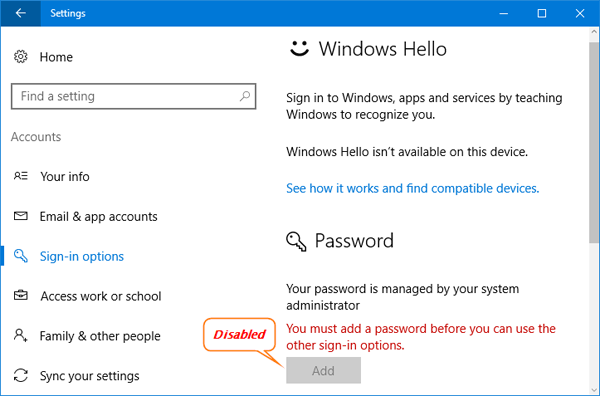
If you’re using Windows 10, open the Settings app and you might also find the option to change/reset password is greyed out.

unable-change-windows-password

In this tutorial we’ll show you a simple way to fix the issue “Windows cannot change the password” in Windows 10, 8 and 7.

Fix Error: “Windows cannot Change the Password” in Windows 10 / 8 / 7

  1. Press the Windows key + R to open the Run dialog box, then type compmgmt.msc and press Enter to open the Computer Management.
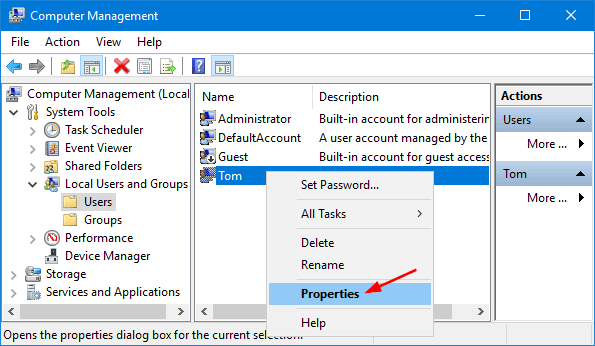
  2. Now, you can expand Local Users and Groups -> Users. In the right side, right-click on the user account which is not allowing you to change its password, then select Properties from the context menu.

    windows-account-properties

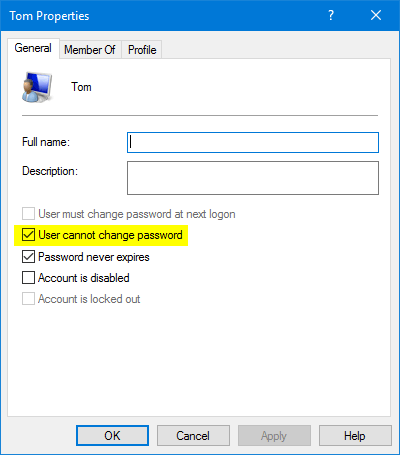
  3. You need to uncheck a box “User cannot change password“. Click Apply and then OK.

    user-cannot-change-password

    Now you should be able to change or set a Windows password in Control Panel.

Fix: Sleep Option Missing in Windows 10 / 8 / 7 Power Menu

February 5th, 2017 by Admin

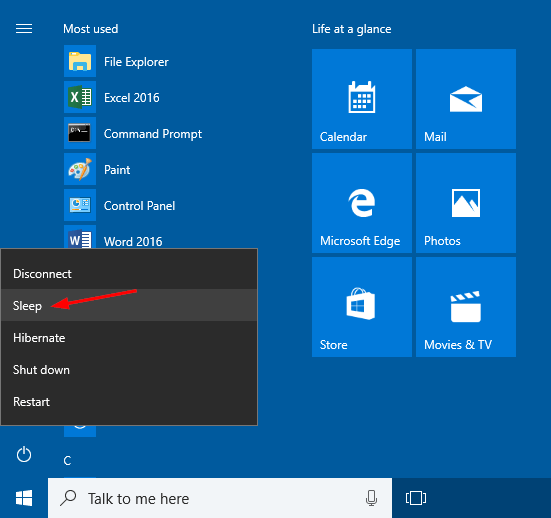
Missing sleep option in the power menu in Windows 10? When you click the Start button, then click the Power icon (or click the arrow next to shut down), you might find the Sleep option is missing or greyed out. In this tutorial we’ll show you how to fix the issue: Sleep option missing in Windows 10 / 8 / 7 Power menu.

sleep-in-power-options-menu

Method 1: Enable Sleep Mode in Control Panel

  1. Open the Control Panel in Large icons view. Click Power Options.

    power-options

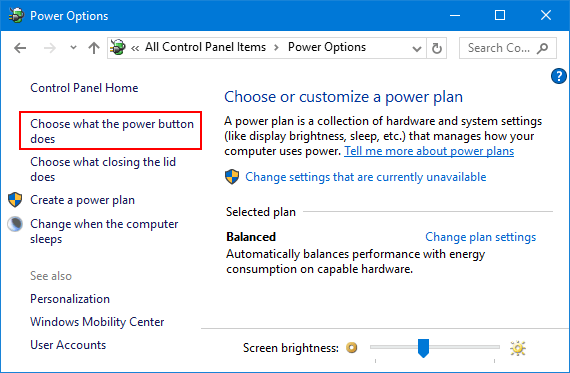
  2. Click the “Choose what the power button does” link on the left side of the window.

    choose-what-power-does

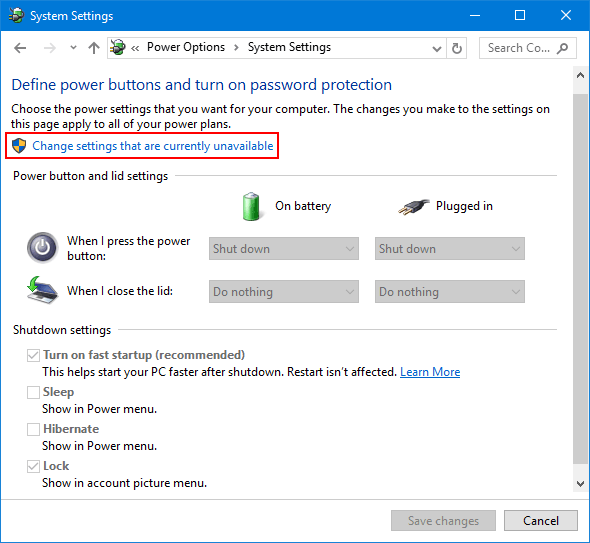
  3. Click the link that says “Change settings that are currently unavailable“.

    change-settings-unavailable

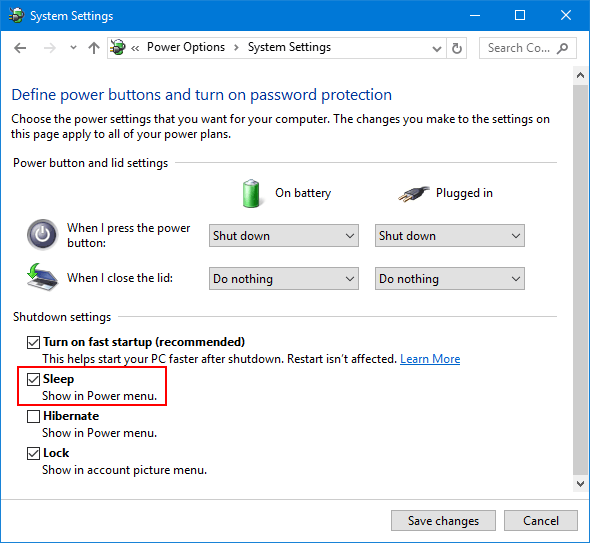
  4. Scroll down to the Shutdown settings section. Now check the Sleep checkbox and click Save changes button.

    enable-sleep-option

Method 2: Enable Sleep Mode Using Group Policy

  1. Open the Local Group Policy Editor. Navigate to Computer Configuration -> Administrative Templates -> Windows Components -> File Explorer.
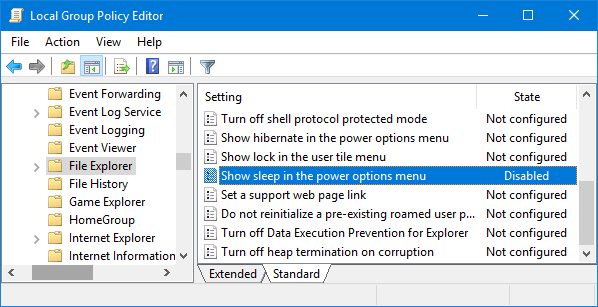
  2. On the right side panel, double-click on Show sleep in the power options menu settings in the list as shown.

    show-sleep-in-power-options-menu

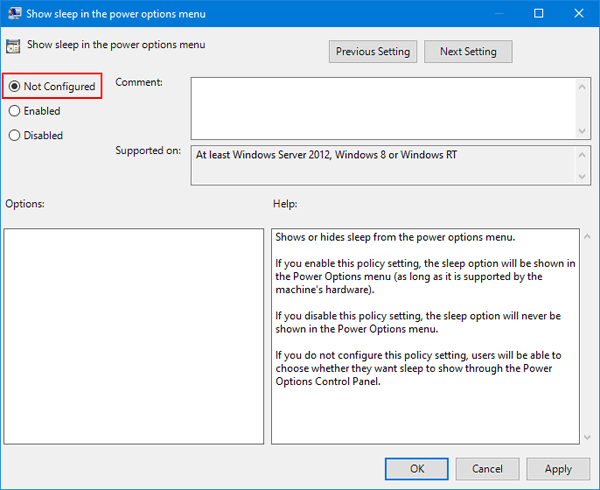
  3. In the next window that opens up, select either Enabled or Not Configured and then click OK.

    enable-sleep-via-group-policy

    This would add the Sleep option in the Power Options menu in Windows.

Method 3: Turn on Connected Standby (InstantGo)

InstantGo (previously called Connected Standby) is a smart feature in Windows 10/8 that allows your PC to maintain network connectivity when your screen is off in sleep mode. However, Any attempt to disable InstantGo may likely disable the regular Standby/Sleep mode too, as most devices supporting Connected Standby does not support traditional sleep options.

If you’ve disabled InstantGo, you have to turn it on again. Follow these steps:

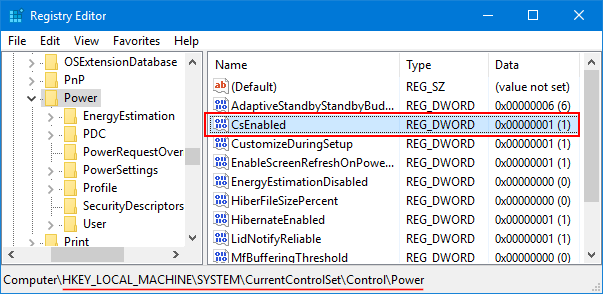
  1. Open the Registry Editor. Navigate to the following key:
    HKEY_LOCAL_MACHINE\SYSTEM\CurrentControlSet\Control\Power
  2. On the right side pane, double-click CsEnabled and set its value to 1.

    enable-connected-standby-InstantGo

  3. When it’s done, close the Registry Editor and reboot your computer.

Method 4: Install the Latest Display Driver

If your system is using the generic display driver, the Sleep option might also disappear from the Power Options menu. You need to download and install latest display driver from the manufacturers website.

Restore Missing “Extract All” Option to ZIP Right-Click Menu

January 17th, 2017 by Admin

Windows has built-in native support for ZIP files. When you right-click on a .zip file in Windows Explorer, the “Extract All” option from context menu allows you to extract all contents of the zip file to a folder of your choice.

If the “Extract All” option is missing or overridden by third-party zip/unzip software, you can restore it with a registry hack in Windows 10 / 8 / 7 / Vista.

How to Restore Missing “Extract All” Option to ZIP Right-Click Menu?

This registry hack requires you to log into Windows as administrator. Follow these steps:

  1. Download this REG file (add_extract_all_context_menu.reg) and save it to a folder where you can find easily. Tips: the .reg file is actually a text file and you can view the content using NotePad.
  2. After the download is complete, double-click on the .REG file. Click Run if prompted by Security Warning.
  3. Registry Editor will confirm if you want to import the registry settings in your .reg file, click Yes.

    add-extract-all-context-menu

  4. Once it’s done, right-click on a .zip file and the “Extract All” option will show up in the Explorer’s right-click context menu.

If you want to remove the “Extract All” option from Explorer’s right-click menu, you can run this .reg file (remove_extract_all_context_menu.reg) instead. That’s all there is to it.