Archive for the ‘Windows 8’ category

How to Disable Caps Lock Pop-up Notification in Windows 10 / 8 / 7

March 11th, 2016 by Admin

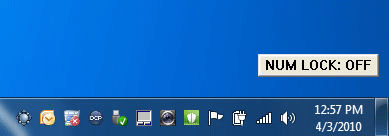
Every time you press the Caps Lock key, you might see a popup notification near the bottom-right corner of your screen. This can be a big problem since it takes focus off of the window/app you’re typing in. If you’re playing a game and accidentally press Caps Lock, clicking the popup will minimize the game.

caps-lock-notification

In this tutorial we’ll show you all possible ways to disable Caps Lock notification that pops up at the bottom right of your screen. The methods differ depending on the manufacturer of your computer.

Method 1: For HP computers

Here’s how to turn off Caps Lock notification on HP computers:

  1. Press the Windows logo key + R to bring up the Run box. Type regedit and hit Enter.
  2. After the Registry Editor opens, navigate to:
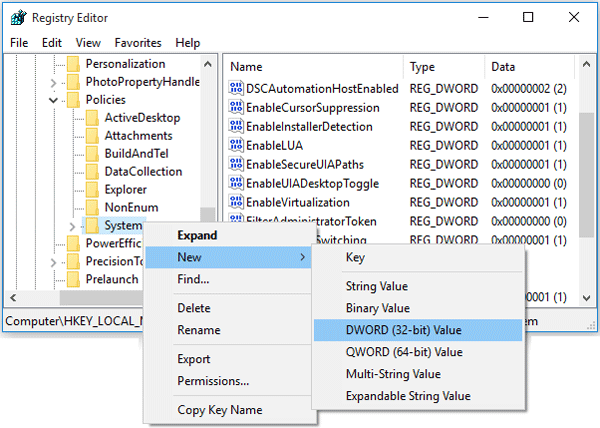
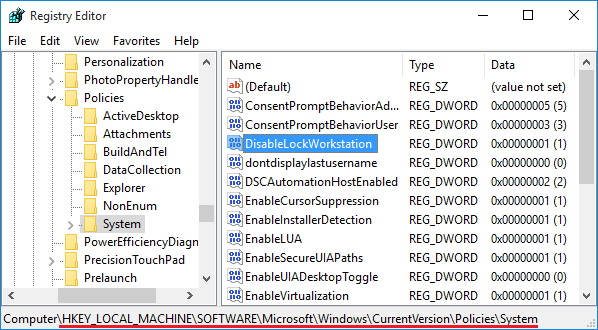
    HKEY_LOCAL_MACHINE\SOFTWARE\Policies\Hewlett-Packard\HP HotKey Support
  3. In right pane, double-click on the CapsLockOSD entry and set its value to 0.

Method 2: For Dell computers

Dell Quickset is supposedly a helpful little program that helps you keep track of your power management and other system settings. To disable Caps Lock notification on Dell computer, you can uninstall Quickset, or make a registry change by following the steps below:

  1. Press the Windows logo key + R to bring up the Run box. Type regedit and hit Enter.
  2. After the Registry Editor opens, navigate to:
    HKEY_LOCAL_MACHINE\SOFTWARE\Dell Computer Corporation\QuickSet
  3. In right pane, double-click on the QuickSetControl entry and set its value to 1.

Method 3: For Lenovo computers

  1. Open the Control Panel. Set the View by option to Large icons.
  2. Click on Display icon, then click on Change display settings on left panel.
  3. Click on the Advanced settings, then click on On-Screen Display tab.
  4. Check Enable on-screen display.
  5. Under “Indicator settings for NumLock and CapsLock” section, look for “While the numeric lock or caps lock is ON” section, choose the “Show the indicator for a few seconds” option.

    disable-caps-lock-indicator

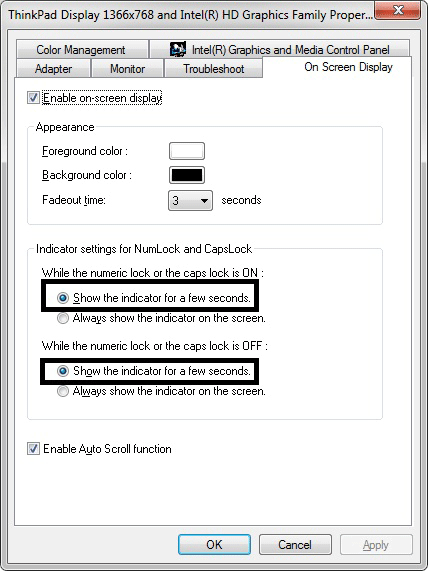
  6. Click Apply, then click OK.

Method 4:

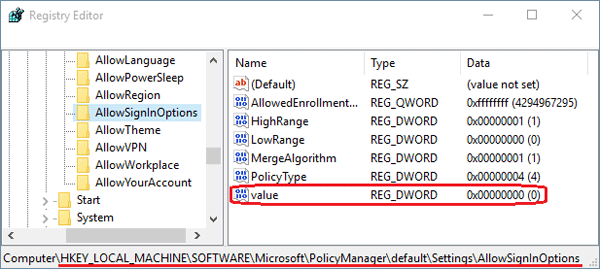
The Caps Lock notification might be handled by BlueTooth (BTTray.exe) process. You must edit the following registry entries to ged rid of this ugly alert:

  1. Press the Windows logo key + R to bring up the Run box. Type regedit and hit Enter.
  2. When the Registry Editor opens, navigate to:
    HKEY_LOCAL_MACHINE\SOFTWARE\Widcomm\BTConfig\General
  3. Change the value of KeyIndication from 1 to 0.
  4. Reboot your computer and the Caps Lock pop-up notification is gone!

Method 5:

This is a common method to decrease the display time for Caps Lock notification:

  1. Open Control Panel. Set the View by option to Large icons.
  2. Click Ease of Access Center.
  3. Select “Make it easier to focus on tasks“.
  4. Scroll down to the “Adjust time limits and flashing visuals” section, Check the checkbox to “Turn off all unnecessary animations (when possible)“. Under the option “How long should Windows Notification dialogue boxes stay open“, select 5 seconds.
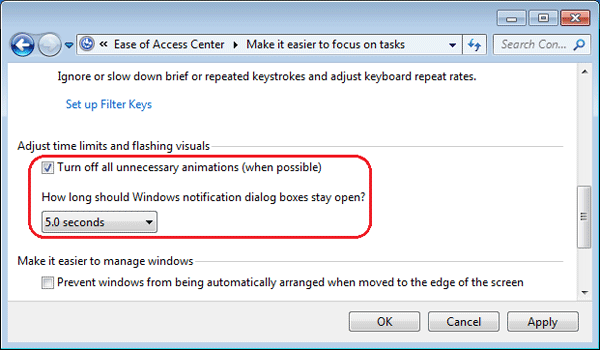
    turn-off-notication

  5. Click Apply/OK.

The end result is that you will still see the notification that Caps Lock has been turned on or off, but it will not cause a pause in your typing.

How to Stream Video / Audio from PC to Sony TV Wirelessly

March 8th, 2016 by Admin

Like many people, you probably have lots of music, video and photo files stored on your computer. There might be times when you want to play them on your TV. In this tutorial we’ll walk you through the steps of streaming video / audio from a Windows PC to Sony TV wirelessly. No need to install any third-party software.

You’ll need:

  • A computer running with Windows 10, 8 or 7
  • Sony TV with built-in WiFi and DLNA support
  • Wireless network with DHCP enabled (WiFi)

How to Stream Video / Audio from PC to Sony TV Wirelessly

There’s actually an open standard for sharing media files across a home network. It’s called the Digital Living Network Alliance (DLNA), and you probably already have everything you need to use it. Here we’ll set up your PC as a DLNA media server, and the TV will work as a DLNA renderer to receive stream over the LAN.

Part 1: Connect Your TV to A Network Using Wireless Connection

It’s pretty easy to configure your Sony TV to connect to wireless LAN. Follow these steps:

tv-settings

Press the HOME button, then select [Settings] > [Network] > [Network setup] > [Easy].
Choose Wi-Fi and follow the on-screen instructions to complete the set-up.

Note: When entering Wi-Fi passwords, press OK to bring up the virtual keyboard. Click NEXT key on the virtual keyboard when it’s done.

Part 2: Set Up Your Computer as a Media Server

Windows Media Player is the built-in software available in Windows 10/8/7 that you can use to share your media over the network to DLNA-compliant devices. Before getting started, you need to turn on media streaming options in Windows.

media-sharing-options

You will then be prompted with a list of DLNA-compliant devices that Windows has found on your wireless network. Select the Sony TV you want to share with and then OK. In my example, my Sony TV is shown with its model KD-55X8000C.

Now open Windows Media Player. Drag your favorite movies, musics or photos stored on your computer, then drop them into Windows Media Player’s library.

Right-click on the videos or audios you want to watch on TV, select “Cast to Device” and choose your TV from the menu.

cast-to-device

Once the “Cast to Device” remote control window is launched, you can reorder or delete items, add to the queue, or toggle repeat. It’s even possible to add new media items from Windows Media Player or Windows Explorer by dragging them into this window.

play-video-on-TV

So this is how you can stream a video or audio fro a Windows PC to TV over a wireless network. Enjoy it!

How to Turn On Media Streaming in Windows 10, 8 and 7

March 8th, 2016 by Admin

Is it possible to stream your favorite movies from a Windows PC to TV or Xbox 360? Nowadays most of new TVs support the DLNA feature, just turn on the Media Streaming in Windows, and you can then watch your videos on TV connected to LAN, without having to transfer the videos over a USB drive. In this tutorial we’ll show you 2 ways to turn on media streaming in Windows 10, 8 and 7.

Method 1: Turn On Media Streaming from Windows Media Player

  1. Launch Windows Media Player.
  2. From the Player Library view, click on Stream and choose “Turn on media streaming“.

    turn-on-media-stream

    If “More streaming options” is shown in the drop-down menu, it indicates media streaming is already turned on.

  3. Click on Turn on media streaming.

    turn-on-media-sharing

  4. Here you can give your media library a name. You’ll also see a list of detected media devices and players on your network. You can allow or block each player from accessing your media. Simply select “Local network” and click on “Allow All“, it will allow all devices on the LAN access to your media library.

    media-sharing-options

    If you want to turn off media streaming later, just click on “Block All“.

However, the “Turn on media streaming” option is not available in all versions of Windows Media Player, and you might have to turn on media streaming using the Control Panel.

Method 2: Turn on Media Streaming from Control Panel

  1. Open the Control Panel. If you’re running Windows 10 or 8, just press the Windows key + X to open the WinX menu and then select “Control Panel“.
  2. By default, the Control Panel should open in Category view. Click Network and Internet.

    network-and-internet

  3. Click Network and Sharing Center.

    network-sharing-center

  4. In the left pane, click Change advanced sharing settings.

    advanced-sharing-settings

  5. To enable media streaming and other options, select “All Networks” type and click on “Choose media streaming options” as shown below.

    choose-media-sharing-option

  6. Click on Turn on media streaming. If you don’t see that button, media streaming is already turned on. You’re done.

    turn-on-media-sharing

  7. On this screen, you’ll see all of the DLNA-compatible devices that Windows Media Player recognized on your local network. Click on Allow All and this will allow all networked machines access to your media library. (If you want to turn off media streaming later, just click on “Block All“.)

    media-sharing-options

Reset / Remove Forgotten Password on Surface RT Tablet

February 24th, 2016 by Admin

Lost your Surface password? Locked out of your Surface RT tablet? At present, there is no any password recovery utility available to Windows RT system, so you might have to reset your tablet to factory defaults. This tutorial explains how to remove or reset Surface RT password by performing a factory reset.

Reset / Remove Forgotten Password on Surface RT Tablet

Windows RT integrates a built-in rescue method that allows you to reset the OS from the login screen. Here’s how to restore Surface RT tablet to factory default condition, without knowing your password:

  1. From the Windows login screen, click the Power icon at the bottom right of the screen. Holding down the SHIFT key on your keyboard and then click Restart.

    restart-from-login

    If your tablet doesn’t have a physical keyboard, you need to open the on-screen keyboard in order to access the SHIFT key. In the lower-left corner of your screen, you should see the Ease of Access icon. Click on that icon and then select the “On-Screen Keyboard” option. The on-screen keyboard will open. From there tap / click the Shift key once, then click on the Power icon and select Restart.

    on-screen-keyboard

  2. The tablet will reboot and take you to the troubleshooting option screen. Click Troubleshoot.

  3. Click on “Reset your PC” and then click Next.

    reset-this-pc

  4. You’ll now be prompted with two options. “Keep my files” and “Remove everything“. In this case, I click “Keep my files” as I want to keep the personal files intact. No matter whichever option you pick, all of your system settings will return to their defaults and apps will be uninstalled.

    keep-my-files

  5. Click Reset. Now, you can sit back and relax. Windows will now start the long process of resetting your entire PC, all files, software, users, and apps you have installed will be gone, and the PC will be like the first day it was purchased.

After resetting, you’ll be presented with a nice clean install of Windows RT with the best performance. Perform a factory reset is always a good move if you’re locked out of your Windows admin account, or plan to sale or donate your tablet.

2 Ways to Repair Corrupt or Missing System Files in Windows 10 / 8

February 22nd, 2016 by Admin

Did you accidentally deleted a vital system file? Windows failed to load because of missing or corrupt system files? In this tutorial we’ll show you how to repair corrupt or missing system files using the Windows built-in command line utility – SFC (System File Checker). SFC is built into Windows 10/8/7/Vista that can scan your system files for corruption or modification. If a file is missing or modified, it will automatically replace that file with the correct version.

When your Windows system won’t load normally, start it in Safe Mode or boot off Windows Setup DVD, and you can also use the SFC command to repair corrupt or missing system files, without having to reinstall the whole OS.

Note: Though these guides are written for Windows 10 and Windows 8, a very similar process will work for Windows 7, Vista or XP.

Method 1: Repair System Files After Logging into Windows

  1. Open an elevated Command Prompt. To do this, press the Windows key + X to open the Quick Access menu and then select “Command Prompt (Admin)“.
  2. In the Command Prompt, run the following command:
    sfc /scannow

    sfc

  3. Just keep waiting & be patient because running this command will take quite a bit of time. The scan results will be shown after this process is finished. If you see a “Windows Resource Protection found corrupt files but was unable to fix some of them” message, try reboot into Safe Mode and run the SFC command again, or try the method below.

Method 2: Repair System Files Offline When Windows Won’t Boot

If Windows cannot start because some of system files are corrupted or missing, just boot your computer from Windows Installation DVD and you can repair the system files offline. If you don’t have a Windows Installation DVD, you can borrow one from a friend or use a Recovery Drive created in any computer running Windows 10/8.

  1. Insert the Windows Installation DVD and set up your computer to boot from optical drive (You might need to change the boot priority in the UEFI / BIOS). Press a key when prompted to boot from DVD.
  2. Once booted to the DVD, you’ll see the familiar Windows installation language-selection screen. Click Next.

    windows-10-setup

  3. Click on “Repair your computer“.

    repair-your-computer

  4. When you are asked to choose an option for how you want to continue. Click Troubleshoot.

    toubleshoot

  5. Next click “Advanced options“.

    advanced-options

  6. On the next screen, click “Command Prompt“.

    command-prompt

  7. In the Command Prompt, use the dir command to find the drive letter of your Windows partition. In my example, C:\ is the System Reserved partition and D:\ is my actual Windows partition.

    find-os-partition

  8. Now run the SFC command to repair your Windows installation. It will scan all your system files, identify those that are corrupt or missing and try to fix the problems it find.
    sfc /scannow /offbootdir=D:\ /offwindir=D:\windows

    repair-damaged-files

    Remember to replace D:\ with the actual drive letter of your Windows partition.

When the scan is complete, remove the installation DVD and restart your computer to check if your problem is fixed. To perform the recovery experiment, I intentionally deleted a system file c:\windows\system32\sechc.exe, and the file can be restored successfully by running the SFC command.

Enable / Disable Lock Workstation Feature in Windows 10 / 8 / 7 and Vista

February 2nd, 2016 by Admin

In previous post we’ve covered 3 ways to lock a Windows computer. If you are unable to lock your Windows system or want to disable the computer lock option completely, here’s how you can enable / disable lock workstation feature in Windows 10, 8, 7 and Vista. When the lock feature is disabled, you will be unable to lock your computer by either pressing Windows + L, Ctrl + Alt + Del, or clicking the Lock option from the Start menu.

account-lock-option

How to Enable / Disable Lock Workstation Feature?

  1. Press the Windows + R key combination to bring up a run box, type gpedit.msc and hit Enter.
  2. When the Local Group Policy Editor opens navigate to:
    User Configuration\System\Ctrl+Alt+Del Options
  3. On the right hand side you should see a setting called “Remove Lock Computer“. Double-click on it.
  4. Then change the radio button over to Enabled if you want to disable the lock workstation feature.

    ctrl-alt-del-options

    To enable this feature later, just change it to Disabled or Not Configured. Click OK to save your changes.

  5. Now you will need to enforce the updated policy to take effect on your PC, to do this press the Windows + R key combination, when the Run box open run:
    gpupdate /force
  6. Once you press enter you Local Group Policy will be automatically updated. Windows will no longer show the lock option when that you press the Windows key + L or Ctrl+Alt+Delete keyboard combination.

2 Options to Remove the Lock Option from Windows Start Menu

February 1st, 2016 by Admin

No matter what version of Windows you are running, you can find the lock option in the Start Menu (or Start Screen) that allows you to lock your computer. In this tutorial we’ll show you 2 ways to disable / remove the lock option from Windows 11, 10, 8 and 7 Start menu.

account-lock-option

Method 1: Remove the Lock Option with Group Policy

Follow this method and you can remove the lock option from the user tile menu on the Start menu (or Start screen) in Windows 11, 10, 8.1 or 8.

  1. Press the Windows key + R to open the Run box. Type gpedit.msc and press Enter.
  2. When the Local Group Policy Editor opens, expand the tree to the following path:
    Local Computer Policy\Computer Configuration\Administrative Templates\Windows Components\File Explorer
  3. In the right-hand pane you should now see a variety of settings. Double-click on the “Show lock in the user tile menu” setting and its properties screen will open.

    show-lock-in-user-menu

  4. Set it to Disabled and click OK.

    disable-lock-in-user-menu

    Now close the Local Group Policy Editor window. You’ll see the lock option is disabled or removed from the Start menu.

Method 2: Remove the Lock Option with Registry Hack

If the Group Policy Editor is not available in your computer or you’re running Windows 7, then use this registry hack to disable the lock option from your Windows Start menu.

  1. Press the Windows key + R to open the Run box. Type regedit and press Enter.
  2. When the Registry Editor opens, browse down to the following key:
    HKEY_LOCAL_MACHINE\SOFTWARE\Microsoft\Windows\CurrentVersion\Policies\System
  3. Right-click on the System key on the left pane and select New -> DWORD (32 bit) Value.

    new-dword-value

  4. Name it DisableLockWorkstation and set the value to 1 in order to disable the lock option in the Start menu.

    disable-lock-workstation

    If you want to show / enable the lock option later on, just change the value to 0.

  5. Close the Registry Editor and you will see the lock option turns gray or disappeared from the Start menu.