Archive for the ‘Windows 8’ category

Reset Dell Laptop to Factory Settings without Knowing Admin Password

November 5th, 2015 by Admin

How to reset your Dell computer to original factory settings if you forgot the administrator password? A forgotten password should not become an obstacle on the way! This guide explains how to perform a factory reset on Windows 10/8/7/Vista Dell laptop, without knowing the admin password.

Note: a factory reset is used to wipe and take your computer back to where it was on the day you opened the box. It will delete everything on your hard drive. Be sure to backup anything you don’t want to lose.

Part 1: Reset Windows 10/8 Dell Laptop to Factory Settings without Admin Password

Locked out of your Dell laptop after forgot the admin password? Don’t worry! Follow these steps and you can factory reset Windows 10 or 8 from the login screen:

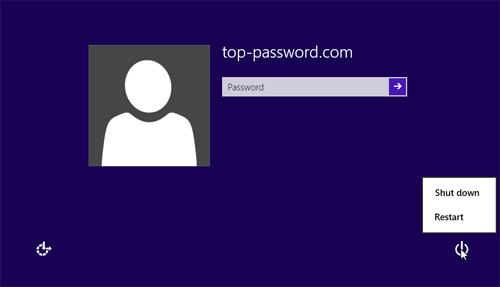
  1. From the login screen, click the Power icon in the lower right corner of the screen. While holding the Shift key, click Restart.

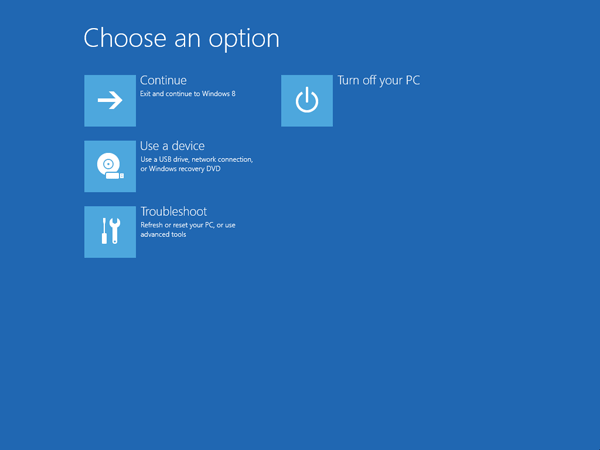
  2. The computer will restart and take you to the troubleshooting option screen. Click on Troubleshoot.

  3. Now you’ll see the options to reset or refresh your computer. Click on Reset your PC.

  4. Click Next. The system will reboot and begin preparing to reset the PC.
  5. At the Reset your PC screen, click Just remove my files and then Click Reset.

Part 2: Reset Windows 7/Vista Dell Laptop to Factory Settings without Admin Password

Unlike Windows 10/8, Windows 7 and Vista will require you to enter admin password when resetting it to factory state. If you’ve forgotten your password, you can remove the password by booting your Dell lapltop from PCUnlocker Live CD. If you don’t have such as a Live CD, you can create one from another computer you have access to.

Once you’ve successfully removed the admin password (or you could remember your password), let’s proceed with a factory reset on your Windows 7/Vista Dell laptop:

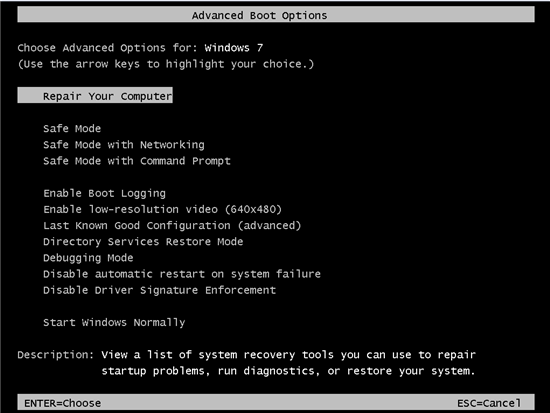
  1. Turn on the laptop. As soon as the Dell logo appears on the screen, repeatedly press the F8 key until you see the “Advanced Boot Options” menu.

    repair-your-computer

  2. Select “Repair your computer” and press Enter. The System Recovery Options screen opens.
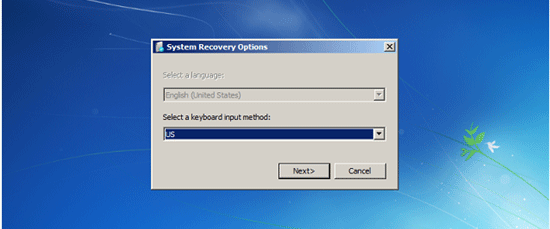
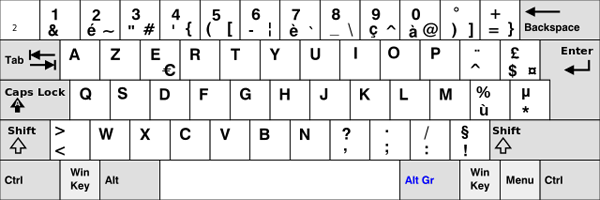
  3. Select your keyboard layout, and then click on Next.

    select-keyboard-layout

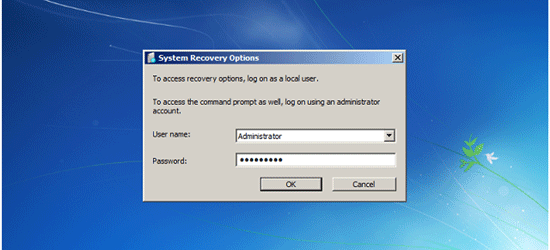
  4. At the next screen it will ask you for the user name and password. Type your Administrator username and password, and then click OK. If you’ve removed the admin password, leave the password field blank.

    enter-admin-password

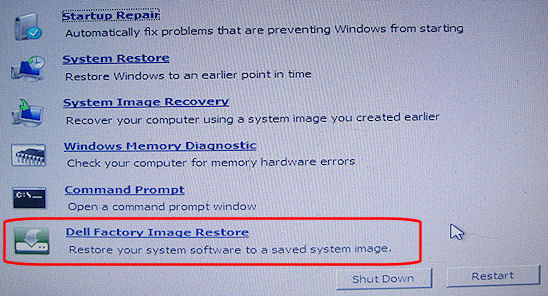
  5. When you’re presented with a list of system recovery options, look for an option named “Dell Datasafe Restore and Emergency Backup“, “Dell Factory Image Restore“, or “Dell Backup and Recovery Managers“. Click on it and follow the on-screen instructions to reset your Dell laptop to factory settings.

    dell-factory-reset

Block Read / Write Access to USB or CD Drive in Windows 10 / 8 / 7

October 29th, 2015 by Admin

There are situations where you might want to disable USB/CD device access in your computer, if someone wants to copy your files to removable devices (USB stick or CD). In this tutorial we’ll show you 2 ways to block read/write access to USB/CD drive in Windows 10, 8 and 7.

Method 1: Using Group Policy

  1. Open up the Run box by press the Windows key + R. Type gpedit.msc and press Enter.

    gpedit

  2. When the Local Group Policy Editor opens, navigate to the following location:
    User Configuration -> Administrative Templates -> System -> Removable Storage Access

    If you want to block access to removable devices for ALL Windows accounts, navigate to this location instead:
    Computer Configuration -> Administrative Templates -> System -> Removable Storage Access

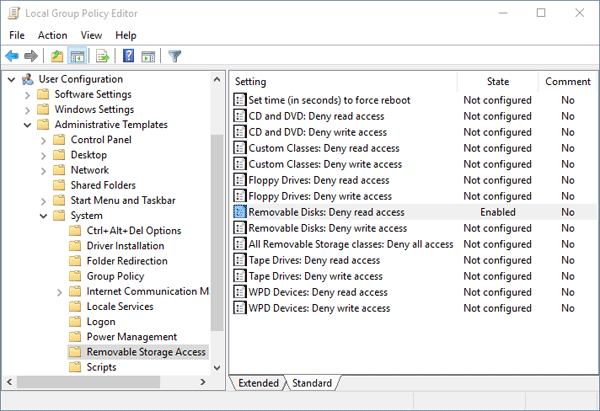
  3. In the right pane, there are lots of settings for denying read/write access to removable disk, CD and DVD. If you want to deny read access to all external removable hard drive or USB flash drive, just double-click on the policy “Removable Disks: Deny read access“, and set it to Enabled.

    usb-storage-access

  4. In order to make your changes take effect immediately, open an administrative Command Prompt and run the following command:
    gpupdate /force
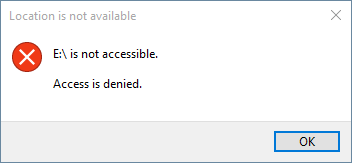
  5. Once your group policy takes effect, a user will see the following message box whenever they attempt to open a removable storage device.

    usb-access-is-denied

Method 2: Using Registry Trick

However, not all editions of Windows has a Group Policy Editor (gpedit.msc). If you’re using a Home edition of Windows, you have to use this registry trick to disable the USB/CD drive access. Here’s how:

  1. Press the Windows key + R to open the Run box. Type regedit and hit Enter.
  2. In the Registry Editor, navigate to the following key:
    HKEY_CURRENT_USER\SOFTWARE\Policies\Microsoft\Windows\RemovableStorageDevices

    If you want to block access to removable devices for ALL Windows accounts, navigate to this key instead:
    HKEY_LOCAL_MACHINE\SOFTWARE\Policies\Microsoft\Windows\RemovableStorageDevices

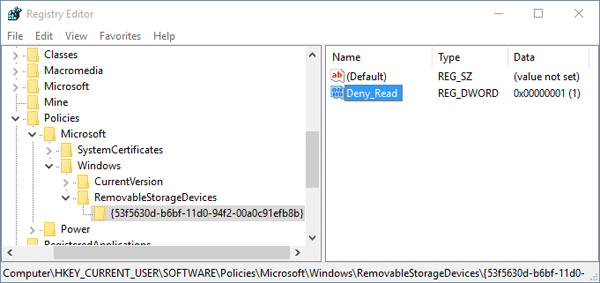
  3. In the left pane, right-click on RemovableStorageDevices, select New -> Key and type in {53f5630d-b6bf-11d0-94f2-00a0c91efb8b}.

    {53f5630d-b6bf-11d0-94f2-00a0c91efb8b} is GUID of the generic USB storage device. If you want to block CD/DVD access, type the GUID {53f56308-b6bf-11d0-94f2-00a0c91efb8b} instead.

  4. In the right pane, right-click on an empty area and select New -> DWORD (32-bit) Value and type Deny_Read and press Enter, modify its value to 1.

    usb-deny-read

    If you want to deny write access, create a new value Deny_Write and set its value to 1.

  5. Close the Registry Editor. Restart your computer to apply changes.

Auto Shutdown Windows 10 / 8 As You Expect

September 25th, 2015 by Admin

Sometimes you might want to schedule Windows to shutdown automatically after a specified amount of time. For example, let’s say you’re downloading a big file at night. You know it will take about one hour for it to be complete, but it’s too late and you must sleep now. You don’t want to leave your laptop running overnight.

Here I’ll show you 2 methods to set up auto shutdown in Windows 10 and 8, and instruct your computer to automatically shutdown after a given amount of time, or at a specified time.

Method 1: Auto Shutdown Windows 10/8 After a Certain Amount of Time

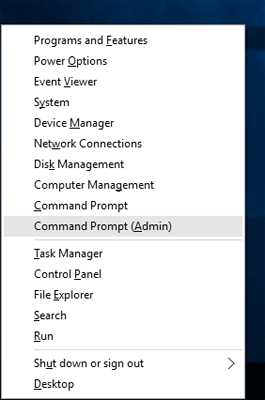
  1. Press the Windows key + X opens the Quick Access Menu. Click on Command Prompt (Admin).

    win+x-menu

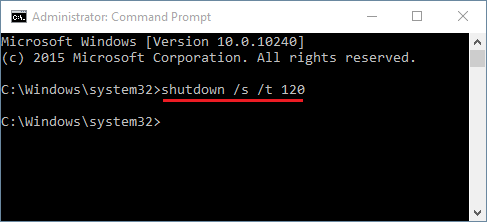
  2. Using the shutdown command you can set your computer to automatically shutdown after the amount of time you specified. For example, if you want to shutdown computer exactly after 120 seconds, type the command as follow:
    shutdown /s /t 120

    auto-shutdown

  3. Once you execute the command above, the system will force close all running applications and shutdown after 2 minutes.

Method 2: Auto Shutdown Windows 10/8 At a Specified Time

But sometimes you might want to schedule your Windows computer to shutdown at a specified time. For example, if you have a habit of listening music on your laptop before bed, you might have the tendency to fall asleep but forgot to turn off your computer. To avoid this, you can configure your PC to shutdown automatically at midnight. Here’s how:

  1. You’ll need to open up Task Scheduler to create a schedule task. Press the Windows key + R and type taskschd.msc in the Run box.
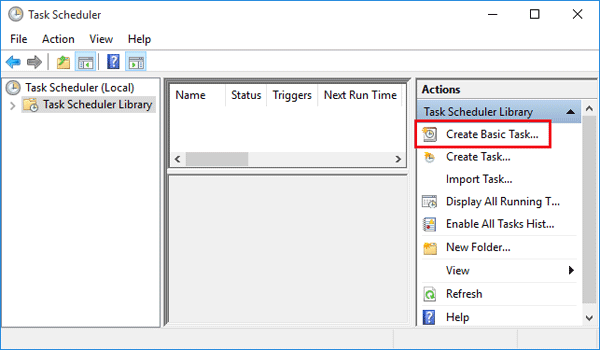
  2. The Task Scheduler window will come up. Select Create Basic Task from the Actions panel on the right.

    task-scheduler

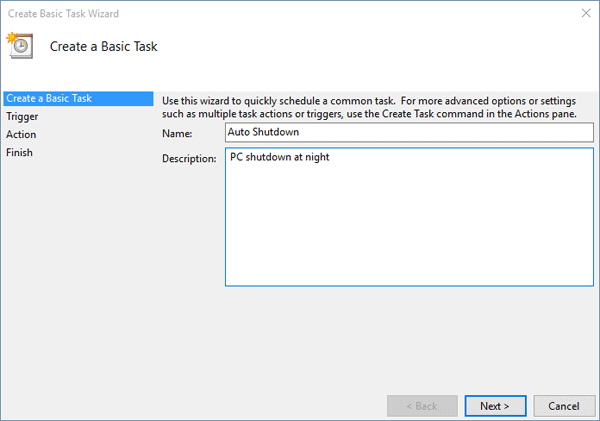
  3. Enter a meaningful name and description of the task you are going to create, and then click on Next.

    create-basic-task

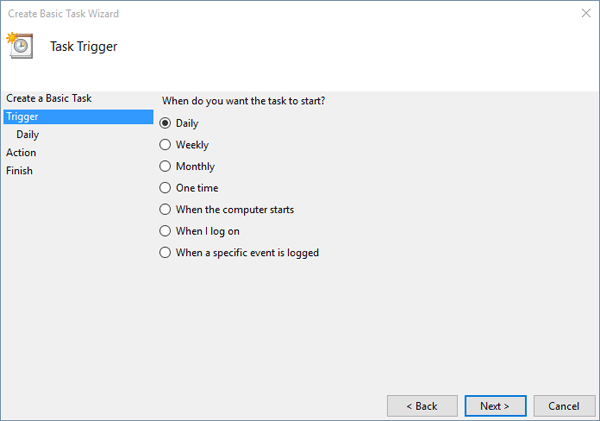
  4. Select the radio button “Daily” and click on Next to continue.

    task-trigger

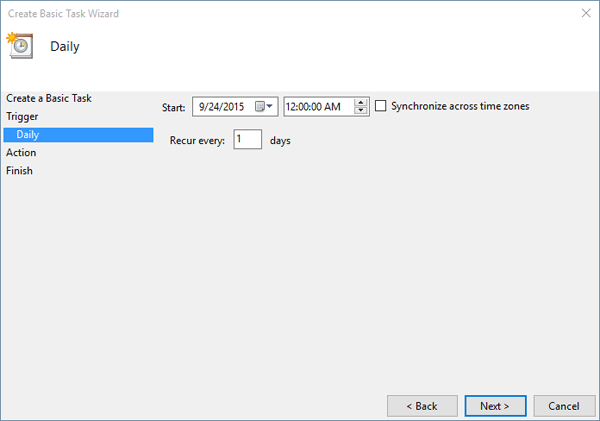
  5. Now enter the starting date and time. Also, make sure that you are choosing for the task to reoccur every day.

    when-to-start-task

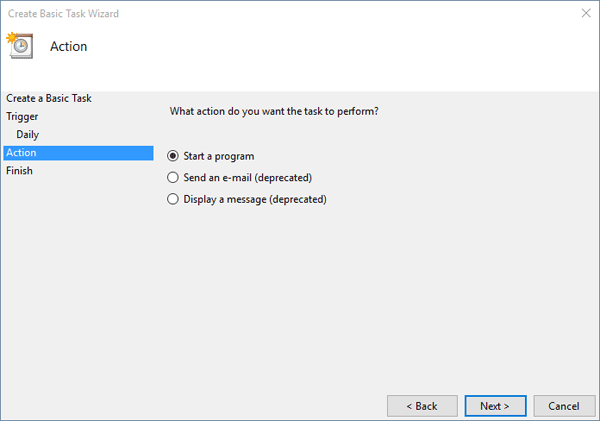
  6. Select the radio button “Start a program” and click on Next.

    task-action

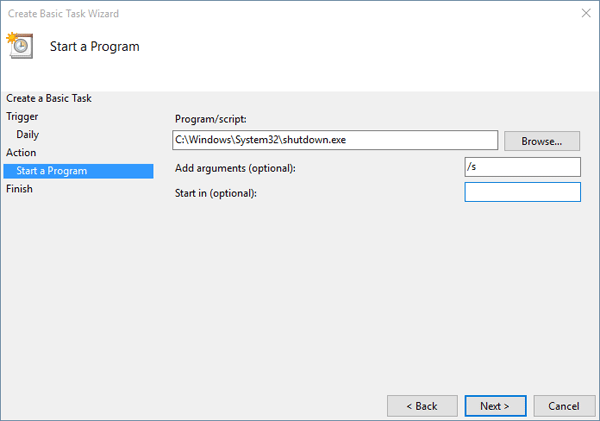
  7. Click on Browse button to locate shutdown.exe under the system folder c:\windows\system32. Enter /s as the application argument which forces your Windows computer to shut down.

    shutdown-task

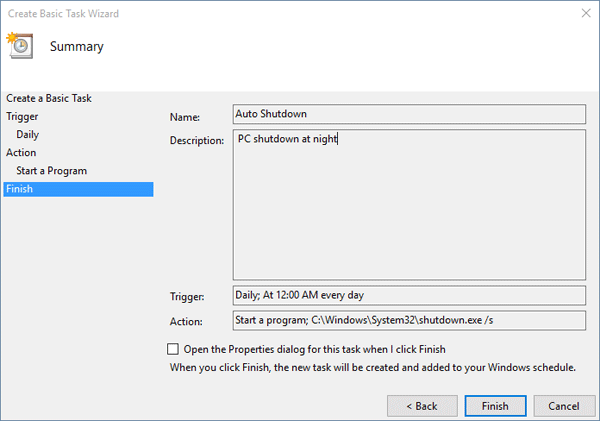
  8. Go through the summary, and if everything is fine, click on Finish.

    finish-task-creating

    Now you have successfully configured the automatic shutdown at night.

Reset Forgotten Windows 8 Password on Lenovo Yoga Tablet 2

August 30th, 2015 by Admin

Lenovo Yoga Tablet 2 was loaded with a 32-bit version of Windows 8.1, and if you’ve forgotten the login password, you can reset it with PCUnlocker. But this tablet can boot in native UEFI mode only, so you need to use 32-bit version of PCUnlocker Enterprise which supports UEFI boot. Let’s see how to create a UEFI bootable USB drive with PCUnlocker and then reset lost Windows 8 password on Lenovo Yoga Tablet 2.

Part 1: Create A PCUnlocker Live USB

As this tablet doesn’t come with a CD drive, you have to use a USB thumb drive (with at least 1GB of space) instead. Follow the steps below to create a PCUnlocker Live USB from another computer:

  1. Download the 32-bit version of PCUnlocker Enterprise and save it to your desktop. Unzip it and you’ll get a CD image: pcunlocker.iso.
  2. Download and install the free USB creator software – ISO2Disc, which allows you to make a bootable USB drive from a ISO image.
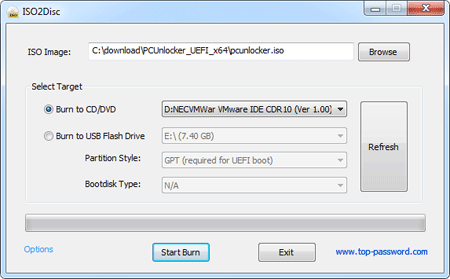
  3. Launch the ISO2Disc program. Click on Browse button and locate the pcunlocker.iso file. Next click on “Burn to USB Flash Drive” and select your attached USB thumb drive.
  4. Select “GPT (required for UEFI boot)” from the Partition Style list. Click on Start Burn to begin creating a PCUnlocker Live USB drive.

Part 2: Reset Lenovo Yoga Tablet 2 Password

As the tablet doesn’t have a full-size USB port, you have to use a micro USB on-the-go (USB OTG) adapter to connect your USB thumb drive to the micro USB port on the Lenovo Yoga Tablet 2. Once connected, you can proceed to reset your forgotten Windows 8 password:

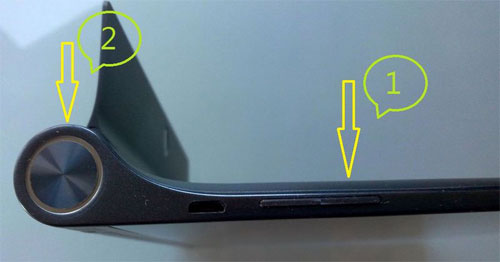
  1. When your tablet is turned off, press and hold the volume rocker up button, and press and hold the Power button at the same time.

    lenovo-yoga-tablet

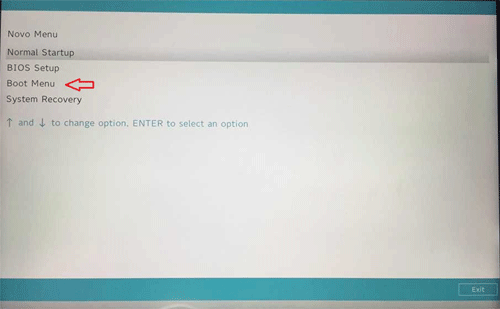
  2. This will turn on the tablet and take you to the Novo Menu. Now you can release both the volume rocker and the Power button.

    yoga-tablet-boot-menu

  3. Select the Boot Menu and hit Enter. From the next screen, choose the USB thumb drive as the boot media.
  4. Once booted to the PCUnlocker program, you’ll see a list of Windows accounts displayed on your screen. Choose a user account and click on “Reset Password” button, it will unlock & reset your forgotten Windows 8 password offline.

  5. Disconnect your USB drive and reboot the tablet. You can now login to Windows without typing a password!

How to Create A Windows To Go USB Drive in Windows 8 Enterprise

August 3rd, 2015 by Admin

Windows to Go is a exclusive feature available in Windows 8 Enterprise only, which lets users create a portable version of the OS that can be used directly from a USB drive. Here’s how to create a Windows To Go USB drive in Windows 8 Enterprise, without using any third-party software.
How to Create A Windows To Go USB Drive in Windows 8 Enterprise?

  1. First of all we need to open the Windows To Go Creator. Press the Windows key + W, type “Windows To Go” and then press Enter. The Windows To Go Creator Wizard opens.
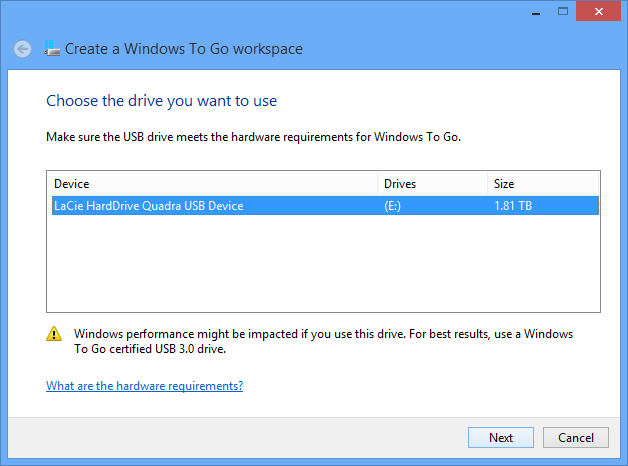
  2. Select your USB drive. Although it’s recommend to use USB 3.0 external storage device, USB 2.0 should also work.
    windows-to-go-1

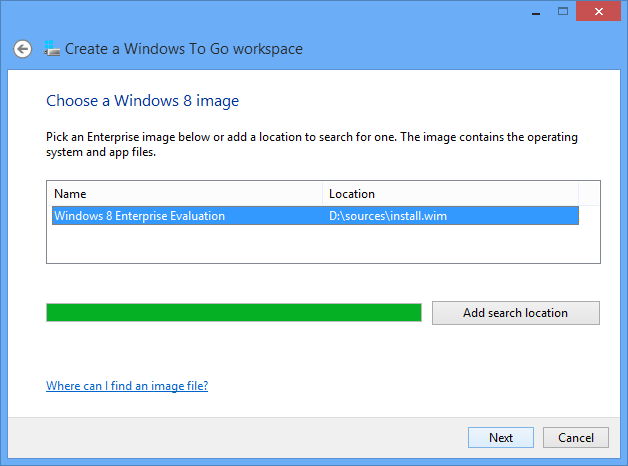
  3. Select Windows 8 image (.wim) file from Windows 8 installation DVD. If you’re using a Windows 8 installation ISO file, you can extract the install.wim file from it with the freeware 7-zip.

    windows-to-go-2

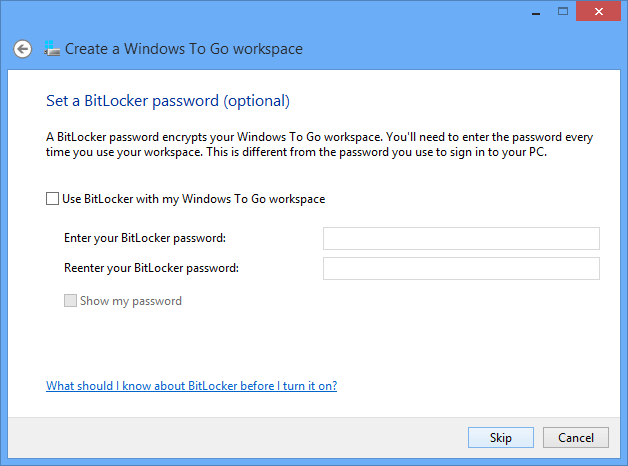
  4. Set up BitLocker password. By using Bitlocker, the USB drive and all data on it will be encrypted. This option is not mandatory, and you can skip it by clicking the Skip button.

    windows-to-go-3

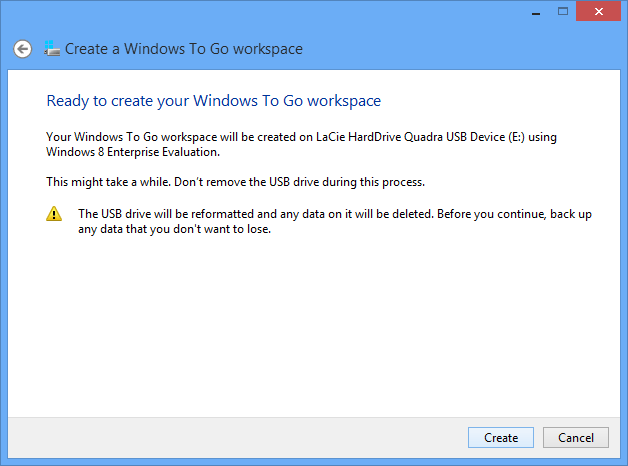
  5. Begin to create Windows To Go USB drive. This step displays the summary of settings and prepares your storage media for Windows To Go workspace. Clicking on Create at the bottom will start the process.

    windows-to-go-4

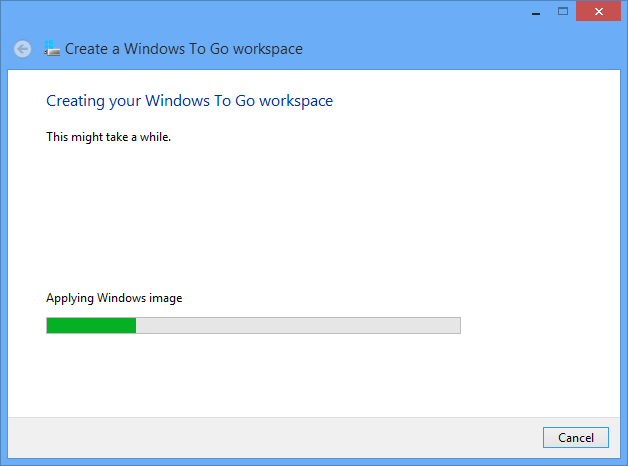
  6. After this step, it begins to install Windows 8 on your USB drive. The whole process should take about 30 minutes, depending on the hardware from which you are running this.

    Windows-to-go-5

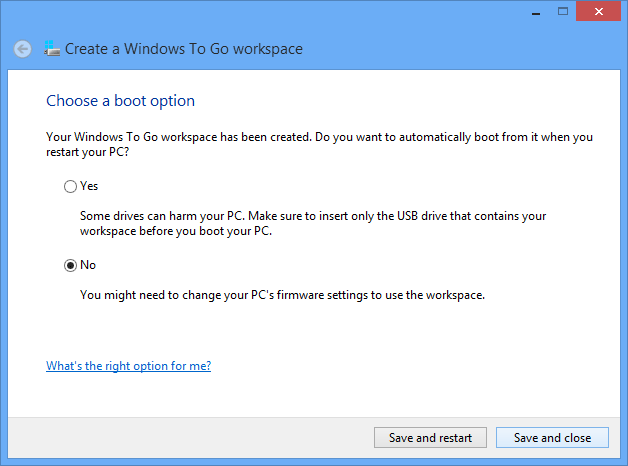
  7. Once a Windows To Go USB drive has been made you can choose whether to set up the host PC to boot from USB devices, or leave it as it is. You can close this wizard by selecting No, then choosing Save and Close.

    windows-to-go-boot-option

  8. Now your USB drive is ready for use.

Windows To Go Creator is only available in Enterprise edition of Windows 8. But with the freeware ISO2Disc you can create Windows To Go USB drive in any edition of Windows, so long as you have a Windows 8 ISO image.

2 Options to Add a User to Local Administrators Group

July 13th, 2015 by Admin

Only an administrator can perform the administration tasks such as installing a driver or an application. If you have an existing standard or limited account, you can grant it administrator privileges by adding it to the built-in Administrators group. Here are two options to add a user to the local Administrators group in Windows 10, 8, 7, Vista or XP.

Option 1: Computer Management

The easier way to add a user to the local Administrators group is to use the Computer Management app. Here’s how:

  1. To open the Computer Management, right-click on My Computer icon on your desktop and then select Manage. Another method is to press the Windows key + R to bring up the Run box, then type compmgmt.msc and hit Enter.
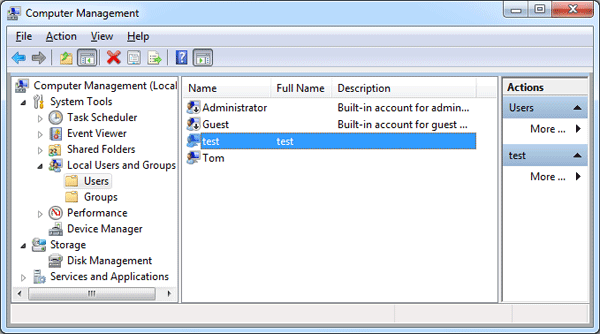
  2. When the Computer Management window opens, expand Local Users And Groups in the left pane, and click on Users (Please skip to the option 2 below if you don’t see Local Users and Groups.)

    local-users-and-groups

  3. Double-click your desired user account in the right hand side.
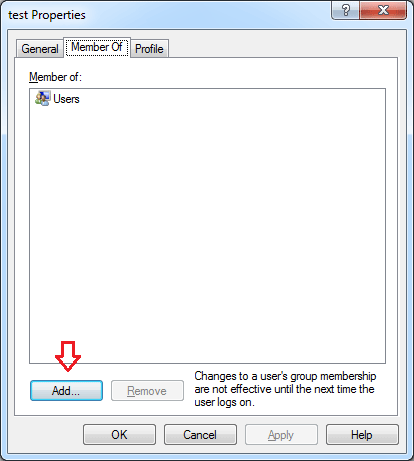
  4. In the User Properties window, click the Add button.

    account-properties

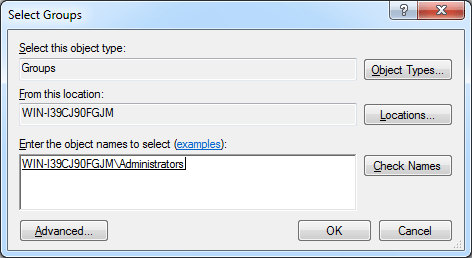
  5. In the Select Groups dialog, type the name of your administrators group. Click Check Names, and then click OK.

    select-groups

    If you don’t know the name of your administrator group, click Advanced and next click Find Now.

Option 2: Command Prompt

However, not every edition of Windows have the Local Users and Groups entry in the Computer Management (for example, Windows 8 Home and domain controller). This method will work on all editions of Windows.

  1. Open an elevated Command Prompt. In Windows 10 or 8, press the Windows key + X and then click “Command Prompt (Admin)“. In Windows 7 or Vista, go to Start > All Programs > Accessories, then right-click on Command Prompt shortcut and select “Run as Administrator“.
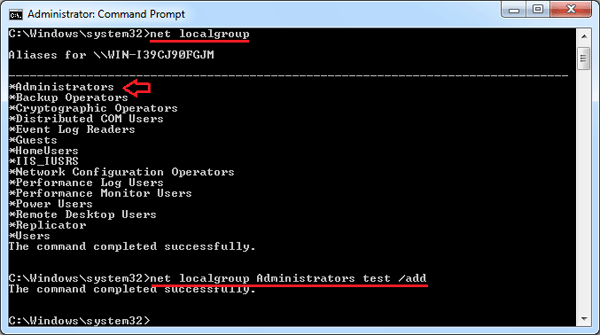
  2. To see a list of local groups available, just type:
    net localgroup
  3. You can add a user to the built-in Administrators group by running the following command:

    net localgroup Administrators [username] /add

    For example, add a user named test to the administrators group, we can run the below command.
    net localgroup Administrators test /add

    add-user-to-group

How to Bypass the Password on Any Windows Version

July 6th, 2015 by Admin

There are lots of people that for some reason forget the login password on their Windows computers. Most of the answers they find all over the Internet is to reinstall or reset the password. This is not the answer you’ll get here. Today I’ll share with you how to bypass the password on any Windows version, not just reset it.

How to Bypass the Password on Any Windows Version?

  1. Download the required password bypassing tool – PCUnlocker. Once it’s finished, double-click the zip file to extract it. You will then need to burn the ISO file to a writable CD using a program like ISO2Disc.

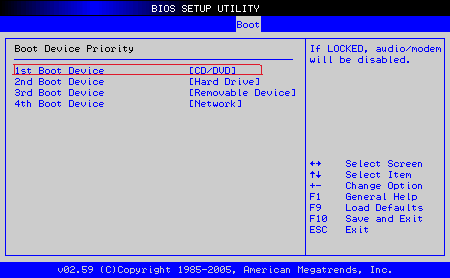
  2. Insert the CD into the computer that needs its password bypass and boot from it. You may have to change the computer’s boot order in the BIOS in order to boot from the CD.

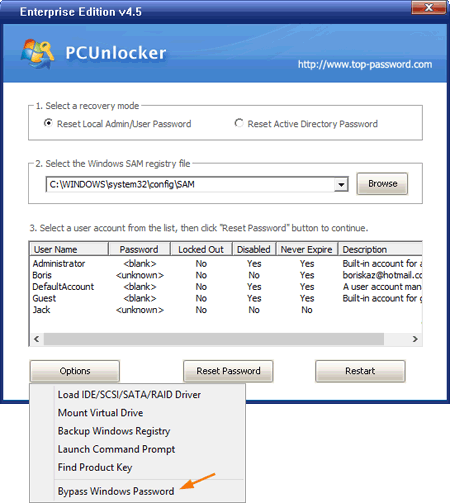
  3. If you boot from the CD successfully, it will run the Windows PE environment from memory. When the PCUnlocker application opens, you’ll see a list of Windows user accounts that are discovered on your computer.
  4. Here we’re not going to reset the user password, so don’t click the “Reset Password” button. At the bottom-left side of your screen, there is an Options button. Click on Options and select “Bypass Windows Password”.

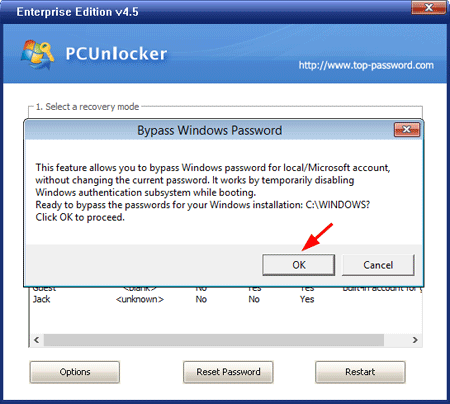
  5. Confirm your password bypass operation and click OK to proceed.

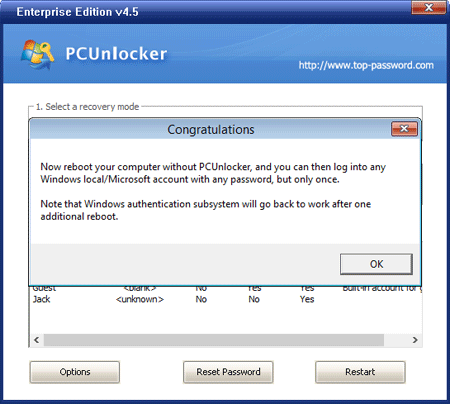
  6. When you see the Congratulations dialog box, you’re almost done!

    Restart your compute and take out the CD. When it boots to the Windows login screen, click the icon of any User account (supporting Windows 8 Microsoft account) and you can login with arbitrary password.

I have tested this procedure on Windows 10, 8.1, 8, 7, Vista, XP and it works fine, so if yours somehow does not work, go back through the steps again and make sure you have not missed any step. Or check out the boot up toubleshooting guide for PCUnlocker.

3 Ways to Turn off Windows Defender in Windows 10 or 8

July 5th, 2015 by Admin

Windows Defender is a built-in antivirus software comes with Windows 10 and Windows 8. While Windows Defender provides very baseline protection, it slows down your PC considerably. Users who prefer using third-party security solution like Kaspersky, McAfee or Norton might want to completely disable Windows Defender. Here are 3 ways to turn off Windows Defender in Windows 10 or 8.

Method 1: Permanently Turn off Windows Defender with Group Policy

  1. Press the Windows key + R to bring up the Run box. Type gpedit.msc and hit Enter.

  2. In the left pane of Local Group Policy Editor, navigate to the following location:
    Computer Configuration -> Administrative Templates -> Windows Components -> Windows Defender Antivirus -> Real-time Protection

    In the right pane you will see a policy labeled “Turn off real-time protection“. Double-click on it to modify.

  3. Select Enabled. Click Apply and then OK.

  4. You have to restart the computer to allow this policy to take place. When you try to turn on real-time protection again in Windows Defender, you’ll get a message that saying “This setting is managed by your administrator“.

Method 2: Permanently Turn off Windows Defender with Command Prompt

  1. Open the Command Prompt as administrator. Type the following command and press Enter.
    reg add "HKEY_LOCAL_MACHINE\SOFTWARE\Policies\Microsoft\Windows Defender\Real-Time Protection" /v DisableRealtimeMonitoring /t REG_DWORD /d 1 /f

  2. Restart your computer to apply the changes, and then Windows Defender should now be disabled.

Method 3: Temporarily Turn off Real-time Protection from Windows Defender

  1. After opening up Windows Defender, navigate to Virus & threat protection tab. Under the “Virus & threat protection settings” section, click on the Manage settings link.

  2. Turn off the Real-time protection toggle switch.

  3. Windows Defender will disable its real-time protection temporarily. The next time you restart your computer Windows Defender will re-enable automatically.