Archive for the ‘Windows 8’ category

How to Turn Off SmartScreen Filter in Windows 10 or 8

April 9th, 2015 by Admin

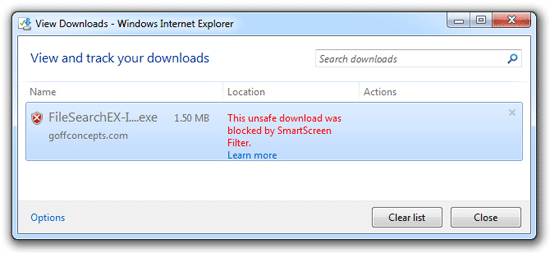
SmartScreen Filter is a useful security feature introduced since Windows 8. When trying to download or run a specific program, SmartScreen might show you a warning that “it is not commonly downloaded and could harm your computer“, “running this program might put your PC at risk” or “This unsafe download was blocked by SmartScreen Filter“.

smartscreen

download-blocked-by-smartscreen

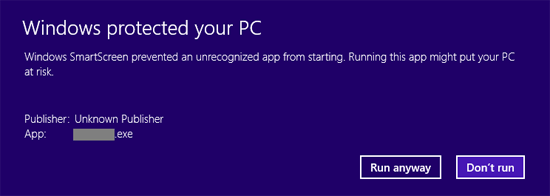
If a program is already used by a reasonably large number of people, it will be considered to be safe and SmartScreen will allow you to download or install it without warnings. If the program is rarely downloaded, SmartScreen will warn that it might not be a safe choice. If you are sure that the downloaded program is safe, you can continue by clicking Run Anyway button.

This can be annoying, when downloading less popular applications. SmartScreen is not an anti-virus software and it won’t scan your PC for threats at all. SmartScreen may occasionally prevent a legitimate application from running. If you don’t like that feature, here’s how to disable it separately from Control Panel, Microsoft Edge and Internet Explorer.

Part 1: Turn Off SmartScreen Filter from Control Panel

  1. Press the Windows key + X to bring up the Power User menu, and then click Control Panel.
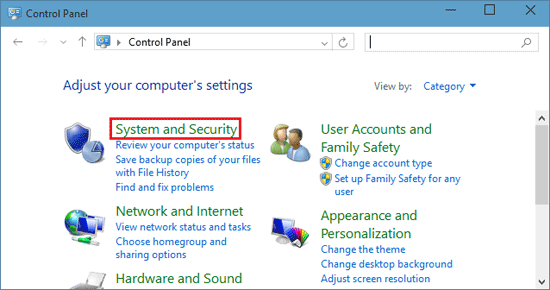
  2. After opening the Control Panel, select System and Security option as it has been shown in the image below.

    control-panel

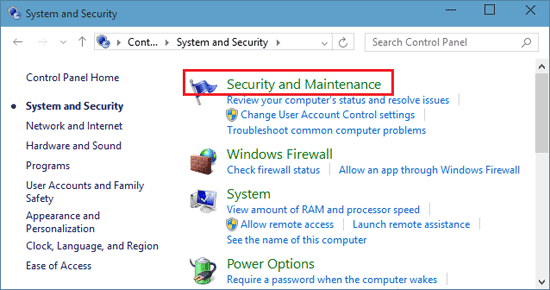
  3. Now select the Action Center option, or click on Security and Maintenance in Windows 10.

    system-and-security

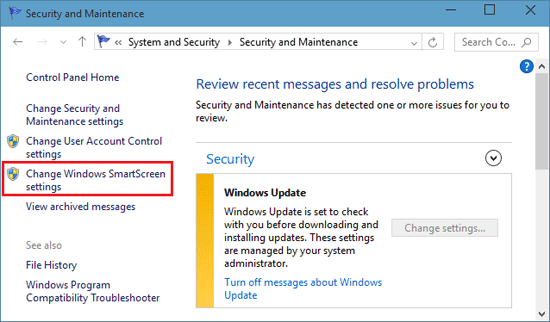
  4. In the left pane, click on the Change SmartScreen settings link.

    change-smartscreen-settings

  5. Now SmartScreen Settings window will appear. You will see three options there. Check the last option
    Don’t do anything (Turn Off Windows SmartScreen)” and press OK to disable SmartScreen.

    disable-smartscreen

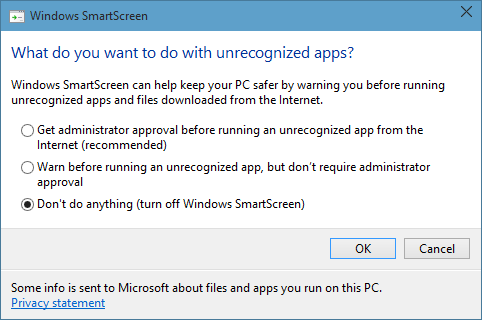
  6. Now you are done with it. SmartScreen is disabled now. It will no more irritate you until you re-enable it.

Part 2: Turn Off SmartScreen Filter for Microsoft Edge

However, even if you’ve turned off SmartScreen Filter in Control Panel, Microsoft Edge browser still uses the SmartScreen Filter to check for malicious website or download. Here is how to disable SmartScreen Filter protection in Microsoft Edge:

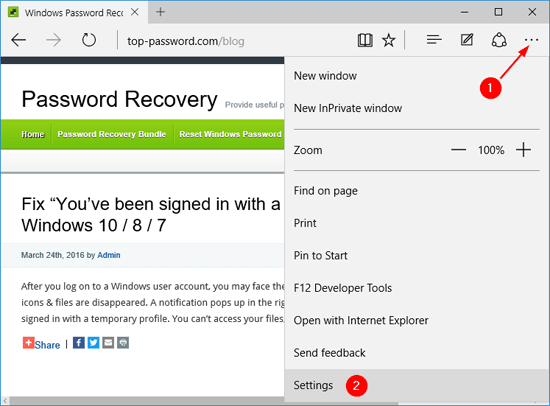
  1. Open Microsoft Edge. Click on the More actions button at the top right corner, and then select Settings from the drop-down menu.

    microsoft-edge-settings

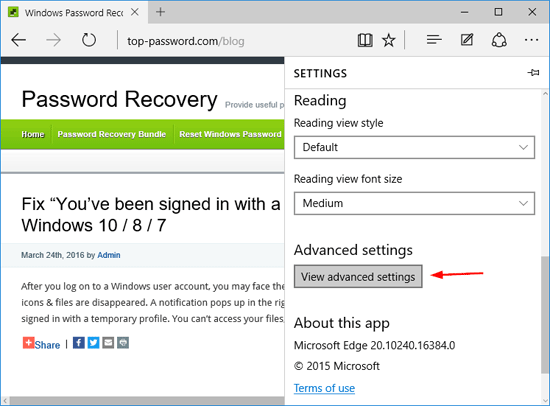
  2. Scroll down the settings and click on “View advanced settings” button.

    view-advanced-settings

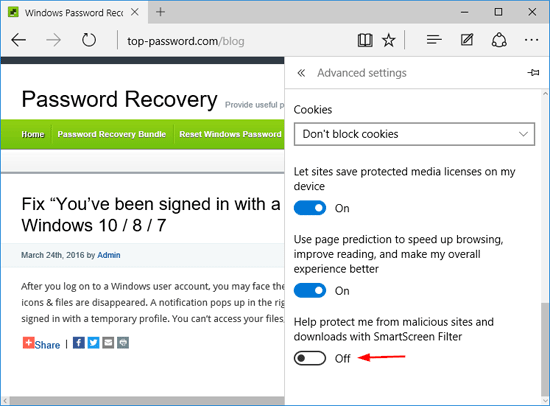
  3. Toggle the “Help protect me from malicious sites and downloads with SmartScreen Filter” switch Off.

    disable-smart-filter-protect

Part 3: Turn Off SmartScreen Filter for Internet Explorer

If your downloaded is blocked by Internet Explorer, here is how to turn off SmartScreen Filter in Internet Explorer:

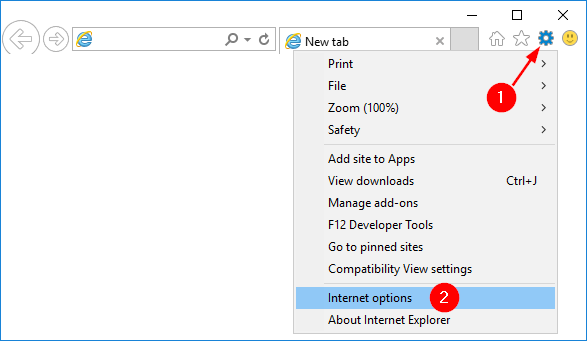
  1. Open Internet Explorer. Click the Gear icon in the upper-right corner and then select Internet Options.

    internet-options

  2. Select the Advanced tab. Scroll down to the Security section and then uncheck the “Enable SmartScreen Filter” setting.

    uncheck-smartscreen-filter

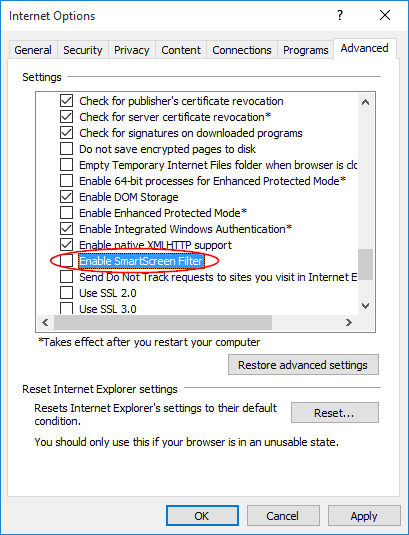
  3. Click Apply and then OK.

How to Create An Encrypted and Locked Folder in Windows

April 4th, 2015 by Admin

There are many folder locking programs out there that allow you to password protect and set different access rights to your files. But most of these programs don’t encrypt your files at all. Someone can easily bypass this protection to access your files by booting your PC with a Linux or WinPE Live CD, or removing your hard drive and connecting it to another PC.

If you’re a bit more conscious of privacy, encrypting your files is a better solution. Lock My Folders is an on-the-fly encryption software to lock and encrypt all kinds of pictures, videos, documents, files and folders. In this article we’ll explain how to use this program to create an encrypted and locked folder in Windows 10, 8, 7, Vista and XP.

Part 1: Set Password

Click here to download the Lock My Folders application and install it on your computer. The first time you launch the program, it will prompt you to set a master password that will be used to encrypt your files later on.

Enter a password that you can remember as you’ll need it to open and use the program next time.

Part 2: Create An Encrypted Folder

To create an encrypted folder, click on Add button from within the Lock My Folders program.

In the popup window, type your desired folder name and specify the location where you would like your new secure folder to be created. Click OK. You can create a secure folder in your local hard drive or USB flash drive.

Now your secure folder should have been created. You can then copy all your private photos, documents & videos into this folder, or create or edit a confidential file in the secure folder. All your files stored in this folder will be encrypted automatically on the fly.

Part 3: Manage Your Encrypted Folders

With the steps above you can create as many secure folders as you want. You can lock your secure folder after you finish working with it. Just right-click on the secure folder and select “Lock My Folder“.

When a secure folder is locked, everyone couldn’t access all files in it without knowing your password. You can also set your locked secure folders to be invisible from Windows Explorer and Command Prompt, by following these steps:

  1. Start the Lock My Folders program.
  2. Click on the Options icon from the top right corner of the main screen, and then select Settings.
  3. Check the “Hide the secure folders when they are locked” box.

If you shutdown or restart your PC, all your secure folders will be locked out automatically.

The next time you need to open or access the secure folder, you need to unlock it firstly. Right-click on the secure folder and select “Unlock My Folder“.

The program will ask you to enter your password. Upon successfully verifying the password, the program will open the secure folder in Windows Explorer.

If you need to reinstall your operating system or transfer your secure folders to another machine, just backup the secure folders to an external storage device and you can then import them to the Lock My Folders program again. It’s that simple!

How to Delete the Windows.old Folder in Windows 10/8/7

March 23rd, 2015 by Admin

When you perform a custom Windows installation or upgrade Windows to a newer version, the old Windows folder is renamed to Windows.old in case you’d like to revert the upgrade. Windows 8 or 10 users might also have seen the Windows.old folder after performing a PC refresh.

Windows.old contains not only your old Windows installation files, but also your old Documents, Settings and Programs. The folder is usually gigantic in size and can take up considerable space in your system partition. So if you are pretty sure that you no longer need any data from Windows.old then it would be a wise decision to delete it.

windows.old-folder

Unfortunately, you can’t remove the Windows.old folder by simply pressing the Delete key because your user account doesn’t have ownership of the folder. Here’s how to take ownership all files and subfolders in Windows.old, so you can then delete the whole folder to reclaim some space.

How to Delete the Windows.old Folder?

  1. Download and install the freeware TakeOwnershipPro on your local computer.
  2. Start the TakeOwnershipPro program and drag the C:\Windows.old folder to the program. Tick the “Include subfolders and files” box.

    take-ownership-pro

  3. Click Take Ownership. The program will begin to take ownership of all files and subfolders in the Windows.old folder. It could take you one or two minutes, depending on number of files and folders it contains.
  4. Once it is done, you can then delete the Windows.old folder without any permission issue.

It’s that simple. Deleting the Windows.old folder can save you quite a large amount of hard disk space and it will not affect the present state of the new OS.

Create A Custom Image to Refresh Your Windows 8 or 10 PC

February 28th, 2015 by Admin

PC Refresh and Reset has been available since the first release of Windows 8. In my previous post we’ve showed you how to reset your computer to factory default settings, or refresh your installation while keeping your settings and data files intact. One drawback is that you have to reinstall all your desktop applications after performing a PC reset or refresh.

If you have installed a lot of applications, or misplace the necessary installation discs or product keys, it can be an annoying and time-consuming task to get your computer back up and running. In this tutorial we’ll show you how to use the Windows built-in tool recimg.exe to create a custom image that contains all your desktop applications, so you won’t have to reinstall them after a refresh.

Part 1: Create A Custom Refresh Image in Windows 10 or Windows 8

A custom image will be a snapshot of the current state of Windows 10 / 8 and that will include all desktop applications that are currently installed on your computer. You should create a custom refresh image immediately after setting up your computer the way you want it so it’s clean and customized.

When you have your PC set up just the way you like it, here’s how to create your custom refresh image:

  1. Press the Windows key + X to bring up the Power User menu, and then select Command Prompt (Admin). When the UAC warning appears, click the Yes button.
  2. From the command prompt, run the recimg.exe tool to create a custom image file in your specified folder.

    recimg /CreateImage C:\CustomImage

    Enter the above command will create a new custom refresh image under the directory C:\CustomImage. If the folder doesn’t exist, it will create one for you.

    recimg

  3. It could take at least 30 minutes or more to finish creating the image, depending on how many applications you have installed. Once it’s done, you will see a new CustomRefresh.wim file created under your specified folder. And this .wim file will be set as the default refresh image and will be used next time when you use Refresh your PC operation.

    custom-refresh-image

Note: The recimg.exe tool is not included in the Windows 10 version released on July 29. You can only use it in Windows 10 Insider Builds up to Build 10122 or Windows 8/8.1.

Part 2: Refresh Your Windows 10 / 8 PC with Custom Image

  1. From the Windows 10 or 8 login screen, hold down the SHIFT key and click on the Power icon visible on the bottom right of the screen, then click Restart option.

    windows-8-login-screen

  2. In a moment you’ll see the recovery screen. click on the Troubleshoot option.

    recovery-mode

  3. Now click on the Refresh your PC option.

    troubleshoot

  4. Click Next. The system will reboot and begin preparing to refresh your PC. After Refresh your PC, you will notice all your previous installed application are right back to where they were. But you might lose some personal settings from those applications.

Last but not least, have a look on your C: drive and you’ll find a new folder named Windows.old, contains all the program files and Windows directory from your previous installation. If any of your applications had additional information stored in their installation directory, you can recover it from this folder.

The Windows.old folder could take up a large amount of disk space. Once you’re sure you don’t need anything from it, you can delete it to reclaim free disk space. But you might receive the “Access denied” error when you try to delete this folder. In that case, you need to take ownership of that folder using the freeware TakeOwnershipPro before deleting it.

take-ownership

5 Methods to Open File Explorer in Windows 10 / 8.1 / 8

February 4th, 2015 by Admin

Since Windows 8, Windows Explorer has been renamed to File Explorer and updated in significant ways. One of the first things I do after installing a new Windows OS is to find the explorer. In this article we’ll show you 5 methods to access File Explorer in Windows 8.1 and Windows 10.

Method 1: Open File Explorer with Win + E Shortcut

The easiest and quickest way to open File Explorer on all Windows is to press the Windows Key + E combination. Just press Win + E keyboard shortcut and you’ll see the File Explorer open where you can browse through all files on your hard drive.

Method 2: Open File Explorer from WinX Menu

You can bring up the WinX Menu (also known as Power User Menu) with your keyboard by pressing the Windows key and the X key together. This menu contains quick access to system utilities like the File Explorer, Control Panel, Command Prompt, Task Manager, Device Manager, and more.

winx-menu

Method 3: Open File Explorer from the Taskbar

By default, Windows 8.1 includes a File Explorer shortcut pinned to your taskbar. Simply click the shortcut icon on the taskbar and it will launch File Explorer immediately.

taskbar

Method 4: Using the Search Charm

Swipe in from the right edge of the screen, tap Search (or if you’re using a mouse, point to the upper-right corner of the screen, move the mouse pointer down, and then click Search), enter File Explorer in the search box, and then tap or click File Explorer.

search-app

Method 5: Add a Shortcut on the Desktop

However, most computer users have become accustomed to the way of opening the File Explorer by double-clicking the “My Computer” icon or “This PC” icon on the desktop.

my-computer-shortcut

To bring the “My Computer” icon back to your desktop, please refer to this article: Display My Computer Icon on Desktop in Windows 10.

Disable Command Prompt Using Group Policy or Registry Trick

February 2nd, 2015 by Admin

Command Prompt is a built-in tool in Windows that is rarely used by the average user. It’s not so user-friendly but advanced computer users with malicious intent can use the Command Prompt to bypass most restrictions that are enforced on the Windows Explorer based GUI. In this post, we will explain how to disable Command Prompt in Windows 11/10/8/7.

Note: If you need to use the Command Prompt frequently, or run batch scripts or use the Terminal Services, disabling Command Prompt is not recommended.

Option 1: Disable Command Prompt Using Group Policy

  1. Press the Windows key + R to bring up the Run box, type gpedit.msc and hit Enter.

  2. This will open the Local Group Policy Editor. Now, go to the following location in the left pane:
    User Configuration/Administrative Templates/System

    Make sure click on the System node rather than expanding it. In the right side pane you will see the “Prevent access to the command prompt” policy. Double-click it to modify.

  3. In the pop-up window, select Enabled. If you also want to prevent running .bat or .cmd script files, select Yes from the dropdown under the Options section. Click Apply/OK and you are done.

  4. You do not have to restart your computer for the setting to take effect. If you try to launch the Command Prompt, you’ll see the message “The command prompt has been disabled by your administrator.

Option 2: Disable Command Prompt with Registry Trick

Unfortunately, the Local Group Policy (gpedit.msc) is not available in all editions of Windows. For those users running the Home edition of Windows, you can still disable Command Prompt with this registry tweak:

  1. Press the Windows key + R to bring up the Run box, type regedit and hit Enter.

  2. This will open the Registry Editor. Navigate to the registry key: HKEY_CURRENT_USER\Software\Policies\Microsoft\Windows. Right-click the Windows key in the left sidebar and choose New -> Key.

  3. Name the newly-created as System. When the System key is selected, right-click the blank area in the right pane and select New -> DWORD (32-bit) Value.

  4. Name the DWORD as DisableCMD and then give it a value 1 for disabling the Command Prompt and preventing batch files from running. If you want to disable the Command Prompt but allow batch files, set the value to 2. This change will take effect immediately.

    To enable the Command Prompt again, just change the value to 0.

Conclusion

So this is how you can disable the Command Prompt in all versions of Windows. If you need a more secure method to lock the Command Prompt, you can use the third-party software – Protect My Folders, which allows you to protect c:\windows\system32\cmd.exe with a password.

How to Reset Forgotten Windows Password with Ultimate Boot CD (UBCD)

January 15th, 2015 by Admin

In this tutorial we’ll show you how to crack and reset Windows password when you forget it or want to unlock a computer with an unknown password. There are tons of recovery tools available to bypass password, but here I’ll use the freeware Ultimate Boot CD (UBCD).

Ultimate Boot CD is a Linux-based bootable disc with loads of useful software for repairing or fixing almost any Windows problem. The built-in chntpw utility could be used to wipe windows passwords and view/edit the registry. Here’s how.

Note: Ultimate Boot CD is a freeware so don’t expect it to work with domain controllers. If you want to find a more powerful yet easy-to-use password recovery software, try the PCUnlocker Live CD.

How to Reset Forgotten Windows Password with Ultimate Boot CD?

Before getting started, you need to download the Ultimate Boot CD (about 588Mb) from its official website, and then burn it to a CD. With the CD you can follow the steps below to reset forgotten Windows 8/7/Vista/XP password:

  1. Boot your locked computer from Ultimate Boot CD. On the boot menu of Ultimate Boot CD, choose Parted Magic and press Enter.

    ultimate-boot-cd

  2. The next screen you have to select your graphic settings. Just select option 1 and press Enter to use the default settings.

    parted-magic

  3. Once you are presented with the Parted Magic desktop, go to the left bottom corner of the screen and choose System Tools -> Change Windows Password.

    change-windows-password

  4. A new small window will open. It lists all Windows partitions detected on your local hard drive. Click on the correct drive and it will start the chntpw utility in the console.

    select-windows-installation

  5. You will now be presented with the chntpw Main Interactive Menu. Type 1 and press Enter.

    chntpw

  6. This will list out all of the Windows users on the system. Type the name of your desired user and press Enter.

    enter-username

  7. You will now be given the option to blank out the password, as well as several other ways to promote or unlock the user account. Type 1 and press Enter, it will remove the existing password.

    user-edit-menu

  8. If you don’t want to reset other user password, type ! and press Enter.

    quit-edit-menu

  9. Type q and hit Enter at this point to quit the User Edit Menu.

    quit-chntpw

  10. You will then be asked to write the registry hive to disk. Type y to confirm and save your changes.

    write-hive-files

  11. Now you can reboot, and you can log into your Windows account with a blank password. Once you’re logged in, you can go to the Control Panel to change your password to something else — something you can remember.

How to Hide A Drive / Partition from Windows Explorer

December 24th, 2014 by Admin

Do you have some private files that you want to hide from your children? Here is a registry trick to hide a drive or partition in Windows 11/10/8/7/Vista/XP, so it cannot be accessed from Windows Explorer by inexperienced users.

The method is not foolproof though, and users can still access the contents of the hidden drive from Command Prompt or Disk Management. If you have some confidential or sensitive data on a local disk and want to lock / protect it securely, I recommend you use the Protect My Folder application.

How to Hide A Drive / Partition from Windows Explorer?

  1. Open Registry Editor and navigate to the following key: HKEY_LOCAL_MACHINE\Software\Microsoft\Windows\CurrentVersion\Policies\Explorer. In the right pane, right-click the blank area and choose New -> DWORD (32-bit) Value.

  2. Name the newly-created DWORD as NoDrives and then double-click it. In the pop-up window, choose Decimal, enter a proper number for hiding your desired partition. In my example, I want to hide the network drive Z:, so I type in the value 33554432.

    Here’s a list of the values (decimal number) you’ll want to enter for different drive letters:

    • A: 1
    • B: 2
    • C: 4
    • D: 8
    • E: 16
    • F: 32
    • G: 64
    • H: 128
    • I: 256
    • J: 512
    • K: 1024
    • L: 2048
    • M: 4096
    • N: 8192
    • O: 16384
    • P: 32768
    • Q: 65536
    • R: 131072
    • S: 262144
    • T: 524288
    • U: 1048576
    • V: 2097152
    • W: 4194304
    • X: 8388608
    • Y: 16777216
    • Z: 33554432
    • ALL: 67108863

    But what to do if you want to hide more than one drive in Windows? Just add the values of the drives that you want to hide. For example, if you want to hide the drives E:, F: and A: you would enter 49 (16+32+1) in NoDrives as the decimal value.

  3. Restart your computer and your target drive will disappear from Windows Explorer.

    You can even hide the C: drive without corrupting your system. When you want to get your drives back, just set NoDrives to 0 or simply delete NoDrives altogether.