Archive for the ‘Windows 8’ category

How to Crack Windows 8.1 Password with A Bootdisk

October 13th, 2014 by Admin

How to unlock your computer after you’ve forgotten Windows 8.1 password? PCUnlocker is a powerful bootdisk that allows you to crack Windows 8.1 password on a computer where you forgot your password. The step-by-step guide below should work for Windows 8, Windows 8.1 and earlier versions of Windows.

How to Crack Windows 8.1 Password with A Bootdisk?

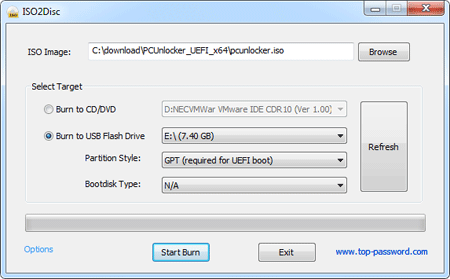
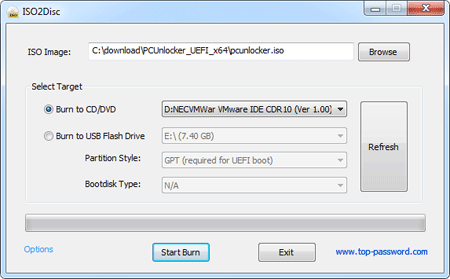
After you download PCUnlocker, you have to burn it on a CD by right-clicking the ISO file. If you don’t have an optical drive and you want to boot from a USB flash drive, you can use the free tool ISO2Disc.
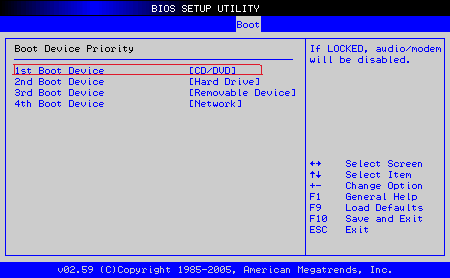
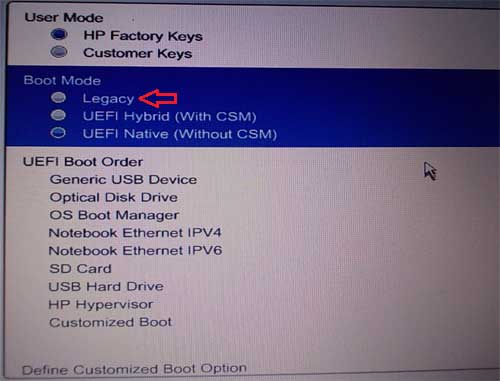
Next, you have to ensure that the CD or USB flash drive comes before the hard drive in the boot order of your BIOS settings. Most PCs allow you to access the PC setup by pressing F2, F12 or Del right after you turn the PC on. If your computer comes with UEFI firmware, you might also need to set your PC to boot with Legacy BIOS mode instead of UEFI mode.

After you boot PCUnlocker, you should see the following screen. If you have more than one Windows installation on the computer, be sure to choose the correct SAM registry file for your target Windows installation.

Choose the user account where you want to reset the password, click on Reset Password button. This program will remove the existing login password and unlock your account in case it was locked out or disabled.

The password cracking process is now completed. Reboot your computer and take out the CD or USB flash drive. You can then login to Windows 8.1 without the need of a password!

Lost Windows 8 or 7 Password on ASUS Zenbook

September 24th, 2014 by Admin

Just bought a new Asus Zenbook which came preloaded with Windows 8 but you’ve lost the password? A forgotten password is no need for panic. As long as you have a password removal utility, you can get back into Windows 8 or Windows 7 Ultrabook in minutes. PCUnlocker is one of the best recovery tools that can help you get rid of forgotten Windows 8 or 7 password with ease. The following is a walkthrough of using a CD to reset Windows 8/7 admin password on ASUS Zenbook Prime UX31A.

First of all, you need to make a PCUnlocker Live CD using a secondary computer, not your locked PC. Download the ISO image of PCUnlocker and burn it onto a blank CD with your CD burning program. If you don’t have one, try the freeware ISO2Disc or ImgBurn.

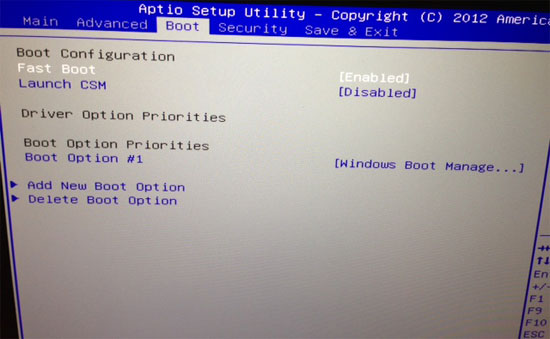
Once you’ve created a PCUnlocker Live CD, put it in the CD drive of your locked ASUS Zenbook laptop. Power on the machine and repeatedly press F2 key to enter the BIOS Setup. Go to the Security tab and disable the Secure Boot Control option. Navigate to the Boot tab, disable Fast Boot and enable Launch CSM. Press F10 to save and exit.

asus-zenbook-uefi

Press and hold ESC key to launch Boot Menu when the computer restarts. Select the CD drive from the list and press Enter to boot from it. After a while, the PCUnlocker program will launch and it shows you a list of local accounts for your Windows 8/7 installation.

Select the administrator account and click on Reset Password button. This will unlock / remove your ASUS Zenbook login password immediately. Take out the CD and reboot, you can then get back into your Windows 8/7 system without entering a password!

Conclusion

After enabling the CSM (Compatibility Support Module) on your ASUS Zenbook, the UEFI firmware will run as an emulated legacy BIOS. If you need to create a UEFI compatible CD, you need to use the Enterprise edition of PCUnlocker which can boot in UEFI mode, without requiring you to enable CSM support.

How to Log on to HP Omni 10 Tablet After Forgot Windows 8.1 Password

September 23rd, 2014 by Admin

Forgot Windows 8.1 password and can’t log on to your HP Omni 10 tablet? More often than not, common approaches to this problem is creating boot disks with password bypass tools or an independent Linux OS. Because HP Omni 10 tablet is preloaded with 32-bit UEFI firmware, here we’ll use a UEFI compatible software – PCUnlocker Enterprise. Here’s how to reset forgotten Windows 8.1 password on HP Omni 10 tablet.

How to Log on to HP Omni 10 Tablet After Forgot Windows 8.1 Password?

  1. After you’ve purchased PCUnlocker Enterprise (trial version), you’ll receive an order confirmation email with a link to download the software. Unzip the downloaded file and you’ll get two files: pcunlocker.iso and ReadMe.txt.
  2. Then download and launch ISO2Disc, which is a really simple piece of software that helps you burn an ISO image to a disk (CD or USB drive). Locate the PCUnlocker ISO image and select GPT (required for UEFI boot), click the Start Burn button to create a bootable USB drive. If you’d like, you could also create a bootable CD instead.

  3. HP Omni 10 tablet doesn’t come with a full sized USB port. To connect a USB drive to your tablet, a OTG cable is required. Now you need to boot your tablet from the boot disk you’ve created. Hold the Volume down button and then press the Power button to turn on your tablet until the Boot Menu appears. Select your USB drive and press Enter.
  4. Now your tablet will boot from USB drive. When the PCUnlocker program launches, it will display a list of user accounts that are stored in your Windows 8.1 SAM registry file. Choose an account and click on Reset Password button. The program will reset your forgotten password instantly.

  5. Restart your tablet and disconnect the USB drive. You can then log on to your HP Omni 10 tablet without typing a password!

How to Bypass Windows 8 Password on ASUS VivoTab Smart Tablet

September 22nd, 2014 by Admin

Forgot Windows 8 password and can’t get into your ASUS VivoTab Smart tablet? You don’t have to trash the computer, or even perform a dreaded factory restore. Here’s how you can bypass Windows 8 password on ASUS VivoTab Smart tablet, without losing any file or data.

How to Bypass Windows 8 Password on ASUS VivoTab Smart Tablet?

Before getting started, you need to find a password recovery utility that supports UEFI booting, because ASUS VivoTab Smart uses 32-bit UEFI firmware instead of legacy BIOS. Here we’ll use the Enterprise edition of PCUnlocker, which works with 32-bit/64-bit UEFI-based computers.

Use a secondary PC to download the full version of PCUnlocker Enterprise (trial version). Unzip the downloaded file and you’ll get a CD image called pcunlocker.iso, which needs to be burned onto a USB flash drive (or CD) with the ISO2Disc program. Remember to choose the GPT (required for UEFI boot) option.

After you’ve created a PCUnlocker USB drive, use a Micro USB adapter to connect it to your ASUS VivoTab Smart tablet. If your tablet is running, you must turn off the tablet.

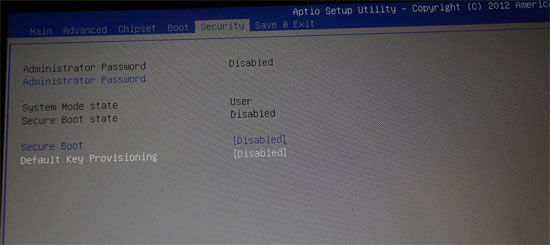
While pressing the Power button, hold the volume down button until you get to the Boot Device Menu screen. From there select Enter Setup. In the BIOS Setup, select the Security tab, disable Secure Boot and Default Key Provisioning.

asus-vivotab-smart-bios

Navigate to the Boot tab. Under the Boot Option Priorities section, set your USB flash drive as the first boot option. Save your changes and exit BIOS.

The tablet will restart and boot from your created USB drive. After a while, you’ll get to the PCUnlocker program which automatically locates all Windows accounts on your tablet. Choose an account and click on Reset Password. It will bypass / remove your forgotten password in no time.

Now you’ve successfully bypassed Windows 8 password on your ASUS VivoTab Smart tablet. Disconnect the USB drive and you can then boot into Windows 8 without entering a password!

Use VHD to Dual Boot Windows 8.1 on Windows 7 PC

September 15th, 2014 by Admin

Got a Windows 7 PC and want to install Windows 8.1 as a second operating system for dual-booting? All you have to do is create a new partition for Windows 8.1, then install it. But what to do if you don’t have a spare partition to do this? In this post we’ll learn how to install Windows 8.1 into a virtual hard disk (VHD) and dual boot Windows 8.1 on a Windows 7 PC, without partitioning.

How to Use VHD to Dual Boot Windows 8.1 on Windows 7 PC?

  1. Boot your computer from Windows 8.1 installation DVD or USB drive. If you have a Windows 8.1 ISO image, you can make a installation disc from the ISO image using the freeware ISO2Disc.
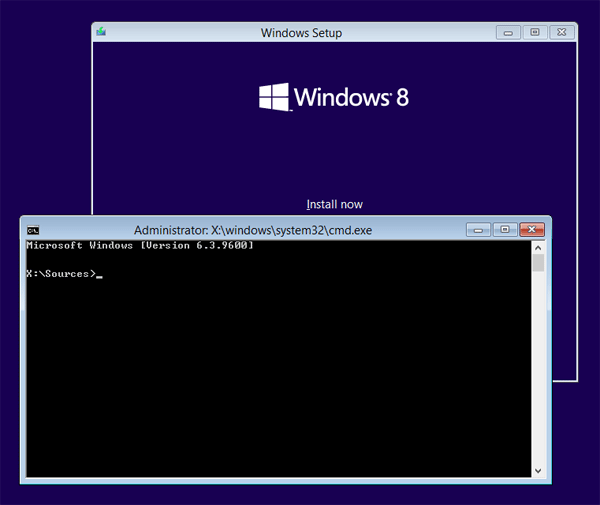
  2. After a few minutes, you’ll see the Windows Setup screen. Pick a language (U.S. English is the default), and click Next.
  3. The next screen allows you to install or repair Windows 8. Press Shift + F10 to open up a Command Prompt.

    windows-8-setup

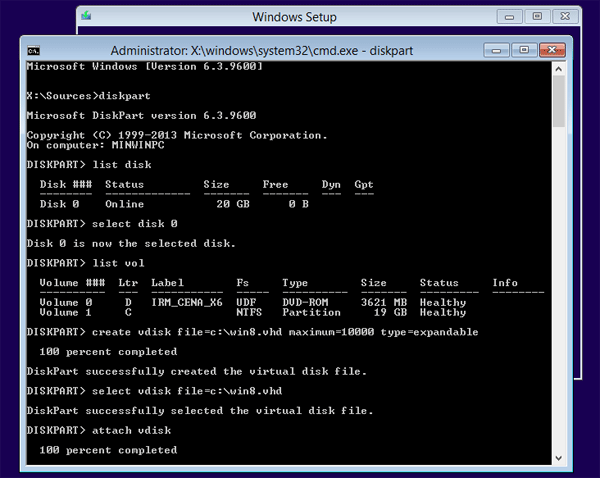
  4. Now you need to use the diskpart utility to create a virtual drive that Windows 8.1 will be installed on. Type diskpart and press Enter to open the command-line disk partitioning utility.
  5. At the diskpart prompt, type the following commands, pressing Enter after each one:
    • list disk
      This shows your currently attached hard disks. In this example I only have one, Disk 0.
    • select disk 0
    • list vol
      Show all the volumes that exist on that disk. You need to know the drive letter that you want to store your VHD file on.

    • create vdisk file=c:\win8.vhd maximum=10000 type=expandable
      This creates a dynamic VHD that can grow to 10GB in the root of C:\ drive. If your partition is smaller than 10GB then be sure to use a smaller value for maximum that is less than your actual partition size.
    • select vdisk file=c:\win8.vhd
      After selecting this vdisk, the following commands will apply to it
    • attach vdisk
      The VHD will be mounted and the disk will be available to the windows installer
    • exit

    create-vhd

  6. You can now click Install Now button. Accept the Licenses agreements. On the next screen select Custom: Install Windows only (advanced).
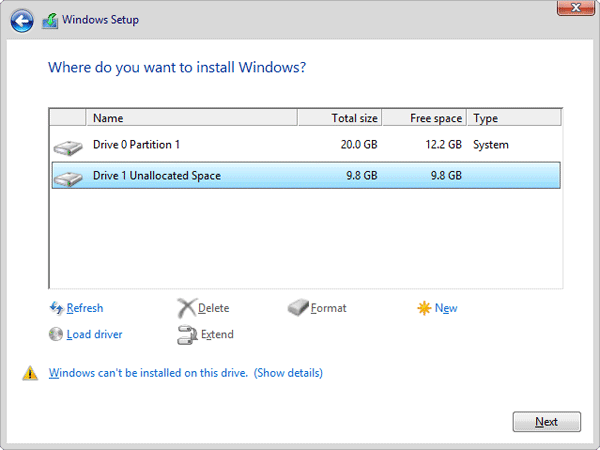
  7. At this point, Windows Setup will prompt you to choose where you want to install Windows 8.1 and you can now select your virtual drive, which will be designated as Unallocated Space and be the size that you specified. As you can see in the screenshot below, I have selected my 10GB VHD. Keep in mind that when you select the VHD, you’ll see a Warning message that says that Windows cannot be installed to this disk. Just ignore it and click Next to continue.

    install-windows-8-on-vhd

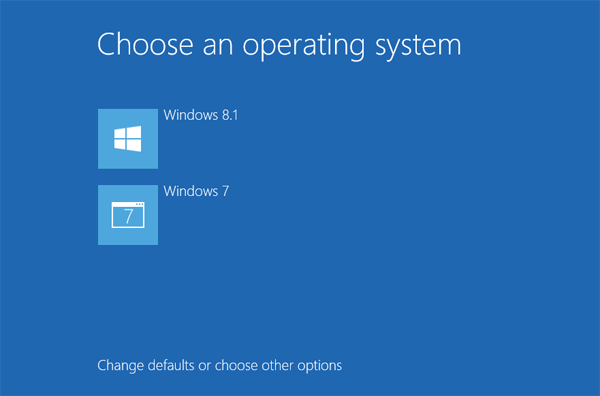
  8. When the installation is complete, Windows Setup will reboot your system one final time and you will then see the new Windows 8.1 style dual boot screen shown as below. As you can see, Windows 8.1 will automatically launch in 30 seconds if you don’t choose Windows 7.

    dual-boot-windows-8

That’s it!

How to Bypass Windows 8.1 Pro Password on Microsoft Surface Pro 3

September 2nd, 2014 by Admin

If you forgot your password for logging into Microsoft Surface Pro 3, here is how you can bypass Windows 8.1 Pro password so you can sign into your local or Microsoft account again.

Just like Surface Pro or Pro 2, Surface Pro 3 also uses 64-bit UEFI (Unified Extensible Firmware Interface) firmware and it can boot into native UEFI mode only. This makes old-fashioned password cracking bootdisks obsolete, including Offline NT Password & Registry Editor. In this tutorial we’ll explain how to bypass Surface Pro 3 password with PCUnlocker, which supports both UEFI booting and password bypass for local/Microsoft account.

How to Bypass Windows 8.1 Pro Password on Microsoft Surface Pro 3?

To get PCUnlocker to work, you need to use a spare PC to download the Enterprise edition of PCUnlocker which comes as a self-extracting ZIP file. Unzip the downloaded file and you’ll get a CD image called pcunlocker.iso.

Burn the ISO image to your USB flash drive using the freeware ISO2Disc. Remember to choose the GPT partition style, because MBR-based bootdisk is unable to boot with UEFI mode.

Once you’ve create a PCUnlocker Live USB drive, insert it into the USB port of your Surface Pro 3 tablet. Make sure your tablet is powered off at this point. Press and hold the volume-down button (on the left side of your tablet), then press and release the Power button (on the top). When the Surface logo appears, release the volume-down button. Surface will boot from your USB drive.

After loading the Windows 8 PE from the USB drive, you’ll be taken to the PCUnlocker program. It shows you a list of local accounts that is extracted from your Windows 8.1 SAM registry hive. If you use an email account for signing into your tablet, you can see your email address in the “Description” column of the associated local account.

Select a local account and click on Reset Password button. It will bypass / reset your forgotten login password in no time. If you’ve chosen the local account associated with your email address, the program will assign a new password for your Microsoft account login (Note: this new password can be used to log on your tablet locally).

Now you’ve successfully bypassed Windows 8.1 Pro password on your Surface Pro 3. Restart the computer and disconnect the USB drive, you can then log on your Surface without a password!

How to Bypass Windows 8 Password on HP Envy dv6

August 28th, 2014 by Admin

Locked out of HP Envy dv6 notebook because you’ve misplaced or forgotten your Windows 8 password? Despite being Microsoft’s most secure operating system, it’s possible to bypass or reset Windows 8 local/Microsoft account password with PCUnlocker. This article explains how you can easily bypass Windows 8 password on HP Envy dv6 notebook.

How to Bypass Windows 8 Password on HP Envy dv6?

PCUnlocker comes as an ISO image that needs to be burned on to a CD, or you can put the ISO on to USB stick using a utility. Then simply boot to the CD or USB to run the utility for bypassing Windows 8 password. Here are step-by-step instructions:

  1. Use a spare computer to download the PCUnlocker program. Unzip the downloaded file and you’ll get a pcunlocker.iso image. Burn the ISO image to a blank CD using the freeware ISO2Disc. If you don’t have an optical drive, you can burn the ISO image to a USB flash drive.
  2. Next, you have to boot your locked HP Envy dv6 notebook from the CD/USB drive. Because this Windows 8 laptop comes with UEFI BIOS, you need to firstly enable the Legacy support in the BIOS. Turn on the computer and immediately press the Esc key repeatedly until the Startup Menu opens.

    hp-startup-menu

  3. Use the arrow keys to select BIOS Setup and press Enter. Navigate to the System Configuration menu, use the down arrow key to select Boot Options, then press Enter.
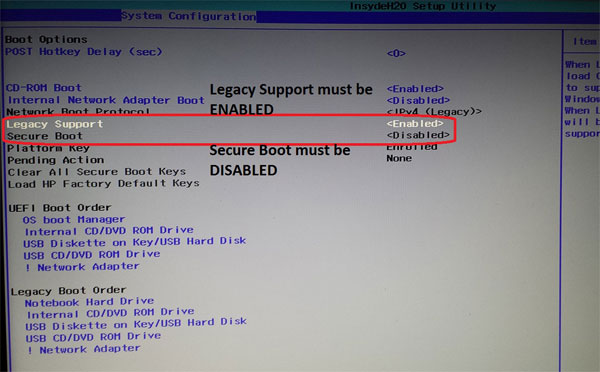
  4. Set “Secure Boot” to “Disabled” and set “Legacy Support” to “Enabled”. Press F10 to save your changes and exit BIOS.

    hp-envy-secure-boot

  5. When the computer has restarted, quickly press the Esc key to access the Startup Menu again. This time select Boot Device Options and press Enter.
  6. When the Boot Option Menu screen appears, use the up or down arrow key to select your boot media (Internal CD/DVD ROM or USB Hard Drive). Then press Enter to boot into that device.
  7. The computer will load the Windows PE operating system from your boot media and take you directly to the PCUnlocker program. Choose the user account where you want to bypass the password, and click on Reset Password button. If you use a Microsoft account as your login method, make sure you choose the local account with the “Description” column shown as your Live account ID.

  8. The program will remove your local account password immediately. As Windows 8 can’t accept blank password for Microsoft account, the program will assign a temporary password Password123 to your Microsoft account.
  9. The last step is to reboot your computer and take out the CD or USB drive. When you come to the Windows 8 login screen, you can log on as your desired account and regain access to all files on your HP Envy dv6 notebook. That’s it!

How to Unlock Dell Vostro Laptop After Forgot Windows 8 or 7 Password

August 27th, 2014 by Admin

Forgot the login password for your Dell Vostro 3560 laptop? How can I bypass or reset a lost administrator password? If you do not want to run the cracking tool on your computer for days/weeks/years in attempting to decrypt the login password, you can quickly delete the forgotten Windows user password with PCUnlocker. In this article we’ll walk you through the steps of resetting lost Windows 8 or Windows 7 password on your Dell Vostro laptops.

How to Unlock Dell Vostro Laptop After Forgot Windows 8 or 7 Password?

PCUnlocker comes as an ISO image that needs to be burned on to a CD, or you can put the ISO on to USB stick using a utility. Then simply boot to the CD or USB to run the utility for unlocking your Windows user password. Here are step-by-step instructions:

  1. Use a spare computer to download the PCUnlocker program. Unzip the downloaded file and you’ll get a pcunlocker.iso image. Burn the ISO image to a blank CD (or USB flash drive) using the freeware ISO2Disc.
  2. After you have the disc, you have to boot your locked Dell Vostro laptop from CD. Turn on the computer. When the DELL logo appears, press F2 immediately to access the BIOS Setup.
  3. Navigate to the Boot tab, use the arrow keys to move CD/DVD/CD-RW Drive (or USB Storage Device) to the top of bootable device list. If this screen has a setting labeled “Boot List Option”, it indicates your computer is preloaded with the latest UEFI firmware instead of traditional BIOS. You need to change the Boot List Option from UEFI to Legacy, disable Secure Boot and enable Load Legacy Option Rom.

    dell-vostro-bios

  4. Save your changes and exit BIOS Setup. The computer will automatically reboot from your burned CD (or USB flash drive). If everything goes as expected, you’ll come to the PCUnlocker program which shows you a list of user accounts for your Windows installation.
  5. Choose one of Windows accounts and click on Reset Password button. It will unlock / enable the selected account and reset the password as well. If the selected account is a standard account, it will also been promoted to an administrator account.

  6. The last step is to simply click on Restart button to reboot the machine. Make sure to remove the CD or USB so it doesn’t boot again. If you’ve changed the Boot List Option from UEFI to Legacy, you have to switch it back again. Now when you boot the machine the password for that user should be gone!