Archive for the ‘Windows 8’ category

Fix: Can’t Type Special Characters on Windows Login Screen

March 5th, 2018 by Admin

Can’t log into Windows if your password contains certain special characters? If you’re concerned about the security of your Windows account, you may use some ultra complex password generated from password manager. When setting up password via Control Panel, you can input special characters with a copy and paste operation, or using the built-in Character Map utility. The problem is that these ways don’t work on the Windows login screen.

In this tutorial we’ll explain how you can enter special characters on Windows login screen, or simply remove your password to unlock your computer.

Method 1: Type Special Characters on Windows Login Screen

To insert the special character (such as #, &, @, {,}, [,],) shown on the upper part of a key, just hold down SHIFT and press the desired key to type it. If your desired characters (such as ©,®,∆,√) that are not on the keyboard, you can type it using Alt key codes:

  1. Place your cursor in the location where you wish to insert a special character.
  2. When the NUM LOCK key is on, press and hold down the Alt key, then tap the numbers (ALT code) on the numeric keypad at the right side of your keyboard.
  3. Release the Alt key, the desired character will appear.

For example, let’s say you want to type the copyright symbol ©. It’s ALT code is 0169. With Num Lock enabled, hold down Alt key and tap the sequence of numbers (0, 1, 6, 9) on the numpad, then release the Alt key.

The following is the ALT codes for the most common characters:

Note: You must use the numeric keypad to type the ALT code. However, most laptops and tablets don’t have the traditional numeric keypad. To type special characters, you may have to add an external USB keyboard with embedded numeric keypad.

Method 2: Remove Windows Password to Bypass the Login Screen

If you’re still unable to type special characters on the login screen, you may be completely locked out of Windows admin account. In order to regain access to your system, you can use PCUnlocker to remove the login password before Windows loads up.

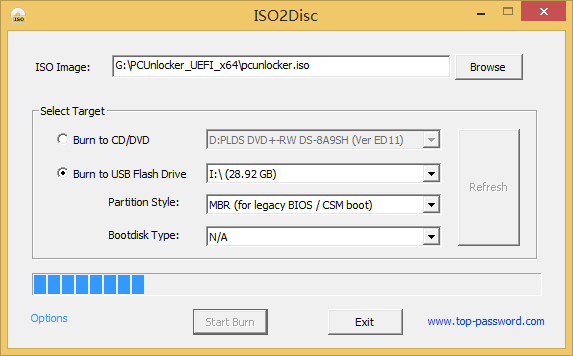
  1. To start, use a second computer to download the ISO image of PCUnlocker. Run the ISO2Disc utility and browse for the ISO file you just downloaded, just select your USB drive and start the process to create a bootable PCUnlocker USB drive.
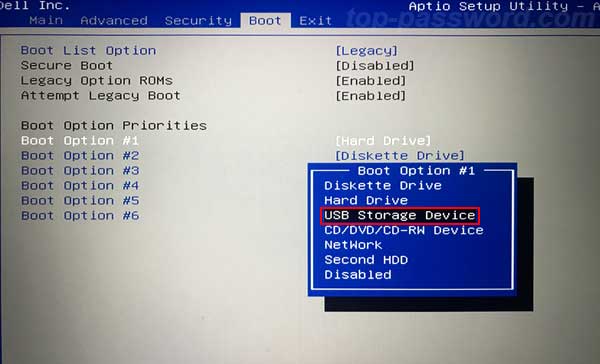
  2. Plug the USB drive into your locked computer. Enter into the BIOS setup and change the boot sequence to force your computer to boot from USB drive first.
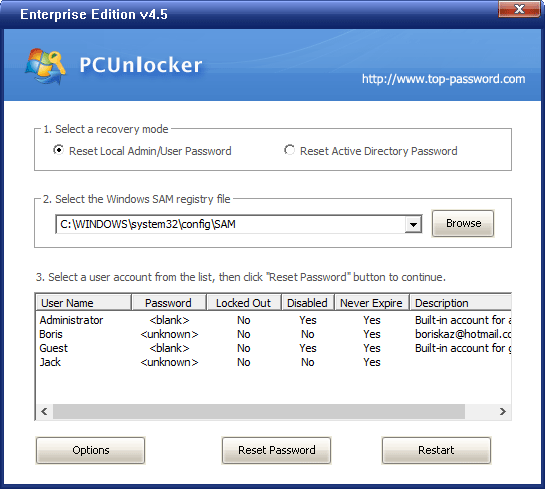
  3. After PCUnlocker loads from the USB drive, you can see all local accounts found on your computer. Just select your admin account and click on Reset Password button. This lets you remove / delete the Windows password that you’re unable to type on the login screen.
  4. Reboot your computer and restore the BIOS boot sequence to boot from hard drive. Windows will log in to your local admin account without prompting you to type password any longer. Done!

4 Ways to Enable or Disable Aero Peek in Windows 10 / 8 / 7

February 24th, 2018 by Admin

Aero Peek is a usability feature available since Windows 7, which allows you to temporarily view the desktop without having to minimize all the open windows. Just move the mouse at the far right end of the taskbar, it makes all the open windows go transparent and you can see the desktop. Move the mouse away to see your open windows again.

If you don’t like Aero Peek, you can disable it easily. In this tutorial we’ll show you 4 ways to enable or disable Aero Peek in Windows 10 / 8 / 7.

Updated: These methods don’t work with Windows 11. If you want to disable desktop peek in Windows 11, please check out this tutorial.

Method 1: Enable or Disable Aero Peek via Right-clicking “Show desktop” Button

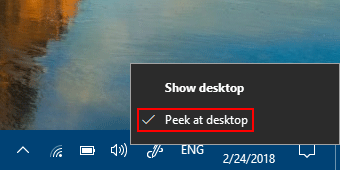
Move your cursor over the “Show desktop” button, which can be found as a small rectangle present at the right corner of the taskbar. Right-click the “Show desktop” button, and then select “Peek at desktop” from the popup menu.

When Aero Peek is turned on, there should be a check mark next to the “Peek at desktop” option. Clicking that option again will then disable Aero Peek.

Method 2: Enable or Disable Aero Peek via Right-clicking Taskbar

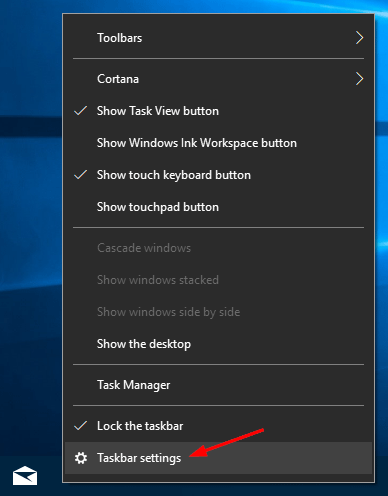
Right click an empty space on the taskbar, and then select Taskbar settings from the popup menu.

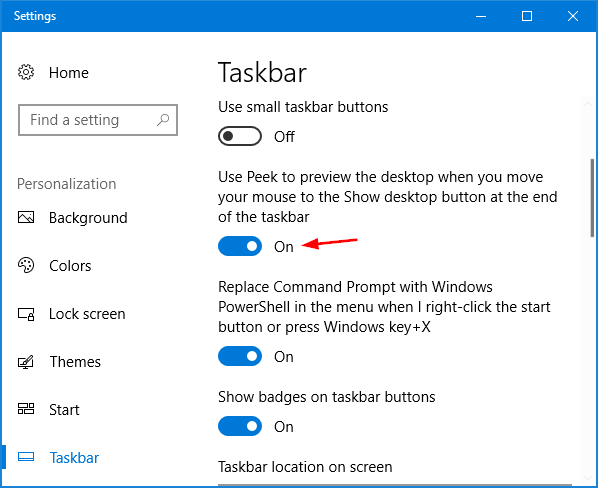
On the Taskbar settings window, just toggle the “Use Peek to preview the desktop when you move your mouse to the Show desktop button at the end of the taskbar” option on or off to enable or disable Aero Peek.

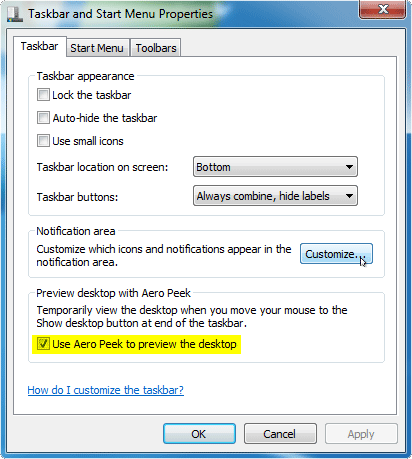
If you’re running Windows 7, right-click on the taskbar and select Properties. You’ll get a similar option “Use Aero Peek to preview the desktop” that allows you to enable or disable Aero Peek.

Method 3: Enable or Disable Aero Peek via System Properties

  1. Press the Windows + R keyboard shortcut to open the Run dialog, then type sysdm.cpl and hit Enter.
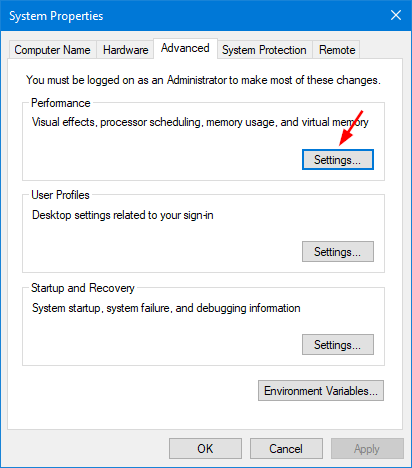
  2. On the System Properties dialog box, select the Advanced tab. Click the Settings button under the Performance section.

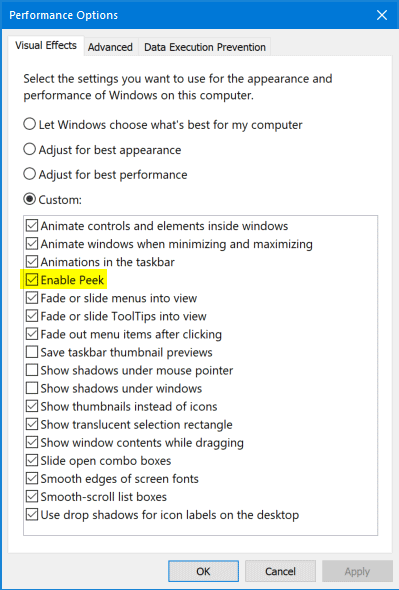
  3. Select the Visual Effects tab, look for the option entitled “Enable Aero Peek” or “Enable Peek“, which allows you to turn the Aero Peek feature on or off.

  4. Click Apply and then OK.

Method 4: Enable or Disable Aero Peek via Registry Hack

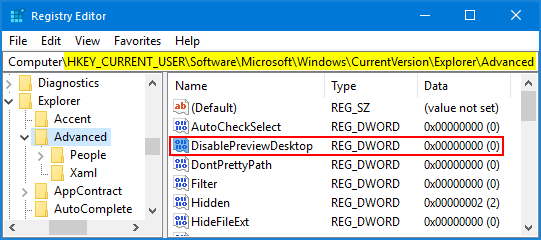
  1. Open the Registry Editor and navigate to the following key:
    HKEY_CURRENT_USER\Software\Microsoft\Windows\CurrentVersion\Explorer\Advanced
  2. Double-click a DWORD value called DisablePreviewDesktop on the right pane, set its value to 0 if you want to enable Aero Peek, or change its value to 1 when you don’t use Aero Peek.

  3. Close Registry Editor. Restart or log off your system.

How to Disable Change Password Option from the CTRL + ALT + DEL Screen

February 23rd, 2018 by Admin

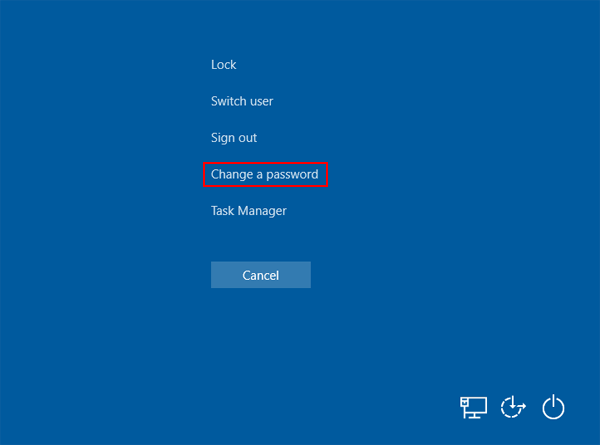
How to remove the “Change a password” option from the Ctrl+Alt+Del screen in Windows 10? When pressing the Ctrl+Alt+Delete keyboard combination, it will invoke the Windows Security Screen and users can change the login password there. Here’s how you can disable the ability of changing password from the Ctrl+Alt+Delete screen in Windows 10 / 8 / 7, through group policy or registry tweak.

Method 1: Disable Change Password Option from the CTRL+ALT+DEL Screen via Group Policy

  1. Press the Windows key + R keyboard shortcut, then type gpedit.msc into the Run command box and click OK.

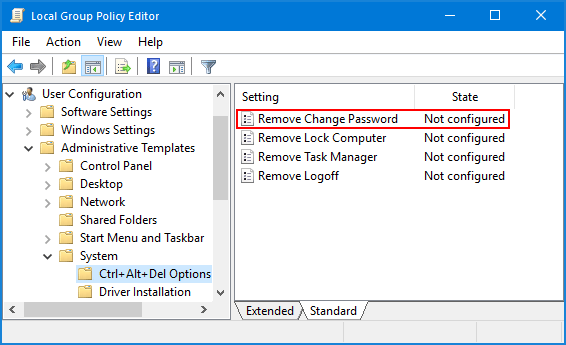
  2. Once the Local Group Policy Editor opens, navigate to the following path:
    User Configuration > Administrative Templates > System > Ctrl+Alt+Del Option

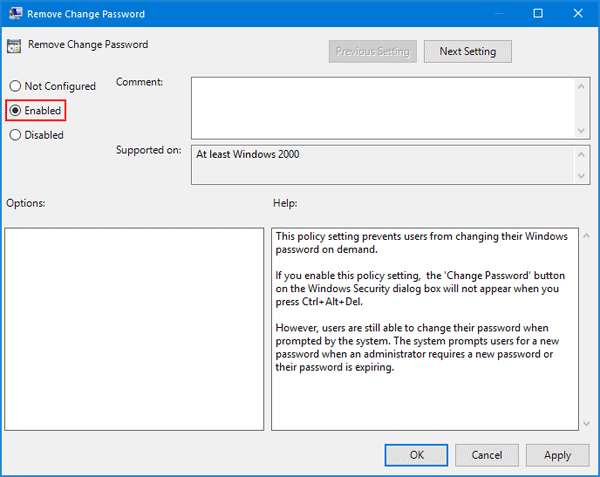
    On the right, double-click the Remove Change Password policy.

  3. Select Enabled. Click Apply and reboot your computer.

    The next time you press the Ctrl + Alt + Del key combination, you should no longer see the “Change a password” option on the screen.

Method 2: Disable Change Password Option from the CTRL+ALT+DEL Screen via Registry Tweak

  1. Press the Windows key + R keyboard shortcut, then type regedit into the Run command box and click OK.

  2. In the Registry Editor window, browse to the following path:
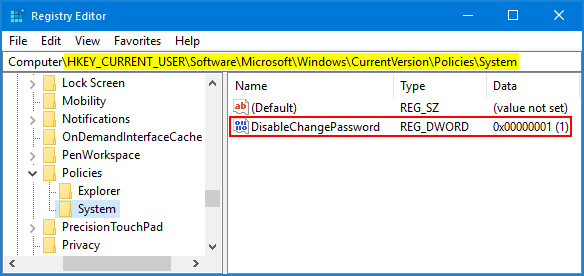
    HKEY_CURRENT_USER\Software\Microsoft\Windows\CurrentVersion\Policies\System

    If the System key isn’t present, you have to create it. Right-click Policies key on the left, and select New -> Key, then name it System.

  3. Right-click blank area on the right side, select New -> DWORD (32-bit) Value. Name the key DisableChangePassword and set its value from 0 to 1.

  4. These changes require that you restart your computer. After that, the “Change a password” option will be missing from the screen when you press Ctrl + Alt + Del.

Change Mouse Pointer Size and Color in Windows 10 / 8 / 7

January 18th, 2018 by Admin

Mouse cursor is too small? How can I change the color of mouse pointer to make it easier to see? When you’re playing a game, you may find the mouse cursor is way too small for your screen. Here are 3 simple ways to change mouse pointer size and color in Windows 10 / 8 / 7.

Method 1: Change Mouse Pointer Size and Color from Settings (Windows 10 Only)

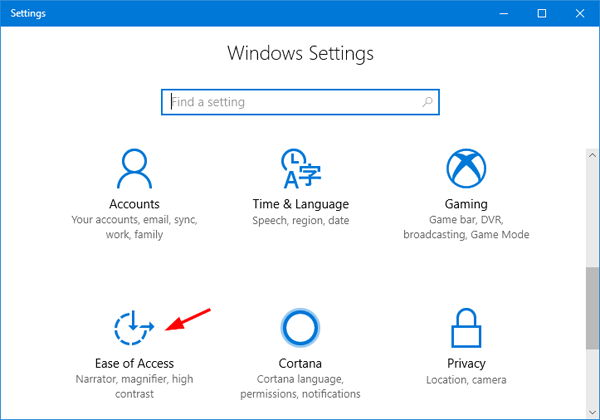
Press the Windows + I key combination to open the Settings app, and then click Ease of Access.

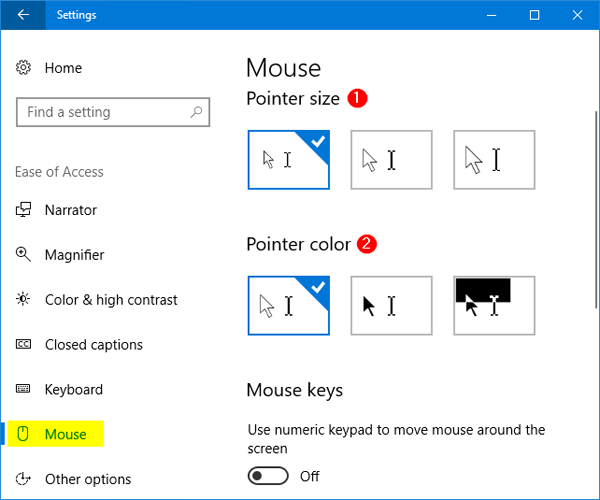
Select the Mouse tab. On the right side of the window, there are three different sizes and colors you can choose from for your mouse pointer. Click on one to select it.

Method 2: Change Mouse Pointer Size and Color from Ease of Access Center

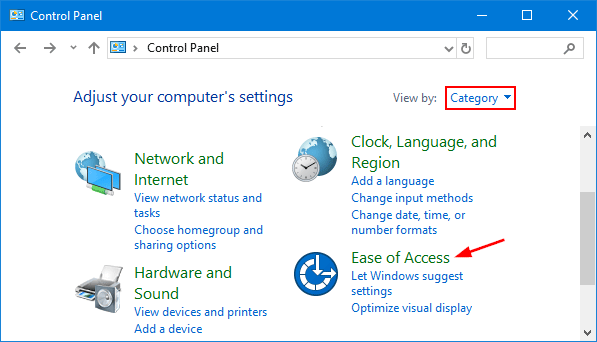
Open the Control Panel in Category view, and then click Ease of Access.

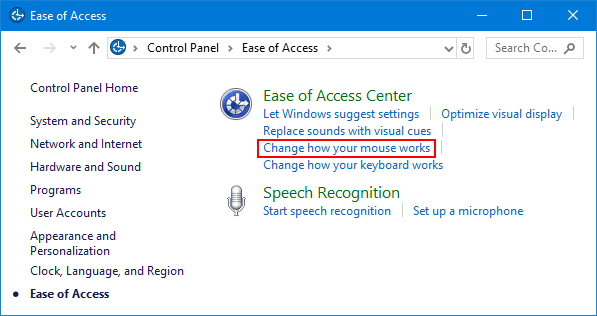
On the next screen, click on the link that says “Change how your mouse works“.

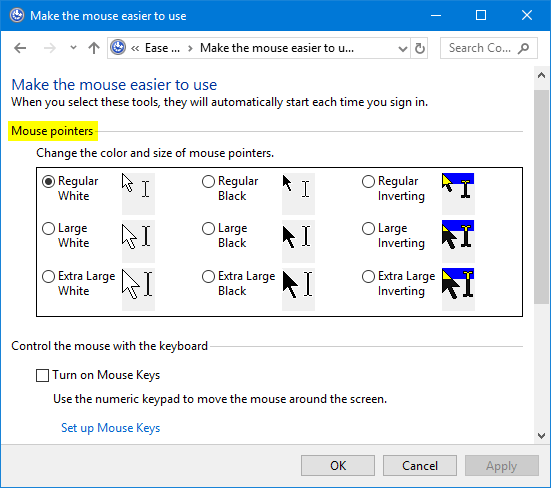
Under the Mouse pointers section, you can check the option for the size and color of the mouse pointer that you want to use. Click OK to apply your changes.

Method 3: Change Mouse Pointer Size and Color from Mouse Properties

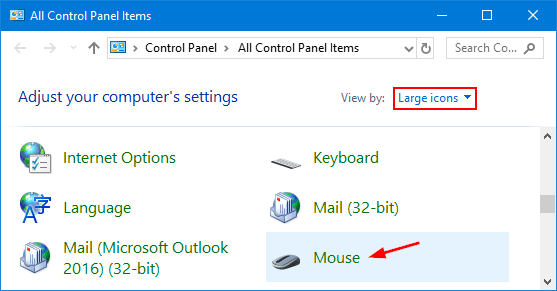
Open the Control Panel and switch to Large icons view. Click Mouse.

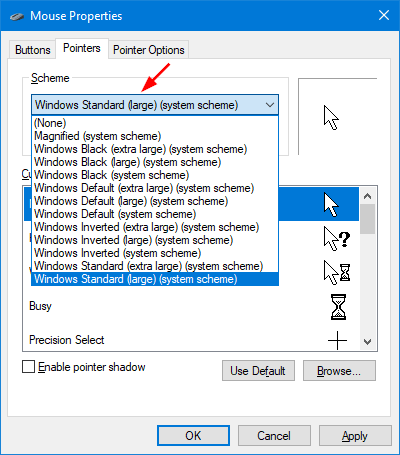
When the Mouse Properties window opens, select the Pointers tab. Select a mouse pointer scheme from the drop-down box. Click Apply and then OK.

If you want to restore the original mouse pointer scheme, click the Use Default button at the bottom.
That’s it!
Find If Your Drive is SSD or HDD in Windows 10 / 8 / 7

January 17th, 2018 by Admin

How can I know whether a disk is a solid-state drive (SSD) or hard disk? Is there a way to check if I have a SSD or HDD without having to open the laptop itself to see what’s inside it? Here are 2 easy methods to find if your drive is SSD or HDD in Windows 10/8/7, without using third-party software.

Method 1: Find If Your Drive is SSD or HDD Using Disk Defragmenter

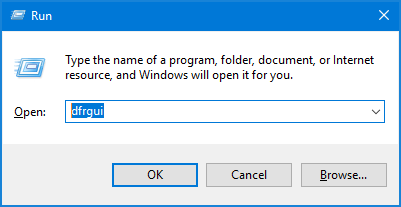
Simply press the Windows key + R keyboard shortcut to open the Run box, type dfrgui and press Enter.

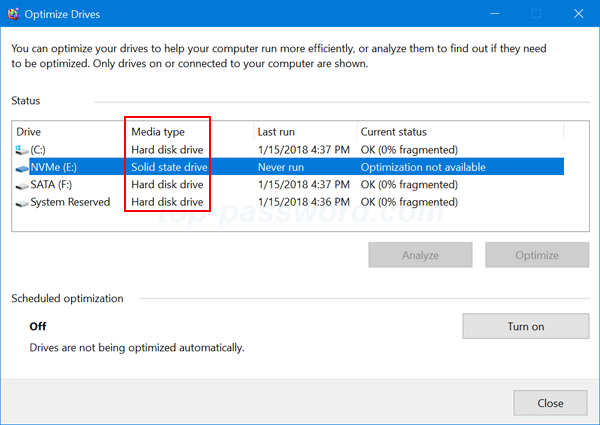
When the Disk Defragmenter window is shown, look for the Media type column and you can find out which drive is solid state drive (SSD), and which one is hard disk drive (HDD).

Method 2: Find If Your Drive is SSD or HDD Using PowerShell

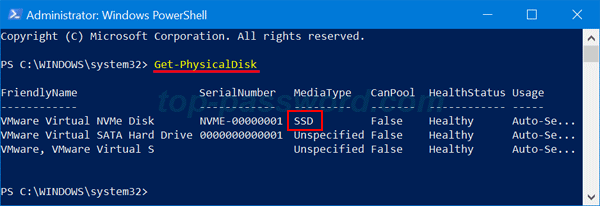
Open the PowerShell as administrator, and type the following command and press Enter:

Get-PhysicalDisk

The command will list all physical disks connected to your computer. The MediaType parameter can help you identify what type is your disk drive, HDD or SSD.

That’s it!

3 Steps to Change DVD Region in Windows 10 / 8 / 7

January 13th, 2018 by Admin

“I just bought a DVD movie. When I tried to play it on Windows 10, I received a warning that the DVD was purchased in region 2, my computer DVD player was set for region 1, and I needed to change the region. I’ve never come across this before. Please help!”

Most commercial DVDs have a region code that ties the DVD to specific regions of the world, as a measure of copy protection. If a DVD’s region code doesn’t match the current region code of your DVD player, you’ll receive a warning that you need to change regions in order to play the DVD. The following tutorial will show you how to change the region code of your DVD player in Windows 10 / 8 / 7.

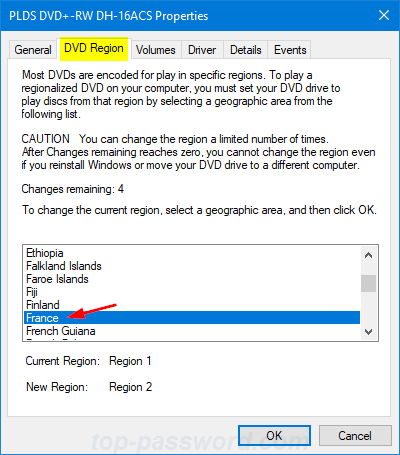
Note: The region code for a DVD player can only be changed five times. The fifth time you change the region, your DVD player is permanently locked to the last region you set.

How to Change DVD Region in Windows 10 / 8 / 7?

  1. Press the Windows key + R to open the Run box. Type in devmgmt.msc and press Enter.

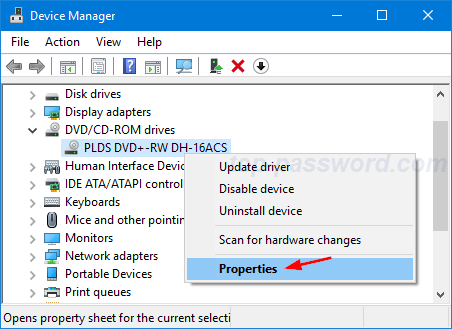
  2. When the Device Manager window opens, expand DVD/CD-ROM drives. Right-click on your DVD player and then select Properties.

  3. Click on the DVD Region tab. Select the region in which you want to change to and click OK.

How to Set a Disk or Volume Read-Only in Windows 10 / 8 / 7

January 11th, 2018 by Admin

How to enable write protection for a disk drive or set your volume read-only? How can I prevent a hard drive from being formatted? In this tutorial we’ll show you how to set a particular disk or volume read-only in Windows 10 / 8 / 7, without using any third-party software.

Part 1: Set a Volume Read-Only

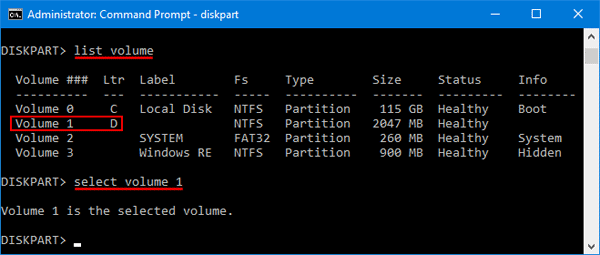
  1. Open the Command Prompt as administrator, and then run the diskpart command.

  2. Type list volume and press Enter. Next type select volume #, where # is the number of the volume you’re going to lock it as read-only.

  3. To make your selected volume read-only, type attributes volume set readonly and press Enter.

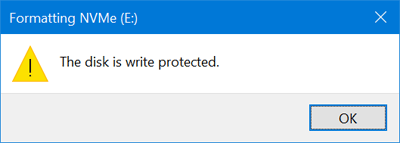
  4. Now, you’ll be unable to delete or modify the files on that volume. When you try to format that volume, you’ll get the error “The disk is write protected“.

If you want to clear ready-only attribute for your volume later, just repeat steps 1 through 2 above and then run this command:

attributes volume clear readonly

Part 2: Set a Disk Read-Only

If you want to set the entire disk read-only, follow these steps:

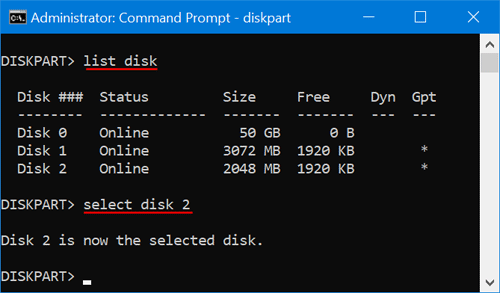
  1. Open the Command Prompt as administrator, and then run the diskpart command.
  2. Type list disk and press Enter. Next type select disk #, where # is the number of the disk you want to make read-only.

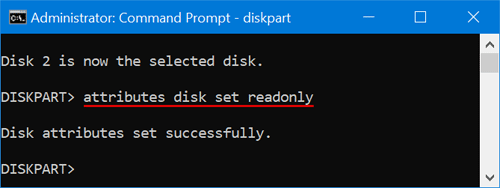
  3. To set your chosen disk read-only, type attributes disk set readonly and press Enter.

  4. Now your disk is write-protected and all its partitions turn into read-only.

When you want to clear ready-only attribute for your disk, just repeat steps 1 through 2 above and then run this command:

attributes disk clear readonly

That’s it!

How to Change Monitor Refresh Rate in Windows 10 / 8 / 7

January 3rd, 2018 by Admin

Do you have any trouble with flickering on the monitor when playing games? Most of screen flickering issues can be solved by adjusting the monitor’s refresh rate. The refresh rate refers to how many times per second the screen refreshes the image on it. Increasing the monitor’s refresh rate should reduce screen flicker, which results in less strain on their eyes. In this tutorial we’ll show you how to change monitor refresh rate in Windows 10 / 8 / 7.

Note: The refresh rates that you can set for your monitor are determined by the capabilities of the Graphic card and monitor.

Part 1: Change Monitor Refresh Rate in Windows 10

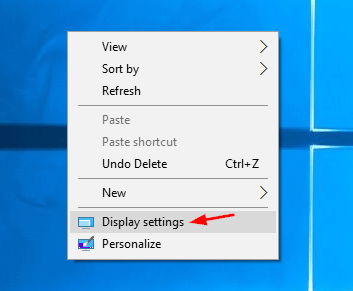
  1. Right-click an empty area on the desktop and select Display settings.

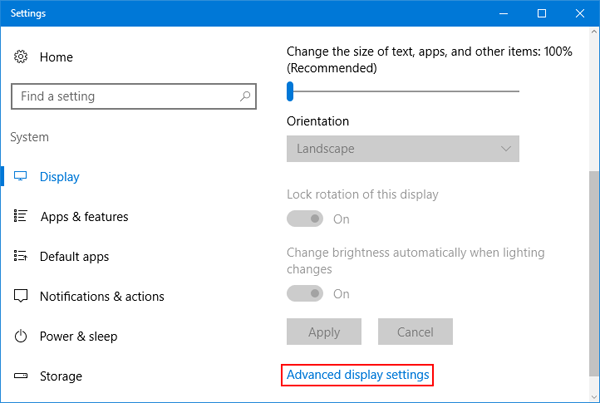
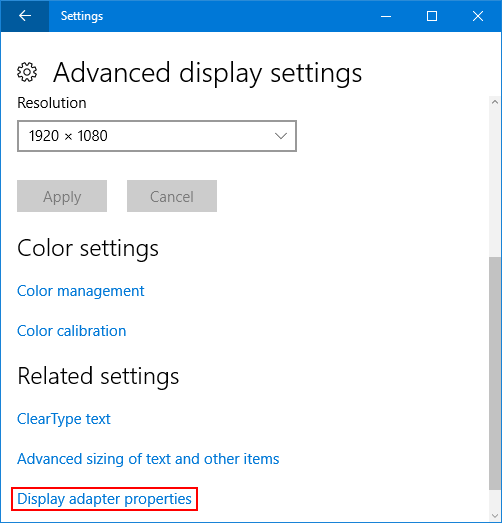
  2. This should open the Settings app and go to the Display tab. Click Advanced display settings at the bottom of the right pane.

  3. Click Display adapter properties.

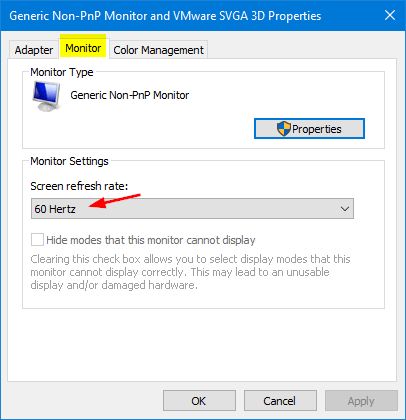
  4. This will open the Monitor and graphics card properties. Go to the Monitor tab and you can select a higher or lower refresh rate and click Apply.

Part 2: Change Monitor Refresh Rate in Windows 8 / 7

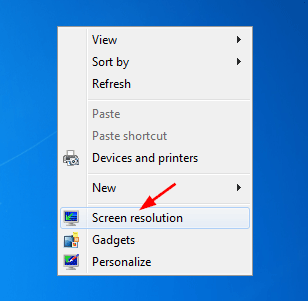
  1. Right-click an empty area on the desktop and select Screen resolution.

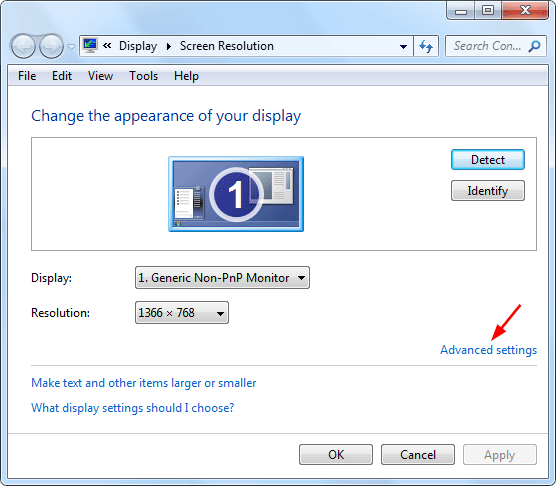
  2. Click on Advanced Settings in the bottom right.

  3. When the Display adapter properties window opens, click the Monitor tab, and then select a Screen Refresh Rate from the drop down menu.
  4. Click Apply. That’s it!

How to Stop Standard Users from Changing BitLocker Password

December 18th, 2017 by Admin

If you want to configure BitLocker in Windows 10 / 8, you have to log in as administrator. However, standard users are allowed to change BitLocker password by default. In this tutorial we’ll show you 2 ways to stop standard users from changing BitLocker password in Windows 10 / 8.

Method 1: Prevent Standard Users from Changing BitLocker Password via Group Policy

  1. Press the WIN + R keys to open the Run box. Type gpedit.msc and hit Enter.

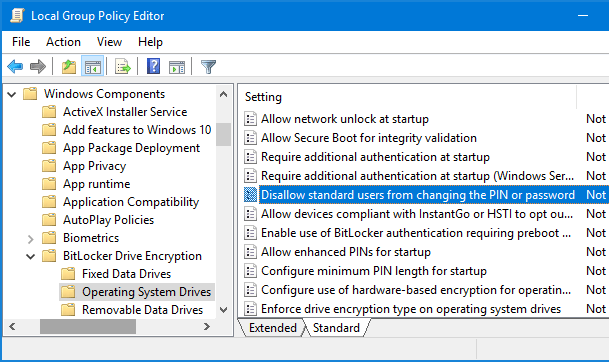
  2. In the left pane of the Local Group Policy Editor, navigate to: Computer Configuration\Administrative Templates\Windows Components\BitLocker Drive Encryption\Operating System Drives.

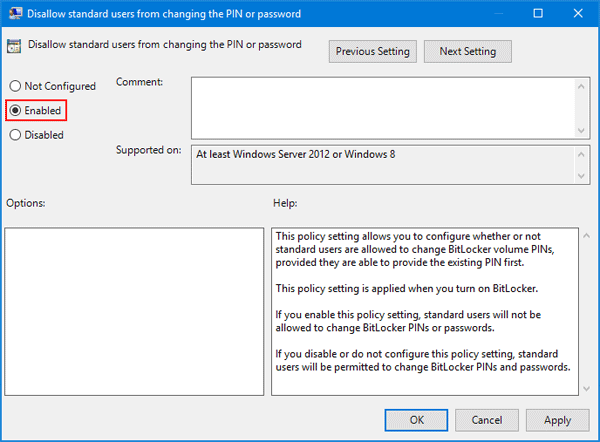
    Next, double-click on the Disallow standard users from changing the PIN or password policy in the right pane.

  3. Select the Enabled option, click Apply and then OK.

  4. When the standard users try to change BitLocker password on a fixed drive, the UAC will prompt to enter an administrator’s password firstly.

Method 2: Prevent Standard Users from Changing BitLocker Password via Registry Editor

  1. Press the WIN + R keys to open the Run box. Type regedit and hit Enter.

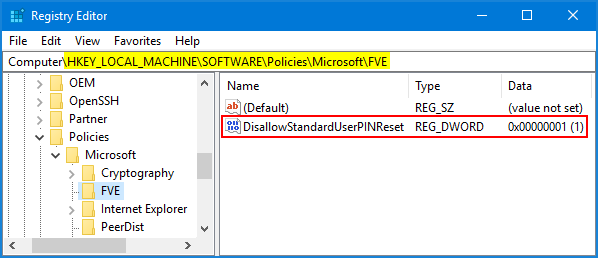
  2. In the left pane of Registry Editor, navigate to the key: HKEY_LOCAL_MACHINE\SOFTWARE\Policies\Microsoft\FVE. If the FVE key doesn’t exist, right-click the Microsoft key and create a subkey named FVE.
  3. While the FVE key is selected, right-click blank area in the right pane and create a DWORD (32-bit) value named DisallowStandardUserPINReset, set its value data to 1.

  4. Close Registry Editor.

If you want to allow standard users to change BitLocker password, just change the value data of DisallowStandardUserPINReset to 0 and you’re done.

How to Change BitLocker Password in Windows 10 / 8 / 7

December 14th, 2017 by Admin

If you’ve turned on BitLocker encryption on a fixed or removable drive, you can choose to unlock the drive with a BitLocker password. When your BitLocker password is compromised, changing the password should be a top priority. In this tutorial we’ll show you 3 ways to change BitLocker password in Windows 10 / 8 / 7.

Method 1: Change BitLocker Password from Windows Explorer

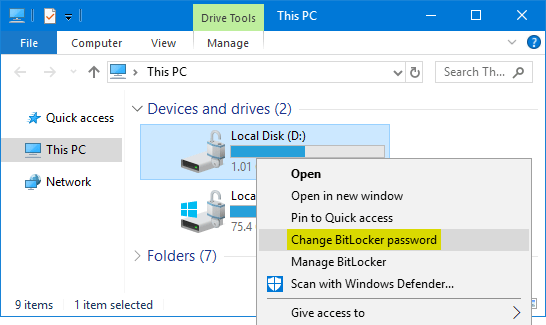
  1. Right-click on the BitLocker encrypted drive in Windows Explorer, and select Change BitLocker password from the context menu.

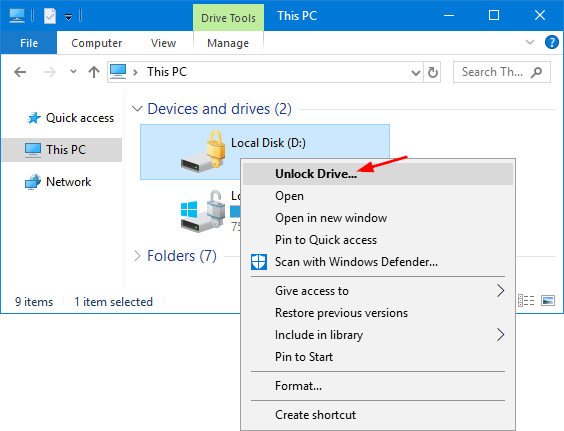
    Note: if the encrypted drive shows a gold lock on the icon, then you can’t see the “Change Bitlocker password” option in the context menu, and you need to unlock the BitLocker drive firstly.

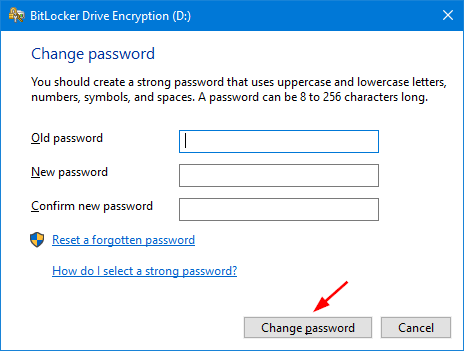
  2. Enter the old password, followed by the new password (entered twice), and then click Change password.

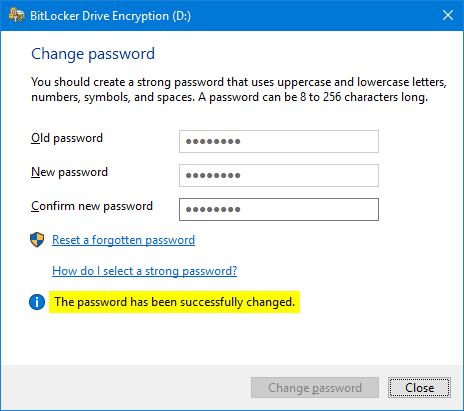
  3. You would be shown a message that the password has been changed successfully in the same window.

Method 2: Change BitLocker Password from Control Panel

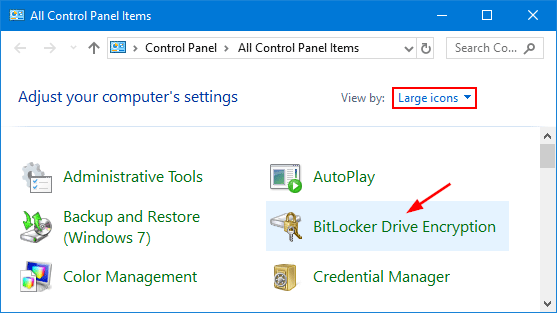
  1. Open the Control Panel and select Large icons in the View by drop-down menu. Click BitLocker Drive Encryption.

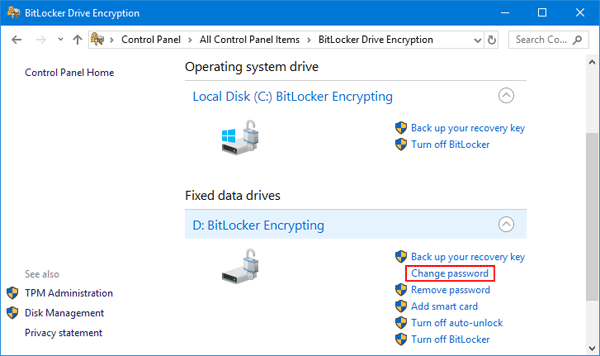
  2. Expand the drive for which you want to change the BitLocker password, and click Change password from the list of options.

  3. When the Change Password window appears, type your old password and new password. Click Change password.

  4. Now you’ve changed your BitLocker password.

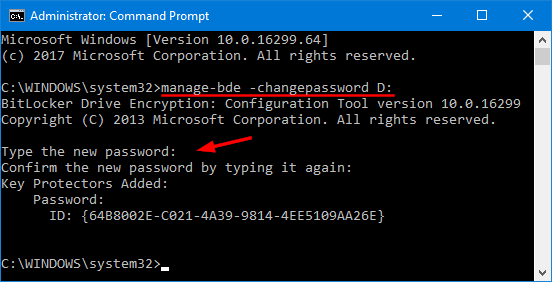
Method 3: Change BitLocker Password Using Command Line

  1. Open the Command Prompt as administrator.
  2. Assuming you’re going to change Bitlocker password for drive D:, type the following command and hit Enter.
    manage-bde -changepassword d:

  3. You’ll be prompted to enter the new password twice. Note: your password won’t be shown while you’re typing.
  4. When the password has been successfully changed, you can close Command Prompt. Every time you boot into Windows, you can unlock the BitLocker drive with the new password.