Archive for the ‘Windows Vista’ category

How to Encrypt Your Files with EFS in Windows

November 20th, 2012 by Admin

EFS (Encrypting File System) is a built-in component of the NTFS file system, which comes with all professional versions of Windows since Windows 2000. Using EFS, you can encrypt files and folders so that only authorized logged-on users can view the data. If someone else logs in with unauthorized users, or boots from a Windows PE or Linux CD, or removes the hard drive, the files remain encrypted and they are inaccessible.

To use EFS, you simply change the property of a folder and enable encryption. Once a folder is encrypted with EFS, all the files you create within that folder or move into that folder are automatically encrypted.

How to Encrypt Your Files with EFS in Windows?

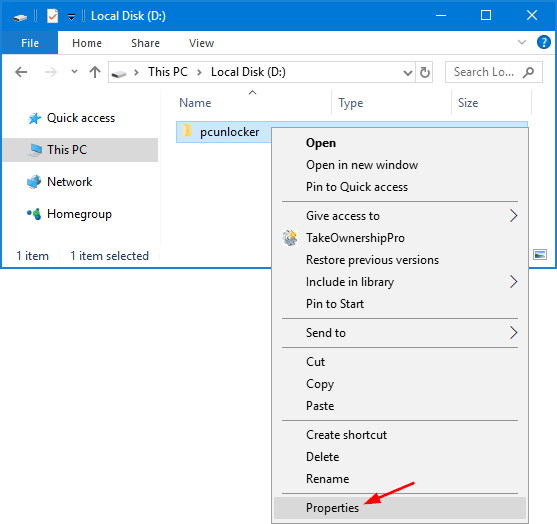
Select one or multiple files and folders in Windows Explorer, right-click the selection afterwards and select Properties from the context menu.

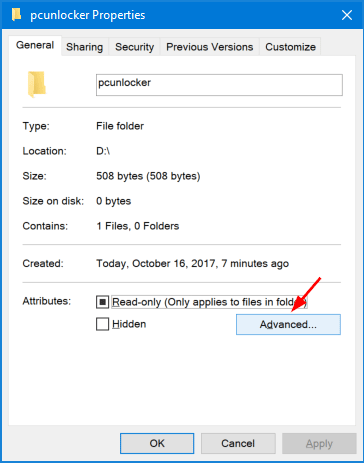
Click on Advanced button from the Properties window.

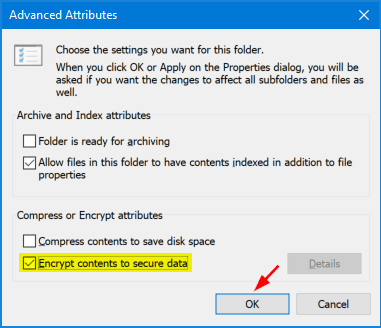
Tick the Encrypt contents to secure data checkbox on the new window, and click OK.

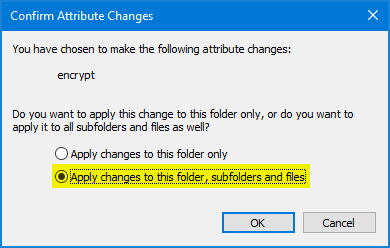
If you have selected at least one folder, you will be asked if you only want to encrypt the root files of that folder, or files in sub-folders as well.

The files and folder in question are then displayed in green in Windows Explorer. Congratulations, you have just encrypted your first files or folders with EFS.

Note: If the original EFS certificate is lost or corrupted in your system, you’ll lose access to your EFS encrypted files. It is important to backup your EFS certificate in a safe location.

Conclusion

Because it is already included in a typical Windows installation, EFS is the quickest way to encrypt your files if you’re already using Windows. There’s nothing to download or install and encrypting a folder can be done with just a few clicks. Unless you really have very sensitive information that requires a very strong encryption solution, EFS should suffice.

How to Hack Windows Administrator Password

October 30th, 2012 by Admin

Most of us have experienced a situation where in we need to gain access to a computer which is password protected or at times we may forget the administrator password without which it becomes impossible to login to the computer. So here is an excellent hack.

In this tutorial we’ll show you how to hack Windows administrator password on Windows 8/7/Vista/XP. The only requirement for this is that you need to find an alternative computer to create a password hacking Live CD. Here is a step-by-step instruction to hack Windows administrator password.

  1. Click here to download the Reset Windows Password software. Once the download is complete, unzip the download file and you’ll find the CD ISO image: ResetWindowsPwd.iso.
  2. Burn the ISO image to an empty CD using any CD/DVD recording software such as BurnCDCC or ISO2Disc.
  3. Place the Live CD you’ve created in the CD drive of your computer with the administrator password you want to hack. Head into the computer BIOS and set your computer to boot from CD.
  4. The boot procedure may take one or two minutes, and the Reset Windows Password program will start.
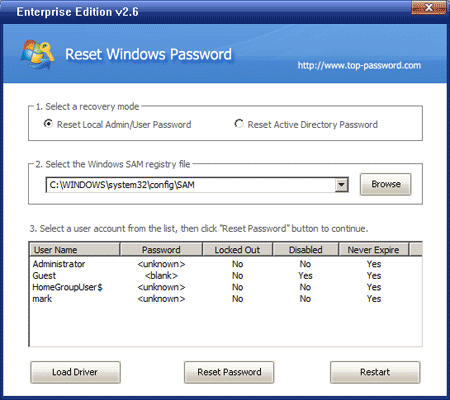
  5. From the main window of Reset Windows Password program, you could see the Windows SAM registry file and user accounts inside the SAM file.
  6. Choose the administrator account, and then click on the Reset Password button. It will blank your forgotten/unknown password instantly.

Now remove the password hacking Lice CD and restart the computer. You can then log in to the administrator account with a blank password. This hack works even if you forgot the administrator password and can’t log in to Windows.

How to Bypass Windows 7/Vista/XP Admin Password

October 26th, 2012 by Admin

For most Windows users, forgetting the password to an administrator account can be devastating. Hacking your way into the computer is not always easy and trying to remember the password may not do you any good either. Luckily there is a powerful recovery software which allows you to bypass Windows 7/Vista/XP admin password in minutes.

With Reset Windows Password utility you can bypass Windows admin password through booting your computer from a CD or USB drive. Quickly regain access to your locked computer when you forgot the administrator password. This method is a very simple one. You just need to download the software on an alternative computer, and create a bootable CD or USB drive. So you can then use it to boot your computer and remove the forgotten admin password easily.

How to Bypass Windows 7/Vista/XP Admin Password?

  1. Download the zip archive of Reset Windows Password utility to an alternative computer. Once you download the zip file, just unzip it and burn the ResetWindowsPwd.iso file to a blank CD or USB flash drive using ISO2Disc.
  2. Insert the bootable CD/USB drive into the target computer with a forgotten administrator password. Power on the computer and set it to boot from CD or USB, not your local hard drive.
  3. Shortly after loading the operating system inside the CD/USB drive, it will launch the Reset Windows Password program. You’ll see the Windows SAM registry hive and a list of Windows user accounts which are detected by the program.
  4. Choose the administrator account and then click on Reset Password button, it will remove your Windows administrator password immediately.
  5. Remove the bootable CD or USB drive. Restart the computer and you can then log in to your administrator account with a blank password.

With Reset Windows Password utility you can also unlock any locked-out or disabled Windows accounts, and bypass domain administrator passwords on a domain controller. I think, this would be the perfect password recovery tool for both home and business users alike.

How to Remove Windows Administrator Password

October 24th, 2012 by Admin

Forgot Windows administrator password? This might bring a lot of irritating and time consuming consequences. Even if you can still log on your computer with a limited account, you don’t have full right to remove or change administrator password. So the only option is to do it from a boot CD/USB.

With Reset Windows Password utility you are able to remove Windows administrator password without knowing the original one for your Windows 8/7/Vista/XP system. This utility works by making a bootable CD or USB drive. After booting from the CD/USB drive, this utility gains full access to the Windows SAM (Security Accounts Manager) file where all Windows passwords are stored, and enables you to easily remove the password associated with your administrator account.

How to Remove Windows Administrator Password?

  1. Download the zip archive of Reset Windows Password utility to an alternative computer. Once you download the zip file, just unzip it and burn the ResetWindowsPwd.iso file to a blank CD or USB flash drive using ISO2Disc.
  2. Insert the bootable CD/USB drive into the target computer with a forgotten administrator password. Power on the computer and set it to boot from CD or USB, not your local hard drive.
  3. Shortly after loading the operating system inside the CD/USB drive, it will launch the Reset Windows Password program. You’ll see the Windows SAM registry hive and a list of Windows user accounts which are detected by the program.
  4. Choose the administrator account and then click on Reset Password button, it will remove your Windows administrator password immediately.
  5. Remove the bootable CD or USB drive. Restart the computer and you can then log in to your administrator account with a blank password.

Reset Windows Password utility can be used to as a great relief if you are usually confronted with the problem of forgetting Windows password. Follow this simple guide you can remove Windows administrator password on almost all versions of Windows system.

How to Copy and Paste Files Across Remote Desktop

October 23rd, 2012 by Admin

There are occasions when you need to copy or transfer files between your local and remote computers via remote desktop. However the copy and paste generally doesn’t work. The well-known solution is to enable drive mapping in remote desktop, so you can access your local drive from the remote computer. But it will expose your personal local drive to that computer, which can also lead to virus attack.

Actually, you can make the copy and paste function work by starting the Rdpclip utility. Rdpclip (remote desktop clipboard) is responsible for providing copy/paste functionality over a remote desktop connection, which is available in all versions of Windows. To regain the copy and paste function, you’ll need to manually restart the Rdpclip.exe utility.

How to Copy and Paste Files Across Remote Desktop?

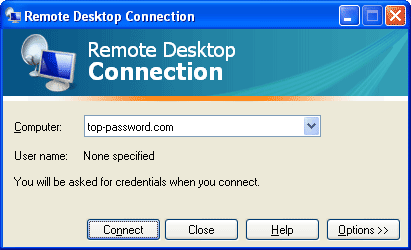
  1. Click Start, type mstsc in the Run box to start up a remote desktop connection dialog.
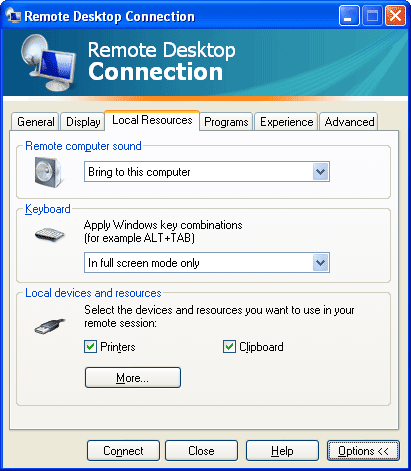
  2. Then expand the dialog by clicking on Options, then check the Local Resources tab.
  3. Make sure the Clipboard is checked, so the Rdpclip utility will be automatically started in your remote computer after setting up a remote desktop connection.
  4. The next step is to launch the Rdpclip utility on your local computer. Just click Start menu, type rdpclip in the Run box, press Enter key. The program will run in the background.
  5. Now you should be able to copy and paste files from your local computer to a remote desktop session, drag and drop files from the remote desktop machine to your local machine.

If the copy and paste function still does not work or stops working all of a sudden, you may need to kill the Rdpclip process and start it again.

How to Disable Prompt for Password on Wake Up from Sleep/Standby

October 22nd, 2012 by Admin

The prompt for user password upon wake up from sleep, standby or hibernate is a feature provided in Windows 7/Vista/XP for security reason. But if you are the sole owner of PC and you do not have any threat from someone gaining access to your PC then you might find this feature an annoying one and may want to disable it. It’s easy to disable the prompt for password when computer wakes up from sleep, standby or hibernate in Windows 7/Vista/XP.

How to Disable Password Prompt on Wake Up in Windows 7?

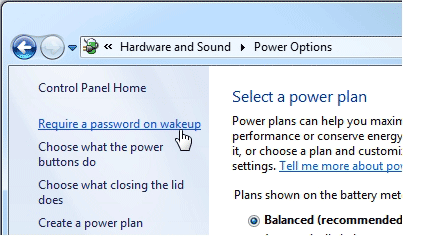
  1. Go to Control Panel –> Hardware and Sound –> Power Options.
  2. On the left side, click the Require a password on wakeup option. You navigate to System Settings as shown in the breadcrumb.
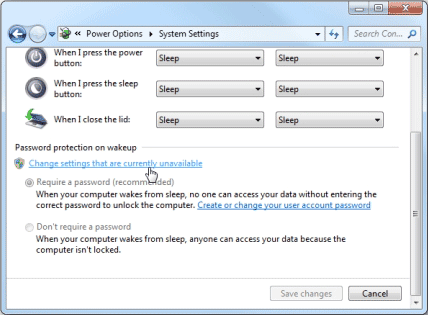
  3. Click the Change settings that are currently unavailable link under the Password protection on wakeup section. This will enable the two options below the link.

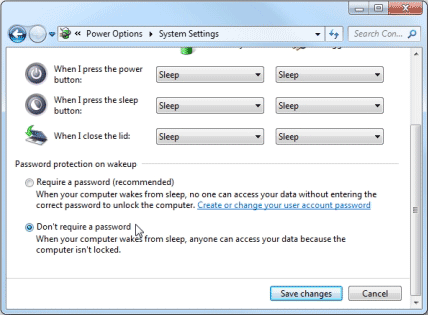
  4. Select the Don’t require a password option.
  5. Click the Save changes button.

How to Disable Password Prompt on Wake Up in Windows Vista?

  1. Go to Control Panel –> Hardware and Sound –> Power Options.
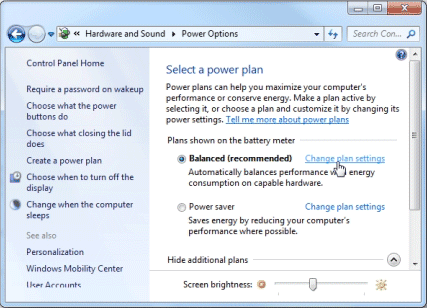
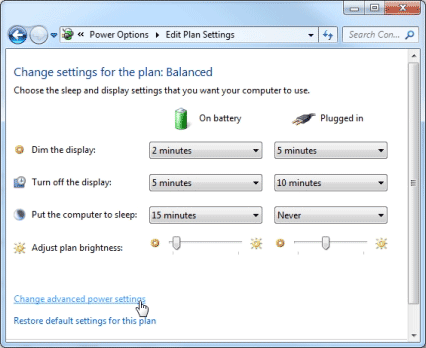
  2. Find the power plan you’re using, and then click the Change plan settings link
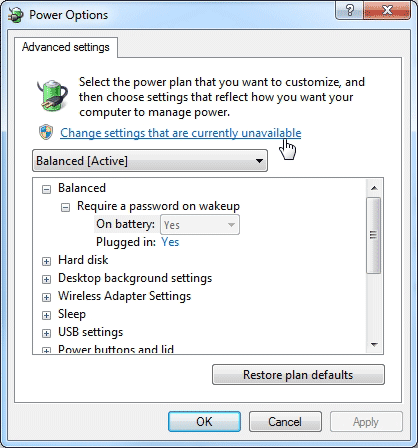
  3. Click the Change advanced power settings link. The Power Options dialog box is displayed.
  4. Click the Change settings that are currently unavailable link. This will enable the On battery drop-down list in the list box.
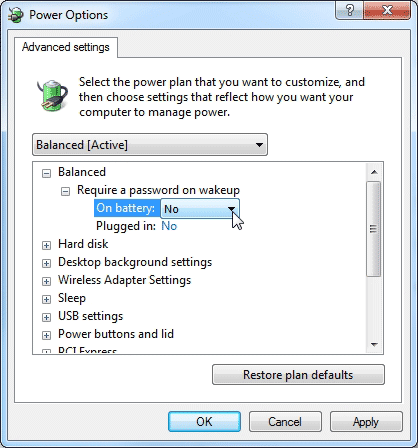
  5. Select No from the On battery drop-down list under the Require a password on wakeup node.
  6. Select No from the Plugged in drop-down list below the On battery drop-down list.
  7. Click OK.

How to Disable Password Prompt on Wake Up in Windows XP?

  1. Click Start, and then click Control Panel.
  2. Click Performance and Maintenance.
  3. Click Power Options.
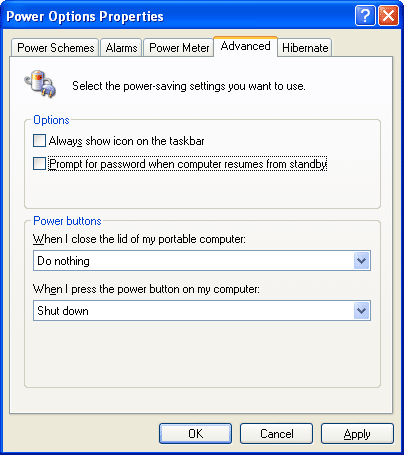
  4. Click Advanced tab.
  5. Under the Options section, uncheck the check box for Prompt for password when computer resume from standby option.
After re-configuration, Windows won’t prompt and ask user to enter a password on resume or wake up from sleep or standby state anymore.