Archive for the ‘Windows Vista’ category

PXE-Boot: Reset Forgotten Windows Password without CD or USB Drive

December 23rd, 2014 by Admin

Many Windows password tools require creating a bootable CD or USB drive, and then booting it to recover / reset lost admin password. However, what if you encounter an old computer that doesn’t support USB booting, neither have a CD drive? Thankfully, you can reset forgotten Windows password via PXE network boot.

PCUnlocker is a bootable utility that can reset lost Windows password from a bootable CD, USB device or network over PXE. Just set up a PXE server on your LAN to store the PCUnlocker CD image, and you can then boot any other PC on the same LAN to reset a lost password. Here’s how.

Part 1: Set Up A PXE Server

A PXE server can be any accessible Windows PC on your LAN network. Before get started, you need to disable DHCP in your router and use a static IP address for your PXE server. Follow the steps below to set up a PXE server which is required for PXE booting.

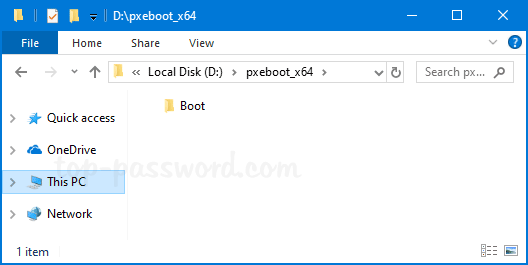
  1. After you’ve purchased PCUnlocker Enterprise, download the pxe-boot version (pxeboot_x64.zip) via this link included in your order confirmation email. Extract all files from pxeboot_x86.zip to a folder of your choice. Here, I extracted the ZIP file to the folder C:\pxeboot_x64.

  2. Download and install the freeware Serva from this link (Use the Serva_Non-Supporter_64 version if you are running 64-bit Windows). Run the program and click on the Settings button at the bottom.
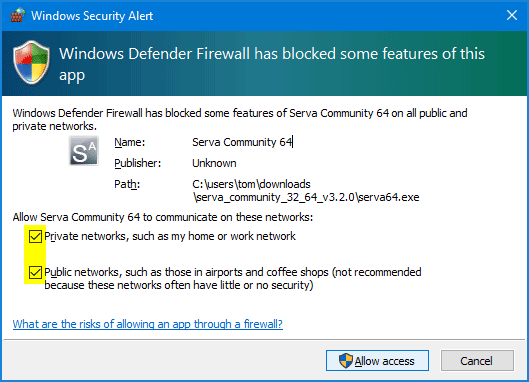
  3. If the Windows firewall displays a prompt named Windows Security Alert, asking you to allow Serva to access the network, click Allow Access.

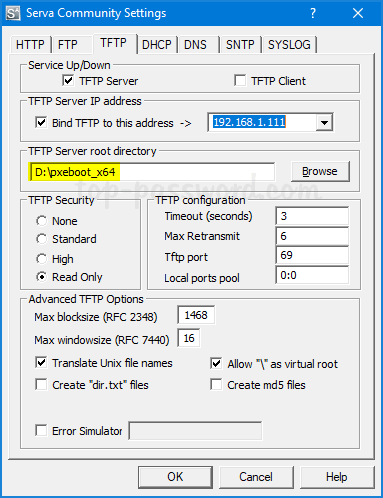
  4. In the Serva Settings window, click on TFTP tab. Tick TFTP Server and set the root directory to the folder where you extracted the pxeboot_x64.zip file (in my case D:\pxeboot_x64). Check the Allow ‘\’ As virtual root option.

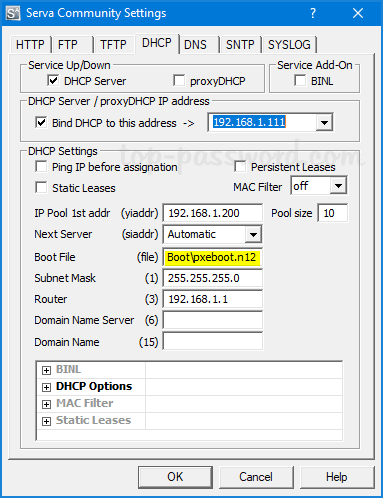
  5. Click on DHCP tab. Setup the IP pool starting address and Size of pool for your network. Type Boot\pxeboot.n12 in the Boot File box.

  6. Click OK to save your settings and restart Serva.

Part 2: PXE-Booting Your Locked PC on LAN

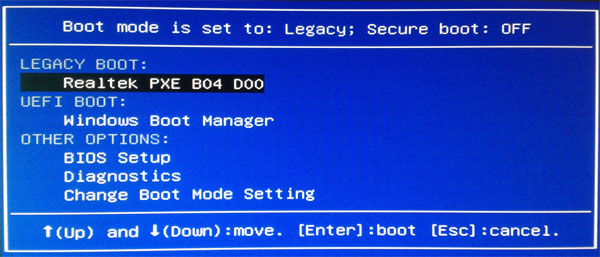
  1. Power on your locked PC and press a proper key to access the Boot Menu. Select Realtek PXE or your network device and press Enter.

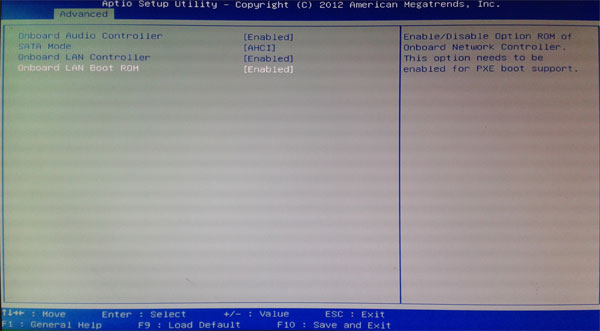
    If your PXE NIC device is not listed in the boot order, you need to enable an option labeled “PXE”, “PXE ROM”, “Network ROM” or “Realtek PXE OPROM” in the BIOS.

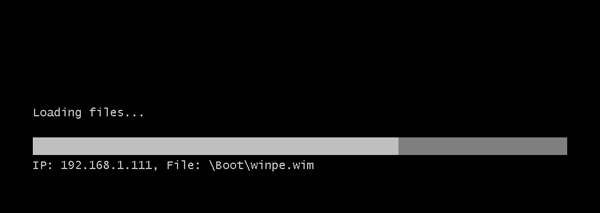
  2. Once you’ve chosen to boot from PXE Network, your computer will broadcast a DHCP request over the network. After receiving a IP address from the PXE server, it begins to download the PCUnlocker CD image that is stored on the PXE server.

Part 3: Reset Forgotten Windows Password

  1. After loading the PCUnlocker CD image into RAM, Windows 8 PE will start and boot directly to the PCUnlocker program itself. The program automatically searches Windows SAM file on the local hard drive and lists all your user accounts.

  2. Select a user account whose password you forgot, and click on Reset Password button. It will unlock / reset your Windows login password in no time.
  3. Reboot your computer and boot it from local hard drive. You can then login without a password!

Windows 8.1 Displays Context Menu on the Left Instead of Right Side

December 5th, 2014 by Admin

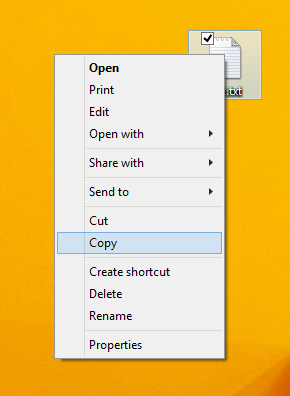
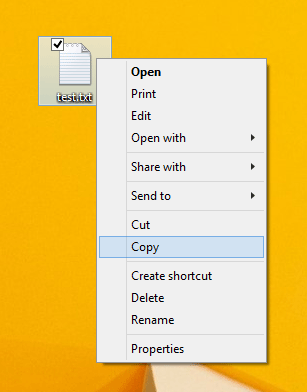
If you’ve upgraded to Windows 8.1 or Windows 10, you may notice that the context menu is displayed at left side of where you click at, but in Windows 8, 7 or Vista the menu expands to right side by default. For example, when you right-click a file, the context menu may appear on the left hand side, rather than on the right-hand side. This misbehavior also happens with the drop-down menus in other applications.

right-handed-menu

This has to do with a Tablet PC Setting which controls how the menu items are displayed. This tutorial will show you how to set the context menu to open to the right side of where you click at in Windows 8.1 and Windows 10.

How to Set Context Menu to Open to the Left Instead of Right Side?

  1. Press the Windows key + R to bring up the Run box.
  2. Copy and paste shell:::{80F3F1D5-FECA-45F3-BC32-752C152E456E} into the Run box, and then press Enter.
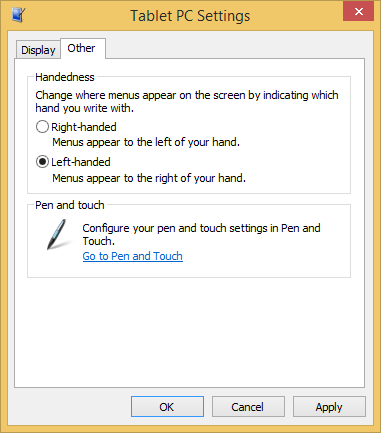
  3. You should see Tablet PC Settings dialog box, regardless of your PC type. Go to the Other tab and check the box Left-handed.

    handedness

  4. Click OK. You should now see the context menu expand to right side.

    left-handed-menu

    This trick also works for Windows 8, 7 and Vista.

How to Hide User Name from Windows Lock Screen

November 1st, 2014 by Admin

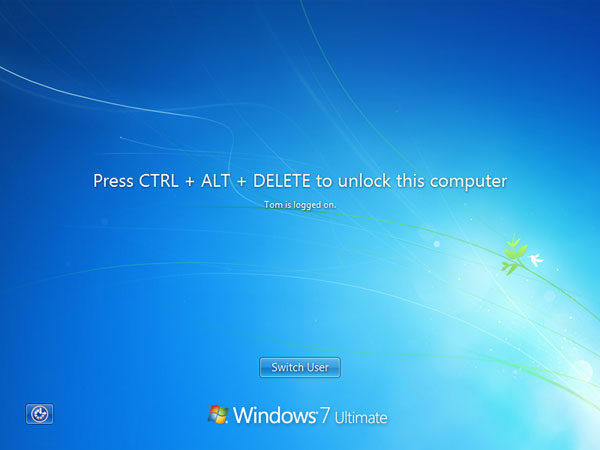
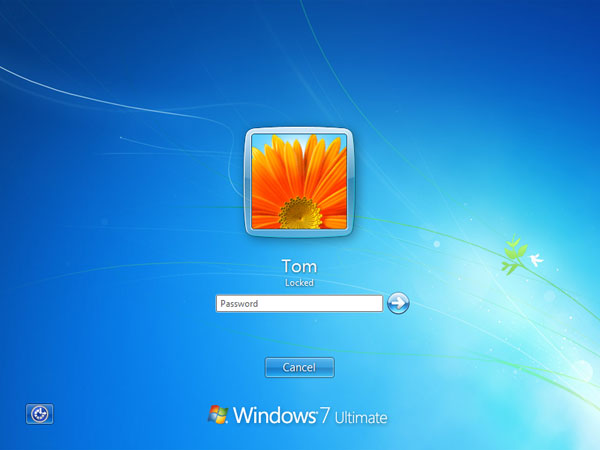
It’s a common security practice to lock your Windows desktop screen by pressing Windows + L keys every time you walk away from your computer. This can prevent other people from accessing your computer in your absence. However, did you realize that Windows will display the user name on the screen while your PC is locked? A user name can be just as sensitive as a password in a lot of scenarios. Luckily there is a simple way to hide your user name from Windows lock screen.

How to Hide User Name from Windows Lock Screen?

  1. Open the Registry Editor by pressing Windows + R keys simultaneously.
  2. Browse down to the following registry key:
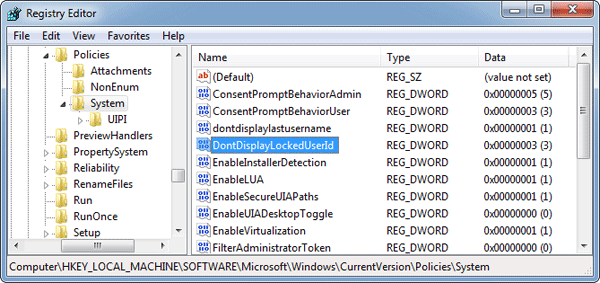
    HKEY_LOCAL_MACHINE\Software\Microsoft\Windows\CurrentVersion\Policies\System
  3. On the right-hand side, create a new DWORD 32-bit value named DontDisplayLockedUserId and give it one of these values:
    • 1 = User display name, domain and user names
    • 2 = User display name only
    • 3 = Do not display user information

    dont-display-locked-user

    If you change this value to 3 then it will remove all user information from your Windows lock screen.

    Note: To prevent the last logged on user to be displayed in the Windows logon screen, also set the dontdisplaylastusername value to 1.

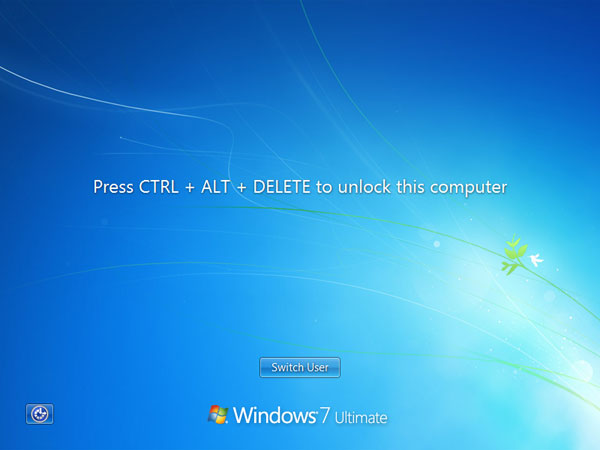
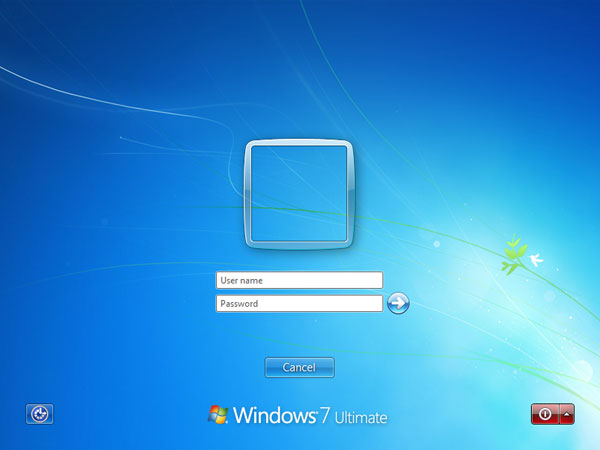
  4. Exit Registry Editor and reboot your computer. The next time you press Windows + L to lock your computer, your user name will not be displayed on the Windows lock screen any longer. User will be required to enter both their user name and password when logging back in from the locked workstation.

This is how it looks like on a Windows 7 machine.
Before:

press-ctrl-alt-del-2

windows-logon2

After:

press-ctrl-alt-del

windows-logon

Fix: Unable To Execute Files In The Temporary Directory. Setup Aborted

October 27th, 2014 by Admin

When you try to install a program downloaded from the Internet in Windows 8, 7 or XP, you might receive the following error message:

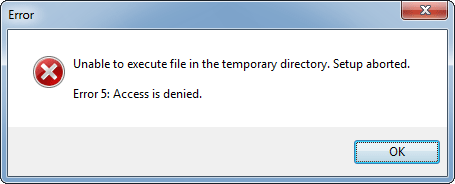
Unable to execute file in the temporary directory. Setup aborted. Error 5: Access is denied.

unable-execute-file

Right-click your downloaded .exe file and select Run as administrator. This is a temporary fix and Microsoft needs to patch it up in their updates. The problem is with the security permissions on your profile temp folder. Here are step-by-step instructions to fix this error permanently:

Before sorting out this issue, we need to find out where the temp folder is located. This folder is different for each Windows user i.e., each logged-in user gets a separate “Temp” folder. Simply press Windows key + R to bring up the Run box. Type cmd and press Enter.

The Command Prompt will run with permissions of the current logged-on user. Type set TEMP and press Enter. It will display your profile temp folder. By default, the temp folder is stored in C:\Users\{username}\AppData\Local directory in Windows 8/7/Vista, and in C:\Documents and Settings\{username}\Local Settings directory in Windows XP and previous versions.

command-prompt

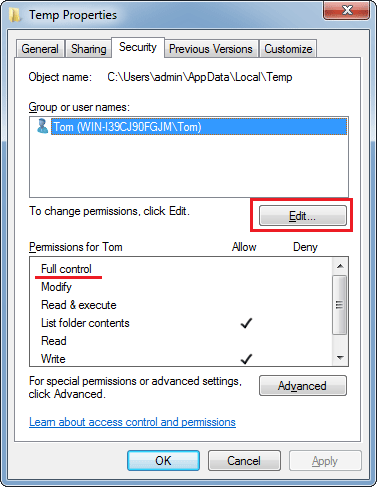
Navigate to your profile temp folder. Right-click on the Temp folder and choose Properties. In the Properties window, click the Security tab, and then click Edit to change permissions.

folder-properties

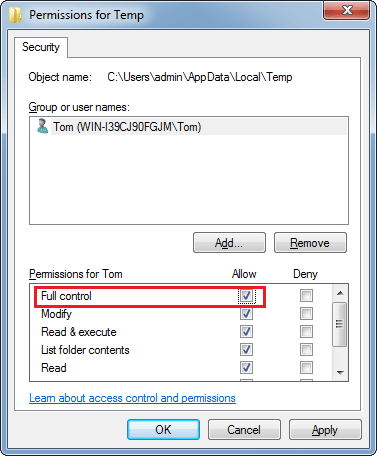
Here select your account from the list and check the Full Control checkbox. When done, hit OK. Note that when you will check the Full Control checkbox, all other permissions will be automatically checked too.

folder-permissions

Now go ahead and you should be able to install your program successfully.

How to Take Screenshots with Freeware Greenshot

October 22nd, 2014 by Admin

There are many programs available for taking screenshots. If you’re looking for a free option, Greenshot is is an excellent and open source screenshot tool for Microsoft Windows. It is free for both personal and commercial use. It’s much easier for a beginner to use than some paid screenshot tools. Here’s how to install Greenshot and use it to take screenshots in Windows 7.

How to Take Screenshots with Freeware Greenshot?

You can grab a free copy of Greenshot from its official website. Compatible with all Windows versions, the downloaded file is sized at nearly 1.3Mb. Double-click the setup file you have downloaded to install it on your computer.

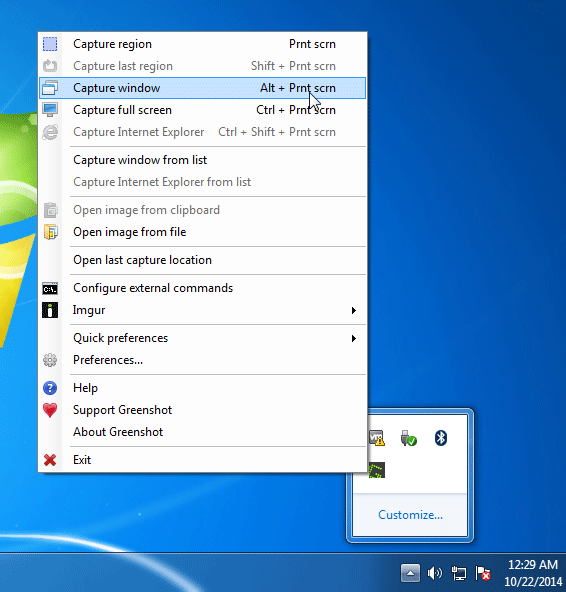
After installation, right-click on the Greenshot icon in the system tray to access the Greenshot menu. Using this menu, you can take different types of screenshots, open an image in the Greenshot editor, set Preferences, and perform several other useful tasks.

capture-window

As an example, we’re going to take a screenshot of the Skype application. Simple select the Capture window from the Greenshot menu, and you can then pick the Skype window to capture with a single click.

skype

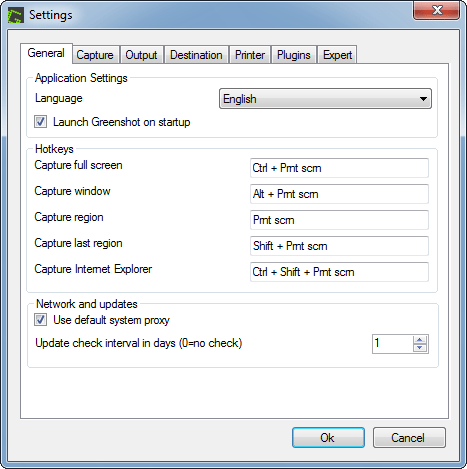
Thankfully, Greenshot also provides a list of keyboard shortcuts that making the jobs easier. If you need to take a screenshot for an active window, simply press the Alt + PrntScr hotkey. While pressing Ctrl + PrntScr you can capture the full screen.

greenshot

Once a screenshot has been captured, a popup menu will display asking what you want to do with the screenshot. We can choose to save it to a folder, or open it in Greenshot’s image editor to add some enhancements to it.

Conclusion

Greenshot may not be the best screenshot-taking program. But it handles most basic screen capture needs easily. If you don’t need to capture video and don’t mind editing captures in another program, it does everything you are likely to need. In fact, Greenshot has become my screen capture program of choice.

3 Options to Disable “Press Ctrl+Alt+Del to Log on” in Windows

August 19th, 2014 by Admin

How to bypass the Ctrl+Alt+Del logon prompt? One way of adding an additional layer of security to your computer is by enabling secure logon. By enabling secure logon, users are required to press Ctrl+Alt+Del before they can enter their credentials and log on. However, if you’re tried of pressing Ctrl+Alt+Del every time you turn on the computer, there are 3 easy options to disable the secure logon.

Option 1: Disable Secure Logon in the User Accounts Applet

  1. Press Windows key + R to bring up the Run box. Type netplwiz or Control Userpasswords2 and press Enter.
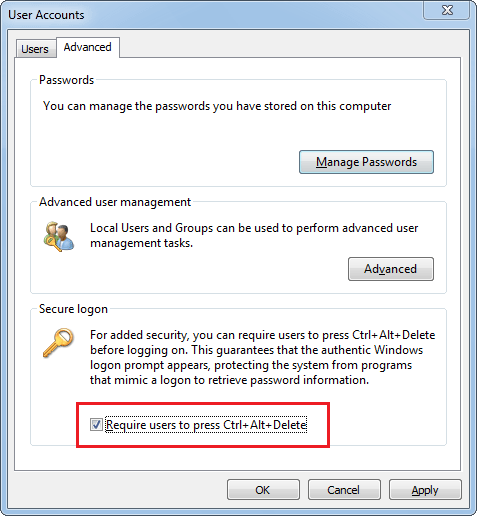
  2. When the User Accounts applet opens, click on Advanced tab.

    secure-logon

  3. Uncheck the Require users to press Ctrl+Alt+Delete checkbox. Click OK. The next time you start the computer it will boot directly to the login credential dialog box, without prompting your to press Ctrl+Alt+Del.

Option 2: Disable Secure Logon through Group Policy

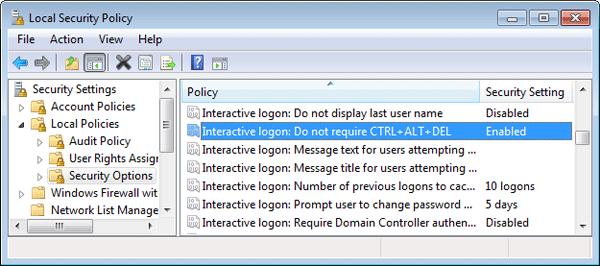
  1. Press Windows key + R to bring up the Run box. Type secpol.msc and press Enter to open the Local Security Policy Editor.
  2. Navigate to Security Settings -> Local Policies -> Security Options.
  3. In the right pane, double click on Interactive logon: Do not require CTRL+ALT+DEL.
  4. Select and set the radio button of Enabled.

    disable-ctrl-alt-del

  5. Save the policy change by clicking OK.

Option 3: Disable Secure Logon through Windows Registry

  1. Press Windows key + R to bring up the Run box. Type regedit and press Enter to open the Registry Editor.
  2. In the left pane of Registry Editor, navigate to the following key:

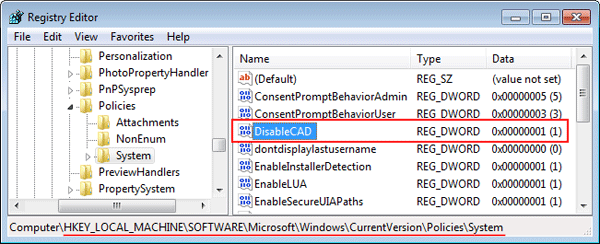
    HKEY_LOCAL_MACHINE\SOFTWARE\Microsoft\Windows\CurrentVersion\Policies\System

  3. You should see a DWORD (32-bit) entry named DisableCAD in the right pane. Double-click it and change its value from 0 to 1.

    DisableCAD

  4. Close Registry Editor and you’re done!

Reset Forgotten Windows Password for Xen Virtual Machine

August 5th, 2014 by Admin

Forgot Windows password to a Xen virtual machine? How can I reset a Windows 2008 (Xen HMV) VPS administrator login? To reset a lost VM password, you will need a tool called PCUnlocker. This software exists of a bootable CD image which can be burned to a CD or USB drive. Basically, you boot a Xen VM from the CD image and it allows you to reset forgotten Windows password offline.

How to Reset Forgotten Windows Password for Xen Virtual Machine?

  1. Download the self-extracting Zip archive of PCUnlocker and save it to your host OS. Extract the CD image (pcunlocker.iso) from the downloaded file. If you’ve enabled EFI/UEFI in your Xen VM, you need to use PCUnlocker Enterprise which supports UEFI booting.
  2. Start virt-manager (also known as Virtual Machine Manager). Select your Windows VM that need a password reset, click on EDIT menu at the top and then select Virtual Machine Details.
  3. In the Details window, click on IDE CDROM 1 tab. Click Connect to mount the PCUnlocker ISO image (pcunlocker.iso) to the virtual CD drive.
  4. Click on the Boot Options tab. Tick Enable boot menu. Check the CDROM item and put the CDROM item on top of the boot device list. Click Apply to save your changes.

    xen-boot-order

  5. Power on your Windows virtual machine and Xen will now boot from the PCUnlocker CD image, loading the WinPE OS and taking you directly into the tool. This program automatically finds your Windows SAM file and show you a list of local accounts.

  6. Select one of your user accounts and click on Reset Password button. It will reset your Windows VM password quickly, as well as unlock the account in the event it is locked out, disabled or expired.
  7. Disconnect your CD drive and restart the VM. Now you can enjoy log on to your Windows virtual machine without entering any password.

Using the same method you can reset lost Windows password for any virtual machine running in KVM, Xen, Qemu. This works with all versions of Windows, including Windows 8.1 and Windows Server 2012.