Archive for the ‘Windows XP’ category

How to Bypass the Password on Any Windows Version

July 6th, 2015 by Admin

There are lots of people that for some reason forget the login password on their Windows computers. Most of the answers they find all over the Internet is to reinstall or reset the password. This is not the answer you’ll get here. Today I’ll share with you how to bypass the password on any Windows version, not just reset it.

How to Bypass the Password on Any Windows Version?

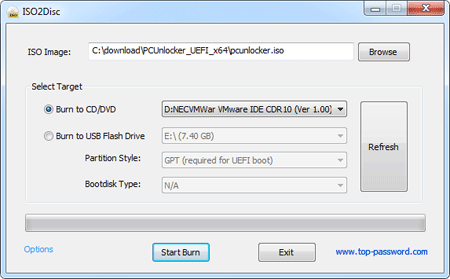
  1. Download the required password bypassing tool – PCUnlocker. Once it’s finished, double-click the zip file to extract it. You will then need to burn the ISO file to a writable CD using a program like ISO2Disc.

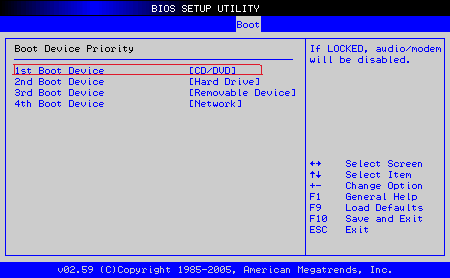
  2. Insert the CD into the computer that needs its password bypass and boot from it. You may have to change the computer’s boot order in the BIOS in order to boot from the CD.

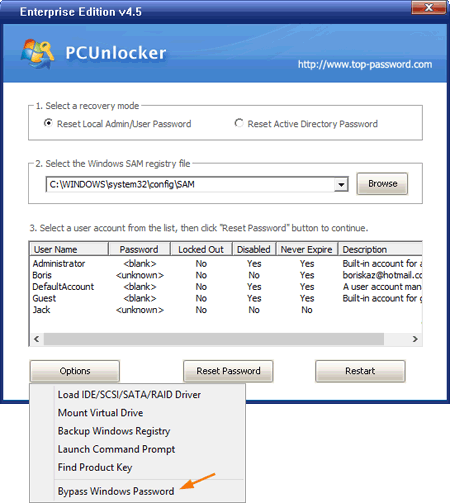
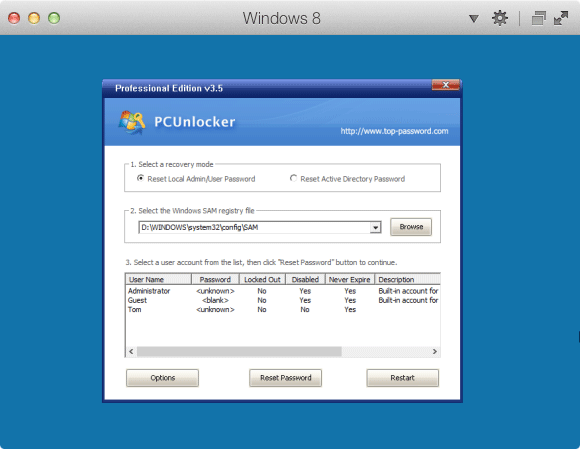
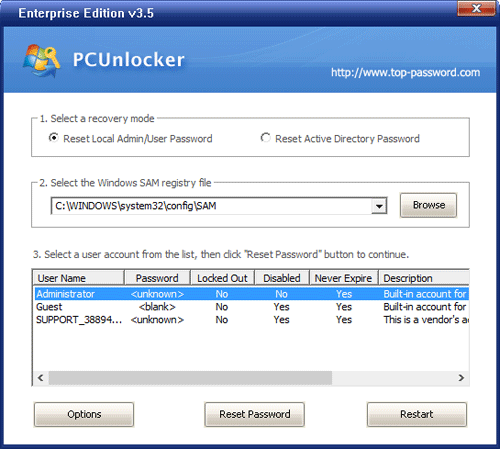
  3. If you boot from the CD successfully, it will run the Windows PE environment from memory. When the PCUnlocker application opens, you’ll see a list of Windows user accounts that are discovered on your computer.
  4. Here we’re not going to reset the user password, so don’t click the “Reset Password” button. At the bottom-left side of your screen, there is an Options button. Click on Options and select “Bypass Windows Password”.

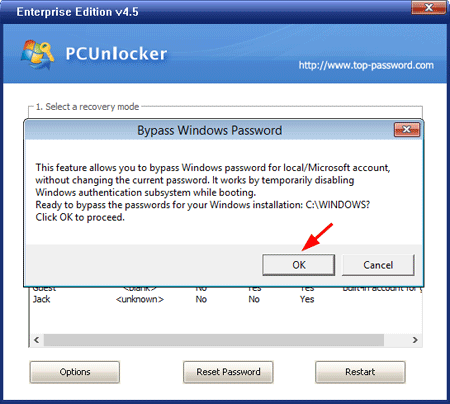
  5. Confirm your password bypass operation and click OK to proceed.

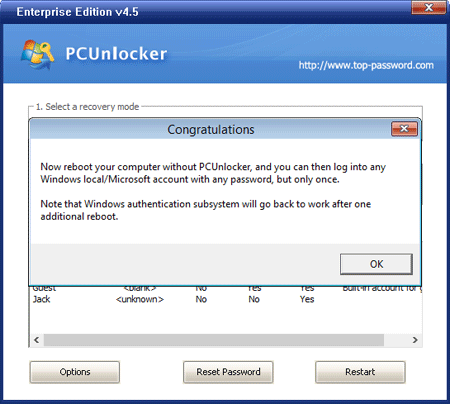
  6. When you see the Congratulations dialog box, you’re almost done!

    Restart your compute and take out the CD. When it boots to the Windows login screen, click the icon of any User account (supporting Windows 8 Microsoft account) and you can login with arbitrary password.

I have tested this procedure on Windows 10, 8.1, 8, 7, Vista, XP and it works fine, so if yours somehow does not work, go back through the steps again and make sure you have not missed any step. Or check out the boot up toubleshooting guide for PCUnlocker.

FAQs for Password Reset Disk in Windows

June 22nd, 2015 by Admin

A password reset disk allows you to change lost Windows user password from Windows login screen, without needing to know your old password. In one of my previous posts we’ve covered how to create and use a password reset disk in Windows 7. Here we’ll try to answer the frequently asked questions about password reset disk in Windows 10/8/7/Vista/XP.

The use of password reset disk has actually protected many users against forgetting their logon passwords. And Microsoft recommends you to always create a password reset disk immediately after setting up a new user account. If you have a lot of users and do not wish to create a reset disk for each one, then you should at least create one for the administrator account on that computer. You can then use that administrator account to change any other user’s password.

FAQ: I’ve created a password reset disk for account A, can I use it to reset the password for account B?

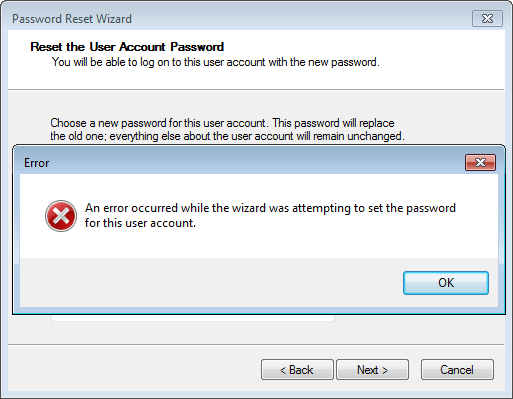
No. Password reset disk is unique to an account (good from security point of view). That’s to say, even if you create a password reset disk for account A of Windows machine A, you cannot use it to reset the password for account B of Windows machine A, and you’ll got the following error message:

password-reset-error

FAQ: Can I create a password reset disk after forgetting my Windows password?

It’s too late to create a password reset disk. You have to create a password reset disk before you forgot the password. If you’ve already forgotten your Windows password and don’t have a password reset disk, you need to take use of the third-party live CDs such as PCUnlocker.

FAQ: Do I have to re-create a password reset disk after changing the password?

Your previously-created password reset disk will continue to work. No need to re-create the disk every time you change your user password.

FAQ: Can I create multiple password reset disks for one account?

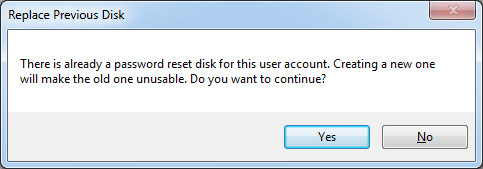
Only one password reset disk can be created for per account. When you try to create another password reset disk, you’ll get the warn message “There is already a password reset disk for this user account. Creating a new one will make the old one unusable. Do you want to continue?

replace-reset-disk

If you click Yes, the previous password reset disk automatically expires, and Windows no longer recognizes it when the user tries to use it to reset the password. This is integrated in the operating system for security purposes.

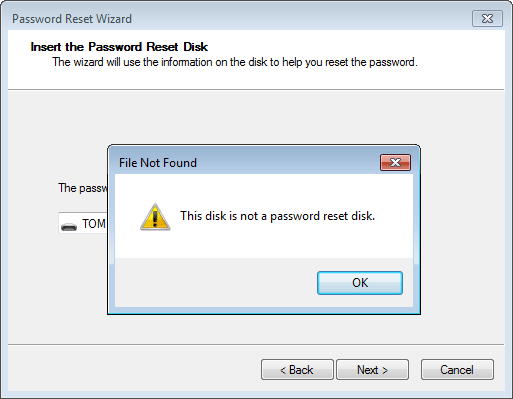
FAQ: Why Windows say “this disk is not a password reset disk”?

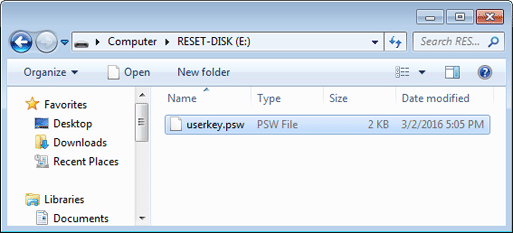
A password reset disk is actually a USB drive that contains a single file named userkey.psw in its root directory. userkey.psw is an encrypted backup version of your password.

password-reset-disk

If you try to reset password using a USB drive that doesn’t contain the userkey.psw file, Windows will warn you that it’s not a password reset disk.

not-password-reset-disk

FAQ: Where should I store the password reset disk?

A password reset disk in the wrong hands could be used to reset the account password for whichever computer and user account for which it was created. Therefore it’s imperative to keep your password reset disk in a secure location, preferably away from the computer it was created with.

Parallels Desktop: Reset Lost Windows VM Password

May 16th, 2015 by Admin

If we forget the Admin password for a Windows virtual machine running on Parallels Desktop, is there an easy way to reset it? With PCUnlocker you can reset lost Windows password and regain access to your Parallels VM. This is considerably faster than destroying and rebuilding your VM.

This tutorial will take you step by step through resetting a Windows login password inside a Parallels Desktop virtual machine running on your Mac.

How to Reset Windows VM Password on Parallels Desktop?

  1. Click here to download and save the PCUnlocker self-extracting Zip file on to your Mac. Once the download is complete, double-click on the .zip file and Archive Utility should appear and automatically extract your files. Open the folder you extracted to and you can see a CD image: pcunlocker.iso.

  2. Start Parallels Desktop but do not start your virtual machine. Right-click on your Windows virtual machine and choose Configure.
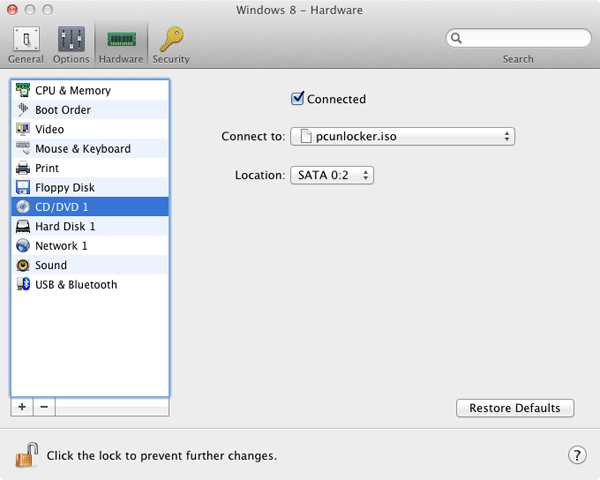
  3. In the Virtual Machine Configuration dialog, choose the Hardware tab and select CD/DVD 1. Make sure that Connected option is checked. From the “Connected to:” drop-down list, select “Choose an image file” and locate the pcunlocker.iso file you downloaded in step 1.

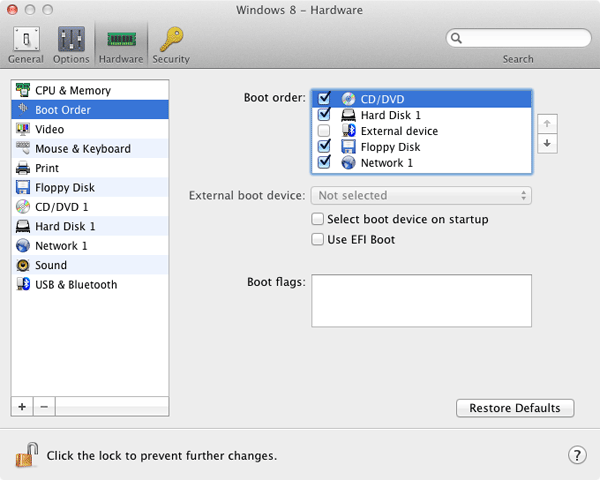
  4. Go to Hardware tab and click Boot Order. Move CD/DVD to the first place in the Boot order.

  5. Start your Windows virtual machine and it will boot directly to the PCUnlocker program which lists all user accounts on your Windows system.
  6. Select a user whose password you would like to reset and click on “Reset Password” button to clear the user’s password. The program should now alert you that the password was cleared.

  7. You can now power off your virtual machine. Be sure to go back to the Virtual Machine Configuration and change the boot order back to hard disk. Start the VM and you should be able to log into Windows without typing a password!

Besides resetting Parallels Desktop password, you can also use PCUnlocker to bypass the passwords for Windows virtual machines running in Parallels Workstation, VMware Workstation, VirtualBox, Hyper-V, Virtual PC, ESX/ESXi, and other virtualization software.

How to Change Local or Domain Password Policy from Command Prompt

May 10th, 2015 by Admin

How to disable the password complexity policy for Windows Server Core installation? If your Windows system comes with a GUI interface, you change the password policy from within the Group Policy Editor, but the steps are still a bit complicated for a Windows domain controller.

In this tutorial we’ll show you a quick yet simple way to change local / domain password policy from the Command Prompt. This method works with all versions of Windows, including Windows 10, 8, 7, Vista and Windows Server 2012 (R2) / 2008 (R2) / 2003.

How to Change Local/Domain Password Policy from Command Prompt?

If your computer is a domain controller, follow the steps below and you can change the default domain password policy. To change the local password policy on a domain controller, you must boot your server in Directory Services Restore Mode (DSRM) and then perform the steps below:

  1. Open an elevated Command Prompt. If you’ve forgotten the local or domain administrator password and couldn’t log on, try the PCUnlocker bootdisk for bypassing the password.
  2. Type the following command and hit Enter:
    secedit.exe /export /cfg C:\secconfig.cfg

    export-group-policy

    This will dump the local policy or domain policy for the system, including account policies, audit policies, and so on.

  3. Open the C:\secconfig.cfg file with your text editor. For Windows Server Core, you can type notepad.exe in the Command Prompt. When Notepad launches, click the File -> Open menu to open C:\secconfig.cfg.
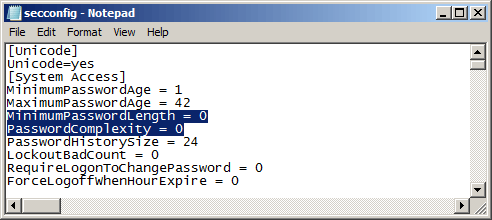
  4. Now you can view and edit all of the relevant policies as shown below. In this example, we’ll disable the password complexity policy. So we replace PasswordComplexity = 1 to PasswordComplexity = 0, and change the value of MinimumPasswordLength to 0.

    edit-group-policy

  5. When done, save your changes. To load the edited file as your new policy configuration, use the following command:
    secedit.exe /configure /db %windir%\securitynew.sdb /cfg C:\secconfig.cfg /areas SECURITYPOLICY

    update-group-policy

  6. The new password policy will apply to all password changes and new password. After disabling the password complexity policy, you should be able to change Windows account password to whatever you like.

How to Create An Encrypted and Locked Folder in Windows

April 4th, 2015 by Admin

There are many folder locking programs out there that allow you to password protect and set different access rights to your files. But most of these programs don’t encrypt your files at all. Someone can easily bypass this protection to access your files by booting your PC with a Linux or WinPE Live CD, or removing your hard drive and connecting it to another PC.

If you’re a bit more conscious of privacy, encrypting your files is a better solution. Lock My Folders is an on-the-fly encryption software to lock and encrypt all kinds of pictures, videos, documents, files and folders. In this article we’ll explain how to use this program to create an encrypted and locked folder in Windows 10, 8, 7, Vista and XP.

Part 1: Set Password

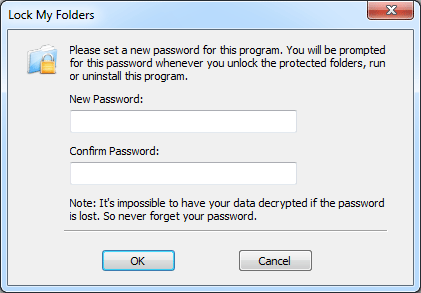
Click here to download the Lock My Folders application and install it on your computer. The first time you launch the program, it will prompt you to set a master password that will be used to encrypt your files later on.

Enter a password that you can remember as you’ll need it to open and use the program next time.

Part 2: Create An Encrypted Folder

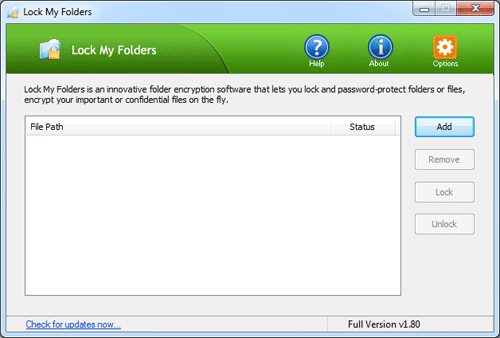
To create an encrypted folder, click on Add button from within the Lock My Folders program.

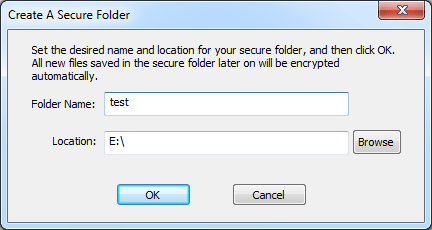
In the popup window, type your desired folder name and specify the location where you would like your new secure folder to be created. Click OK. You can create a secure folder in your local hard drive or USB flash drive.

Now your secure folder should have been created. You can then copy all your private photos, documents & videos into this folder, or create or edit a confidential file in the secure folder. All your files stored in this folder will be encrypted automatically on the fly.

Part 3: Manage Your Encrypted Folders

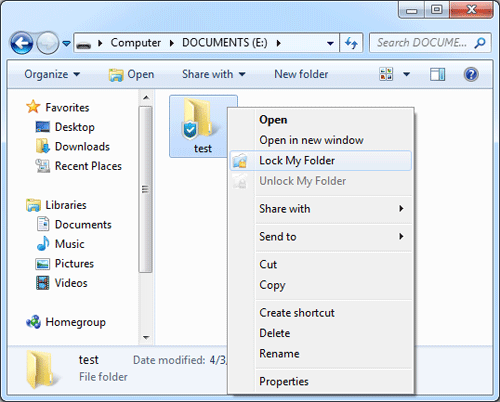
With the steps above you can create as many secure folders as you want. You can lock your secure folder after you finish working with it. Just right-click on the secure folder and select “Lock My Folder“.

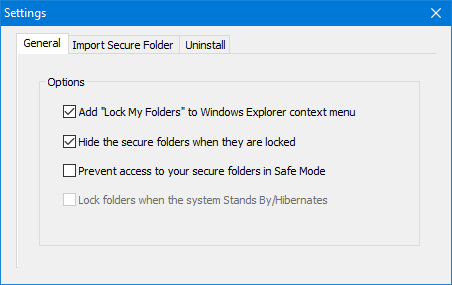
When a secure folder is locked, everyone couldn’t access all files in it without knowing your password. You can also set your locked secure folders to be invisible from Windows Explorer and Command Prompt, by following these steps:

  1. Start the Lock My Folders program.
  2. Click on the Options icon from the top right corner of the main screen, and then select Settings.
  3. Check the “Hide the secure folders when they are locked” box.

If you shutdown or restart your PC, all your secure folders will be locked out automatically.

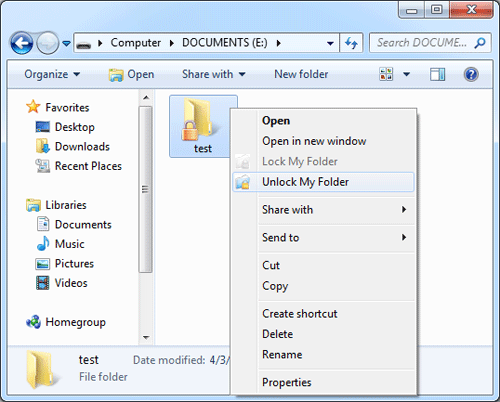
The next time you need to open or access the secure folder, you need to unlock it firstly. Right-click on the secure folder and select “Unlock My Folder“.

The program will ask you to enter your password. Upon successfully verifying the password, the program will open the secure folder in Windows Explorer.

If you need to reinstall your operating system or transfer your secure folders to another machine, just backup the secure folders to an external storage device and you can then import them to the Lock My Folders program again. It’s that simple!

Forgot Windows XP Domain Password and Can’t Login

January 16th, 2015 by Admin

Locked out of Windows XP domain machine and can’t log into the domain user account? Need to gain access to your computer after the domain controller is no longer available or you forgot the password?

forgot-xp-domain-password

In this article we’ll explain how to reset forgotten Windows XP password and then remove your computer from a domain that no longer exists, or which you no longer have access.

Part 1: Reset Forgotten Windows XP Password

Before removing your computer from the domain you need to first log in as a local administrator. If you’ve forgotten your password, you can reset it easily with the PCUnlocker program. Here’s how:

  1. Use a spare PC to download the PCUnlocker ISO image and burn it to a CD or USB flash drive using the ISO2Disc program.
  2. Boot your locked Windows XP machine from PCUnlocker Live CD/USB drive.
  3. Once the PCUnlocker program starts, you can see a list of local accounts for your Windows XP system.

    reset-xp-password

  4. Choose the built-in Administrator account and click on Reset Password button. It will remove the local administrator password immediately.

Part 2: Remove Windows XP from Domain

Once you’ve reset the local administrator password, you can then log on your computer locally and remove Windows XP from a non-existent domain, by following the steps below:

  1. Boot your Windows XP machine as usual. When you get to the Welcome screen, press Ctrl + Alt + Del twice to get the classic Windows logon box.
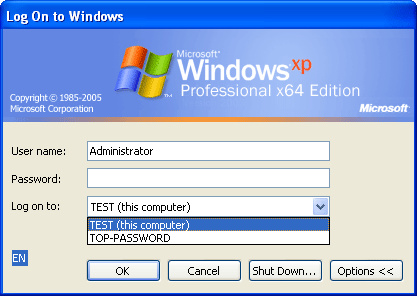
  2. Type Administrator in User name box, and leave the password box empty as you’ve reset the local administrator password. Make sure that in the Log on to field, you have pulled down to “this computer” rather than a domain. Click OK and you should be able to log on successfully.

    logon-to-xp-locally

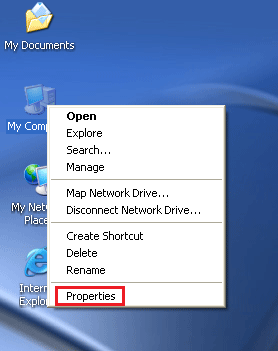
  3. After getting into Windows XP, right-click the My Computer icon on your desktop and select Properties.

    right-click-my-computer

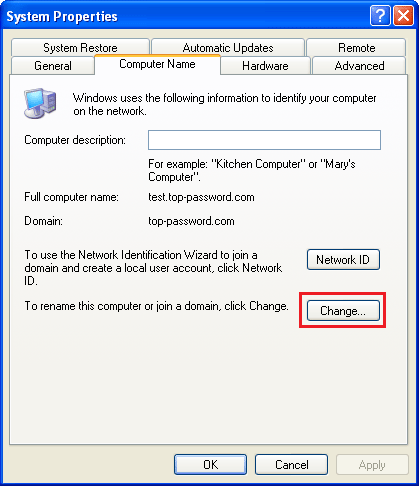
  4. In the System Properties window, go to the Computer Name tab and click the Change button.

    system-properties

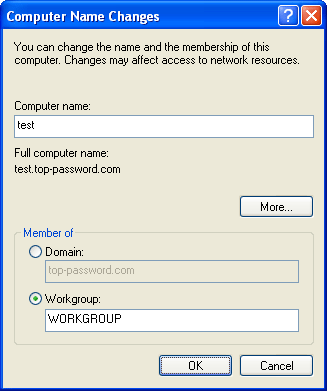
  5. In the Member of section, choose Workgroup and then type something, anything in the Workgroup field.

    remove-xp-from-domain

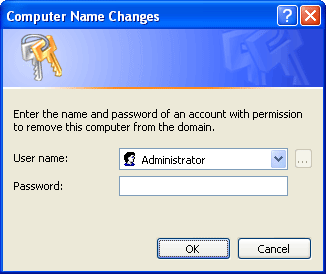
  6. When you click OK, you will be prompted to provide the login credentials for an account with permission to remove this computer from domain. Just type Administrator in User name box, and leave the password box empty. Click OK.

    computer-name-changes

  7. Reboot your computer for the change to take effect. Now you’ve successfully removed Windows XP from a domain.

How to Reset Forgotten Windows Password with Ultimate Boot CD (UBCD)

January 15th, 2015 by Admin

In this tutorial we’ll show you how to crack and reset Windows password when you forget it or want to unlock a computer with an unknown password. There are tons of recovery tools available to bypass password, but here I’ll use the freeware Ultimate Boot CD (UBCD).

Ultimate Boot CD is a Linux-based bootable disc with loads of useful software for repairing or fixing almost any Windows problem. The built-in chntpw utility could be used to wipe windows passwords and view/edit the registry. Here’s how.

Note: Ultimate Boot CD is a freeware so don’t expect it to work with domain controllers. If you want to find a more powerful yet easy-to-use password recovery software, try the PCUnlocker Live CD.

How to Reset Forgotten Windows Password with Ultimate Boot CD?

Before getting started, you need to download the Ultimate Boot CD (about 588Mb) from its official website, and then burn it to a CD. With the CD you can follow the steps below to reset forgotten Windows 8/7/Vista/XP password:

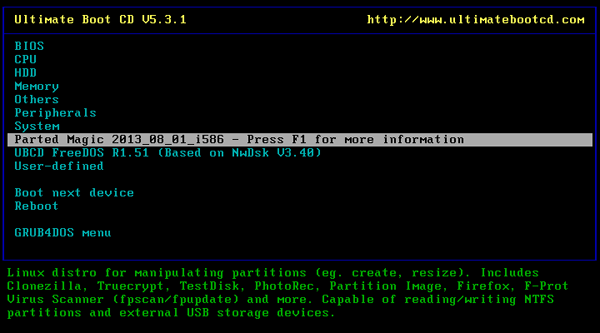
  1. Boot your locked computer from Ultimate Boot CD. On the boot menu of Ultimate Boot CD, choose Parted Magic and press Enter.

    ultimate-boot-cd

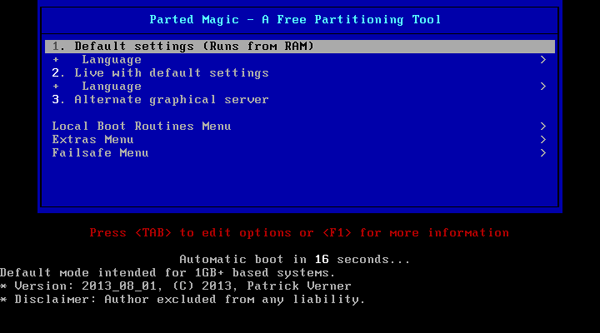
  2. The next screen you have to select your graphic settings. Just select option 1 and press Enter to use the default settings.

    parted-magic

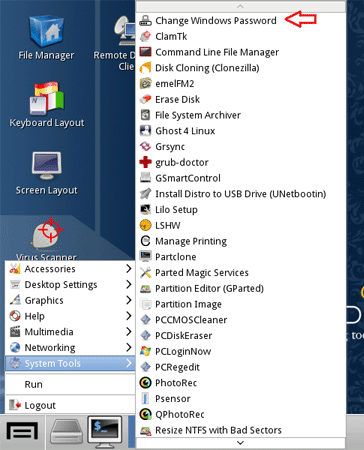
  3. Once you are presented with the Parted Magic desktop, go to the left bottom corner of the screen and choose System Tools -> Change Windows Password.

    change-windows-password

  4. A new small window will open. It lists all Windows partitions detected on your local hard drive. Click on the correct drive and it will start the chntpw utility in the console.

    select-windows-installation

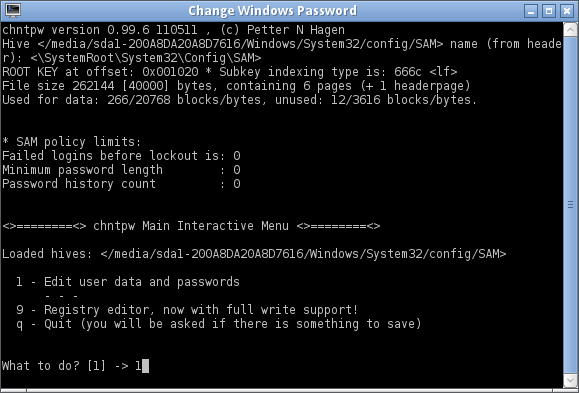
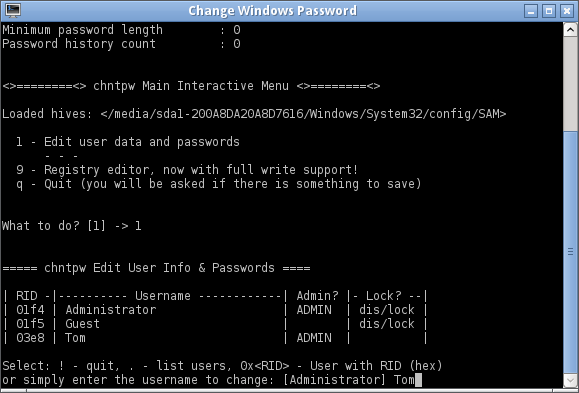
  5. You will now be presented with the chntpw Main Interactive Menu. Type 1 and press Enter.

    chntpw

  6. This will list out all of the Windows users on the system. Type the name of your desired user and press Enter.

    enter-username

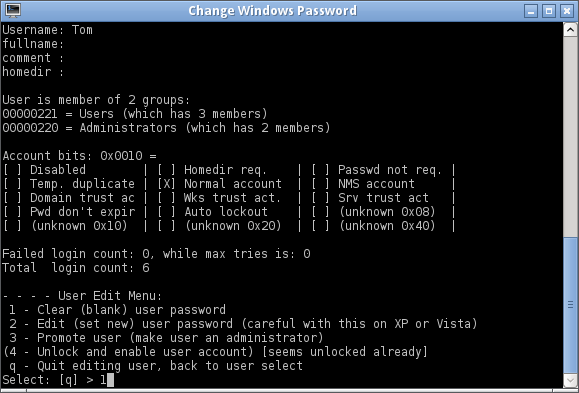
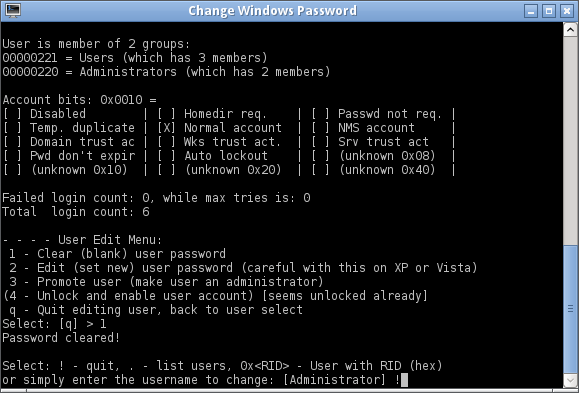
  7. You will now be given the option to blank out the password, as well as several other ways to promote or unlock the user account. Type 1 and press Enter, it will remove the existing password.

    user-edit-menu

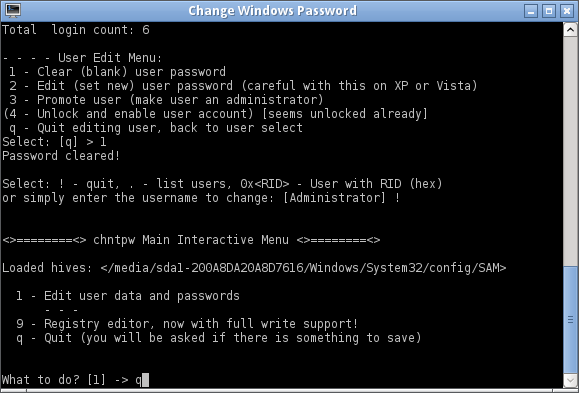
  8. If you don’t want to reset other user password, type ! and press Enter.

    quit-edit-menu

  9. Type q and hit Enter at this point to quit the User Edit Menu.

    quit-chntpw

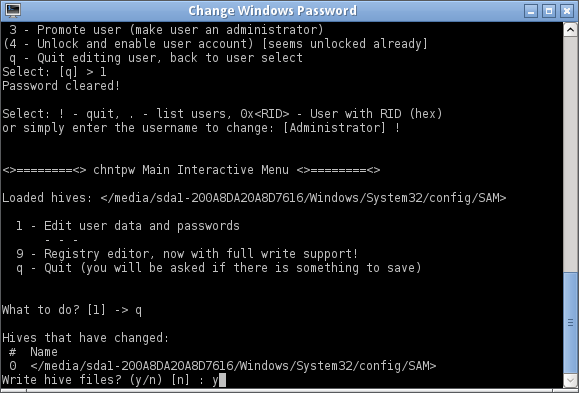
  10. You will then be asked to write the registry hive to disk. Type y to confirm and save your changes.

    write-hive-files

  11. Now you can reboot, and you can log into your Windows account with a blank password. Once you’re logged in, you can go to the Control Panel to change your password to something else — something you can remember.

How to Hide A Drive / Partition from Windows Explorer

December 24th, 2014 by Admin

Do you have some private files that you want to hide from your children? Here is a registry trick to hide a drive or partition in Windows 11/10/8/7/Vista/XP, so it cannot be accessed from Windows Explorer by inexperienced users.

The method is not foolproof though, and users can still access the contents of the hidden drive from Command Prompt or Disk Management. If you have some confidential or sensitive data on a local disk and want to lock / protect it securely, I recommend you use the Protect My Folder application.

How to Hide A Drive / Partition from Windows Explorer?

  1. Open Registry Editor and navigate to the following key: HKEY_LOCAL_MACHINE\Software\Microsoft\Windows\CurrentVersion\Policies\Explorer. In the right pane, right-click the blank area and choose New -> DWORD (32-bit) Value.

  2. Name the newly-created DWORD as NoDrives and then double-click it. In the pop-up window, choose Decimal, enter a proper number for hiding your desired partition. In my example, I want to hide the network drive Z:, so I type in the value 33554432.

    Here’s a list of the values (decimal number) you’ll want to enter for different drive letters:

    • A: 1
    • B: 2
    • C: 4
    • D: 8
    • E: 16
    • F: 32
    • G: 64
    • H: 128
    • I: 256
    • J: 512
    • K: 1024
    • L: 2048
    • M: 4096
    • N: 8192
    • O: 16384
    • P: 32768
    • Q: 65536
    • R: 131072
    • S: 262144
    • T: 524288
    • U: 1048576
    • V: 2097152
    • W: 4194304
    • X: 8388608
    • Y: 16777216
    • Z: 33554432
    • ALL: 67108863

    But what to do if you want to hide more than one drive in Windows? Just add the values of the drives that you want to hide. For example, if you want to hide the drives E:, F: and A: you would enter 49 (16+32+1) in NoDrives as the decimal value.
  3. Restart your computer and your target drive will disappear from Windows Explorer.

    You can even hide the C: drive without corrupting your system. When you want to get your drives back, just set NoDrives to 0 or simply delete NoDrives altogether.