Posts Tagged ‘Active Directory’

How to Perform Active Directory Offline Defragmentation

October 19th, 2012 by Admin

The Active Directory database tends to become fragmented over time, just like any other database does. Although Windows Server 2008/2003/2000 performs behind-the-scenes online defragmentation periodically, this defragmentation only moves data around the database file (NTDS.DIT) and doesn’t reduce the file’s size – the ntds.dit database file cannot be compacted while Active Directory is online. If you have significantly fewer objects in AD than you had previously, you can shrink the size of the ntds.dit file by performing an offline defragmentation.

Tips: If you forgot domain administrator password in Active Directory and can’t log on the domain controller, you can reset/unlock any domain user account passwords easily with Reset Windows Password utility.

Performing an offline defragmentation can increase performance, however, the main reason would normally be to free up disk space. Please note, you should backup your database before doing this by copying your ntds.dit to another location.

How to Perform Active Directory Offline Defragmentation?

First, you need to stop the Active Directory Domain Service. You can defrag / compact the ntds.dit database file when AD is not running. It’s not necessary to reboot into Directory Services Restore Mode.

After the services have been stopped, open a Command Prompt on the server, and enter the following commands:
NTDSUTIL
Activate Instance NTDS
Files
Info

At this point, you should see a summary of the files that are used by the Active directory database. To begin the defragmentation process, enter the following command:
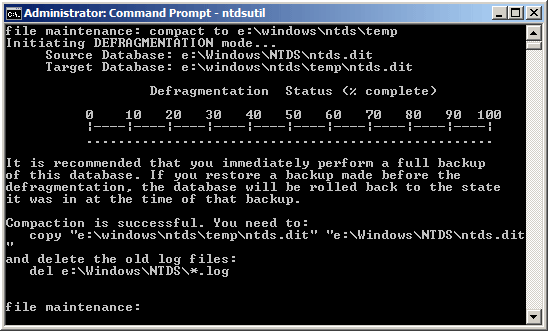
Compact to e:\windows\ntds\temp
The command shown above assumes that you have created a folder named Temp beneath the e:\windows\ntds\temp folder.

When the process completes, you need to do what it says and copy the defragged database from e:\windows\ntds\temp\ntds.dit to e:\windows\ntds\ntds.dit.

Finally, restart the Active Directory Domain Services (the dependency services will restart automatically). You now have a smaller and better performing Active Directory.

How to Access the Directory Services Restore Mode on a Remote DC

October 15th, 2012 by Admin

When Active Directory (AD) isn’t working, the steps you’d typically follow would be to boot into Directory Services Restore Mode (DSRM) for repairing or recovering Active Directory. To access Directory Services Restore Mode, you typically press F8 prior to the machine booting into Windows, then select the Directory Services Restore Mode option from the menu that appears.

Tips: If you forgot DSRM password or domain admin password, you can reset the forgotten password easily with Reset Windows Password utility.

But sometimes you need to fix a problematic DC in a remote location, but nobody is close enough to troubleshot. Obviously, you can’t boot the domain controller into DSRM as usual. In this tutorial we’ll show you how to access Directory Services Restore Mode on a remote DC.

How to Access Directory Services Restore Mode on a Remote DC?

  1. On your machine, select Run from the Start menu, type Mstsc /console, and click OK.
  2. Type the IP address of the remote domain controller you want to connect to.
  3. Log on to the server using the Active Directory account.
  4. On the DC, right-click My Computer, click Properties, and then click the Advanced tab.
  5. Click Settings for startup and recovery.
  6. Click the Edit button to edit the startup options file.
  7. Modify the default entry to include the /SAFEBOOT:DSREPAIR switch, as shown in the following example:multi(0)disk(0)rdisk(0)partition(2)\WINNT="W2K DC \\ your server name " /fastdetect /SAFEBOOT:DSREPAIR
  8. Save the modified Boot.ini file, and then close Notepad.
  9. Restart the domain controller.
  10. After waiting a few minutes, perform steps 1 and 2 again.
  11. When you reconnect, the server should state that it’s in Directory Services Restore Mode. Log on using the Local Administrator account (not the Active Directory account).

Once you have restarted the server in Directory Services Restore Mode, you are ready to begin the repairing or recovery process.

How to Reset Lost 2008 Active Directory Admin Password

October 11th, 2012 by Admin

We have a few customers, who have forgot their AD Administrator password on their Windows 2008 server. Is there really any way to recover it? I know it’s possible to reset your Windows 7, XP and Vista password. But is it possible to get the AD administrator password on a 2008 server? I hope we can avoid a re-install. Cheers.

Lost or forgot the administrator password on Active Directory 2008? There isn’t any efficient way to recover the password as Active Directory encrypts the password using some very strong encryption algorithms. But you can reset or replace the forgotten password easily. Today’s tutorial will be covering a technique that will allow you to reset your lost 2008 Active Directory Administrator Password.

How to Reset Lost 2008 Active Directory Admin Password?

  1. Download and install Password Recovery Bundle on another computer that you can log in.
  2. Prepare a blank CD and insert it into the computer.
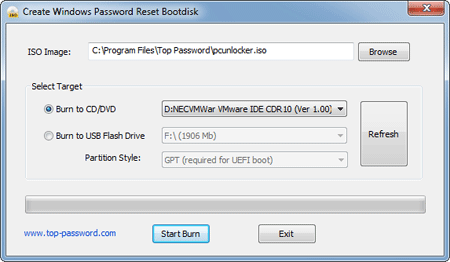
  3. Launch Password Recovery Bundle and click on Windows Password button, it will display the ISO burning dialog.

  4. Choose your CD you’ve plugged in and then click on Start Burn button to create a Live CD.
  5. After you have the Live CD, put it into the CD drive of your Active Directory server whose password you want to reset.
  6. Turn on the Active Directory server and have it boot from the Live CD. You may need to go into BIOS and set CD/DVD as the first boot device.
  7. After booting from the Live CD, it will load the Windows PE operating system inside the Live CD and start the Reset Windows Password program.

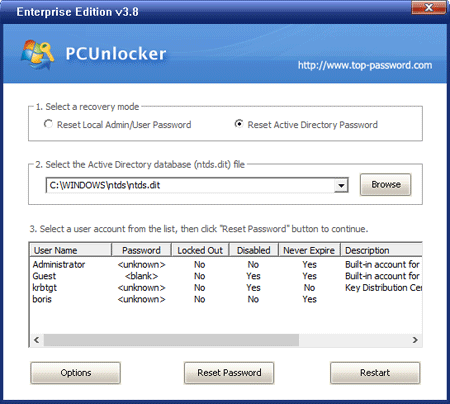
  8. Choose the Active Directory NTDS.dit database, it will display a list of domain user accounts inside the NTDS.dit database.
  9. Choose the administrator account from the list, then click on Reset Password button, the program will replace the forgotten/unknown administrator password with a new password: Password123.

Take out the Live CD and reboot the Windows 2008 server, you can then log in to your domain administrator account with your new password. With the Live CD you can also reset lost admin password on Windows 8, 7, Vista, XP.

How To Install Active Directory on Windows Server 2008

June 14th, 2012 by Admin

In any small network setup where there are maximum of 15 computers, peer-to-peer network infrastructure is the best solution. However when the number of computers are increased and it becomes practically impossible for the administrators to manage several computers as a peer-to-peer setup, installation of Active Directory Services becomes essential.

In this scenario we are going to install Active Directory fresh with a brand new Domain Controller after a fresh install of Windows Server 2008.

Requirements for Active Directory:

Let’s go through some of the requirements for a fresh install of Active Directory Domain Services. Some of these will be required to be done beforehand, others as noted can be done during the install:

  • Install Windows Server 2008
  • Configure TCP/IP and DNS networking configurations
  • An NTFS partition with enough free space
  • Active Directory requires DNS to be installed in the network. If it is not already installed you can specify DNS server to be installed during the Active Directory Domain Services installation.

Once you verify that these requirements have been met we can get started.

How to Install Active Directory on Windows Server 2008:

Let’s start by installing Active Directory through Server Manager. This is the most straight forward way, as a wizard will guide you through the steps necessary.

1. Start Server Manager.

2. Select Roles in the left pane, then click on Add Roles in the center console.
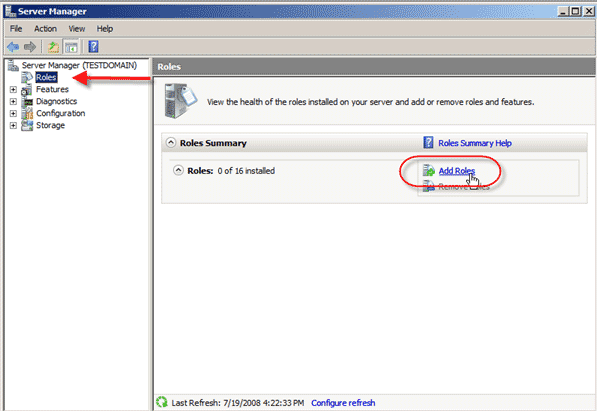
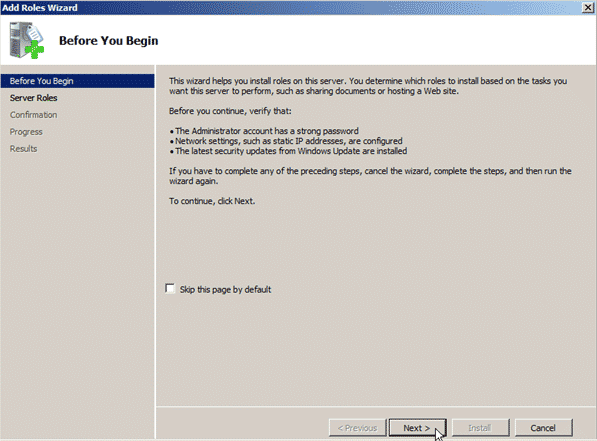
3. Depending on whether you checked off to skip the Before You Begin page while installing another service, you will now see warning pages telling you to make sure you have strong security, static IP, and latest patches before adding roles to your server.

If you get this page, then just click Next.
4. In the Select Server Roles window we are going to place a check next to Active Directory Domain Services and click Next.
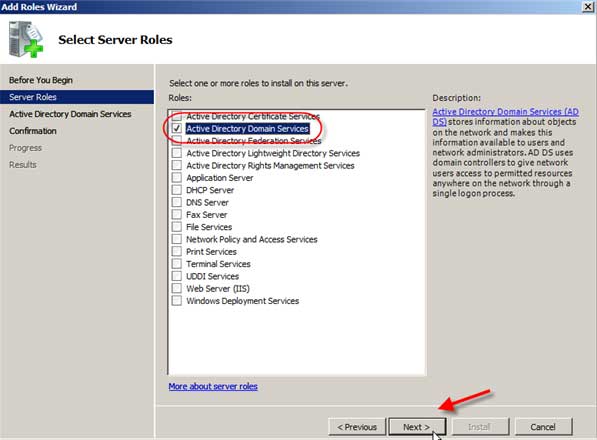
5. The information page on Active Directory Domain Services will give the following warnings, which after reading, you should click Next:
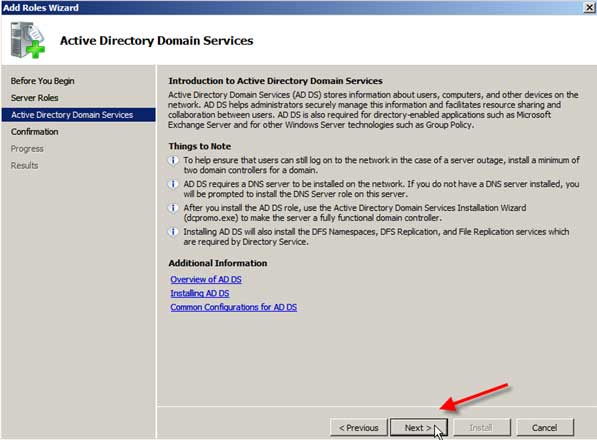
 

6. The Confirm Installation Selections screen will show you some information messages and warn that the server may need to be restarted after installation. Review the information and then click Install.
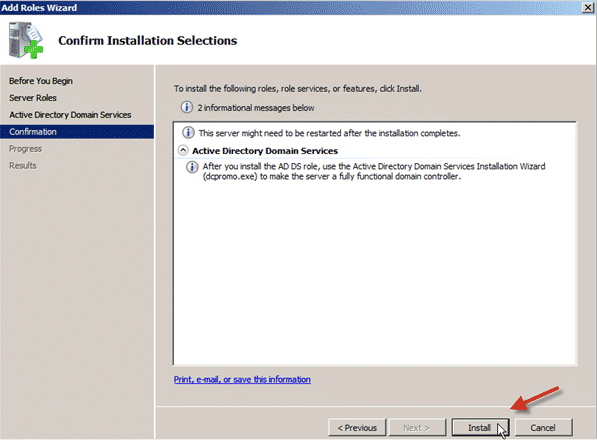
7. The Installation Results screen will hopefully show Installation Succeeded, and an additional warning about running dcpromo.exe (I think they really want us to run dcpromo). Click Close.
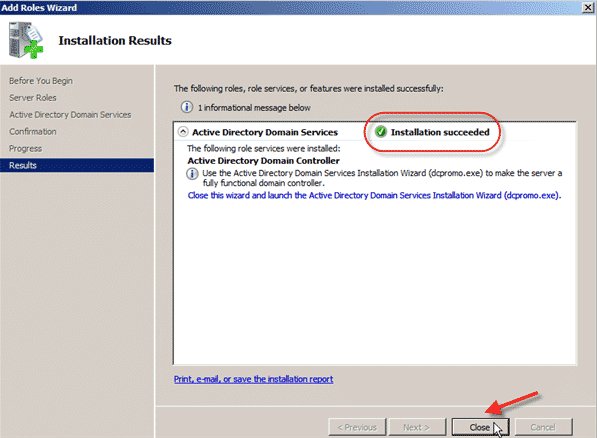
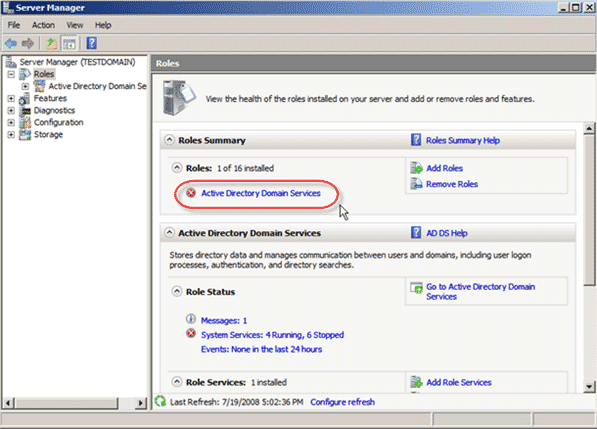
8. After the Installation Wizard closes you will see that Server Manager is showing that Active Directory Domain Services is still not running. This is because we have not run dcpromo yet.
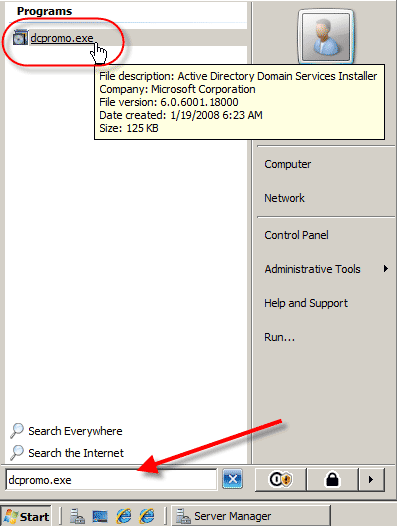
9. Click on the Start button, type dcpromo.exe in the search box and either hit Enter or click on the search result.
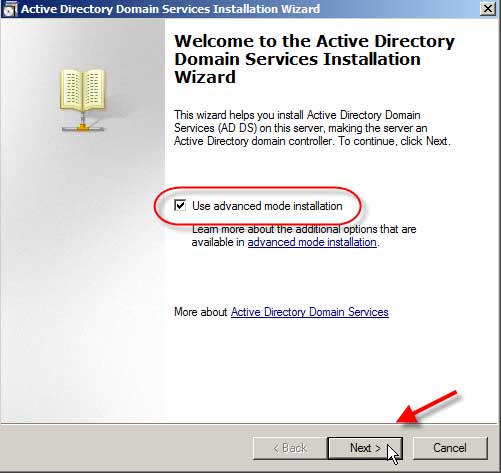
10. The Active Directory Domain Services Installation Wizard will now start. There are links to more information if you want to learn a bit more you can follow them or you can go ahead and click Use advanced mode installation and then click Next.
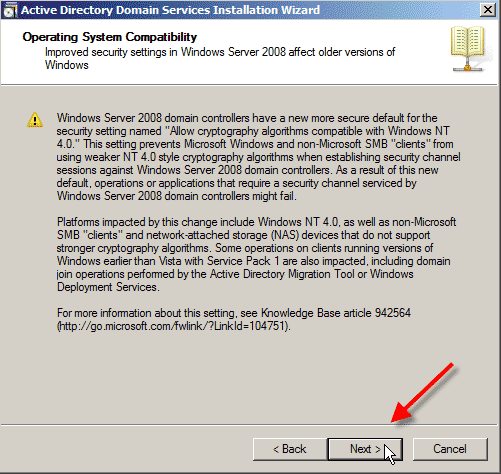
11. The next screen warns about some operating system compatibility with some older clients. Click Next.
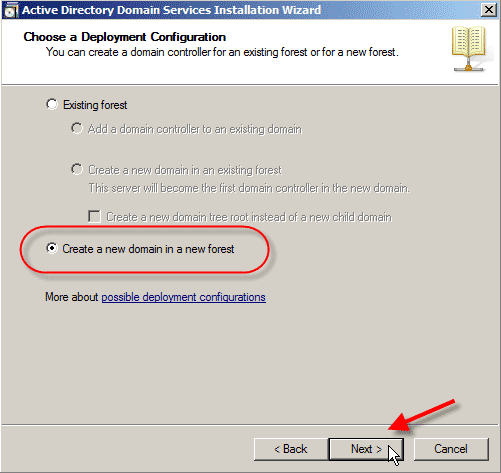
12. Next is the Choose Deployment Configuration screen and you can choose to add a domain to an existing forest or create a forest from scratch. Choose Create a new domain in a new forest and click Next.
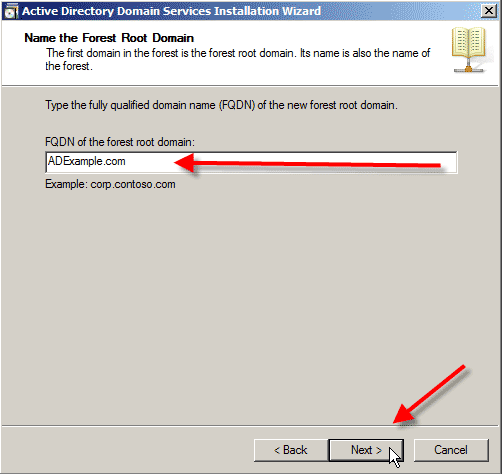
13. The Name the Forest Root Domain wants you to name the root domain of the forest you are creating.

For the purposes of this test we will create ADExample.com. After typing that go ahead and click Next.
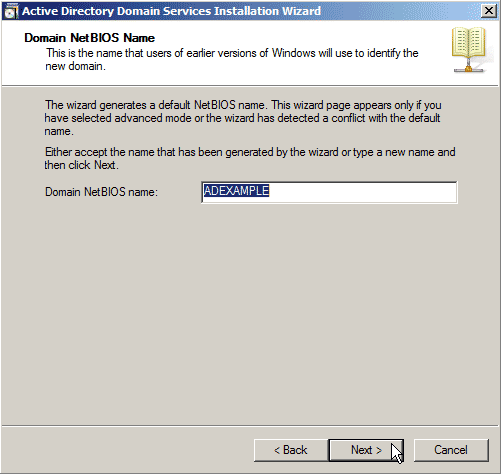
14. The wizard will test to see if that name has been used, after a few seconds you will then be asked for the NetBios name for the domain. In this case I will leave the default in place of ADEXAMPLE, and then click Next.
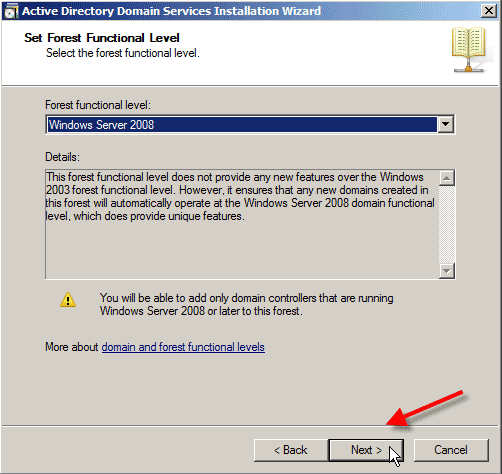
15. The next screen is the Set Forest Functional Level that allows you to choose the function level of the forest.

Since this is a fresh install and a new forest with no additional prior version domains to worry about I am going to select Windows Server 2008. If you did have other domain controllers at earlier versions or had a need to have Windows 2000 or 2003 domain controllers (because of Exchange for example), then you should select the appropriate function level.

Select Windows Server 2008 and then click Next.
16. Now we come to the Additional Domain Controller Options where you can select to install a DNS server, which is recommended on the first domain controller.

Let’s install the DNS Server by placing a check next to it and clicking Next.
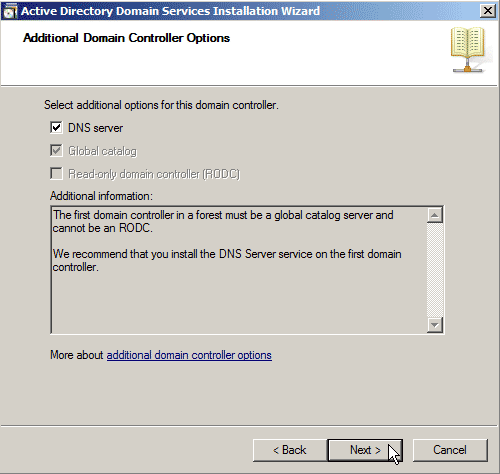
17. You will get a warning window about delegation for this DNS server cannot be created, but since this is the first DNS server you can just click Yes and ignore this warning.

18. Next you can choose to place the files that are necessary for Active Directory, including the Database, Log Files, and SYSVOL.

It is recommended to place the log files and database on a separate volume for performance and recoverability. You can just leave the defaults though and click Next.
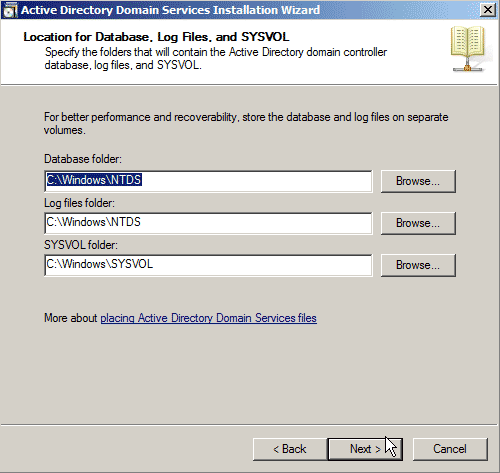
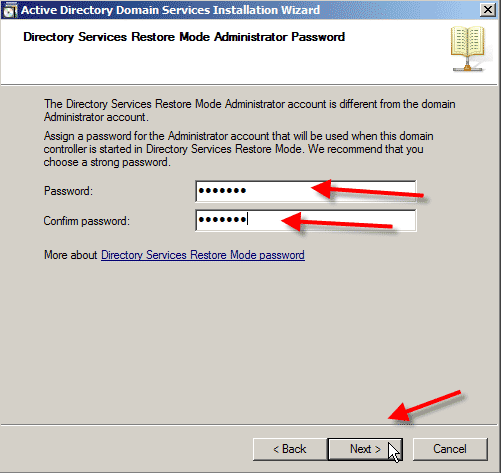
19. Now choose a password for Directory Services Restore Mode that is different than the domain password. Type your password and confirm it before hitting Next.

Note: You should use a STRONG password for this and will be warned if it doesn’t meet criteria.
20. Next you will see a summary of all the options you have went through in the wizard.

If you plan on creating more domain controllers with the same settings hit the Export settings … button to save off a text copy of the settings to use in an answer file for a scripted install. After exporting and reviewing settings click on Next.

21. Now the installation will start including the DNS server option if selected. You will notice a box to Reboot on completion that you can check to reboot soon as everything is installed (A reboot is required you can do it manually or use this function to do it automatically).

NOTE: This can be from a few minutes to several hours depending on different factors.


When its done you will be notified and required to reboot your PC. That’s all!  Now you have a working installation of Active Directory.

How to Add a Computer to Windows Server 2008 Active Directory Domain?

June 7th, 2012 by Admin

This post is for newbies, for the people who are learning Windows Server and Active Directory administration. Follow below steps for adding a computer or a member server to Windows Server 2008 Active Directory based domain.

  1. Go to Run and type ‘NCPA.CPL’ and launch Network settings.
  2. Configure IP address, Subnet Mask, Gateway IP (if any) and DNS IP address.
  3. Ensure connectivity by pining to DNS server / Domain Controller.
  4. Right click on ‘Computer’ and click on properties. Click on ‘Change Settings’.
  5. Click on ‘Change’ button at System Properties.
  6. Select ‘Domain’ and provide domain name. In this example its ‘training’.
  7. Click OK and provide user name and password of Domain Admin  or any other authorized user name.
  8. Reboot the computer to enable the changes.

If your are getting any errors while adding the computer to domain, there seems to be connection issues with Domain Controller. Go to the AD server and check if it is functioning properly. Also check the DNS IP configuration at the client computer. It should be pointing to the correct AD / DNS server.

If you forgot domain administrator password for your Windows Server 2008 Active Directory, you can easily reset the password using Password Recovery Bundle 2012.