How can I change default file drag-and-drop action to copy instead of move? In Windows 11 / 10, when you drag a file and drop it to a folder on a different drive, File Explorer will perform the copy action. If you drag a file and drop it to a folder on the same drive, the default action is move.

Actually, you can let Windows perform the same action for every drag-and-drop operation, regardless of whether you’re dragging files to the same or different drive. In this tutorial we’ll show you a simple method to change the default drag and drop action in Windows 11 / 10.
How to Change Default Drag and Drop Action in Windows 11 / 10
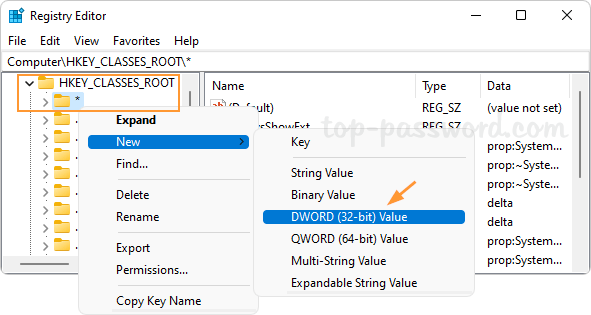
- Open Registry Editor. In the left pane, expand the HKEY_CLASSES_ROOT key and right-click the * sub-key and select New -> DWORD (32-bit) Value.

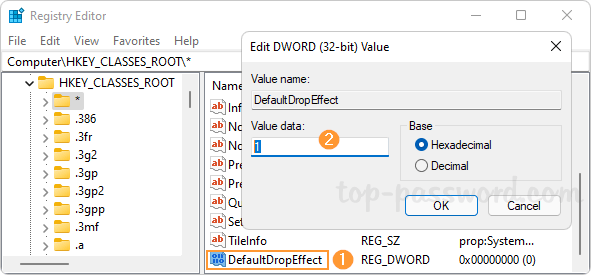
- Name the value DefaultDropEffect. Next, double-click it to modify its value data.

- Change the value data to one of the following values, depending on which type of drag and drop behavior you would like to apply.
- Default action (0): Let Windows decide to copy or move files/folders when you drag and drop it into place.
- Always copy (1): A copy of the file/folder will always be placed at the destination.
- Always move (2): The file/folder will move to the destination.
- Always create a shortcut (4): A link to the original file/folder will always be placed at the destination.
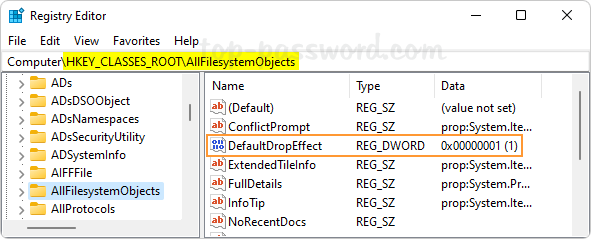
- Next, navigate to another sub-key AllFilesystemObjects and use the same method to create a new 32-bit DWORD value DefaultDropEffect with the same value data.

- Close Registry Editor. The new setting of drag and drop behavior will take effect immediately. If you’ve set DefaultDropEffect to 1, Windows will perform the copy action when you drag a file and drop it to a folder on the same drive.

To undo the changes later, just delete the DefaultDropEffect value from both keys and you’re done.
That’s it!