Looking for a way to disable or hide the Network icon from Windows sign-in screen? In previous posts we’ve explained how to remove the Power icon and disable the Ease of Access button available at login screen. Here we’ll show you 2 ways to remove the Network icon on Windows 10/8 login screen. This can prevent others from changing or disconnecting network without sign-in.
![]()
Method 1: Remove Network Icon on Login Screen Using Group Policy
- Press the Windows logo key + R and type gpedit.msc in the Run box. Press Enter to open the Local Group Policy Editor.
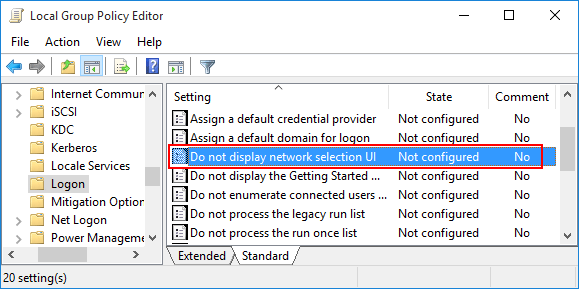
- In the left-hand pane, drill down to Computer Configuration -> Administrative Templates -> System -> Logon. On the right, find the “Do not display network selection UI” item and double-click it.

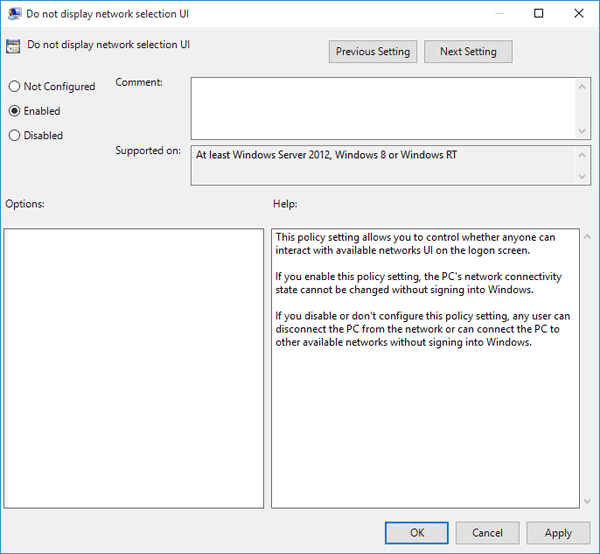
- In the appeared window, click Enabled and then click OK.

- Exit the Local Group Policy Editor and restart your computer. You’ll find that the Network icon is not displayed at the login screen or lock screen any longer.
Method 2: Remove Network Icon on Login Screen Using Registry Hack
- Press the Windows logo key + R and type regedit in the Run box. Press Enter to open the Registry Editor.
- In the left pane of Registry Editor, navigate to the following key:
HKEY_LOCAL_MACHINE\SOFTWARE\Policies\Microsoft\Windows\System - Right-click on the System subkey on the left pane, then select New -> DWORD (32-bit) Value. Name the newly created registry DWORD (REG_DWORD) as DontDisplayNetworkSelectionUI. Double-click on it and then change the Data Value from 0 to 1.

- Close Registry Editor and reboot. After restart, you’ll find that Network icon is no longer present on your Windows login/lock screen.