How can I increase the screen buffer size of Command Prompt? The screen buffer size of Command Prompt is expressed in terms of a coordinate grid based on character cells:
- The width is the number of characters that are displayed on a line in the Command Prompt window. The larger the width size, the more characters will show in the same row before wrapping.
- The height is the number of lines that are stored in the memory.
In this tutorial we’ll show you 3 simple ways to permanently or temporarily change screen buffer size of Command Prompt in Windows 10 / 8 / 7.
Note: Screen buffer size set using Method 2 and Method 3 will only be temporary and as soon as you close the Command Prompt the changes will be lost.
Method 1: Permanently Change Screen Buffer Size of CMD in Properties
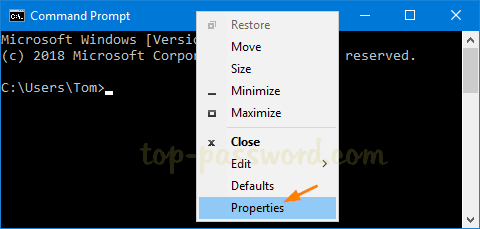
- Right-click on the title bar of the Command Prompt window, and then select Properties from the context menu.

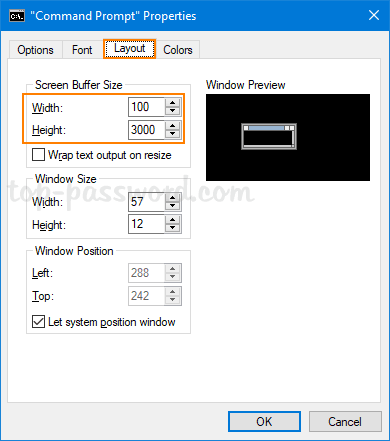
- Go to the Layout tab. Under the “Screen Buffer Size” section you can set the desired width and height. If the screen buffer size is greater than the Window Size, then scroll bars will be displayed as required.

- Click OK to apply.
Method 2: Temporarily Change Screen Buffer Size of CMD Using Mode Command
- When the Command Prompt window is open, you can temporarily change the screen buffer size by typing this command:
mode con:cols=Width_Size lines=Height_Size
Substitute “Width_Size” with the value you want for the screen buffer width size and “Height_Size” with the value you want for the screen buffer height size.
- As soon as you hit Enter, the current Command Prompt window will resize to apply your new screen buffer size.
Method 3: Temporarily Change Screen Buffer Size of CMD Using Batch / Script
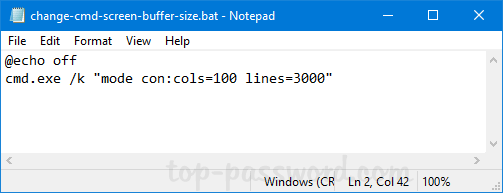
If you need to change screen buffer size from a Windows batch script, just add the following lines:
@echo off

cmd.exe /k "mode con:cols=100 lines=3000"

This will change screen buffer width to 100, and set the height size to 3000. You can make any adjustment you like for the width and height value.