Posts Tagged ‘install active directory’

How to Install Active Directory in Windows Server 2012

November 3rd, 2012 by Admin

Similar to previous versions of Windows Server, there are two steps to install Active Directory: First you need to add the Active Directory Domain Services Role to your computer, then run the dcpromo commmand to promote your server to a domain controller. However, in Windows Server 2012, the dcpromo command has been deprecated.

So what replaces dcpromo in Windows Server 2012? There are now two ways to promote your server to a DC: One, through PowerShell and other is Server Manager. Here we will show you how to install Active Directory through Server Manager.

This tutorial can be divided into 2 steps. Before installing Active Directory, please assign a static IP address to your server and set a strong password for the built-in administrator account.

Part 1: Install Active Directory Domain Services

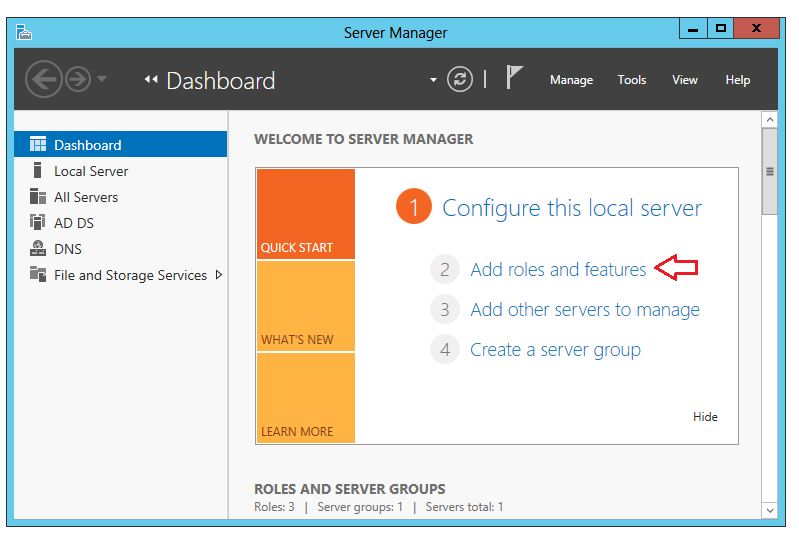
  1. Open Server Manager, then click on Add Roles and Features link.
  2. Click Next on the Before you begin window.
  3. Select Role-based or feature-based installation and then click Next.
  4. Click Select a server from the server pool, click the name of the server to install Active Directory Domain Services to, and then click Next.
  5. Click Active Directory Domain Services. When the Add Roles and Features Wizard dialog box opens, select Add Features, then Next.
  6. On the Active Directory Domain Services page, review the information and then click Next.
  7. On the Confirm installation selections page, click Install.
  8. After the installation has completed, the server will restart.

Part 2: Promote the Server to a Domain Controller

Once above step is completed and all required features have been installed, now is the time to promote the server to a Domain Controller by following the below steps.

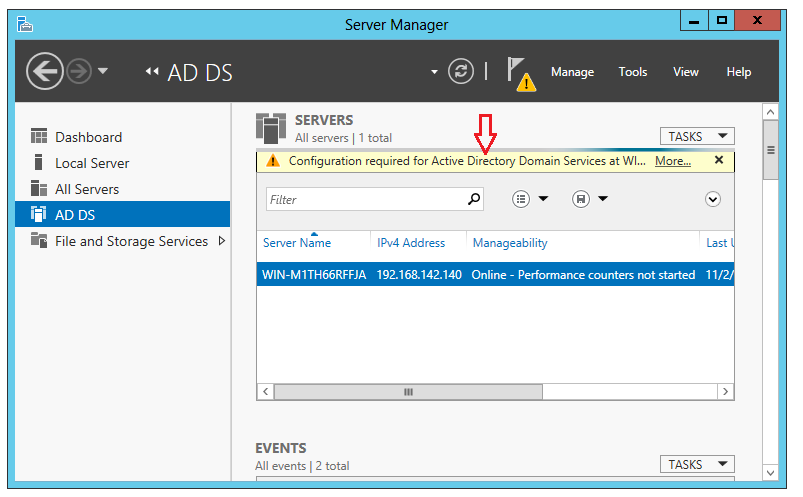
  1. Back in Server Manager, you will notice that AD DS has been added to the left navigation tree. Click on it and then click on More on the right navigation pane where it states that Configuration is required for Active Directory Domain Services.
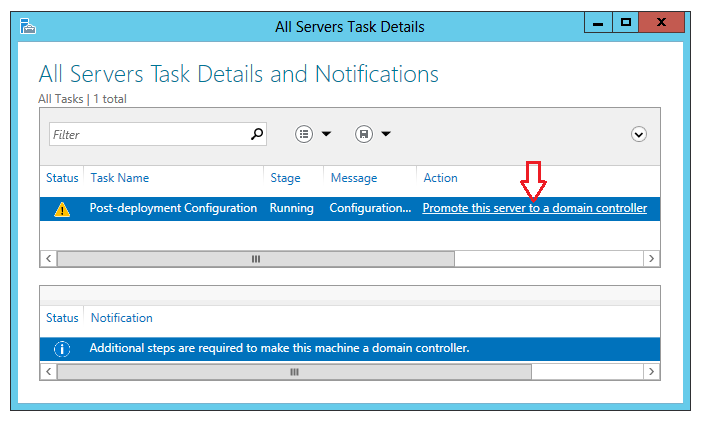
  2. You will now be presented with the All Servers Task Details window, in which you will click on Promote this server to a domain controller under Action.
  3. The Deployment Configuration screen appears and we will select Add a new forest as this is the first domain controller. Enter your Root domain name and then click Next.
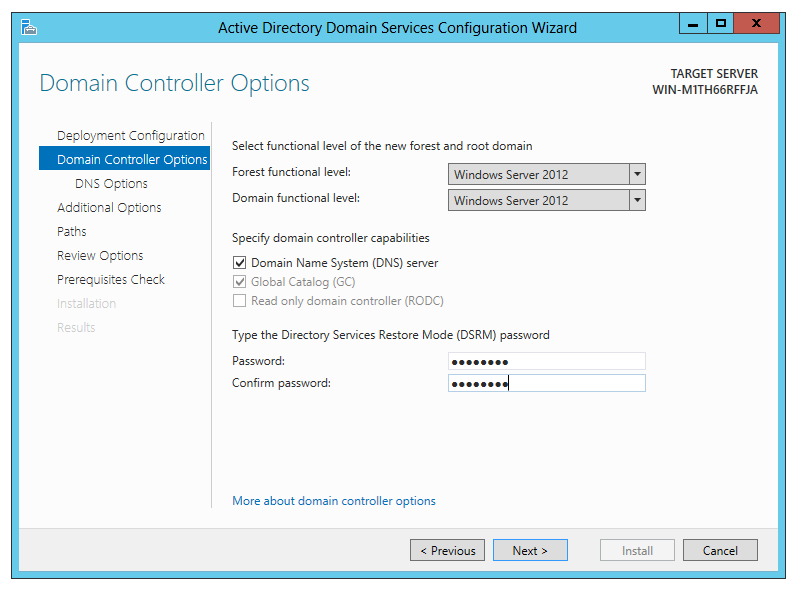
  4. On the Domain Controller Options page select your Forest and Domain functional levels, for this demo will leave the defaults of Windows Server 2012 for both, Enter a desired DSRM Password, click Next.
  5. On the DNS Options page, click Next.
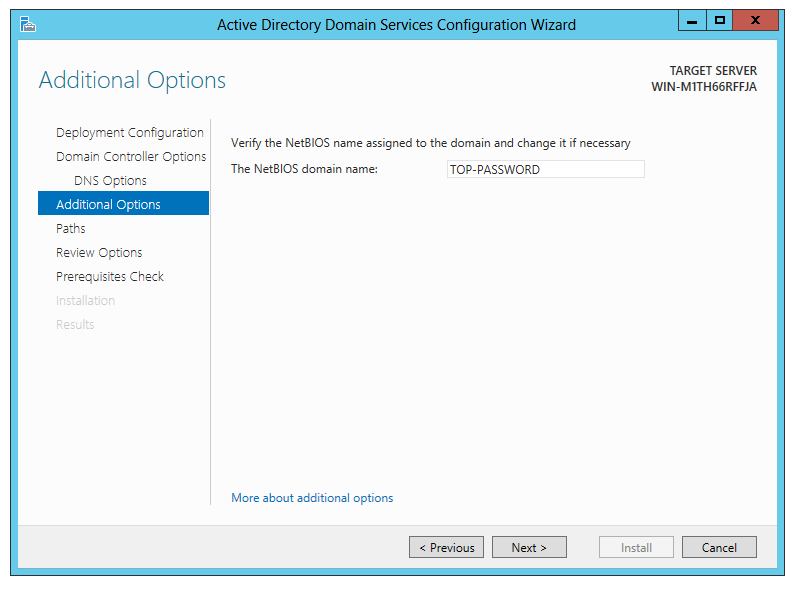
  6. The NetBIOS domain name will then be inputted automatically. In the event of a conflict, it will suggest an alternative by appending the original name with a 0. Click Next.
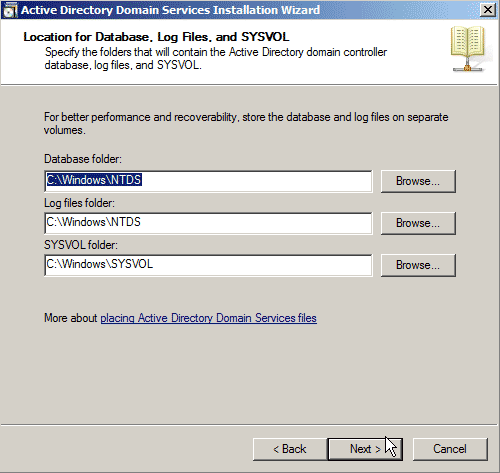
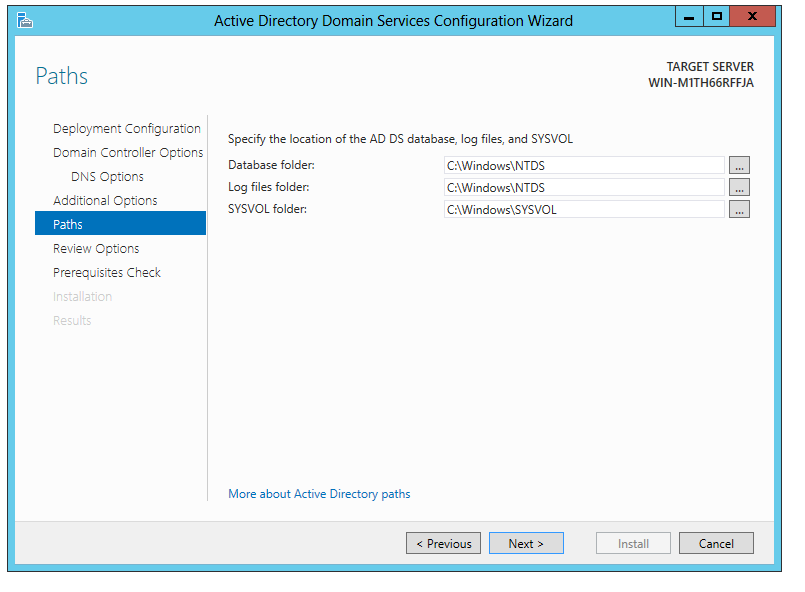
  7. On the Paths page verify the desired locations of the Database, Log files and SYSVOL folders, change the locations is required, click Next.
  8. On the Review Options page, click Next.
  9. The wizard will perform a Prerequisite check before the installation can continue. After the check is completed successfully click Install.
  10. The server will restart once the configuration has completed, the server is now a domain controller for the newly formed domain. Upon restart, you should be able to login using your domain administrator account.

How To Install Active Directory on Windows Server 2008

June 14th, 2012 by Admin

In any small network setup where there are maximum of 15 computers, peer-to-peer network infrastructure is the best solution. However when the number of computers are increased and it becomes practically impossible for the administrators to manage several computers as a peer-to-peer setup, installation of Active Directory Services becomes essential.

In this scenario we are going to install Active Directory fresh with a brand new Domain Controller after a fresh install of Windows Server 2008.

Requirements for Active Directory:

Let’s go through some of the requirements for a fresh install of Active Directory Domain Services. Some of these will be required to be done beforehand, others as noted can be done during the install:

  • Install Windows Server 2008
  • Configure TCP/IP and DNS networking configurations
  • An NTFS partition with enough free space
  • Active Directory requires DNS to be installed in the network. If it is not already installed you can specify DNS server to be installed during the Active Directory Domain Services installation.

Once you verify that these requirements have been met we can get started.

How to Install Active Directory on Windows Server 2008:

Let’s start by installing Active Directory through Server Manager. This is the most straight forward way, as a wizard will guide you through the steps necessary.

1. Start Server Manager.

2. Select Roles in the left pane, then click on Add Roles in the center console.

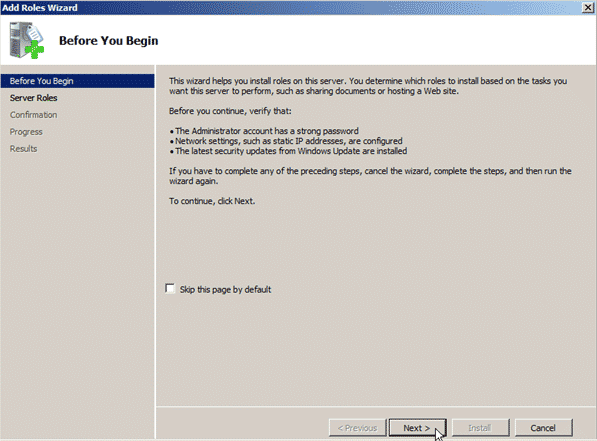
3. Depending on whether you checked off to skip the Before You Begin page while installing another service, you will now see warning pages telling you to make sure you have strong security, static IP, and latest patches before adding roles to your server.

If you get this page, then just click Next.

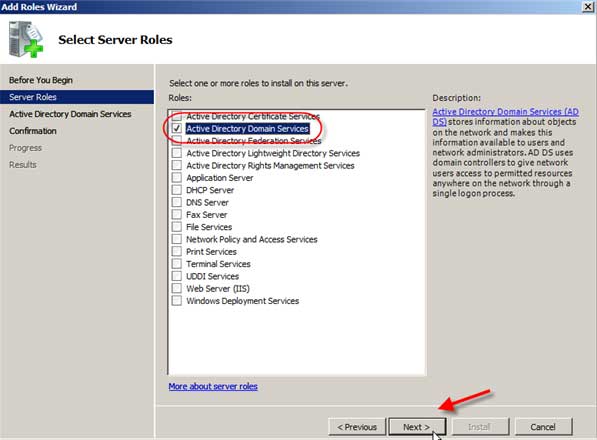
4. In the Select Server Roles window we are going to place a check next to Active Directory Domain Services and click Next.

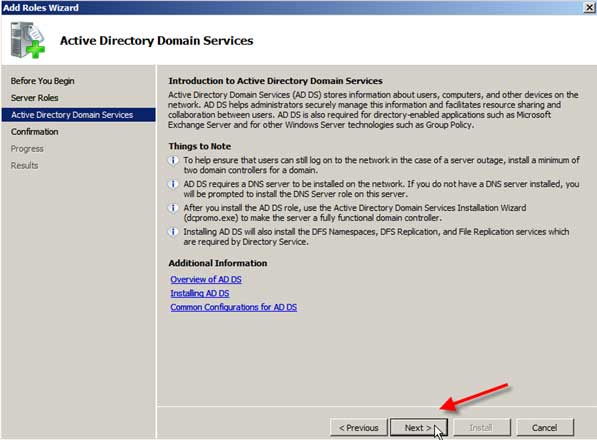
5. The information page on Active Directory Domain Services will give the following warnings, which after reading, you should click Next:


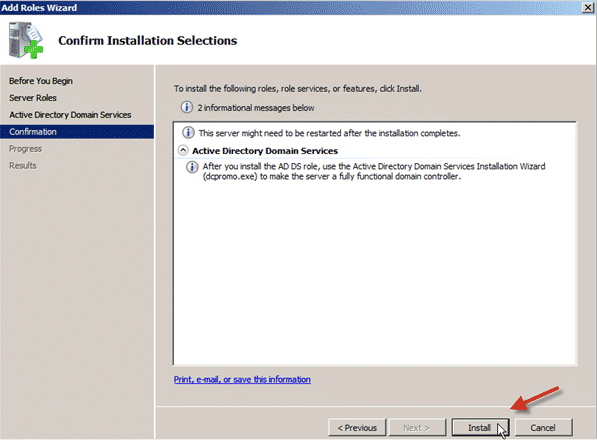
6. The Confirm Installation Selections screen will show you some information messages and warn that the server may need to be restarted after installation. Review the information and then click Install.

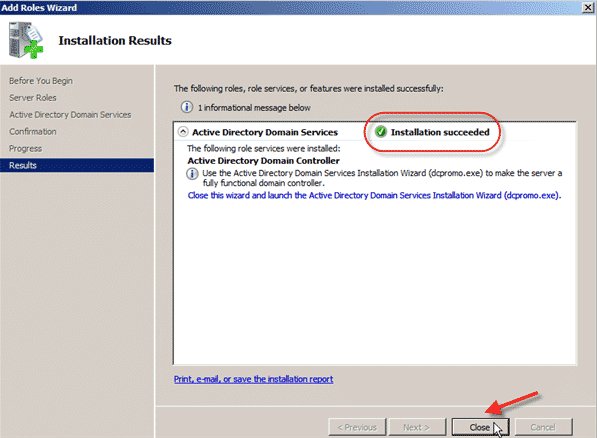
7. The Installation Results screen will hopefully show Installation Succeeded, and an additional warning about running dcpromo.exe (I think they really want us to run dcpromo). Click Close.

8. After the Installation Wizard closes you will see that Server Manager is showing that Active Directory Domain Services is still not running. This is because we have not run dcpromo yet.

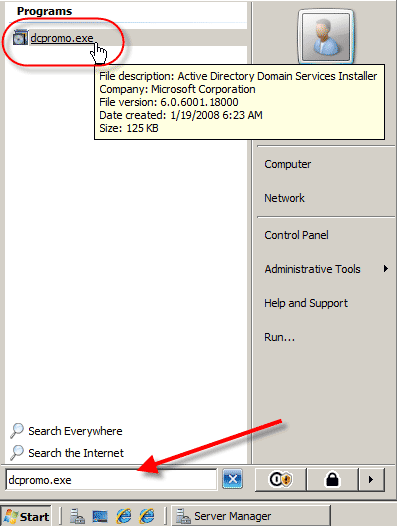
9. Click on the Start button, type dcpromo.exe in the search box and either hit Enter or click on the search result.

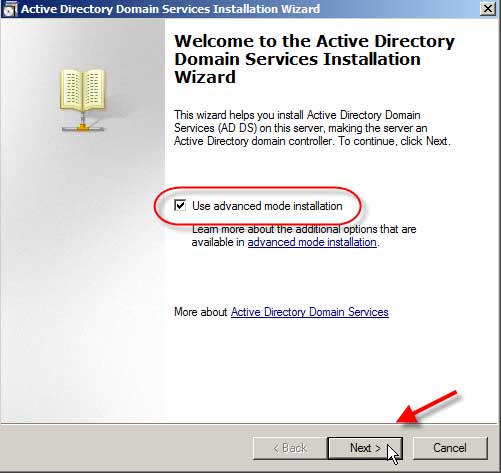
10. The Active Directory Domain Services Installation Wizard will now start. There are links to more information if you want to learn a bit more you can follow them or you can go ahead and click Use advanced mode installation and then click Next.

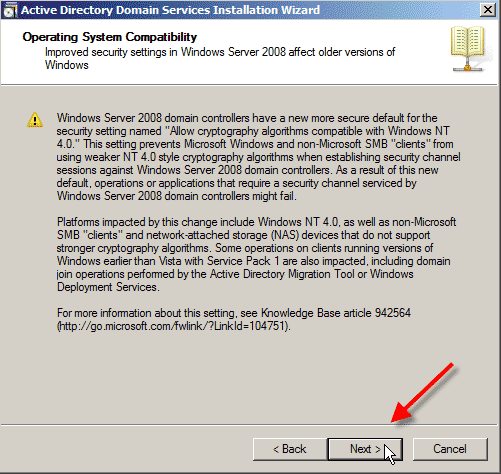
11. The next screen warns about some operating system compatibility with some older clients. Click Next.

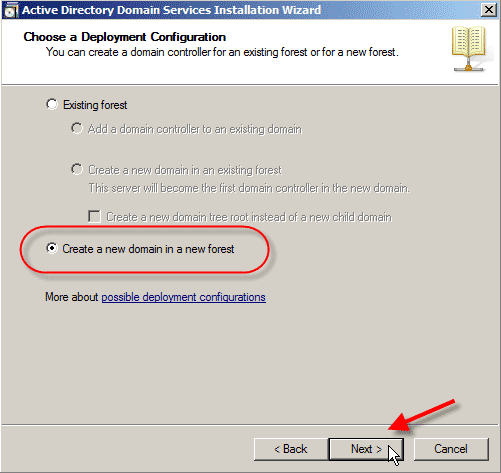
12. Next is the Choose Deployment Configuration screen and you can choose to add a domain to an existing forest or create a forest from scratch. Choose Create a new domain in a new forest and click Next.

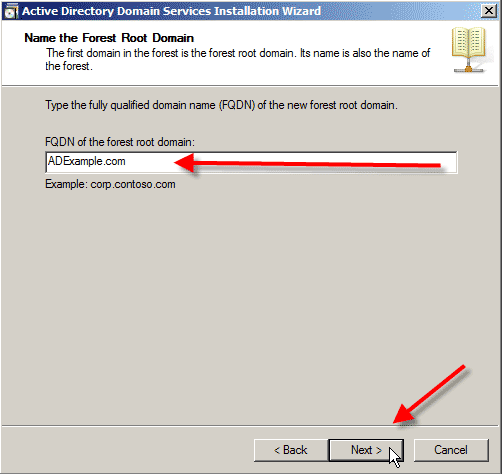
13. The Name the Forest Root Domain wants you to name the root domain of the forest you are creating.

For the purposes of this test we will create ADExample.com. After typing that go ahead and click Next.

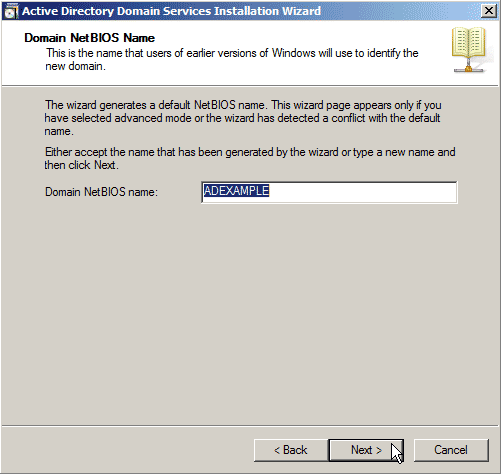
14. The wizard will test to see if that name has been used, after a few seconds you will then be asked for the NetBios name for the domain. In this case I will leave the default in place of ADEXAMPLE, and then click Next.

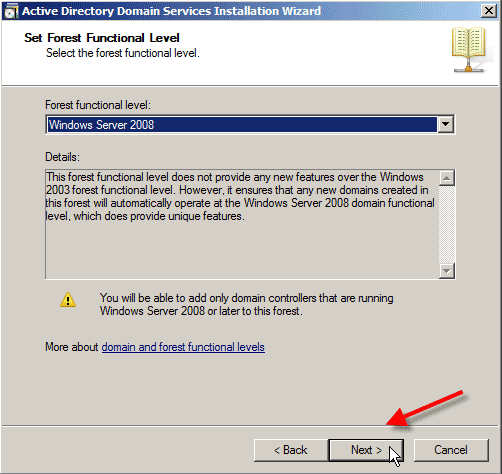
15. The next screen is the Set Forest Functional Level that allows you to choose the function level of the forest.

Since this is a fresh install and a new forest with no additional prior version domains to worry about I am going to select Windows Server 2008. If you did have other domain controllers at earlier versions or had a need to have Windows 2000 or 2003 domain controllers (because of Exchange for example), then you should select the appropriate function level.

Select Windows Server 2008 and then click Next.

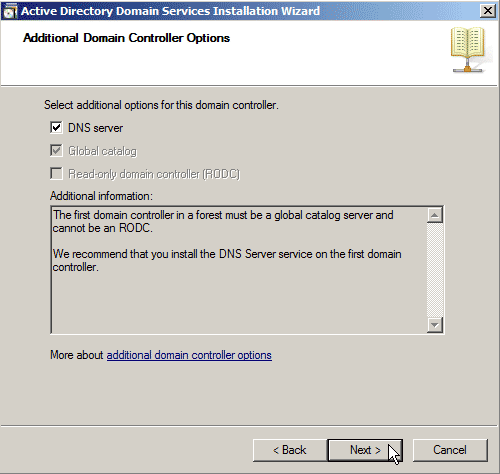
16. Now we come to the Additional Domain Controller Options where you can select to install a DNS server, which is recommended on the first domain controller.

Let’s install the DNS Server by placing a check next to it and clicking Next.

17. You will get a warning window about delegation for this DNS server cannot be created, but since this is the first DNS server you can just click Yes and ignore this warning.

18. Next you can choose to place the files that are necessary for Active Directory, including the Database, Log Files, and SYSVOL.

It is recommended to place the log files and database on a separate volume for performance and recoverability. You can just leave the defaults though and click Next.

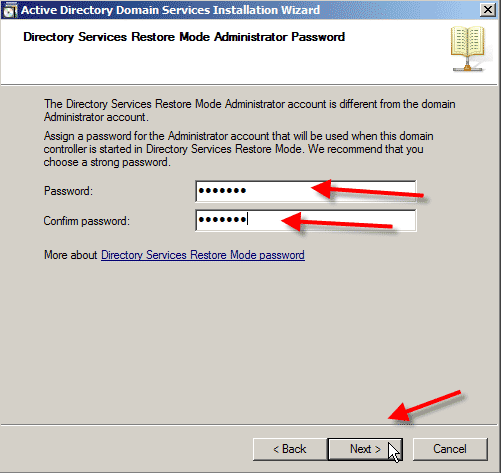
19. Now choose a password for Directory Services Restore Mode that is different than the domain password. Type your password and confirm it before hitting Next.

Note: You should use a STRONG password for this and will be warned if it doesn’t meet criteria.

20. Next you will see a summary of all the options you have went through in the wizard.

If you plan on creating more domain controllers with the same settings hit the Export settings … button to save off a text copy of the settings to use in an answer file for a scripted install. After exporting and reviewing settings click on Next.

21. Now the installation will start including the DNS server option if selected. You will notice a box to Reboot on completion that you can check to reboot soon as everything is installed (A reboot is required you can do it manually or use this function to do it automatically).

NOTE: This can be from a few minutes to several hours depending on different factors.


When its done you will be notified and required to reboot your PC. That’s all!  Now you have a working installation of Active Directory.