Posts Tagged ‘windows 10 onedrive’

How to Install / Uninstall OneDrive in Windows 10

December 15th, 2015 by Admin

In previous post we’ve already explained how you can disable OneDrive from File Explorer in Windows 10. But what if you don’t want the OneDrive service in your system at all? To save system resources, you might consider to uninstall OneDrive completely instead disabling it only.

Unfortunately there is no option in the graphical user interface to uninstall OneDrive in Windows 10. So here we’ll show you how to install / uninstall OneDrive from Command Prompt.

Part 1: Uninstall OneDrive in Windows 10

  1. Press the Windows + X key combinations to open the Quick Access menu. Select Command Prompt (Admin).
  2. At the Command Prompt, type the following command and hit Enter to terminate any process of OneDrive:
    taskkill /f /im OneDrive.exe
  3. To uninstall the OneDrive from Windows 10 64-bit, issue the following commands:
    %systemroot%\SysWOW64\OneDriveSetup.exe /uninstall

    If you’re running the 32-bit version of Windows 10, type this command instead:
    %systemroot%\System32\OneDriveSetup.exe /uninstall

    uninstall-onedrive

Part 2: Install OneDrive in Windows 10

If at any time later you want to use OneDrive again, you can install it from Command Prompt. Here’s how:

  1. Press the Windows + X key combinations to open the Quick Access menu. Select Command Prompt (Admin).
  2. To install the OneDrive in Windows 10 64-bit, issue the following commands:
    %systemroot%\SysWOW64\OneDriveSetup.exe

    If you’re running the 32-bit version of Windows 10, type this command instead:
    %systemroot%\System32\OneDriveSetup.exe
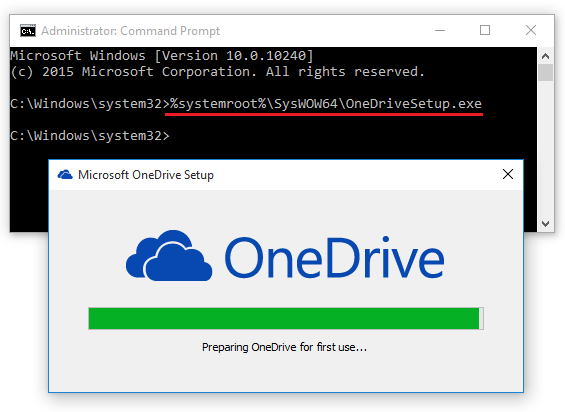
    install-onedrive

  3. Upon completing the installation, restart the computer and you can then use OneDrive again.
2 Options to Disable or Remove OneDrive in Windows 10

December 15th, 2015 by Admin

OneDrive (previously known as SkyDrive) is Microsoft’s cloud based storage service and it is tightly integrated into Windows 10. Once you launch File Explorer, you can access the OneDrive app from the left navigation pane. However, not everyone likes OneDrive. Some may prefer other similar cloud storage services such as Dropbox, Google Drive, Apple iCloud Drive. In this post we’ll show you how to disable / remove OneDrive in Windows 10, using either group policy or registry trick.

Method 1: Disable OneDrive Using Group Policy

  1. Press the Windows + R key combinations to open the Run box. Type gpedit.msc and press Enter.
  2. After the Local Group Policy Editor opens, browse to:
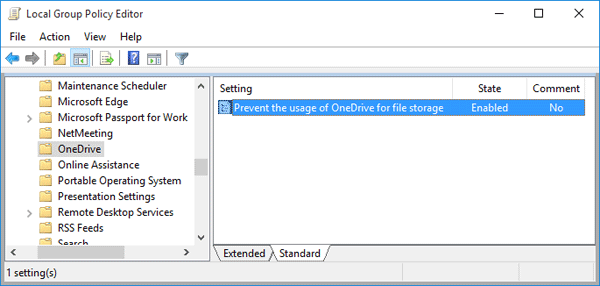
    Computer Configuration -> Administrative Templates -> Windows Components -> OneDrive
  3. In the right pane, double click on policy named Prevent the usage of OneDrive for file storage and set it to Enabled.

    prevent-usage-onedrive

    If you decide to re-enable OneDrive functionality in future, double-click on this policy and set it back to Not Configured.

  4. Restart your computer and now you’ve completely disabled OneDrive functionality in Windows 10/8.

Method 2: Disable OneDrive Using Registry Trick

However, Windows Home edition doesn’t contain Local Group Policy Editor. If you are using Home edition of Windows 10, you can take help of Registry Editor for the same task. Just follow these simple steps to disable OneDrive:

  1. Press the Windows + R key combinations to open the Run box. Type regedit and press Enter.
  2. In the left side of Registry Editor, navigate to the following key:
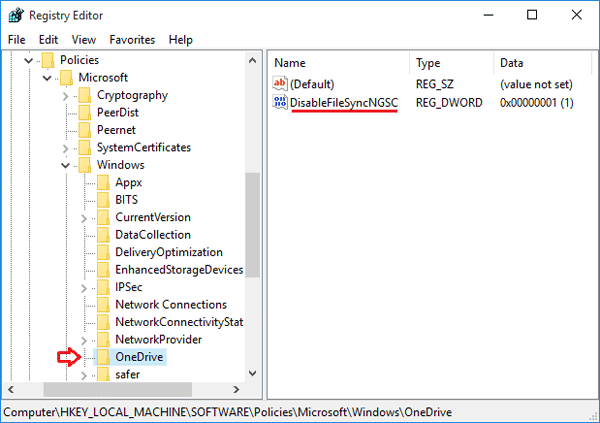
    HKEY_LOCAL_MACHINE\SOFTWARE\Policies\Microsoft\Windows
  3. Right-click the “Windows” Key and then select New -> Key, name it OneDrive.
  4. Now in right-side pane, create a new DWORD entry DisableFileSyncNGSC and set its value to 1.

    disable-onedrive

    To re-enable OneDrive functionality in future, just delete the DisableFileSyncNGSC entry.

  5. Close Registry Editor and restart your computer to take effect. That’s it!