Got a Windows 7 PC and want to install Windows 8.1 as a second operating system for dual-booting? All you have to do is create a new partition for Windows 8.1, then install it. But what to do if you don’t have a spare partition to do this? In this post we’ll learn how to install Windows 8.1 into a virtual hard disk (VHD) and dual boot Windows 8.1 on a Windows 7 PC, without partitioning.
How to Use VHD to Dual Boot Windows 8.1 on Windows 7 PC?
- Boot your computer from Windows 8.1 installation DVD or USB drive. If you have a Windows 8.1 ISO image, you can make a installation disc from the ISO image using the freeware ISO2Disc.
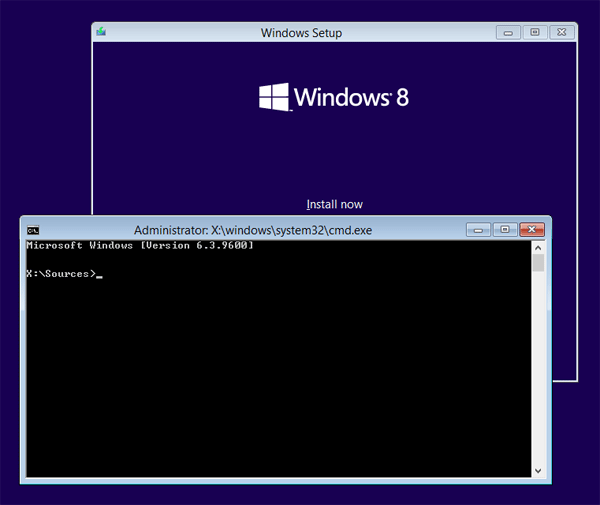
- After a few minutes, you’ll see the Windows Setup screen. Pick a language (U.S. English is the default), and click Next.
- The next screen allows you to install or repair Windows 8. Press Shift + F10 to open up a Command Prompt.

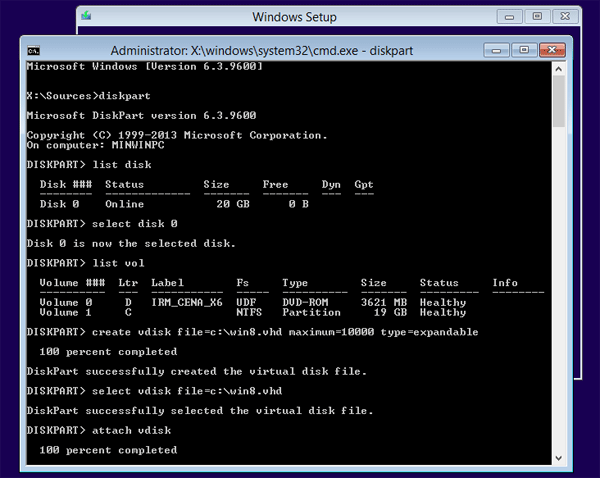
- Now you need to use the diskpart utility to create a virtual drive that Windows 8.1 will be installed on. Type
diskpartand press Enter to open the command-line disk partitioning utility. - At the diskpart prompt, type the following commands, pressing Enter after each one:
list disk
This shows your currently attached hard disks. In this example I only have one, Disk 0.select disk 0list vol
Show all the volumes that exist on that disk. You need to know the drive letter that you want to store your VHD file on.create vdisk file=c:\win8.vhd maximum=10000 type=expandable
This creates a dynamic VHD that can grow to 10GB in the root of C:\ drive. If your partition is smaller than 10GB then be sure to use a smaller value for maximum that is less than your actual partition size.select vdisk file=c:\win8.vhd
After selecting this vdisk, the following commands will apply to itattach vdisk
The VHD will be mounted and the disk will be available to the windows installerexit

- You can now click Install Now button. Accept the Licenses agreements. On the next screen select Custom: Install Windows only (advanced).
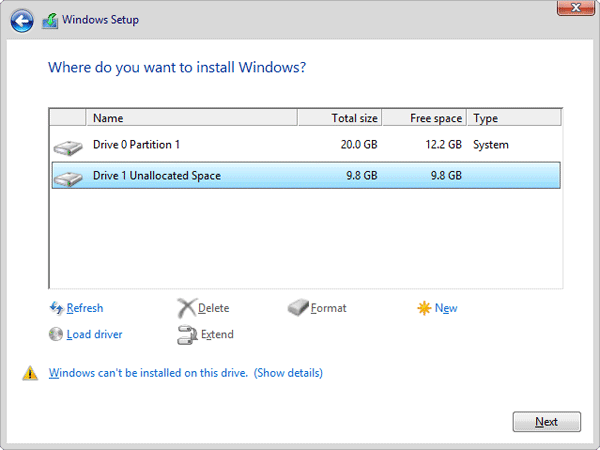
- At this point, Windows Setup will prompt you to choose where you want to install Windows 8.1 and you can now select your virtual drive, which will be designated as Unallocated Space and be the size that you specified. As you can see in the screenshot below, I have selected my 10GB VHD. Keep in mind that when you select the VHD, you’ll see a Warning message that says that Windows cannot be installed to this disk. Just ignore it and click Next to continue.

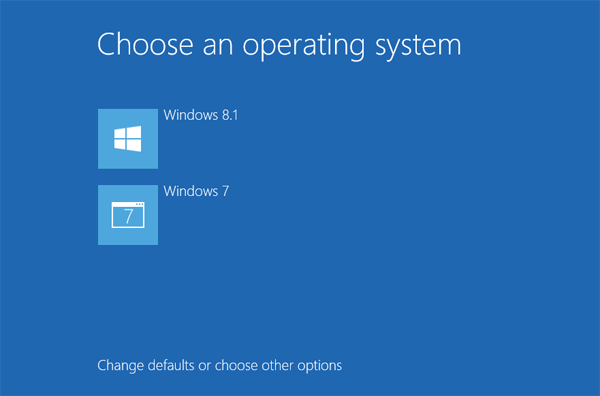
- When the installation is complete, Windows Setup will reboot your system one final time and you will then see the new Windows 8.1 style dual boot screen shown as below. As you can see, Windows 8.1 will automatically launch in 30 seconds if you don’t choose Windows 7.

That’s it!