Windows Password Recovery Using PXE Network Boot
Is it possible to reset / recover a forgotten Windows password without using a CD or USB drive? This tutorial will show you how to boot your locked PC directly over Network Interface Card (NIC), and clear forgotten Windows password without needing to burn a disc.
PXE works with Network Interface Card (NIC) of the system by making it function like a boot device. Nearly every modern Windows PC has a BIOS which supports PXE booting. Just put the PCUnlocker Live image on a PXE server, you can then boot any other PC/netbook on the same LAN network to use PCUnlocker for resetting a lost Windows password!
1Setup A PXE Server
Before getting started, you need to find a working Windows PC on the same network as your locked computer, and then set it up as a PXE server by following the steps below:
-
After you've purchased PCUnlocker Enterprise, download the pxe-boot version (pxeboot_x64.zip) via this link included in your order confirmation email. Extract all files from pxeboot_x64.zip to a folder of your choice. Here, I extracted all the files to C:\pxeboot_x64 folder in my laptop.

Download and install the freeware tftpd32 from this link (tftpd64 standard edition (zip) (534 KB)). Run the program and allow it to access the network if Windows firewall prompts you.

Once the tftpd32 program is open, select your network card from the drop-down list and then click on the Settings button.

In the GLOBAL tab, make sure that TFTP Server and DHCP Server are checked only.

-
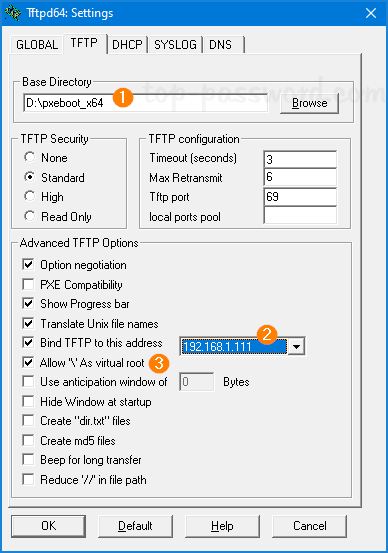
In the TFTP tab, click Browse button to select the folder where you extracted the pxeboot_x64.zip file. Check the Bind TFTP to this address option then set an IP address for TFTP server. Check the Allow '\' As virtual root option.

-
In the DHCP tab, fill in your desired values for running the DHCP server. Set Boot File to Boot\pxeboot.n12, and also bind DHCP to your IP address. If you want to boot your locked PC over PXE in UEFI mode, set Boot File to Boot\bootmgfw.efi instead.

Note: Make sure you have disabled DHCP on your router and set a static IP address for this PC. Otherwise both the DHCP servers will conflict with each other.
- Click OK. Close tftpd32 and re-run it so that the changes take effect. Now you've successfully set up a PXE server.
2Boot to PCUnlocker over PXE Network
Power on your locked Windows PC, and set it to boot over network by modifying the boot order in BIOS or hit a custom key during BIOS post to select a network boot device.

If your PXE NIC device is not listed in the boot order, you might need to enable PXE support in the motherboard: Go to BIOS Setup, look for an option labeled "Onboard LAN Boot ROM", "PXE LAN Boot", "PXE Boot to LAN" or whatsoever, and then set it to Enabled.

During booting via PXE, the network adapter broadcasts a DHCP request over the network. The PXE server we've set up before will assign the adapter an IP address, and transfer the PCUnlocker Live image to your locked PC.

Once the PCUnlocker Live image is downloaded, the computer will load it into memory and bring you directly to the PCUnlocker program.

- Choose a user account and click on Reset Password button. This program will unlock / reset your forgotten Windows password immediately.
- Reboot your computer and boot it from local hard drive, you can then login to Windows without a password!


